Creating GUIs in Python for Digital Humanities Projects
The Programming Historian has received the following tutorial on 'Creating GUIs in Python for Digital Humanities Projects' by @cgoodwinDH. This lesson is now under review and can be read at:
http://programminghistorian.github.io/ph-submissions/en/drafts/originals/creating-guis-in-python-for-digital-humanities-projects
Please feel free to use the line numbers provided on the preview if that helps with anchoring your comments, although you can structure your review as you see fit.
I will act as editor for the review process. My role is to solicit two reviews from the community and to manage the discussions, which should be held here on this forum. I have already read through the lesson and provided feedback, to which the author has responded.
Members of the wider community are also invited to offer constructive feedback which should post to this message thread, but they are asked to first read our Reviewer Guidelines (http://programminghistorian.org/reviewer-guidelines) and to adhere to our anti-harassment policy (below). We ask that all reviews stop after the second formal review has been submitted so that the author can focus on any revisions. I will make an announcement on this thread when that has occurred.
I will endeavor to keep the conversation open here on Github. If anyone feels the need to discuss anything privately, you are welcome to email me.
Our dedicated Ombudsperson is (Ian Milligan - http://programminghistorian.org/en/project-team). Please feel free to contact him at any time if you have concerns that you would like addressed by an impartial observer. Contacting the ombudsperson will have no impact on the outcome of any peer review.
Anti-Harassment Policy
This is a statement of the Programming Historian's principles and sets expectations for the tone and style of all correspondence between reviewers, authors, editors, and contributors to our public forums.
The Programming Historian is dedicated to providing an open scholarly environment that offers community participants the freedom to thoroughly scrutinize ideas, to ask questions, make suggestions, or to requests for clarification, but also provides a harassment-free space for all contributors to the project, regardless of gender, gender identity and expression, sexual orientation, disability, physical appearance, body size, race, age or religion, or technical experience. We do not tolerate harassment or ad hominem attacks of community participants in any form. Participants violating these rules may be expelled from the community at the discretion of the editorial board. Thank you for helping us to create a safe space.
Hi @cgoodwinDH, just a quick note to say I'll be editing your lesson, and aim to get initial feedback to you by the end of the month :)
Hello @yann-ryan , thanks for setting this up. I look forward to working with you and I am very excited to see your initial feedback! Have a great day!
Hi @cgoodwinDH, thank you for this super-useful tutorial! I genuinely learned a new skill, which is a good start :)
My initial feedback and comments are below. If you have questions on specific comments, or would like to talk through the feedback in general, I'm very happy to do that. I'll be in touch via email about the next steps from your side.
I could get the code to run with very minor adjustments to one step (see below), and I successfully merged a number of PDFs, both by running the python script and also with the executable I created. The tutorial is useful and the writing is clear. The reason to create a GUI for this particular task is well-justified.
General suggestions.
-
[ ] As it is, the task is quite abstract: it’s not obviously apparent why it might be specifically of interest to a reader of the Programming Historian. This could be easily fixed, first by attaching some pre-chosen PDFs alongside the tutorial, along with a justification as to why a GUI would be useful in order to merge them (perhaps scanned manuscript pages with some duplicate images?). This would also have the benefit of providing the reader test data with which to check whether their final application is working (removing the danger of a reader getting an error due to a corrupt pdf, for example). Second, use these PDFs to describe a specific scenario where the GUI would be useful (perhaps, you work on a team with a palaeography expert who has a number of scanned manuscript documents, some of which they wish to remove manually before combining, but they don’t have programming skills..) Ideally, you could reconsider the 'Command Line Interface vs. GUI: Merits and Drawbacks' section with a scenario along these lines.
-
[ ] The introduction is quite long considering the overall length of the tutorial, and I would suggest cutting (see specific points below).
-
[ ] One general comment is that the steps to follow are not explicit at certain points, but assume the user will work out the correct actions to get to that step logically. For example, the author uses the phrase ‘when you launch QT designer’ rather than the concrete action ‘launch QT designer by clicking the icon’. Some other examples are in the specific comments below.
-
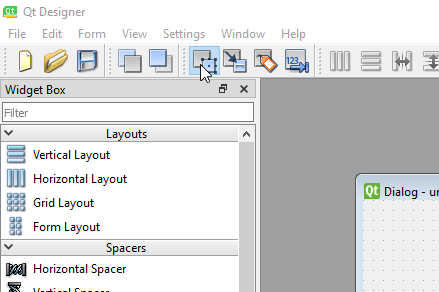
[ ] Considering the tutorial is short, a section giving a broad overview of the QT Designer interface would be useful. I would suggest replacing the images of individual windows with a general screenshot showing all UI elements, and then explaining the key ones in turn, something like:
’this is the Widget Box, it contains the various UI elements you can add, it has several sections and a filter for navigation, while the icons at the top don’t have text, hover over to get the label for each’.
-
[ ] Similarly, explain concretely how to edit item properties in the Property Editor - it’s not clear whether something needs to be saved once the text is edited, for example.
-
[ ] Considering adding sub-headings to the major sections to break into steps, for example, ‘add a push button and configure connection’ before paragraph 27, ‘add a list view’ to paragraph 28, ‘generate python script from the QT designer UI’, and so forth.
-
[ ] The interface is a bit unpredictable - I had to drag files over several times to have them show up in the list box. Considering the interface was created in a very short space of time this is very forgivable, but maybe explain to reader that this might happen, so they don’t assume they have followed the steps incorrectly.
-
[ ] There are very few links to external sites or documentation. I think it would be useful to point to resources with which readers could learn how to add new elements or read more about GUI design principles.
Specific comments:
-
[ ] 3: Very basic knowledge of the shell is required. I recommend stating this in the prerequisites.
-
[ ] 4: Add a link to pip tutorial on PH: https://programminghistorian.org/en/lessons/installing-python-modules-pip
-
[ ] 7: Add, as an endnote, the specific version of QT designer used for this tutorial (in case it breaks with newer versions).
-
[ ] 7-8: Running the pip command seemed to work but no application showed up in the specified folder. Downloading the application from the web worked fine. Perhaps remove the pip option?
-
[ ] 13-15: introduction is useful and interesting, but long considering the overall length of the tutorial. Consider cutting these paragraphs explaining different types of CLIs as they are not central to this tutorial.
-
[ ] This could also be cut: "Additionally, modern operating systems contain templates for any programs running within them. While the Python developer must construct the GUI, the operating system will likely ensure that the program feels like other programs on the operating system, for example, through standardization of the look and feel of buttons and menu bars.”
-
[ ] 20: Where do these principles come from? If they are from an external source, it would be useful to have a link here.
-
[ ] Relate these principles to the specific GUI being created here, either at this point or throughout the tutorial.
-
[ ] 22: Explicitly instruct the reader to open the QT Designer application they have just downloaded.
-
[ ] 23: Considering the tutorial is short, taking the user more slowly through the interface might be useful, including a screen shot of the various windows and a very brief explanation of each. For example, point out that the widget box has section headings and a filter feature, that if you hover over icons the name is displayed.
-
[ ] 25–26: help the reader navigate to the correct Widget by pointing out the subheading/section under which each falls (e.g "drag ‘Label’, found under the ‘Display Widgets’ section…"
-
[ ] 25: Following these steps (editing the text and changing the font), the boundary for the label widget is too small for the text. Consider explaining that the box can be resized and ask user to do so?
-
[ ] 27: Following these instructions to the letter didn’t take me to the previous screen when I typed this. Once I added the mergeDocSlot(), I clicked OK to close the window, and then again to close the second one.
-
[ ] Explain that the purpose is to create a python file which you will then edit.
-
[ ] 34: indicate that the code in the section below is to add or amend to the PDFFileMerger.py python script.
-
[ ] 49 + Explain that you run the application by running the python script in the folder.
-
[ ] 50: At this point I would instruct the reader to run the application and test it with a couple of PDFs. Ideally with ones supplied along with the tutorial, as mentioned in my general comments.
-
[ ] 53: Can you link to resources where one could find information on how to go about creating these additions?
-
[ ] 61: Conclusion could be expanded slightly, particularly with some links to resources.
-
[ ] 62: Could you link to some of this documentation?
@cgoodwinDH and I have been in contact via email, 30 June has been agreed for the deadline for the next draft.
Attempted direct modification of .md file to upload revisions, but GitHub notified me that I do not have write permissions for this file. Emailed @yann-ryan for further instructions (28 June).
Hello @cgoodwinDH and @yann-ryan. I've sent Christopher an invitation for Write Access to ph-submissions.
Let me know if you have any further difficulties or questions about how to make your edits. I'm here, and happy to help.
Hello @anisa-hawes and @yann-ryan - Thank you, Anisa, I received the invitation and now have write access. I uploaded my revised markdown draft today, 30 June 2022. Yann, I sent an email to you (30 June 2022) containing information along with two images for the tutorial and one zip file that contains some sample PDFs for the tutorial user to use during the lesson.
The only hitch with the files is that I am unaware of what subdirectory I might need to use for assets such as images or .zip files, so my markdown code currently assumes and links to the assets in the same directory as the tutorial itself. Once I know of a specific directory, I can change the code.
Thank you both for your help and guiding me through this process! I look forward to future comments and reviews.
Excellent! I'm glad that has worked smoothly, @cgoodwinDH!
I've created a sub-directory within our ph-submissions repository for your data assets. If you can, please upload the sample PDF files to this directory: https://github.com/programminghistorian/ph-submissions/tree/gh-pages/assets/creating-guis-in-python-for-digital-humanities-projects. You can use the following link in the .md file to direct reviewers to your zip file : https://github.com/programminghistorian/ph-submissions/blob/gh-pages/assets/creating-guis-in-python-for-digital-humanities-projects/FILE-NAME.zip. (replacing FILE-NAME.zip with your filename)
Any additional images you want to insert into the lesson, can be uploaded here: https://github.com/programminghistorian/ph-submissions/tree/gh-pages/images/creating-guis-in-python-for-digital-humanities-projects. Images need to be web-friendly (.jpg, or .png and be a maximum of 840 pixels on the longest side). You'll see that @yann-ryan has established the file naming pattern: CREATING-GUIS-IN-PYTHON-FOR-DIGITAL-HUMANITIES-PROJECTS3.png, so it would be good if you could follow this. I can help if the additions involve re-naming the existing images!
Within the Markdown, we insert images using liquid syntax, in this form: {% include figure.html filename="CREATING-GUIS-IN-PYTHON-FOR-DIGITAL-HUMANITIES-PROJECTS1.png" caption="Figure 1. The Qt Designer Windows" %}
Let me know if you if you have any difficulties or if you want me to upload the assets and images for you (I'm really happy to – just email them to me, admin [at] programminghistorian.org). Either way, I can double check the links etc. when you're ready.
Very best for now, Anisa
@anisa-hawes and @yann-ryan , Thank you for the creation of the sub-directories. I've gone ahead and uploaded the .zip file into the appropriate directory and the images into their corresponding directory (and they follow the naming convention that @yann-ryan specified).
I've updated the markdown to reflect the URLs to the assets. I tested the .zip file and it worked correctly. When I view the lesson draft, the .png images show up only as code, just text of the liquid syntax that you specified above, @anisa-hawes . I don't know if the images are supposed to work in the lesson draft view, but the syntax and URLs for the images should be correct, from what I can tell.
But if it is intended for the images to just "show up" as text in this way, then I believe everything is good to go!
Thank you!
Hello @cgoodwinDH. Thank you for those updates. I've made a couple of small adjustments, and the Preview is showing correctly now: http://programminghistorian.github.io/ph-submissions/en/drafts/originals/creating-guis-in-python-for-digital-humanities-projects
@anisa-hawes Many thanks, the preview and everything works perfectly for me!
@yann-ryan I'll await feedback for how we shall proceed from here.
Thank you both very much!
Sorry for being a bit slow to respond. Thanks @cgoodwinDH and @anisa-hawes, everything seems to be looking good. Next, I'll read through and make some final suggestions, and post the required metadata in as a comment here. I'll aim to complete these tasks during next week.
@yann-ryan Thank you, Yann. Sounds great! I look forward to hearing back from you.
Our two reviewers for this lesson will be @Bunoute and @telmaau. Both have indicated they hope to complete the review within about a month.
As a reminder, our reviewer guidelines can be found here, and you can view the lesson here.
You can post your feedback as a comment in this thread. You'll find paragraph numbers on the right edge of the lesson preview, which can be helpful for referring to specific parts of the lesson. Looking forward to your review, and thank you for your time!
Hello @yann-ryan , Thank you for finding reviewers and I look forward to their reflections and comments!
Hello @cgoodwinDH and @yann-ryan !
Thank you for a thorough tutorial – this was the first time I built a GUI application (and it worked!)! Overall, the tutorial was easy to follow, but here are some details that could make it even better and more user-friendly:
-
It is nice to have clearly formulated learning goals and prerequisites in the beginning, and I would make the introduction text body even lighter. For example, “Sometimes, a researcher simply needs a tool that runs with minimal up-front time investiture to run a research tool” is a quite complicated sentence for a simple goal.
-
In paragraph 8, you shared a link for the QT Designer Download, but it was only for mac and Windows, and I as a Linux user had to google another way to install it.
-
When comparing CLI and GUI, it might be nice to have some kind of illustration, although it is not strictly necessary. I know, a terminal window or similar is not very exciting as a picture, but it might help the reader visualize differences between a CLI and a GUI.
-
I find the numbering for the GUI Design Principles very clear, and you could use similar numbered steps (or just shorter paragraphs) later in the tutorial. When I was reading the instructions and pressing the buttons on the Qt Designer window, I sometimes got lost in the text.
-
You could also number the windows in the Qt Designer screenshot (Figure 1) to indicate which box you are talking about, like: “At the center of our layout is the Dialog box (1.) that will become our GUI.”
-
When generating the python file, it had “self.merge_button.clicked.connect(Dialog.mergeDocSlot)” instead of “self.merge_button.clicked.connect(self.mergeDocSlot)” which made me first run into an error. So, it was good that the tutorial shows the full code in the end so that I could compare!
-
the section “Error Testing and Future Additions for Users” had some nice principles about application functionality and debugging. You could consider some sub-headlines to help the reader, but otherwise everything was clearly explained. Great also to have links to further sources.
-
Finally, just a typo: in paragraph 72, there should be HathiTrust instead of HaithiTrust :)
For my programming skills, this tutorial was of an appropriate level, and on a very useful topic!
@telmaau Many thanks for your review and your insightful comments; I look forward to implementing them as I revise :)
@yann-ryan Just to clarify, I believe we are now awaiting one more review? Thank you for all your help thus far.
@telmaau thank you so much for your review! @cgoodwinDH yes, another review is still forthcoming. Please don't make any changes to the text until we receive it (so it doesn't change before the second reviewer is finished). Once we receive the second review, I'll post a summary with some guidelines on further revision based on them both. Thanks!
Just a note to say that unfortunately we have yet to receive a second review for this, but that we hope to have an update or a review by next Monday at the latest. I've been in contact with the author via email to explain the situation.
@lizfischer has agreed to be the second reviewer on this, and hopes to respond early next week. Thanks again for your patience!
@yann-ryan and @lizfischer - Many thanks, I look forward to the comments! :)
@yann-ryan
@DerDoktorFaust, thank you for this lesson! Python GUIs and I have a troubled history-- I have often resorted to making my Python tools browser-based because I've struggled with the GUI packages. So I was very excited to review this lesson and finally learn how to use Qt.
General comments
Overall I think this is a very good lesson. I definitely feel more comfortable playing around with Qt myself having completed it & having a model.
One thing I would like to have had in the beginning is a little detail about why you use Qt over Tkinter. I know both are very popular, but I don't have a good grasp on the difference or why you'd pick one over the other. Maybe it's just personal preference?
In terms of readability & skimmability, some sections are better than others. I think many paragraphs could be split into several smaller ones, with more liberal use of sub-headings. The "Designing the Interface with Qt Designer" and "Error Testing..." sections are particularly dense/"wall of text"-y. Some more subdivision would make it a lot more readable. The introduction has a good level of subdivision in my view.
The thing that caused the most difficulty was that the lesson seems to have been tested/written for Mac users, and there are some differences on Windows that took a while to work out. I'll list my solutions in the detailed comments below.
Links to documentation/further reading on both PyQt5 and Qt Designer would be much appreciated.
Specific notes
Introduction
- The order of the sections in the introduction is unintuitive to me. I would like it if the "Prerequisites and Tools" section came after the "Command Line Interface vs. GUI: Merits and Drawbacks" & "GUI Design Principles" sections. That way, I'll have read all the "conceptual prerequisites" before getting into the hands-on portion by firing up my IDE & installing packages.
- In the "GUI Design Principles" section (par 19-20), it would be useful to talk through the design for this tool, including a diagram of the UI we're aiming for before we actually start in Qt Designer. That would make the "Designing the Interface with Qt Designer" section much easier to follow, since we'd know what the goal layout is.
- In the installation section (par 6-14), it would be nice to organize the
pip installprompts into "Things you need to make GUIs this way in general" and "packages we're using just for this specific application" - Also in the installation section, it was not clear (par 8) that I needed to follow the fman link & download Qt Designer that way. I'm not clear on what the relationship between Qt Designer and the
pip install pyqt5-tools --preinstruction is. Because the rest of thepipinstructions follow an explanatory sentence, it looks like thatpipinstruction is for installing Qt Designer This led to some confusion in par 22 because I didn't know how to "launch Qt Designer," as I had not actually installed it.- also in par 8, the t in QT Designer should be lowercase.
Designing the Interface with Qt Designer
- par 23: The Widget Box is to the left, not the right.
- par 23: It was confusing to find where the "action editor" was based on the instructions & provided screenshots-- in Windows, I don't think it's part of the default layout. Since it isn't even needed for the tutorial, I think it'd be best to not even mention it or to mention it. I found the instructions to rearrange my windows to match the screenshot confusing in general. It wasn't necessary to complete the tutorial, and 95% of the windows were already in the same place to start. I would cut that part.
- par 25-26: These are very long and not easy to follow along with. Especially if you add a "design target" earlier in the tutorial so we know going in what elements we'll be adding, you could break these paragraphs into subheadings like "adding the title," "adding the file upload area," and "adding the merge button"
- Also from a design perspective, I think the layout created in this lesson is missing something to indicate to the user that they should drag & drop files into the list box. That's not intuitive and there needs to be some element in the GUI that indicates how the user should interact with that layout element.
- par 25: not sure what "highlight the Property Editor" means. I think you just mean "in the Property Editor window"?
- par 26: "go to the widget box and select Edit Signals/Slots" is confusing, because for me that was not in the Widget Box window, it was just on the toolbar at the top of the application.
- par 26: "and again to close the next window"-- I had to select mergeDocSlot() in the first pop-up before I could close it.
- between par 26 & 27 there is no instruction to return to Edit Widgets mode
Creating the User Interface Functionality
- par 36: Because the ListDragWidget is a custom class added later, my IDE was upset at the "unresolved reference to ListDragWidget" when I made that change. It wasn't clear to me that we'd be adding that class later, so I spend some time trying to figure out if I'd imported the right packages, the right versions, etc. Some signal that this class will be defined later would be appreciated.
- I needed to also change "Dialog.mergeDocSlot" to "self.mergeDocSlot" in the Qt Designer-generated code, but this isn't mentioned.
- In the dropEvent function (par 39),
self.addItem(file.path())does not work for Windows filepaths. It returns a QUrl that gets misinterpreted by thepdf_merger.append(...)function. Instead, indropEvent()useself.addItem(file.toLocalFile())which changes the QUrl to a local file path. I think this should work on both operating systems, but if you test it and find this does not work on macOS, I'd be happy to test another solution on Windows.
Error Testing and Future Additions for Users
- Moving the sentence "Especially for GUI applications, it is essential to test edge cases and what “strange” things a user might do that could crash the application" (par 52) further up in this section would help clarify the goal of this section.
- The last paragraph (55) should be under its own header, since it is not really related to error testing at all. "Exercises for the Reader" or "More Practice: Additional Features", something like that.
@lizfischer thank you so much for this review! @DerDoktorFaust for the next step, I will summarise the reviews and give you some clear instructions on the way forward. I aim to complete this early next week.
@lizfischer thank you for your review. I was very happy to receive your comments and I am excited to incorporate your suggestions into my article. I'm also glad you found the material useful for your own work!
@yann-ryan Thank you for facilitating these reviews and I look forward to your instructions moving forward!
Thanks again to @lizfischer and @telmaau, and to @DerDoktorFaust for your patience. As per the editor guidelines, below I have summarised the reviews and provided some concrete steps to move forward.
I think both reviews have been very positive and that it will not take much to get this ready for publication. Here is my summary/next steps:
-
The most important comments were relating to readability, particularly in the later sections of the review. As suggested, you should use more sub-headings and numbers/bullet points. For example, paragraph 23 could have a subheading 'The QT designer interface', and each of the descriptions of the boxes could have a separate bullet point and a very brief description. Paragraph 25 could have the subheading 'adding the title', and each step either numbered or with bullets, and so forth. A similar structure would also work for the section 'Error Testing and Future Additions for Users'.
-
Make the following suggested changes to the structure of the introductory materials, including simplifying the language where relevant (see comment from @telmaau). If it is something you feel you can comment on, adding a short note on the benefits (or drawbacks) of QT over other solutions such as Tkinter. Group the prerequisites into different types, and add some subheadings. Move the diagram of the finished UI to paras 19/20, or maybe signpost that the reader can scroll down and see a diagram further down the page (paragraph 29).
-
Move the section on 'Prerequisites and Tools' below "GUI Design Principles", as suggested by @lizfischer. I also recommend returning to the 'Command Line Interface vs. GUI: Merits and Drawbacks' and seeing if it could be edited, for example the material in paragraph 15 is sort of repeated in paragraph 17.
-
Remove the instruction to re-arrange the screen to match Figure 1. You could retain the explanations of each of the boxes, but annotate the screenshot with numbers, and add these numbers to the existing paragraph in bold text to make them stand out.
-
Clarify the steps needed for a reader to install Qt designer. Be specific in the steps, e.g separate the download and install steps from the pip instructions. Also can you add steps for linux users?
-
Follow the reviewer suggestions to ensure that it works across all platforms as far as possible. This includes providing instructions on how to download and install the application on Linux, and following lizfischer's steps to make the code work on Windows.
-
Fix the smaller issues as noted by both reviewers. I think I have listed them all here, but I recommend having a careful read through the reviews too.
- [ ] Double-check that the code “self.merge_button.clicked.connect(Dialog.mergeDocSlot)” correctly reads “self.merge_button.clicked.connect(self.mergeDocSlot)” . Both reviewers noted this as an error, but I can't seem to find it in the lesson preview, so perhaps you have already made this change?
- [ ] par 8, the t in QT Designer should be lowercase.
- [ ] par 23: The Widget Box is to the left, not the right.
- [ ] par 25: Clarify what "highlight the Property Editor" means. Should it read: "in the Property Editor window"?
- [ ] par 26: "go to the widget box and select Edit Signals/Slots" is confusing, because for me that was not in the Widget Box window, it was just on the toolbar at the top of the application.
- [ ] par 25-26: Add something to the layout that indicates the user should drag and drop files.
- [ ] par 26: update instructions to address this issue: "and again to close the next window"-- I had to select mergeDocSlot() in the first pop-up before I could close it.
- [ ] between par 26 & 27 there is no instruction to return to Edit Widgets mode
- [ ] par 36: signal that the class will be defined later, as per comment from @lizfischer.
- [ ] Test the alternative command as suggested by @lizfischer, which should work on both Mac and Windows, and update if you're happy with it.
- [ ] par 52: Moving the sentence "Especially for GUI applications, it is essential to test edge cases and what “strange” things a user might do that could crash the application" further up in this section would help clarify the goal of this section.
- [ ] Par 55 should be under its own header, since it is not really related to error testing at all. "Exercises for the Reader" or "More Practice: Additional Features", something like that.
- [ ] in paragraph 72, there should be HathiTrust instead of HaithiTrust :)
If you have any questions for either me or the reviewers, feel free to post in the issue or contact me via email. When you have finished your draft, please post a comment here (preferably with a list of changes) to let us know so the reviewers can take a look, and we can move forward to the next stage.
Would 4 weeks (December 6) work as a deadline?
@yann-ryan Thank you for this detailed write-up and guidance on how to proceed. December 6 works very well as a deadline. I will have the revisions in by then along with a comment here and a list of changes. Thank you!
@DerDoktorFaust brilliant! Well done on a fab lesson and look forward to your next draft :)
Hello @yann-ryan
I have uploaded the new .md file with all of my revisions. I have also uploaded the new images into the images directory here on Github. Could you please confirm at your convenience that you can see these new images and the changes reflected in the markdown file?
Below is a list of all changes made following the broad and specific guidelines you gave me, along with careful attention to the individual reviewers' comments. I believe I've addressed everything, but please let me know if you find something missing.
I look forward to hearing back from you, and I hope you all have a wonderful holiday coming up!
List of changes:
Changes Based on Specific Comments
- Code fixed for self.merge_button.clicked.connect(Dialog.mergeDocSlot) vs self.merge_button.clicked.connect(self.mergeDocSlot)
- Qt Designer typo fixed
- Corrected directions for Widget Box (left vs right side of screen)
- Changed "highlight the Property Editor" to "in the Property Editor"
- Clarified directions about the Edit Signals/Slots box -- I opted to not use the reviewer's solution of the button in the toolbar because they are located in different places between the MacOS and Windows/Linux version so I provided one instruction that works for both versions
- Added information about using the drag-and-drop widget, namely that users need to drag and drop INTO the widget box itself
- Clarified instructions about closing the edit signals window
- Added instructions about returning to edit widgets mode
- Added note that the drag and drop widget class would be added later and to not worry about IDE warnings at this point in the tutorial
- Moved sentence about testing edge cases to a more suitable place above
- Added header about exercises for the reader
- Corrected typo of HathiTrust.
- As per lizfischer's suggestion, line of code changed to ensure that dropping PDFs into the widget works on Windows; tested this and it works on all operating systems, so the code has been changed to reflect this better line of code
Changes Based on Larger Issues
- I've tried to improve readability throughout. There are many more breaks in the walls of text throughout the entire tutorial; I would individually list these sections that have been broken up, but it is basically every section throughout the tutorial
- The introduction's language has been simplified, but the introduction is longer now because I moved discussion of the project from below to the introduction so that the reader immediately knows what the tutorial will accomplish and the relevance of the example project for digital historians
- Added information about Tkinter vs PyQt to the section discussing installation procedures
- Diagram of the finished application moved much higher in the tutorial so that readers see it early and it now contains a reference to looking back at it as the tutorial proceeds.
- Removed instructions about re-arranging the Qt Designer screen; images now contain numbers referring to the text so the readers knows which box is being described when I introduce Qt Designer
- Instructions for Linux added throughout; differences between Linux/Windows and MacOS Qt Designer versions clarified throughout tutorial
- Clearer instructions added for users of any operating system as to how to open Qt Designer after installation
- Prerequisites and Tools section completely revamped as per suggestions and comments
Questions and Concerns
- I uploaded the new images into the images directory, can you see these?
- I uploaded the new markdown tutorial file where the old one was, can you see this?
- The reason I ask is because when I view the "draft" version on the programming historian site, it is still the old version. I am wondering if this site has to be manually updated and is not connected to Github in that fashion, or if I did indeed properly upload my edits.
Hi @DerDoktorFaust, I'm going through this now. There's a little weirdness with the formatting - some text is being recognised as within backticks when it shouldn't be, which has also meant some images are not displaying. I think I've fixed that now, but am waiting for the preview to update so I can see if it has had the desired effect. Then I'll go through the rest of the text, and also ask the reviewers to check through things. Looks good so far!
Were you looking at http://programminghistorian.github.io/ph-submissions/en/drafts/originals/creating-guis-in-python-for-digital-humanities-projects? That seems to have updated successfully. I think it takes some time to 'build' after it has been updated, so maybe that hadn't happened yet when you viewed it.
Hello @yann-ryan. I've just taken a quick look at the Lesson Preview, and it seems to be rendering code blocks and text paragraphs as they should display. Let me know if there's anything I can help with here, or if the issues you noted have been resolved from your side. Always good to empty your browser cache and (as you mention) wait a little while for the build to complete.