blog
 blog copied to clipboard
01_ARMv7m_Using_The_RUST_Cross_Compiler
0. 导语
今年的study-2023计划中,包含了rust和Cortex-M处理器架构的学习。截止到目前为止RUST已经学的七七八八,偶然间找到了RUST编写简易操作系统的博客https://os.phil-opp.com/ 大为震撼。该博主基于x86架构的芯片使用rust编写了操作系统,里面包含了,中断异常处理、内存分配、还有任务管理的一些机制。受到该博主的启发,或许我们可以基于Cortex-M的同步进行开发。这样做的好处,我们既可以熟悉rust,又可以熟悉Cortex-M,又结合了操作系统的知识,可以说一举三得。我相信理论基础的学习也仅仅是第一步,自己动手编写和调试才能有很深刻的掌握。
我不打算把rbp-os作为一个要交付的“产品”,它不会是一个从顶层到底层的的设计方式。它更像是一种“乐高积木”,一个系统要素一个要素的去实现。在自定义的操作系统中,我们可以随意的增加自己的系统模块。我们按照博主的思路,先去做一个最小的内核,然后慢慢开发中断异常的处理,后续增加内存MMU管理,heap分配器,而这些机制可能一开始我们做一个能够“work”的最简单的实现方式,后续我们慢慢的增强,借鉴Linux内核的处理机制不断的去完善更复杂的场景。
本文会大量的引用:
- Linux操作系统或者FreeRTOS中的操作系统机制来解决baremental的问题
- https://github.com/carloscn/blog#rtos
- https://github.com/carloscn/blog#linux-kernel
- 基于Cortex-M的架构级的机制
- https://github.com/carloscn/blog#armv7-m-cortex-m
本节中会涉及大量关于嵌入式应用方面的知识,硬件架构知识和系统模型分别在上述连接中进行引用。
1. 嵌入式平台
1.1 硬件基本介绍
参考 https://stevenbai.top/rustbook/book/intro/hardware.html 的博客,这里提供了很基础的硬件思路,我们将借助该文档对Cortex-M的rust开发环境进行入门级的整理。在博客中使用了STM32F303VCT6 微控制器。我自己也买了一个这个平台的微控制器:
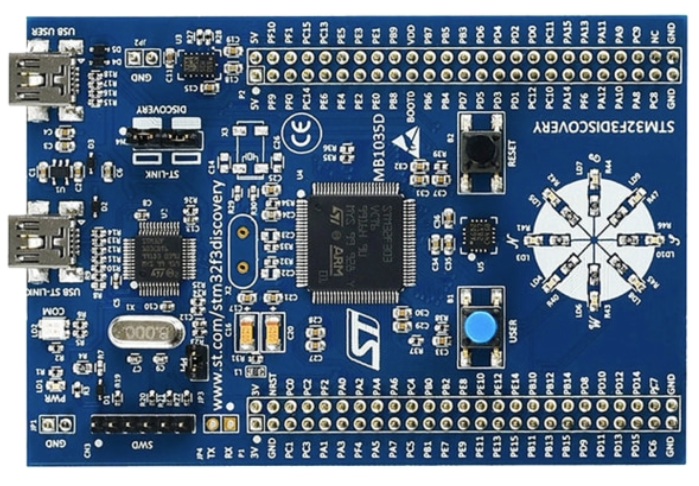
该控制器基本的feature为:
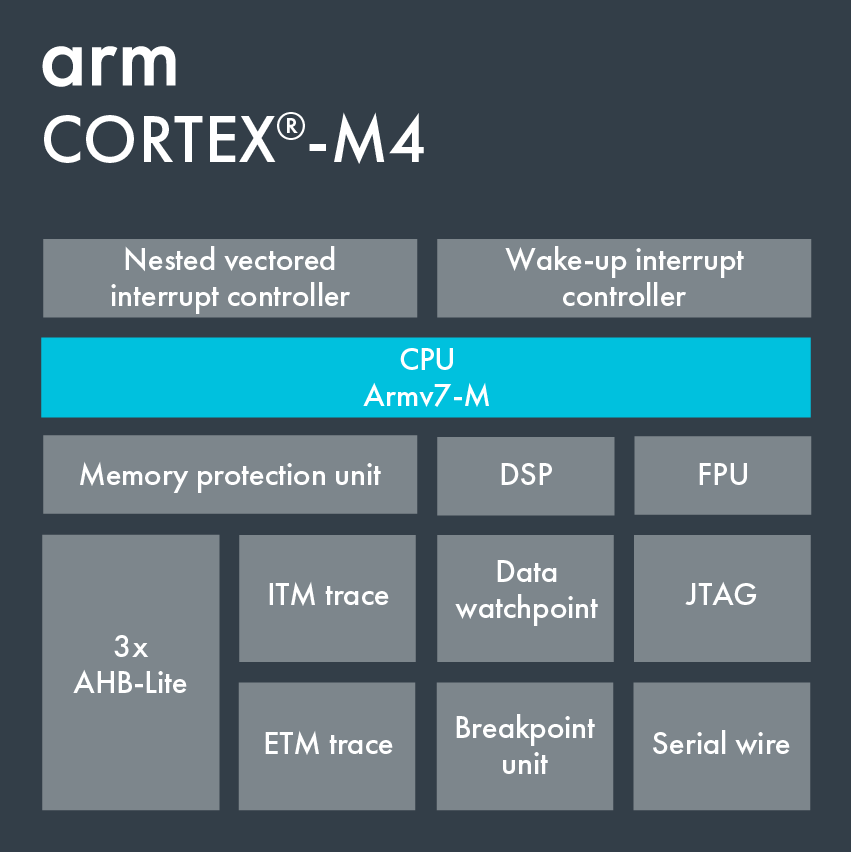
- 单核ARM Cortex-M4F处理器(单精度浮点数)参考:https://developer.arm.com/Processors/Cortex-M4
- 最大时钟频率为72 MHz
- 256KiB的Flash
- 例如定时器,I2C,SPI和USART。
- 通用输入输出(GPIO)和其他类型的引脚
- 一个USB接口 标有"USB USER"的USB端口。
以下是Cortex-M4的一些IP资源:
板子的bsp和文档下载地址: https://www.st.com/en/evaluation-tools/stm32f3discovery.html
1.2 Compiler
1.2.1 C programming
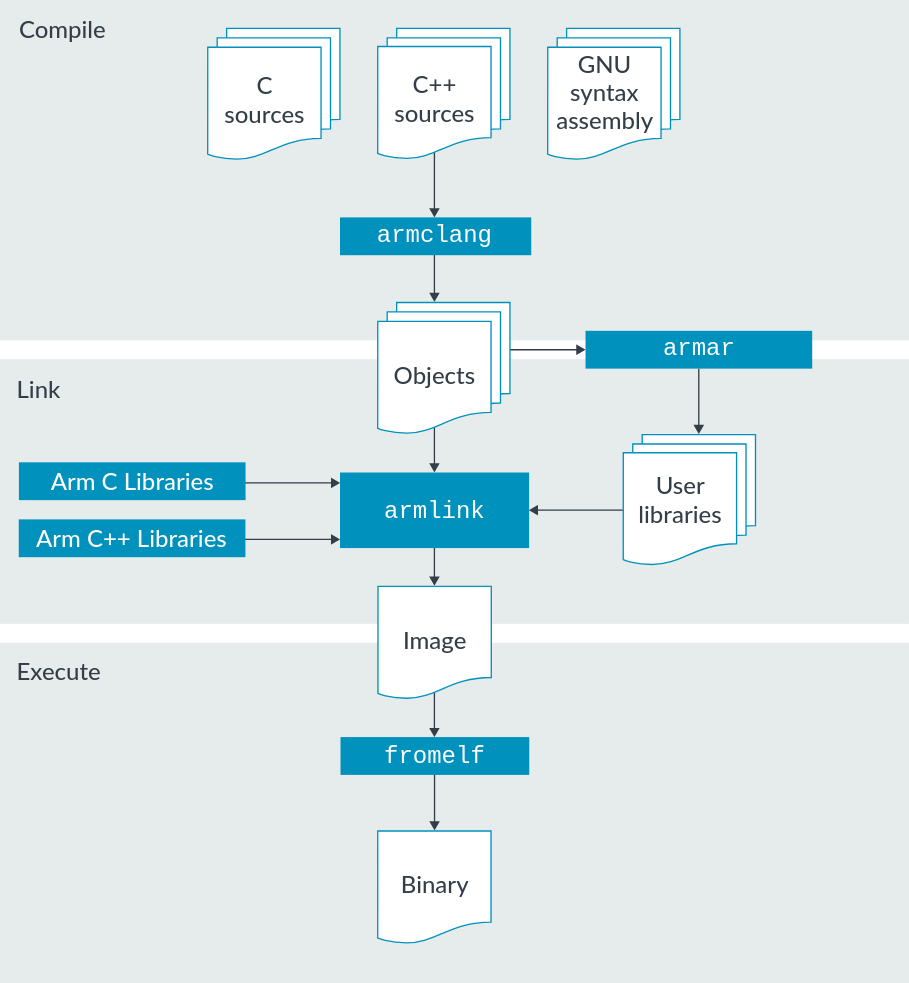
https://developer.arm.com/Tools%20and%20Software/Arm%20Compiler%20for%20Embedded
The following diagram shows how the different toolchain components interact with each other in a typical embedded application build process:
1.2.2 LLVM基础设施和RUST
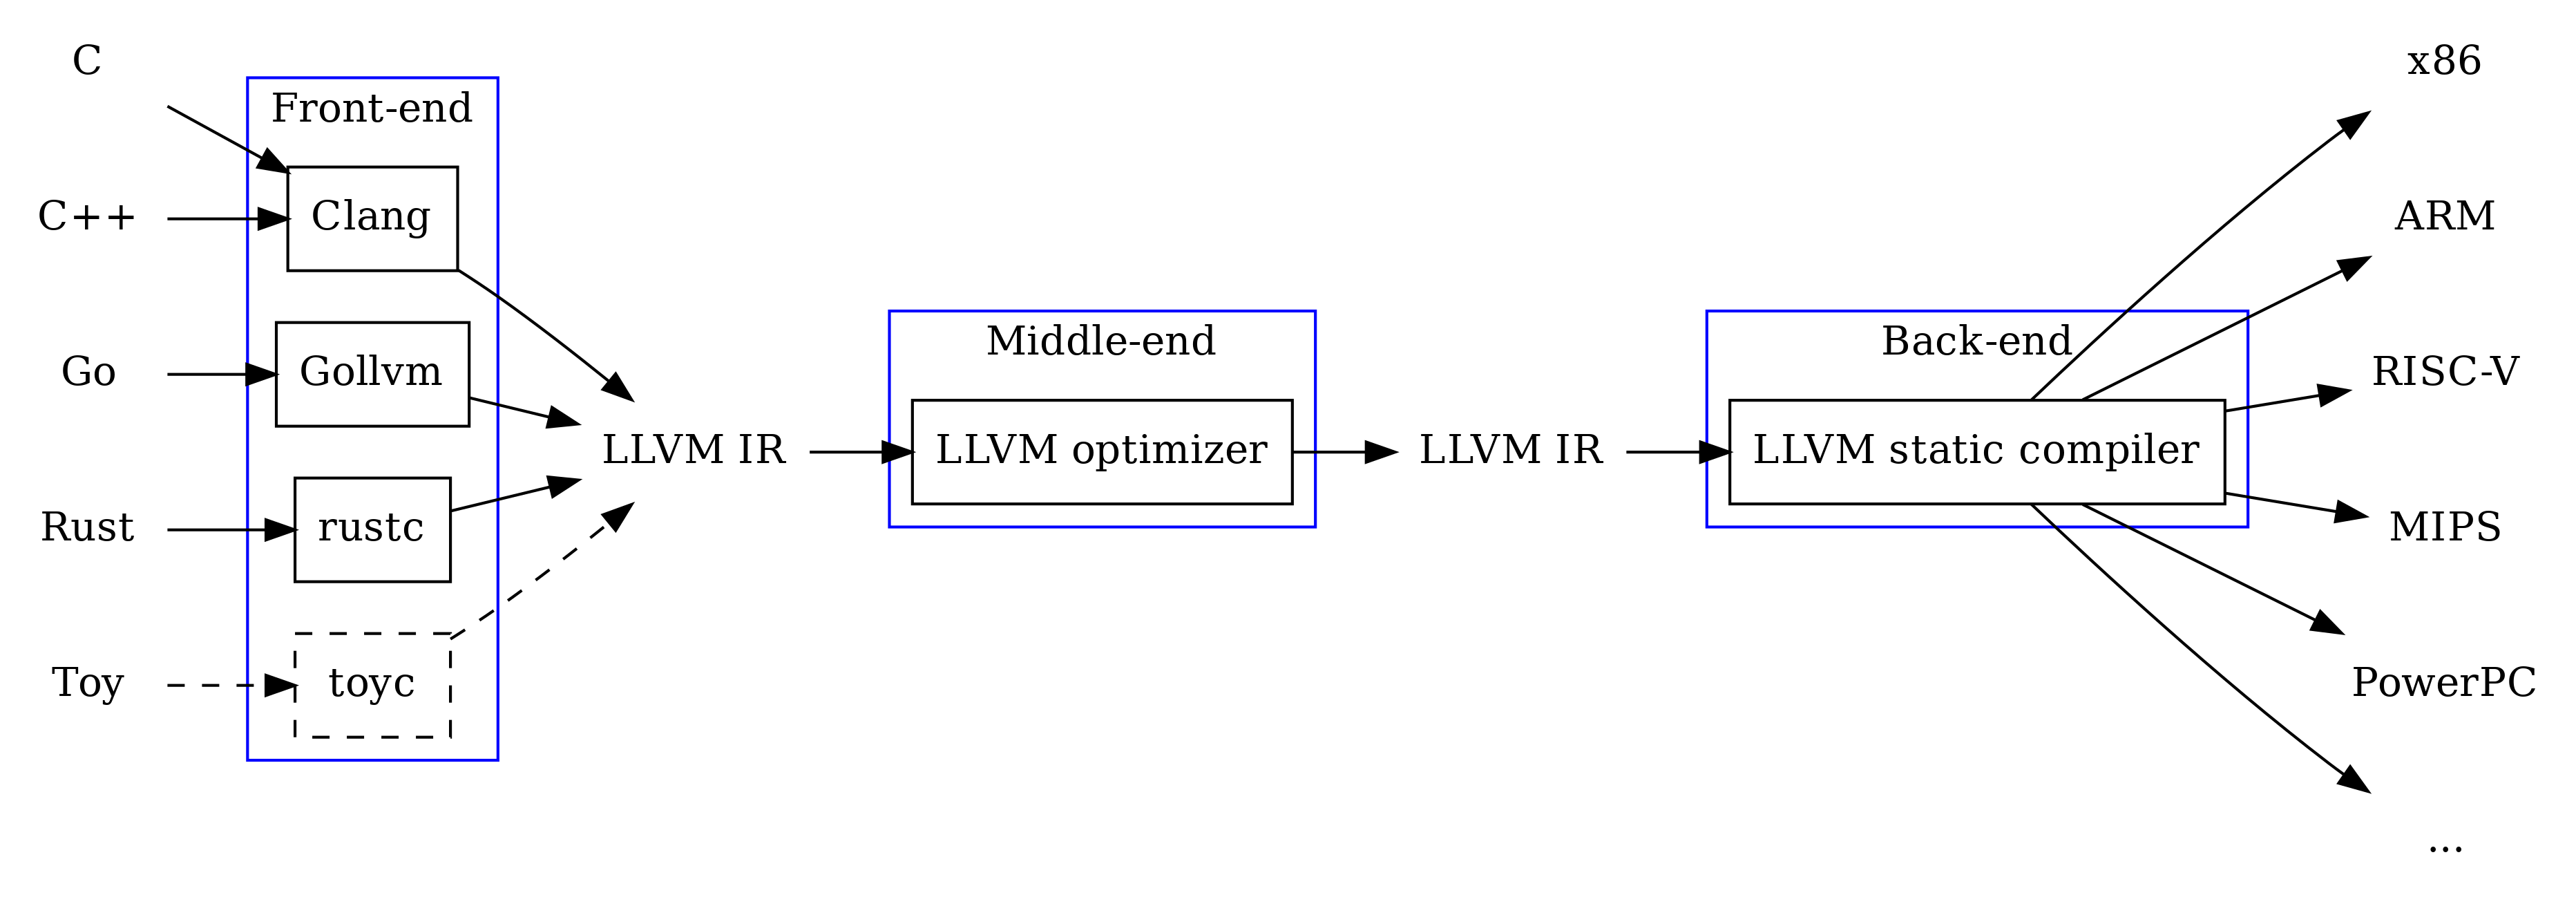
LLVM(Low Level Virtual Machine)提供了一套适合编译器系统的中间语言(Intermediate Representation,IR),有大量变换和优化都围绕其实现。LLVM是许多编程语言后端引擎。 它被C、C++、Rust、Go和Swift等使用[^1]。
编译过程可以分为三个部分。 前端、优化、后端。 编译过程从前端开始。 首先,预处理器开始组织源代码。 这是外部库扩展到目标源代码的阶段。 在Rust中,该指令由use语句定义。 C和C++中的一个类似指令是#include语句。其次,是解析。 在此阶段,代码会被解析,从而发现语法错误,并构建抽象语法树 (AST)。 前端编译的第三步是IR Generation。 在这一步,编译器将AST转换为中间代码(IR)并输出结果。在优化阶段,编译器对程序执行各种转换和清理。 这提高了程序性能,通过减少各种Bug的产生使程序更安全可靠,同时运行一些辅助程序完成一些工作。 稍后我们将探索IR并查看编译器附带的一些优化过程。程序优化后进入后端阶段。 在这,Compiler Back-Endd将IR转换为特定于目标的汇编代码。 然后汇编程序将特定于目标的汇编代码转换为特定于目标的机器代码。 最后,Linker将多个机器代码文件组合成一个文件,我们称之为可执行文件。
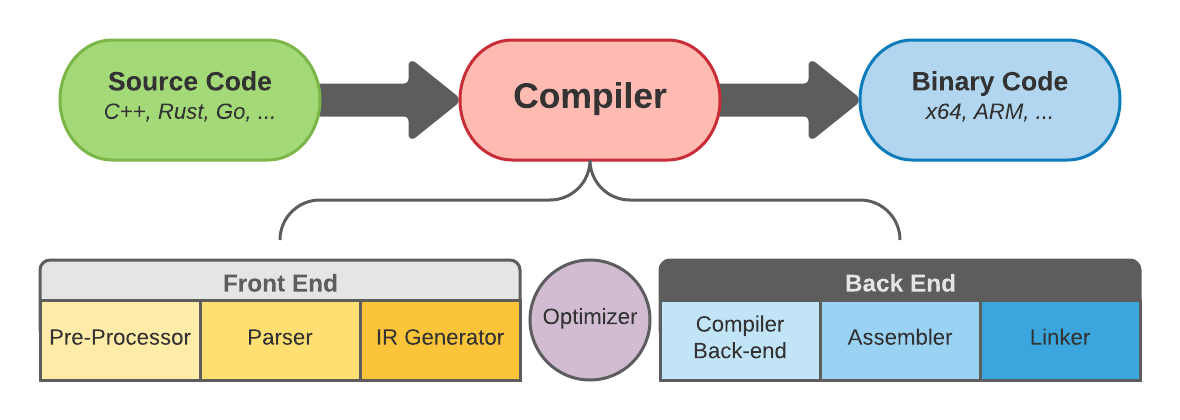
目前我们已经有几种特定于语言的前端。我们有C和C++的clang,Go有gollvm,而Rust有一个叫做rustc的编译器。
RUST工具链
安装rustup:
curl --proto '=https' --tlsv1.2 -sSf https://sh.rustup.rs | sh
rustup的默认安装仅支持本机编译,因此需要添加对ARM Cortex-M的交叉编译支持。对于STM32F3DISCOVERY这个本书示例使用的开发板,请使用target "thumbv7em-none-eabihf"。
$ rustup target add thumbv7em-none-eabihf
还需要安装cargo-binutils
$ cargo install cargo-binutils
$ rustup component add llvm-tools-preview
$ cargo install cargo-generate
no_std[^2]
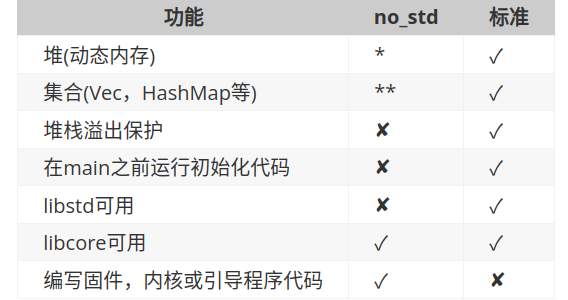
Cortex-M是一个裸机环境。在裸机环境中,系统在运行你的代码之前,没有未加载任何代码。因为没有操作系统的支持,我们将无法使用标准库。 相反,程序及其使用的crate只能直接使用硬件(裸机)来运行。为了防止Rust加载标准库,必须使用no_std[^3]。可通过核心库获得标准库中与平台无关的部分。核心库还排除了嵌入式环境中并不总是需要的东西。其中之一是用于动态内存分配的内存分配器。如果您需要此功能或任何其他功能,通常会有第三方crate实现。
#![no_std] 是一个crate级属性,指示该crate将链接到核心库,而不是标准库。核心库是标准库的与平台无关的子集,它不对程序运行的系统做任何假设。它只提供了语言相关(例如浮点数,字符串和切片)的API,以及处理器功能(例如原子操作和SIMD指令)的API。但是,它缺少涉及平台集成的任何东西的API。 由于这些属性,no_std和核心库代码可用于任何类型的引导程序(阶段0)代码,例如bootloader,固件或内核。
- 仅当您使用
alloccrate并使用合适的分配器(如alloc-cortex-m)时。 - 仅当您使用
collectionscrate并配置全局默认分配器时。
注意rustc的路径
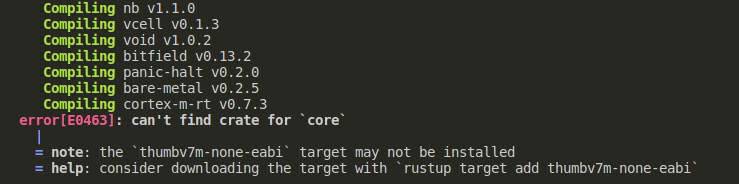
rust工具集可能存在多个安装途径,例如snap和apt安装,他们分别在/snap/bin 或者/usr/bin 目录下面,因此你可能遇到:
error[E0463]: can't find crate for `core`
  |
  = note: the `thumbv7m-none-eabi` target may not be installed
  = help: consider downloading the target with `rustup target add thumbv7m-none-eabi`
然而,你按照建议安装该工具,又出现了
info: component 'rust-std' for target 'thumbv7m-none-eabi' is up to date
解决方案[^4]如下:
I had installed rustup via snap in Ubuntu , so it was in /snap/bin while rustc , rust-gdb were installed in /usr/bin .
According to this installation tutorial , Install Rust - Rust Programming Language 49 all the software was supposed to be in ~/.cargo/bin which only had cargo and rust-fmt .
So I manually deleted all rust related things from /snap/bin . Did sudo apt remove rustc rust-gdb . Also , I removed ~/.cargo/ .
Then I followed the installation tutorial . Chose the stable installation.
Finally I added the target , rustup add target thumbv7m-none-eabi
2. Hello World
2.1 非标准函数
我们将使用cortex-m-quickstart项目模板生成一个新项目。
首先安装cargo-generate
cargo install cargo-generate
然后生成一个新项目
cargo generate --git https://github.com/rust-embedded/cortex-m-quickstart
Project Name: hello_world
Creating project called `hello-world`...
cd hello-world
在.cargo/config.toml中引入正确的版本
#![no_std]
#![no_main]

// pick a panicking behavior
use panic_halt as _; // you can put a breakpoint on `rust_begin_unwind` to catch panics
// use panic_abort as _; // requires nightly
// use panic_itm as _; // logs messages over ITM; requires ITM support
// use panic_semihosting as _; // logs messages to the host stderr; requires a debugger

use cortex_m::asm;
use cortex_m_rt::entry;
use cortex_m_semihosting::{debug, hprintln};

#[entry]
fn main() -> ! {
    hprintln!("Hello, world!\n");

    // exit QEMU
    // NOTE do not run this on hardware; it can corrupt OpenOCD state
    debug::exit(debug::EXIT_SUCCESS);

    loop
-
#![no_std]表示此程序_不会_链接到标准库,而是链接到其子集--核心库。 -
#![no_main]表示该程序将不使用大多数Rust程序使用的标准main接口。使用no_main的主要原因是在no_std上下文中使用main函数需要Rust的nightly版本。 -
extern crate panic_halt;。这个crate提供了一个panic_handler,它定义了程序的panic行为。 -
#[entry]是cortex-m-rtcrate提供的属性,用于标记程序的入口。由于我们没有使用标准的“ main”接口,因此需要另一种方式来指示程序的入口,即#[entry]。 - 注意main函数的签名是
fn main() -> !,因为我们的程序是目标硬件上唯一的程序,所以我们不希望它结束!我们使用发散函数(函数签名中的->!表示没有返回值)来在编译时确保main不会结束。
cargo build --target thumbv7m-none-eabi 编译程序在target/thumbv7m-none-eabi/debug/app中有一个非本地的ELF二进制文件。我们可以使用cargo-binutils检查它。
2.1.1 bin-utils
现在我们在target/thumbv7m-none-eabi/debug/app中有一个非本地的ELF二进制文件。我们可以使用cargo-binutils检查它。
查看elf头文件
使用readelf 可以查看elf文件段信息,这部分和02_ELF文件结构_浅析内部文件结构 完全一致。

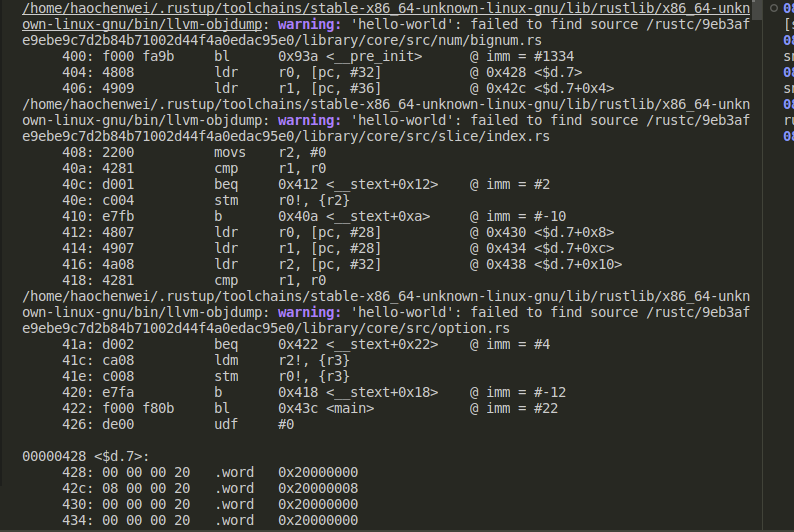
objdump
使用rust-objdump -S hello-world 可以查看汇编信息。
2.1 QEMU
参考: https://stevenbai.top/rustbook/book/start/qemu.html
需要安装qemu-arm
sudo apt install gdb-multiarch openocd qemu-system-arm
要在QEMU上运行此二进制文件,请运行以下命令:
qemu-system-arm \
  -cpu cortex-m3 \
  -machine lm3s6965evb \
  -nographic \
  -semihosting-config enable=on,target=native \
  -kernel target/thumbv7m-none-eabi/debug/examples/hello

-
qemu-system-arm这是QEMU仿真器。QEMU支持很多不同的架构。从名字可以看出,这是ARM处理器的完整仿真。 -
-cpu cortex-m3。这告诉QEMU模拟Cortex-M3 CPU。指定CPU型号可以让我们捕获一些编译参数不当错误:例如,运行针对具有硬件FPU的Cortex-M4F编译的程序,QEMU将在其运行期间产生错误。 -
-machine lm3s6965evb。这告诉QEMU模拟LM3S6965EVB,这是一个包含LM3S6965微控制器的开发板。 -
-nographic。这告诉QEMU不要启动其GUI。 -
-semihosting-config(..)。这告诉QEMU启用半主机。半主机使仿真设备可以使用主机stdout,stderr和stdin并在主机上创建文件。 -
-kernel $file。这告诉QEMU在模拟机上加载并运行哪个二进制文件。
输入这么长的QEMU命令太麻烦了!我们可以设置一个自定义运行器以简化过程。.cargo/config有一行启动 QEMU的运行器被注释掉了,让我们去掉这行注释:
head -n3 .cargo/config.tmol
[target.thumbv7m-none-eabi]
# uncomment this to make `cargo run` execute programs on QEMU
runner = "qemu-system-arm -cpu cortex-m3 -machine lm3s6965evb -nographic -semihosting-config enable=on,target=native -kernel"
cargo run target/thumbv7m-none-eabi/debug/hello-world
2.3 QEMU调试
调试的第一步是在调试模式下启动QEMU:
qemu-system-arm \ -cpu cortex-m3 \ -machine lm3s6965evb \ -nographic \ -semihosting-config enable=on,target=native \ -gdb tcp::3333 \ -S \ -kernel target/thumbv7m-none-eabi/debug/examples/hello
此命令不会在控制台上显示任何内容,并且会阻塞终端。这次我们额外传递了两个参数:
-
-gdb tcp::3333。这告诉QEMU监听TCP端口3333,等待GDB的连接。 -
-S这告诉QEMU在启动时冻结计算机。没有这个,可能我们还没有来得及启动调试器,程序就已经结束了!
接下来,我们在另一个终端中启动GDB,并告诉它加载示例的调试符号:
gdb-multiarch -q target/thumbv7m-none-eabi/debug/examples/hello
然后在GDB Shell中,我们连接到QEMU,它正在TCP端口3333上等待连接。
target remote :3333
Remote debugging using :3333 Reset () at $REGISTRY/cortex-m-rt-0.6.1/src/lib.rs:473 473 pub unsafe extern "C" fn Reset() -> ! {
您会看到该进程已停止,并且程序计数器指向了一个名为“Reset”的函数。那就是重启入口:即Cortex-M启动时执行程序的入口。
该函数最终将调用我们的main函数。让我们使用断点和continue命令一路跳过:
break main
Breakpoint 1 at 0x400: file examples/panic.rs, line 29.
continue
Continuing. Breakpoint 1, main () at examples/hello.rs:17 17 let mut stdout = hio::hstdout().unwrap();
我们现在接近打印“ Hello,world!”的代码。让我们继续使用“ next”命令。
next
18 writeln!(stdout, "Hello, world!").unwrap();
next
20 debug::exit(debug::EXIT_SUCCESS);
此时,您应该在运行qemu-system-arm的终端上看到"Hello, world!"。
$ qemu-system-arm (..) Hello, world!
再次调用next将终止QEMU过程。
next
[Inferior 1 (Remote target) exited normally]
现在,您可以退出GDB会话。
quit
具体可参考: https://gist.github.com/carloscn/f628bb08453cdda3a33de58caa06ba1f
2.4 Target Hardware
在本节中,我们将使用我们的参考硬件STM32F3DISCOVERY。该开发板包含STM32F303VCT6微控制器。该微控制器具有:
- 一个Cortex-M4F内核,其中包括一个单精度FPU
- 闪存的256 KiB位于地址
0x0800_0000。 - 位于地址
0x2000_0000的40KiBRAM。 (还有另一个RAM区域,为简单起见,我们将其忽略)。
2.4.1 Hello World程序
参考# 2. Hello World。
这次用得是Cortex-M4F内核,所以target使用thumbv7em-none-eabihf 。
target = "thumbv7em-none-eabihf" # Cortex-M4F and Cortex-M7F (with FPU)
确保debug::exit()调用已被注释掉或删除,因为他仅用于QEMU环境。
#[entry]
fn main() -> ! {
    hprintln!("Hello, world!").unwrap();

    // exit QEMU
    // NOTE do not run this on hardware; it can corrupt OpenOCD state
    // debug::exit(debug::EXIT_SUCCESS);

    loop {}
}
2.4.2 Linker File
第二步是将存储区域信息输入到“memory.x”文件中。
/* Linker script for the STM32F303VCT6 */
MEMORY
{
  /* NOTE 1 K = 1 KiBi = 1024 bytes */
  FLASH : ORIGIN = 0x08000000, LENGTH = 256K
  RAM : ORIGIN = 0x20000000, LENGTH = 40K
}
现在,您可以像以前一样使用cargo build交叉编译程序,并使用cargo-binutils检查二进制文件。 cortex-m-rt crate可处理让您的芯片运行所需的所有魔术,几乎所有Cortex-M CPU都以相同的方式引导。
$ cargo build --example hello

2.4.3 burning and debugging
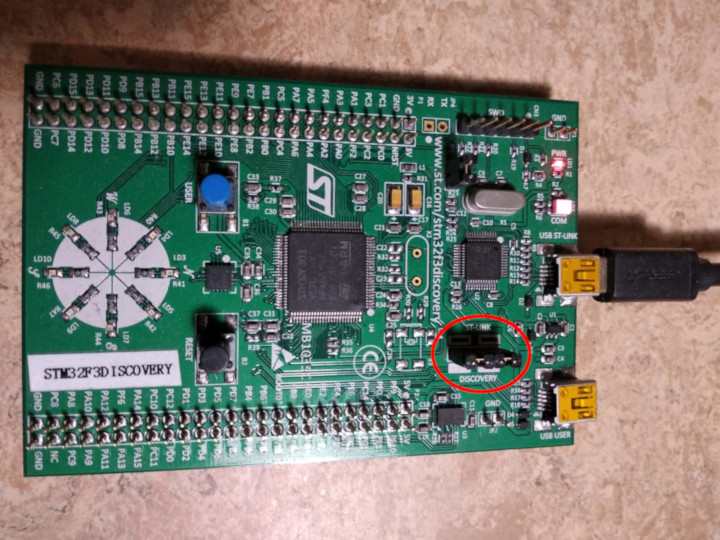
使用micro-USB电缆将开发板连接到笔记本电脑/PC。开发板有两个USB接口。请使用位于板边缘中央的标有“USB ST-LINK”的USB接口。
还要检查ST-LINK跳线是否连接。见下图; ST-LINK标头用红色圈出。
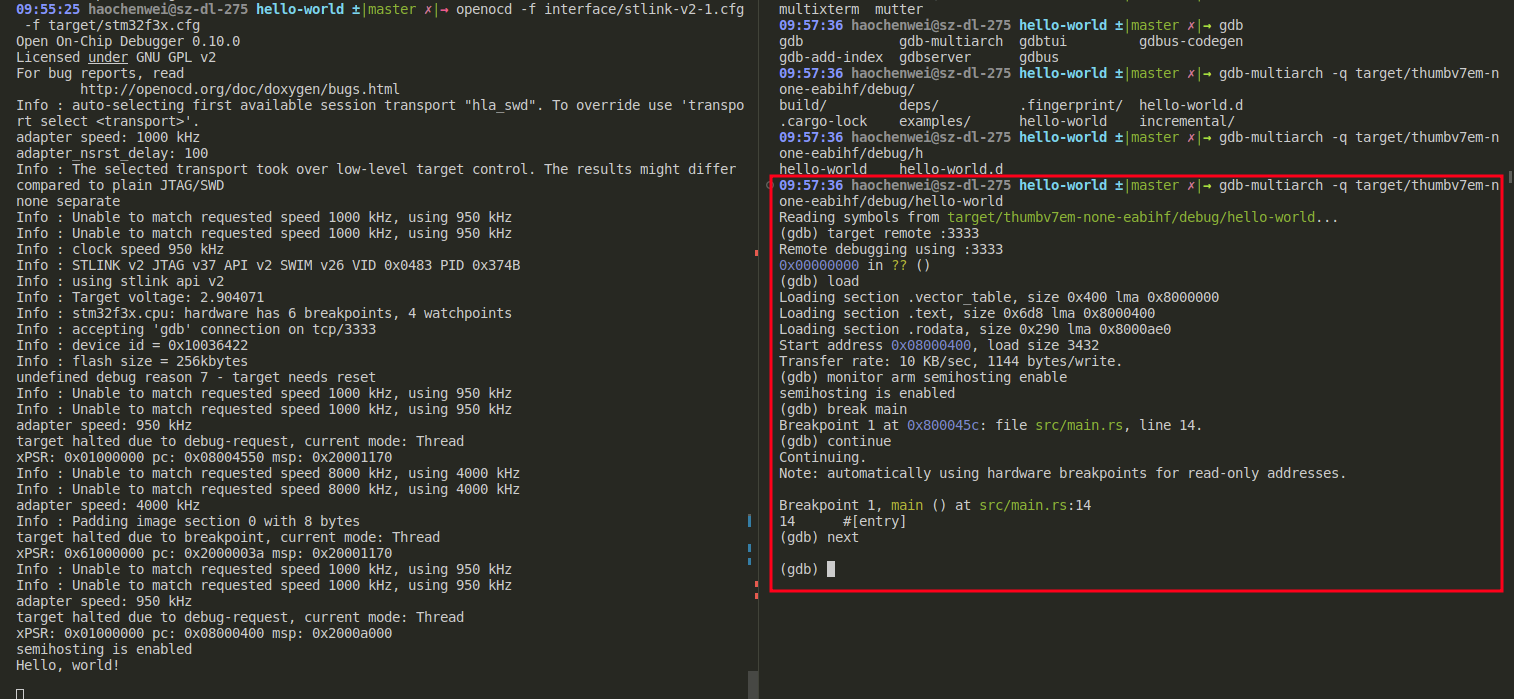
现在运行以下命令:
$ openocd -f interface/stlink-v2-1.cfg -f target/stm32f3x.cfg
您应该获得以下输出,并且阻塞控制台:
Open On-Chip Debugger 0.10.0
Licensed under GNU GPL v2
For bug reports, read
        http://openocd.org/doc/doxygen/bugs.html
Info : auto-selecting first available session transport "hla_swd". To override use 'transport select <transport>'.
adapter speed: 1000 kHz
adapter_nsrst_delay: 100
Info : The selected transport took over low-level target control. The results might differ compared to plain JTAG/SWD
none separate
Info : Unable to match requested speed 1000 kHz, using 950 kHz
Info : Unable to match requested speed 1000 kHz, using 950 kHz
Info : clock speed 950 kHz
Info : STLINK v2 JTAG v27 API v2 SWIM v15 VID 0x0483 PID 0x374B
Info : using stlink api v2
Info : Target voltage: 2.919881
Info : stm32f3x.cpu: hardware has 6 breakpoints, 4 watchpoints
在另一个终端上,也从模板的根目录运行GDB。
$ <gdb> -q target/thumbv7em-none-eabihf/debug/examples/hello
接下来,将GDB连接到OpenOCD,OpenOCD正在监听端口3333。
(gdb) target remote :3333 Remote debugging using :3333 0x00000000 in ?? ()
现在,使用load命令将程序加载到微控制器上。
(gdb) load Loading section .vector_table, size 0x400 lma 0x8000000 Loading section .text, size 0x1e70 lma 0x8000400 Loading section .rodata, size 0x61c lma 0x8002270 Start address 0x800144e, load size 10380 Transfer rate: 17 KB/sec, 3460 bytes/write.
现在程序已加载。该程序需要半主机支持,因此在进行任何半主机调用之前,我们必须告诉OpenOCD启用半主机。您可以使用“monitor”将命令发送到OpenOCD。
(gdb) monitor arm semihosting enable semihosting is enabled
您可以通过调用
monitor help命令来查看所有OpenOCD命令。
像之前一样,我们可以使用断点和continue跳过所有跳转到main函数。
(gdb) break main Breakpoint 1 at 0x8000d18: file examples/hello.rs, line 15. (gdb) continue Continuing. Note: automatically using hardware breakpoints for read-only addresses. Breakpoint 1, main () at examples/hello.rs:15 15 let mut stdout = hio::hstdout().unwrap();
注意如果执行
continue命令后GDB阻塞了终端而不是停在了断点上,则可能需要仔细检查memory.x文件中的内存区域信息是否配置正确(起始地址和长度)。
用next命令替代刚刚的continue,应该也会产生相同的结果。
(gdb) next 16 writeln!(stdout, "Hello, world!").unwrap(); (gdb) next 19 debug::exit(debug::EXIT_SUCCESS);
此时,您应该看到"Hello, world!" 打印在OpenOCD控制台上,等等。
$ openocd (..) Info : halted: PC: 0x08000e6c Hello, world! Info : halted: PC: 0x08000d62 Info : halted: PC: 0x08000d64 Info : halted: PC: 0x08000d66 Info : halted: PC: 0x08000d6a Info : halted: PC: 0x08000a0c Info : halted: PC: 0x08000d70 Info : halted: PC: 0x08000d72
发出另一个next将使处理器执行debug::exit。这会像断点一样挂起程序的执行:
(gdb) next Program received signal SIGTRAP, Trace/breakpoint trap. 0x0800141a in __syscall ()
OpenOCD控制台将会打印如下内容:
$ openocd (..) Info : halted: PC: 0x08001188 semihosting: *** application exited *** Warn : target not halted Warn : target not halted target halted due to breakpoint, current mode: Thread xPSR: 0x21000000 pc: 0x08000d76 msp: 0x20009fc0, semihosting
但是,在微控制器上运行的程序尚未终止,您可以使用continue或类似命令将其恢复。
现在调试需要更多步骤,因此我们将所有这些步骤打包到一个名为openocd.gdb的GDB脚本中。
$ cat openocd.gdb
target remote :3333

# print demangled symbols
set print asm-demangle on

# detect unhandled exceptions, hard faults and panics
break DefaultHandler
break HardFault
break rust_begin_unwind

monitor arm semihosting enable

load

# start the process but immediately halt the processor
stepi
现在运行 <gdb> -x openocd.gdb $program将立即将GDB连接到OpenOCD,启用半主机,加载程序并开始执行。
您也可以将<gdb> -x openocd.gdb转换为自定义运行器,这样cargo run会自动构建程序并开始GDB会话。该运行器已包含在.cargo/config中,只不过现在是被注释掉的状态。
$ head -n10 .cargo/config
[target.thumbv7m-none-eabi]
# uncomment this to make `cargo run` execute programs on QEMU
# runner = "qemu-system-arm -cpu cortex-m3 -machine lm3s6965evb -nographic -semihosting-config enable=on,target=native -kernel"

[target.'cfg(all(target_arch = "arm", target_os = "none"))']
# uncomment ONE of these three option to make `cargo run` start a GDB session
# which option to pick depends on your system
runner = "arm-none-eabi-gdb -x openocd.gdb"
# runner = "gdb-multiarch -x openocd.gdb"
# runner = "gdb -x openocd.gdb"
$ cargo run
Ref
[^1]:LLVM基础设施和Rust
[^2]:Writing an OS in Rust - A Freestanding Rust Binary
[^3]:1184-stabilize-no_std.md
[^4]:Can’t find core , the thumbv7m-none-eabi target may not be installed