Digital-Twin-An-Open-Source-Solution
 Digital-Twin-An-Open-Source-Solution copied to clipboard
A free and open-sourced solution to build digital twins
Digital Twin: An Open-Source Solution
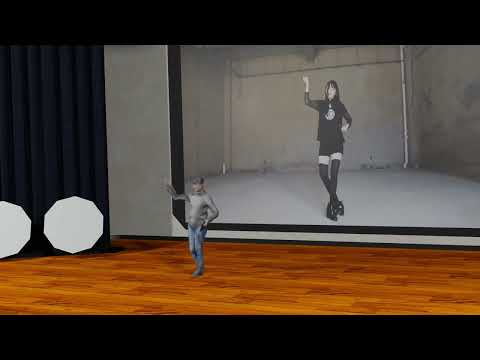
A Video Demonstration
Introduction
This repository serves as an example to build your digital twin with only a cellphone camera. The software at every step is either directly using open-source programs or written by me. I'll share the pipeline in depth in the following sections.
Pipeline
  graph TD;
      Calibrate_Your_Camera-->Take_Pictures_of_the_Target_Person;
      Take_Pictures_of_the_Target_Person-->Run_COLMAP_to_Localize_Cameras;
      Run_COLMAP_to_Localize_Cameras-->Train_NeRF;
      Train_NeRF-->Extract_the_Mesh_From_NeRF;
      Extract_the_Mesh_From_NeRF-->Import_and_Clean_the_Mesh_in_Blender;
      Import_and_Clean_the_Mesh_in_Blender-->Apply_Pose_Bone_to_the_Mesh;
      Fetch_a_Target_Video-->Run_Mediapipe_Pose_Estimation;
      Run_Mediapipe_Pose_Estimation-->Export_Pose_JSON;
      Export_Pose_JSON-->Run_Blender_Script;
      Apply_Pose_Bone_to_the_Mesh-->Run_Blender_Script;
Prerequisites
- Python 3
- OpenCV
- Numpy
- tqdm
- COLMAP
- nerf_pl
- Blender
- mediapipe
Step 0 - Camera Localization
The first step of the pipeline is to calibrate your camera. This step is optional, but it would help the scale recovery and improve the localization stability in the COLMAP step.
To calibrate the camera, please take ~50 images of a checkerboard pattern from different angles. The pattern would be printed out or displayed from any digital screen, eg. an iPad. Place the images under camera_calibration/calibration_images.


Procedure
- Take ~50 images of a checkerboard pattern, and place those images under
image_preprocessing/calibration_images - Change line 8 (
CHECKERBOARD = (6,9)) ofimage_preprocessing/camera_calibration.pyif necessary cd image_preprocessing- Run
python camera_calibration.py - Take 50 to 100 images of the target person with the same camera, and place those images under
image_preprocessing/data_orig/FOLDER_NAME- Replace
FOLDER_NAME
- Replace
- Change line 20 (
w_h_ratio = 4/3) ofimage_preprocessing/undistort_new_images.pyif necessaryw_h_ratiois the image width height ratio
- Assign
w_newandh_newat line 21 and 22 ofimage_preprocessing/undistort_new_images.py- Do this if the original image resolution is too high
- This setting will affect both COLMAP and NeRF
- Change lines 46 and 102 of
image_preprocessing/undistort_new_images.pyif there're no less than 10000 images - Run
python undistort_new_images.pyimage_preprocessing/data/FOLDER_NAMEwill be created, under which undistorted images and acamera.txtwill be stored.
Tips
- Keep camera scale and orientation fixed
- Keep the body of the target person as static as possible
- Take more than 70 images of the target person with full 360-degree views in an indoor environment
- Eg. take images from at least 20 uniformly distributed angles and 3 images from each angle at different camera heights
- An example is shown in Figure 3.
- Separate arms from the main body and legs from each other to reduce manual work in Blender
- If possible, make the background as simple as possible

Further Comments:
- The photograph step is not automated at all, and it takes a couple of minutes. During that, there could be some minor body shifts, affecting the final mesh quality. In the future, I'm considering using a programmable cheap drone to automatically take pictures, but that extra hardware could cost at least $100.
- Taking a quick video is another option. I haven't tried that yet.
- My pictures were taken outdoors, and I think that was a mistake and added tons of difficulties for NeRF to converge. That's why I'm suggesting having an indoor photography environment.
- Some AI algorithms could generate masks for the human body, and those masks could be used by NeRF, but I'm not sure if that would work well robustly.
Step 1 - Camera Localization
- Move
image_preprocessing/data_orig/FOLDER_NAMEto1_camera_localization/ - Create a subfolder
imagesunder1_camera_localization/FOLDER_NAME, and move all images into1_camera_localization/FOLDER_NAME/images - Create a chain of subfolders
sparse/0under1_camera_localization/FOLDER_NAME - Copy
1_camera_localization/sample_data_subfolder/sparse/0/project.inito1_camera_localization/FOLDER_NAME/sparse/0/project.ini- Remember to change lines 4 and 5 of
project.iniaccordinglydatabase_path=WORKSPACE_ABSOLUTE_PATH/1_camera_localization/FOLDER_NAME/database.db image_path=WORKSPACE_ABSOLUTE_PATH/1_camera_localization/images - And also line 14. The four values are
fx,fy,cx,cy, i.e.camera_matrix[0,0],camera_matrix[1,1],camera_matrix[0,2],camera_matrix[1,2].camera_params=771.0800010279605,772.711181640625,241.53466279090742,354.9183215136509
- Remember to change lines 4 and 5 of
- Run COLMAP GUI via
colmap gui- Click
File -> Open projectand select1_camera_localization/FOLDER_NAME/sparse/0/project.ini - Click
File -> Edit project- Click
Newat the line of Database, navigate to1_camera_localization/FOLDER_NAME, and create a filedatabase.db - Click
Selectat the line ofImages, and select1_camera_localization/FOLDER_NAME/images - Click
Save
- Click
- Click
Processing -> Feature extraction- Make sure that
- The camera model is
PINHOLE Shared for all imagesandShared per sub-folderare selectedParameters from EXIFis unchecked- Values under
Custom parametersis correct
- The camera model is
- Click
Extract
- Make sure that
- Click
Processing -> Feature matching -> Run - Click
Reconstruction -> Automatic reconstruction- Assign
Workspace folderto be1_camera_localization/FOLDER_NAME - Assign
image folderto be1_camera_localization/FOLDER_NAME/images - (Optional) Select
ExtremeforQuality - Check
Shared intrinsicsandSparse model - Uncheck
Dense model - Click
Run
- Assign
- Sparse reconstruction result should be visualized, and please verify the camera poses visually
- Quit COLMAP
- Click
- Change
scene_folderat line 5 of1_camera_localization/run_gen_poses.pytoFOLDER_NAME cd 1_camera_localizationandpython run_gen_poses.py
Step 2 - NeRF Training
cd 2_NeRF_traininggit clone https://github.com/kwea123/nerf_pl.gitcd nerf_pl- Execute the following command to train NeRF
python train.py --dataset_name llff \ --root_dir ../../1_camera_localization/FOLDER_NAME \ --N_samples 512 \ --N_importance 128 --img_wh 480 720 \ --num_epochs 2 --batch_size 1024 \ --optimizer adam --lr 5e-4 \ --lr_scheduler steplr --decay_step 10 20 --decay_gamma 0.5 \ --exp_name exp \ --spheric \ --use_disp- Remember to change
--img_wh 480 720to be--img_wh ${w_new} ${h_new}. Replace ${w_new} and ${h_new} with their actual values. - Fine-tune
N_samples,N_importance,num_epochs, andbatch_sizeaccording to your GPU memory. The above example roughly consumes all GPU memory of an NVIDIA T4 GPU and takes about 1 day to converge at about 1.3 epochs.
- Remember to change
- Use
https://github.com/kwea123/nerf_pl/blob/master/extract_mesh.ipynbto extract a mesh within a certain 3D bounding box.- Note: I modified nerf_pl's
extract_color_mesh.pyslightly to reduce memory usage, and the modified file is under2_NeRF_training. Besides, I figured out that the 3D bounding box has to be a cube, rather than a cuboid. I also attempted to relieve that constraint but didn't succeed.
- Note: I modified nerf_pl's
Further Comments:
- Free free to try a faster version of NeRF, eg.
Instant-NGP. - We need a better meshing policy specially designed for NeRF or its variant to improve mesh quality and mesh exporting speed, as well as reduce the memory footprint. The current extraction method is indeed a brute-force one.
Step 3 - Preprocess Mesh in Blender
- Open Blender
File -> Import -> Stanford (.ply)to read the ply file generated in step 2- Move the mesh bottom center to the origin. Rotate and scale the mesh properly if necessary
- Select the mesh, and in
Material Properties, selectBase Colorto beVertex Color | Colorto see a colorful mesh - At `Modifier Properties, add two modifier
Smooth,Factor' = 1.000, andRepeat` = 60Decimate -> Collapse, `Ratio' = 0.025
- Export the modified mesh to a new ply file
- Save and Create a new blender project
- Import the modified mesh
- Create a proper armature and parent the mesh to the armature
- Take a look at the example at
3_preprocess_mesh_in_blender/Yukun512_7.blend
- Take a look at the example at
- Assign weights to each pose bone in the armature
- Still, please refer to
3_preprocess_mesh_in_blender/Yukun512_7.blend
- Still, please refer to
Further Comments:
- Before smoothing, the mesh from the marching cubes has an unrealistically rough surface. Probably a better NeRF variant, eg. Neus, would provide a mesh with higher quality. And
Decimatespeeds up the subsequent processes. - Blender is an amazingly capable 3D software. I still feel that I only know a little about it. Besides, it's a little bit hard to describe its usage with words, so many substeps are documented concisely here.
Step 4 - Mocap and Export
- Fetch your target video, extract images from each frame, and store them under
4_mocap_and_export/images cd 4_mocap_and_exportandpython mocap.pyblender_data.jsonwill be generated
Further Comments:
- There're some AI mocap websites, and I've tried two of them. The first one charged me $48 for a 5min video, and the exported motion was smooth but missed lots of gestures. And the second one was free, but I failed to use it.
- Those websites could take 20min to process a 5min video, while mediapipe runs at 6~7 FPS. More importantly, with mediapipe, we could build real-time applications, rather than offline animations.
Step 5 - Mocap Data in Blender
- In
5_mocap_data_in_blender/script.py, change the POSE_JSON_FILE_PATH to$ABSOLUTE_WORKSPACE_PATH/4_mocap_and_export/blender_data.json
POSE_JSON_FILE_PATH = NONE
POSE_OFFSET = 300
- Smooth the keyframes by switching the
Editor TypetoGraph Editor, andthen executekey -> smooth keytwice.
Further Comments:
- There're a lot of comments in the
script.py. Please read them if you are willing to understand more about the "ugly" trade-offs and tricks in the code. - There could be plenty of ways to improve the
script.py, and in the demonstration video, you may notice some spurious behaviors, eg. sudden large body rotations.