TransitionButton
 TransitionButton copied to clipboard
UIButton sublass for loading and transition animation.
TransitionButton


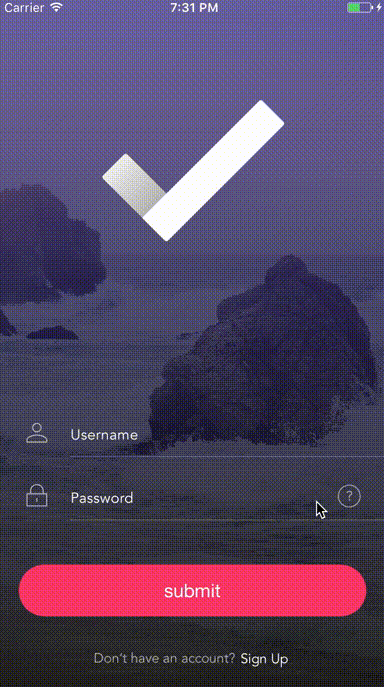
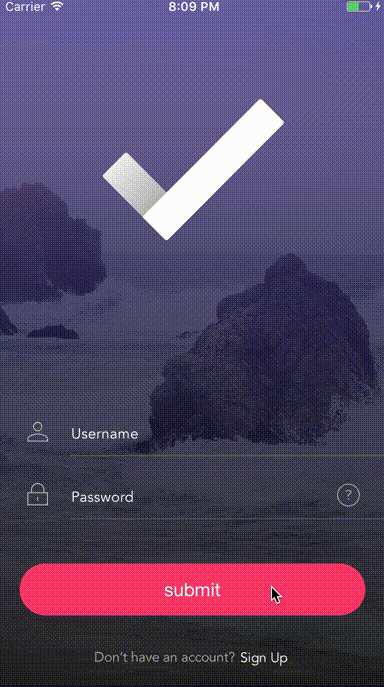
![]()
Concept

Source: Dribbble
Preview
- Expand animation:
- Shake animation:
Example
To run the example project, clone the repo, then open the workspace TransitionButton.xcworkspace run using iOS Example scheme.
Installation
CocoaPods
CocoaPods is a dependency manager for Cocoa projects. You can install it with the following command:
$ gem install cocoapods
To integrate TransitionButton into your Xcode project using CocoaPods, specify it in your Podfile:
use_frameworks!

pod 'TransitionButton'
Then, run the following command:
$ pod install
Carthage
Carthage is a decentralized dependency manager that builds your dependencies and provides you with binary frameworks.
You can install Carthage with Homebrew using the following command:
$ brew update
$ brew install carthage
To integrate TransitionButton into your Xcode project using Carthage, specify it in your Cartfile:
github "aladinway/TransitionButton"
Run carthage update to build the framework and on your application targets’ “General” settings tab, in the “Embedded Binaries” section, drag and drop the built TransitionButton.framework from the Carthage/Build folder on disk.
Usage
TransitionButton is a subclass of UIButton. In addition to all what UIButton provides. TransitionButton has two main methods :
-
startAnimation(): start animating the button with a loading spinner, it should be called just before starting a task, exemple: before a network call to check the login information. -
stopAnimation(animationStyle: StopAnimationStyle, revertAfterDelay delay: TimeInterval, completion: (() -> Void)?): stop animating the button.animationStyle: the style of the stop animation.revertAfterDelay: revert the button to the original state after a delay to give opportunity to custom transition.completion: a completion block to be called once the animation finished, it may be useful to transit to another view controller, example transit to the home screen from the login screen.
For the stop Animation paramteter StopAnimationStyle there is three styles :
StopAnimationStyle.normal: just revert the button to the original state.StopAnimationStyle.expand: expand the button and cover all the screen, useful to do transit animation.StopAnimationStyle.shake: revert the button to original state and make a shaoe animation, useful to reflect that something went wrong
Example
import TransitionButton  // 1: First import the TransitionButton library
import UIKit

class FirstViewController: UIViewController {

    let button = TransitionButton(frame: CGRect(x: 100, y: 100, width: 100, height: 40)) // please use Autolayout in real project

    override func viewDidLoad() {
        super.viewDidLoad()

        self.view.addSubview(button)

        button.backgroundColor = .red
        button.setTitle("button", for: .normal)
        button.cornerRadius = 20
        button.spinnerColor = .white
        button.addTarget(self, action: #selector(buttonAction(_:)), for: .touchUpInside)
    }

    @IBAction func buttonAction(_ button: TransitionButton) {
        button.startAnimation() // 2: Then start the animation when the user tap the button
        let qualityOfServiceClass = DispatchQoS.QoSClass.background
        let backgroundQueue = DispatchQueue.global(qos: qualityOfServiceClass)
        backgroundQueue.async(execute: {

            sleep(3) // 3: Do your networking task or background work here.

            DispatchQueue.main.async(execute: { () -> Void in
                // 4: Stop the animation, here you have three options for the `animationStyle` property:
                // .expand: useful when the task has been compeletd successfully and you want to expand the button and transit to another view controller in the completion callback
                // .shake: when you want to reflect to the user that the task did not complete successfly
                // .normal
                button.stopAnimation(animationStyle: .expand, completion: {
                    let secondVC = UIViewController()
                    self.present(secondVC, animated: true, completion: nil)
                })
            })
        })
    }
}
When using the expand animation it's important that you use a custom fade animation to move from the frist view controller to the second view controller to override the native slide animation. You can use the call CustomTransitionViewController it's a subclass of UIViewController which provides a built-in fade transition animation, here is how your second view contoller should looks like :
import TransitionButton

class SecondViewController: CustomTransitionViewController {

}
And you are done.
Author
Alaeddine M. [email protected]
License
TransitionButton is available under the MIT license. See the LICENSE file for more info.