intro-full-stack
 intro-full-stack copied to clipboard
title: 🥞 revealOptions: transition: 'zoom'
Full ✨ Stack 🥞 Development 💻
How the Web Works
WELCOME!
Expectations
- Be respectful of your classmates and volunteers.
- Do not talk over each other or the volunteers.
- Respect each others space.
- Help each other! Use each other as a resource.
- Teaching is learning.
- Mistakes are OK. Mistakes mean you're learning.
- Have fun!
Volunteer Introductions
CJ
- Your facilitator!
- Graduated from Louisiana Tech University
- BA Computer Science, Minor in Mathematics
- Worked as a System Administrator, QA Analyst, Software Engineer, Full Stack Instructor
- I am currently the Chief Full Stack Engineer at 303 Software
- I live stream myself coding and teaching on Twitch and YouTube on the channel "Coding Garden with CJ"
Agenda
- How the Web Works
- Diagram the Full Stack
- Use the terminal to create folders and files
- Use "VS Code" to edit code files
- Create a webpage with HTML
- Style a web page with CSS
- Make a web page interactive with JavaScript
- Create a dynamic web server with Node.js
- Store and retrieve data from a database
- Deploy a static web site so anyone can access it
- Deploy a dynamic web server so anyone can access it
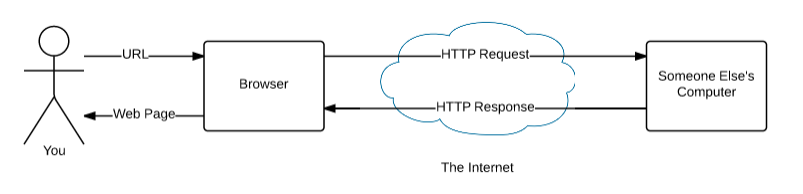
How the Web Works
Less like this...

More like this!

Except it's really big...

"THE CLOUD"

Draw this diagram with me
URL
Uniform Resource Locator
- Every web site on the world wide web has a unique address!

Exercise
- Take 2 minutes to find a page from at least 2 of your favorite sites on the web.
- Write down the URLs and circle / identify each part
- All 8 parts may not be there...
The Terminal
The Terminal
- The terminal is a way to interact with files your computer.
- It is similar to the "File Explorer" but instead of pointing and clicking on icons, everything is done with text "commands"
- You can:
- Go in to directories
- List the files in a directory
- Create files
- Open files or programs
- MUCH MORE!!
- We will use the terminal to manage our files and manage the servers we create
- There are many different types of shells. Today we will use a shell called
bash
Common Commands
Print the current directory path
pwd
List the files in the current directory
ls
Go into a directory
cd directorynamehere
Create a new directory
mkdir directorynametocreate
Exercise
- Open "Git Bash" on your computer
- At the prompt, see what directory you are in:
pwd - Create a directory called workspace:
mkdir workspace - Go into the workspace directory:
cd workspace - Check what directory you are in:
pwd - Open a File Explorer window in the current directory:
explorer .- Move this window to the side so you can see the other folders being created
- Create a directory called my-full-stack-app:
mkdir my-full-stack-app - List the files / folders in the directory:
ls - Go into the directory:
cd my-full-stack-app - Create a directory called client:
mkdir client - Create a directory called server:
mkdir server - List the files / folders in the directory:
ls - Open VS Code in the current directory:
code . - Use the File Explorer to verify all of the folders you have created.
- When you are done: Help others around you!

VS Code
- A file editor.
- There are many other editors. VS Code is a popular one.
- We will use VS Code to edit all of the files that will make up our full stack app.
HTML

HTML
- Hypertext Markup Language
- HTML is the foundation of the World Wide Web and the foundation for every web page.
- Every page you view in a web browser is made up of HTML code (and other things...).
- HTML describes the structure of a web page
- HTML elements are represented by "tags"
- HTML tags label pieces of content such as "heading", "paragraph", "image" etc.
- Web Browsers do not display the HTML tags directly, but use them to "render" the content of the page
A Heading Tag
<h1>Hello World</h1>
A Paragraph Tag
<p>Hello World</p>
Tags can be nested to create hierarchy
<div>
    <h1>Hello World</h1>
    <p>This is a web page.</p>
</div>
Anatomy of a Tag

Exercise:
- Take 2 minutes to find a page from one of your favorite sites on the web.
- Press CTRL+U (in Chrome) while on the web page to open the HTML source code of the page.
- Write down at least 10 different types of tags you see
Exercise:
- Go to VS Code
- In the Explorer on the Left, "right click" the "client" folder and choose "New File"
- Create a file called "index.html"
- Write the following HTML code in the "index.html" file
<!DOCTYPE html>
<html>
    <head>
        <title>My Full Stack App</title>
    </head>
    <body>
    </body>
</html>
<!DOCTYPE html>let's the browser know this is an HTML5 document- The
<html>tag is the root of the document. - The
<head>tag contains information about our page. The content of the<head>tag is not actually rendered on the page. - The
<title>tag sets the title of the page displayed in the tab - The
<body>will contain all of the content of the page. - Notice that each tag has a corresponding closing tag.
A Local Static File Server
Exercise:
- Open "Git Bash"
- Navigate to the "client" folder:
cd client - Start the server in the client directory:
lite-server - Google Chrome should automatically open
http://localhost:3000. - You should see a blank page with the title of your web page in the tab.
- In VS Code, add an
h1title to thebodyof yourindex.htmlfile. - Switch back to Google Chrome and you should see the title!
What just happened?
- lite-server is a static file server running on port
3000on your computer localhostmeans your computer- When you visit
http://localhost:3000in the web browser:- A GET request is made to the root of static file server
- The server responds with the
index.htmlfile - The web browser renders the file
CSS

CSS
- Cascading Style Sheets
- CSS allows us to apply styles to HTML elements on the page.
- CSS can be defined in a separate
.cssfile and linked to an HTML page.
<head>
    <title>My Full Stack App</title>
    <link rel="stylesheet" href="styles.css">
</head>
- CSS is made up style rules
- A rule has a "selector"
- Which element(s) on the page should have these styles
- A rule has many "declarations"
- A declaration has a "property" and a "value"
- There are many CSS properties that can be changed!
- Some common ones include: font-family, color, text-align, margin, padding, width, height
body {
    font-family: sans-serif;
}
h1 {
    color: dodgerblue;
    text-align: center;
}

Exercise:
- Go to VS Code
- In the Explorer on the Left, "right click" the "client" folder and choose "New File"
- Create a file called "styles.css"
- Add a style rule to select the
bodytag and change thefont-familyto besans-serif - Add a style rule to select the
h1tag and change thecolorto be your favorite color and thetext-alignto becenter - Open "index.html", in the
headelement add a link to the css file. - Go back to
http://localhost:3000and the styles should be applied!
<head>
    <title>My Full Stack App</title>
    <link rel="stylesheet" href="styles.css">
</head>
User Input
HTML Forms
- HTML Forms allow us to take in user input!
- The
<form>tag contains the form elements - The
<label>tag describes an input - The
<input>and<textarea>tags allow users to type their input - The
<button>tag allows the user to submit the contents of a form
Exercise:
- Add the following HTML to the body of your "index.html" file
<form>
    <label for="name">Name:</label>
    <input name="name" id="name">
    <label for="content">Content:</label>
    <textarea name="content" id="content" rows="3"></textarea>
    <button>Send</button>
</form>
Exercise:
- Add the following CSS to the
styles.cssfile:
form {
    width: 50%;
    margin: 0 auto;
}
label {
    margin: 1rem;
}
input, textarea, button {
    display: block;
    width: 100%;
    margin: 1rem;
}
JavaScript

- JavaScript is a general purpose programming language
- JavaScript is NOT Java
- JavaScript is to Java as Ham is to Hamburger
- It is the only programming language the Web Browser understands (besides HTML and CSS)
- JavaScript in the web browser allows us to make web pages interactive
- We will use JavaScript to collect the user input from the form and send it to a server
- JavaScript can be defined in a separate
jsfile and linked to an HTML page.
Exercise - create a javascript file
- Go to VS Code
- In the Explorer on the Left, "right click" the "client" folder and choose "New File"
- Create a file called "client.js"
- Inside of the file, write:
alert('hello world!'); - Open "index.html", at the bottom of the
bodyelement add a link to the js file. - Go back to
http://localhost:3000and you should see a message!
<body>
    <!-- other html here -->
    <!-- This should be at the bottom! -->
    <script src="client.js"></script>
</body>
Output messages to the console
- We can use JavaScript to output messages to the developer console
console.logis built in to the web browser to help us debug our code
Exercise - log to the console
- Remove
alert('hello world')from yourclient.jsfile and add the following code:
console.log('hello world!');
Chrome Developer Tools
- Right click the web page and choose "Inspect Element"
- This will open the Chrome Developer Tools
- Select the "Console" tab
- You should see "hello world!" in the console
Selecting Elements
- We can use JavaScript to select elements on the page and make them interactive
document.querySelectoris built in to the web browser. We can use any valid CSS selector to select an element with JavaScript.
Exercise - select elements
- Select the form on the page and log it:
const form = document.querySelector('form');
console.log(form);
- If you hover over the logged
form, it should highlight on the page!
Listening for Events
- We can use JavaScript to listen for when the form is submitted, and then do something with the data in the form
Exercise - listen for the submit event
- Create a
functioncalledformSubmitted - Add a
console.loginside the function - Add an event listener to the form
submitevent and pass in theformSubmittedfunction - Try submitting the form on the page. What happens?
const form = document.querySelector('form');
function formSubmitted() {
    console.log('the form was submitted!');
}
form.addEventListener('submit', formSubmitted);
Preventing the Default Action
- By default, when a form is submitted, the web browser tries to send the data to itself, and the page refreshes
- We want to prevent that so JavaScript can take control
Exercise - prevent the default action
- Add an
eventparameter to theformSubmittedfunction - Inside the function, prevent the default action.
- Now, you should see the console.log!
const form = document.querySelector('form');
function formSubmitted(event) {
    event.preventDefault();
    console.log('the form was submitted!');
}
form.addEventListener('submit', formSubmitted);
Collecting Form Data
- We can use the
FormDataobject to collect the user input from the form.
const formData = new FormData(form);
formData.getallows us to specify the name of an input or textarea to retrieve the contents
const name = formData.get('name');
console.log(name);
Exercise - collect user input with FormData
- Inside the formSubmitted function, create a formData object.
- Get the name and content and store them in variables.
- Log the name and content variables to the console.
- Try submitting the form with different inputs to see what happens.
const form = document.querySelector('form');
function formSubmitted(event) {
    event.preventDefault();
    console.log('the form was submitted!');
    const formData = new FormData(form);
    const name = formData.get('name');
    console.log(name);
    const content = formData.get('content');
    console.log(content);
}
form.addEventListener('submit', formSubmitted);
Hiding and Showing Elements
- We want to show a loading image whenever the user submits the form
- We can hide / show the image with JavaScript!
- The
styleproperty of any element can be used to apply CSS styles with JavaScript!
Exercise - add a loading image
- Add a loading image to the
index.htmlfile below the form
<img src="https://i.imgur.com/nr8xNVI.gif">
- Add the following CSS to
styles.cssto center the image:
img {
    display: block;
    margin: 1rem auto;
    width: 50%;
}
- In the
client.jsfile, select the image and hide it:
const loadingImage = document.querySelector('img');
loadingImage.style.display = 'none';
Exercise - hide / show elements
- Hide the form and show the loading image when the form is submitted!
- This creates a good user experience, as the user can see that "something" is happening with their input.
- Inside the
formSubmittedfunction, add the following code:
form.style.display = 'none'; // hide the form
loadingImage.style.display = 'block'; // show the image
- The form should disappear and the image should appear when the form is submitted!
- We'll come back to the client in a bit.
- Now, let's work on the server!

Node.js
- Node.js is a server side runtime for JavaScript
- This allows us to create back-end / server applications with JavaScript!
- The code we write on the server is very different from the client, but the "syntax" is the same
Exercise - interactive node REPL
- Open "Git Bash"
- Run the node command:
node - You now have a JavaScript REPL (Read Eval Print Loop)
- Type:
console.log('hello from node')and press enter - Type:
.exitto quit the REPL
NPM
- NPM is a package manager for Node.js
- We can use it to install libraries / packages from the NPM registry: https://www.npmjs.com/
Exercise - initialize a package.json
- Open "Git Bash"
- Change to the
workspace/my-full-stack-app/serverdirectory. - Initialize the project:
npm init - Answer the questions
- List the files in the directory:
ls - You should see the
package.jsonfile that was created
Dependencies
- We will use some existing libraries to help us build the back-end server
- These dependencies are installed with npm
- nodemon - a tool to automatically restart the server when changes are detected
- express - a library for creating APIs
- cors - an express middleware that adds CORS headers
- morgan - an express middleware logger
- nedb-promises - a simple database library
Exercise - install dependencies
- Open "Git Bash"
- Change to the
workspace/my-full-stack-app/serverdirectory. - Install dependencies with npm:
npm install nodemon express cors morgan nedb-promises
- Open the
package.jsonfile in VS Code. You should now see all of these dependencies listed
Exercise - create a server.js file
- Go to VS Code
- In the Explorer on the Left, "right click" the "server" folder and choose "New File"
- Create a file called "server.js"
- Write the following JavaScript code in the "server.js" file:
console.log('hello from node!');
- Run the file in the terminal:
node server.js
- You should see
hello from node!logged to the terminal.
Exercise - add scripts to package.json
- Open the
package.jsonfile in VS Code. - Add the following scripts to the
scriptssection:
"scripts": {
    "start": "node server.js",
    "dev": "nodemon server.js"
}
- Open "Git Bash"
- Change to the
workspace/my-full-stack-app/serverdirectory. - Run the command:
npm start - You should see
hello from node!logged to the terminal.
Exercise - Create an express server
- Update the
server.jsfile to include the following code:
const express = require('express');
const app = express();

app.get('/', (req, res) => {
    res.json({
        message: 'Hello from Node.js'
    });
});

app.listen(5000, () => {
    console.log('Server is listening on port 5000!');
});
- Run the command:
npm run dev - You should see the message in the console.
- Visit
http://localhost:5000in your browser - Make a GET request with postman to this address
Back to the diagram
Exercise - Add express middlewares
- Update the top of
server.jsto include:
const express = require('express');
const morgan = require('morgan');
const cors = require('cors');

const app = express();
app.use(morgan('common'));
app.use(cors());
app.use(express.json());
HTTP Requests
- Up until now, we have only made GET requests
- A GET request typically just requests a page or data
- A POST request allows the server to receive data
- There are many other HTTP methods including: GET, POST, PATCH, DELETE, HEAD, OPTIONS
Exercise - Add a post route
- In
server.jsadd a post route below the middlewares:
app.post('/create', (req, res) => {
    res.json(req.body);
});
- In postman make POST request to
http://localhost:5000/createwith the following body content:
{
	"name": "Your name here",
	"content": "Your content here"
}
- In postman select: body -> raw -> choose json from the dropdown

- You should see the same body in the response!
Databases!

Databases
- Databases are used for persistent storage
- There are many different kinds of databases
- NOSQL and SQL are common database types
- We will store all of our messages in a database called
nedb-promises! - This way, no matter when / where we visit the web site, the server will always have all the latest messages that can be served to the client
Exercise - setup the database
- In the
server.jsfile at the top, add the following code:
const nedb = require('nedb-promises')
const db = nedb.create('data.db');
Exercise - Insert data into the database
- Update the post route to insert the request body into the database
app.post('/create', async (req, res) => {
    const inserted = await db.insert(req.body);
    res.json(inserted);
});
- Make a POST request in postman again. This time you should see an _id in the response!
Exercise - Validate the data before inserting
- Update the post route to validate the request body before inserting:
app.post('/create', async (req, res) => {
    if (req.body.name
        && req.body.name.toString() !== ''
        && req.body.content
        && req.body.content.toString() !== '') {
        const inserted = await db.insert({
            name: req.body.name.toString(),
            content: req.body.content.toString()
        });
        res.json(inserted);
    } else {
        res.status(500);
        res.json({
            message: 'Name and content cannot be empty!'
        });
    }
});
- Make a POST request in postman again. This time you should see an _id in the response!
- Try making a POST request with no name or content. You should see the error!
Exercise - List the messages in the database
- Create a new GET route with the following code:
app.get('/list', async (req, res) => {
    const messages = await db.find();
    res.json(messages);
});

* Make a GET request in Postman to `http://localhost:5000/list`
* Also try visiting `http://localhost:5000/list` in the web browser. Does this work? If so, Why?
Back to the diagram
Make requests with fetch + JavaScript in the Browser
- Similar to how we can make requests to the server with postman, we can make requests to the server with JavaScript!
fetchis built in to the web browser and allows us to make requests with JavaScript.
Exercise - Make a POST request with JavaScript
- In the
client.jsfile, add theasynckeyword in front of the word function of theformSubmittedfunction, and add the following code at the end:
async function formSubmitted(event) {
    // lots of codes here
    const message = {
        name,
        content
    };
    const url = 'http://localhost:5000/create';
    const response = await fetch(url, {
        method: 'POST',
        headers: {
            'content-type': 'application/json'
        },
        body: JSON.stringify(message),
    });
    const json = await response.json();
    console.log(json);
}
- Try entering and submitting a message on the page.
- You should see the data logged to the console.
Exercise - Show the form / hide the image
- After a successful submission, it makes sense to hide the loading image and show the form again.
- At the end of the
formSubmittedfunction add the following code:
form.style.display = 'block'; // show the form
loadingImage.style.display = 'none'; // show the image
Exercise - Create a place in the HTML to list the messages
- In the
index.htmlfile, below the form, create a div with theidmessages:
<div id="messages"></div>
Exercise - Select an element by ID with JavaScript
- In the
client.jsfile, at the top, select the messages div and store it in a variable called messagesElement:
const messagesElement = document.querySelector('#messages');
- We will use this variable in the next exercise to list the messages on the page.
Exercise - List all of the messages on the page
- In the
client.jsfile, add the following function:
async function listMessages() {
    messagesElement.innerHTML = ''; // Clear the existing messages
    loadingImage.style.display = 'block'; // show the loading image
    const url = 'http://localhost:5000/list';
    const response = await fetch(url);
    const messages = await response.json();
    for (let i = 0; i < messages.length; i++) {
        const message = messages[i];
        const messageDiv = document.createElement('div');

        const nameElement = document.createElement('h3');
        nameElement.textContent = message.name;
        messageDiv.appendChild(nameElement);

        const contentElement = document.createElement('p');
        contentElement.textContent = message.content;
        messageDiv.appendChild(contentElement);

        messagesElement.appendChild(messageDiv);
    }
    loadingImage.style.display = 'none'; // hide the loading image
}
Exercise - Call the listMessages function
- At the bottom of the
client.jsfile, call thelistMessagesfunction:
listMessages();
- Now when the page loads, you should see all of the messages on the page!
Exercise - Style the messages
- Add the following CSS to the
styles.cssfile to center the messages:
#messages {
    display: block;
    margin: 1rem auto;
    width: 50%;
}
Exercise - List the messages after creating a new message
- At the end of the
formSubmittedfunction, call thelistMessagesfunction:
async function formSubmitted(event) {
    // lots of codes here
    listMessages();
}
- Now, after the form is submitted, you should see the new message on the page!