yolov5
 yolov5 copied to clipboard
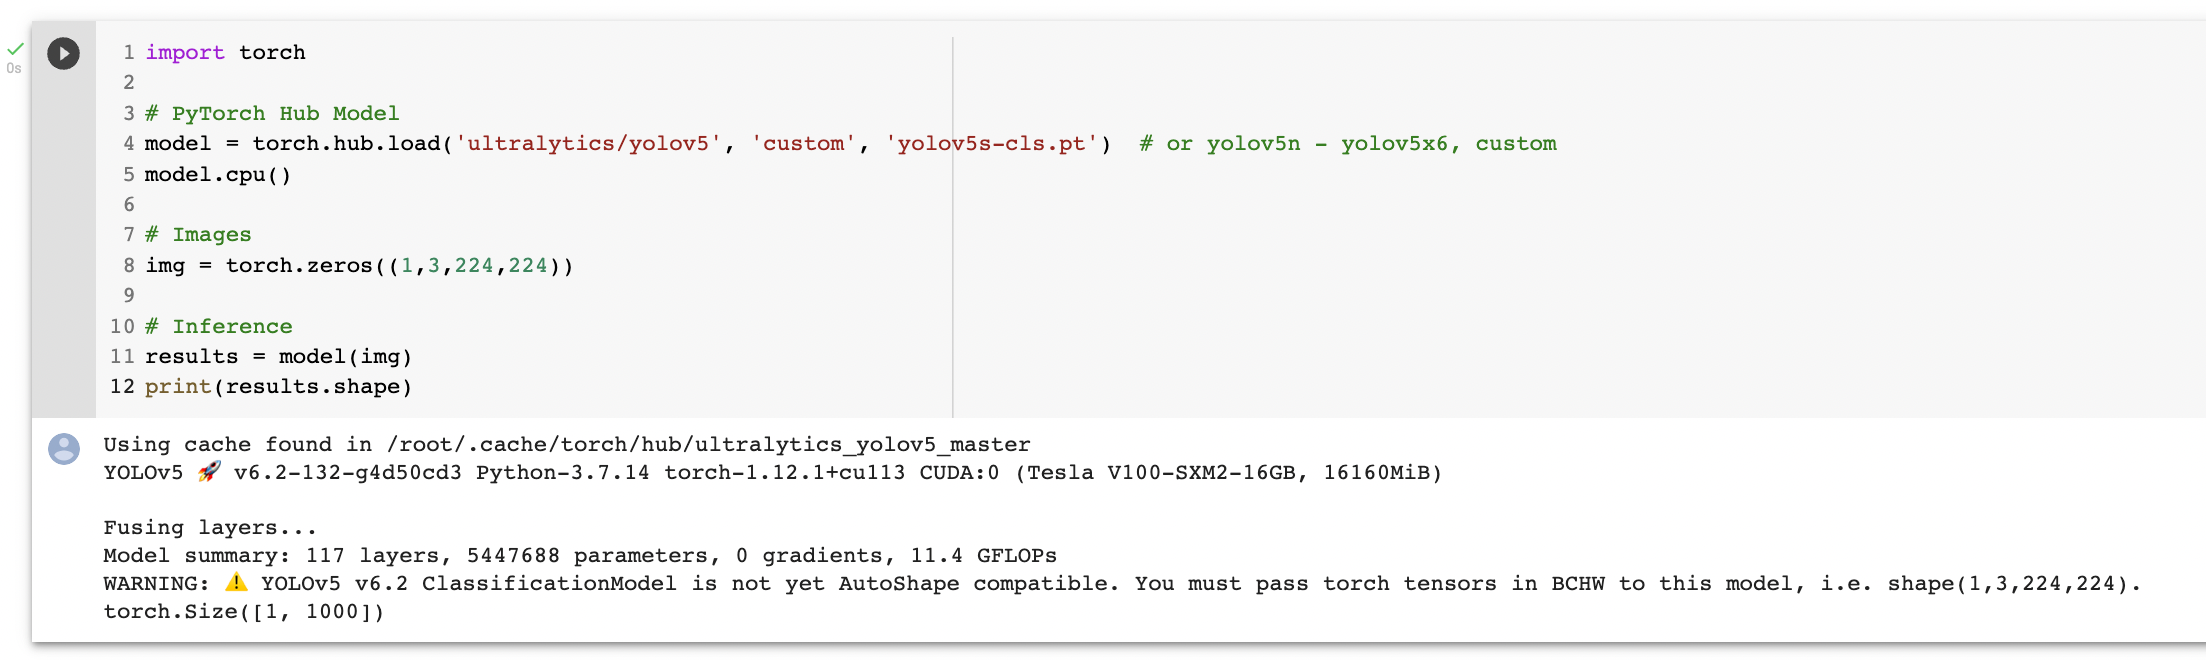
classification model input
Search before asking
- [X] I have searched the YOLOv5 issues and discussions and found no similar questions.
Question
"ClassificationModel is not yet AutoShape compatible. You must pass torch tensors in BCHW to this model, i.e. shape(1,3,224,224)." even when i pass it as mentioned, it gives an error like "expected scalar type Byte but found Float" , could you please give a prediction example for model = torch.hub.load('ultralytics/yolov5', 'custom', 'yolov5s-cls.pt')
Additional
No response
👋 Hello @lordfarquad3211, thank you for your interest in YOLOv5 🚀! Please visit our ⭐️ Tutorials to get started, where you can find quickstart guides for simple tasks like Custom Data Training all the way to advanced concepts like Hyperparameter Evolution.
If this is a 🐛 Bug Report, please provide screenshots and minimum viable code to reproduce your issue, otherwise we can not help you.
If this is a custom training ❓ Question, please provide as much information as possible, including dataset images, training logs, screenshots, and a public link to online W&B logging if available.
For business inquiries or professional support requests please visit https://ultralytics.com or email [email protected].
Requirements
Python>=3.7.0 with all requirements.txt installed including PyTorch>=1.7. To get started:
git clone https://github.com/ultralytics/yolov5  # clone
cd yolov5
pip install -r requirements.txt  # install
Environments
YOLOv5 may be run in any of the following up-to-date verified environments (with all dependencies including CUDA/CUDNN, Python and PyTorch preinstalled):
-
Google Colab and Kaggle notebooks with free GPU:


- Google Cloud Deep Learning VM. See GCP Quickstart Guide
- Amazon Deep Learning AMI. See AWS Quickstart Guide
-
Docker Image. See Docker Quickstart Guide

Status
![]()
If this badge is green, all YOLOv5 GitHub Actions Continuous Integration (CI) tests are currently passing. CI tests verify correct operation of YOLOv5 training (train.py), validation (val.py), inference (detect.py) and export (export.py) on macOS, Windows, and Ubuntu every 24 hours and on every commit.
@lordfarquad3211 I think you need this.
import torch
import torch.nn.functional as F
from PIL import Image
from torchvision import transforms as T

IMAGENET_MEAN = 0.485, 0.456, 0.406
IMAGENET_STD = 0.229, 0.224, 0.225

model = torch.hub.load("ultralytics/yolov5", "custom",
                       "./best.pt")


def classify_transforms(size=224):
    return T.Compose([T.ToTensor(), T.Resize(size), T.CenterCrop(size), T.Normalize(IMAGENET_MEAN, IMAGENET_STD)])


image = Image.open("./2.jpeg")
transformations = classify_transforms()
convert_tensor = transformations(image)
convert_tensor = convert_tensor.unsqueeze(0)

results = model(convert_tensor)
pred = F.softmax(results, dim=1)

for i, prob in enumerate(pred):
    top5i = prob.argsort(0, descending=True)[:5].tolist()
    text = '\n'.join(f'{prob[j]:.2f} {model.names[j]}' for j in top5i)
    print(text)
👋 Hello, this issue has been automatically marked as stale because it has not had recent activity. Please note it will be closed if no further activity occurs.
Access additional YOLOv5 🚀 resources:
- Wiki – https://github.com/ultralytics/yolov5/wiki
- Tutorials – https://docs.ultralytics.com/yolov5
- Docs – https://docs.ultralytics.com
Access additional Ultralytics ⚡ resources:
- Ultralytics HUB – https://ultralytics.com/hub
- Vision API – https://ultralytics.com/yolov5
- About Us – https://ultralytics.com/about
- Join Our Team – https://ultralytics.com/work
- Contact Us – https://ultralytics.com/contact
Feel free to inform us of any other issues you discover or feature requests that come to mind in the future. Pull Requests (PRs) are also always welcomed!
Thank you for your contributions to YOLOv5 🚀 and Vision AI ⭐!
## Model Inferencing For Image Classification
import torch
from PIL import Image
import torch.nn.functional as F
from torchvision import transforms as T
from PIL import Image, ImageDraw, ImageFont
import pathlib
import cv2
import os
temp = pathlib.PosixPath
pathlib.PosixPath = pathlib.WindowsPath


IMAGENET_MEAN = 0.485, 0.456, 0.406
IMAGENET_STD = 0.229, 0.224, 0.225

model = torch.hub.load("ultralytics/yolov5", "custom",
                       "runs/best.pt")

def classify_transforms(size=224):
    return T.Compose([T.ToTensor(), T.Resize(size), T.CenterCrop(size), T.Normalize(IMAGENET_MEAN, IMAGENET_STD)])

imgs = "val_data/imgs.png"
image = Image.open(imgs)
transformations = classify_transforms()
convert_tensor = transformations(image)
convert_tensor = convert_tensor.unsqueeze(0)

results = model(convert_tensor)
print(results)
pred = F.softmax(results, dim=1)

for i, prob in enumerate(pred):
    top5i = prob.argsort(0, descending=True)[:5].tolist()
    text = '\n'.join(f'{prob[j]:.2f} {model.names[j]}' for j in top5i)
    print(text)

save_img = imgs
if save_img:  # Add text to image
    infer_image = Image.open(imgs)
    draw = ImageDraw.Draw(infer_image)
    font = ImageFont.truetype("fonts/16020_FUTURAM.ttf", size=14)
    draw.text((10,10), text = text,
                fill=(0, 0, 0),
                font=font)
    infer_image.show()

if save_img:
    cv2.imwrite('new.jpg', infer_image)
    print("[INFO] Image saved Successfully.")
Result looks like this:
Hi, for some reason your example didn't work for me.
## Model Inferencing For Image Classification
import torch
from PIL import Image
import torch.nn.functional as F
from torchvision import transforms as T
from PIL import Image, ImageDraw, ImageFont
import pathlib
import cv2
import os
temp = pathlib.PosixPath
pathlib.PosixPath = pathlib.WindowsPath

IMAGENET_MEAN = 0.485, 0.456, 0.406
IMAGENET_STD = 0.229, 0.224, 0.225

model = torch.hub.load("ultralytics/yolov5", "custom","C:/Users/Admin/Downloads/yolov5-master/yolov5-master/runs/train-cls/exp9/weights/last.pt")

def classify_transforms(size=224):
    return T.Compose([T.ToTensor(), T.Resize(size), T.CenterCrop(size), T.Normalize(IMAGENET_MEAN, IMAGENET_STD)])

imgs = "C:/Users/Admin/Desktop/581ba937-00B0D1F3F5F7EF1B6B575C09EEEEC63B.jpg"
image = Image.open(imgs)
transformations = classify_transforms()
convert_tensor = transformations(image)
convert_tensor = convert_tensor.unsqueeze(0)

results = model(convert_tensor)
print(results)

@binn77, I think the issue is, that your data is on CPU while the model/weight is on GPU.
I had the same issue, after adding 2 lines of code to load the data to GPU/CUDA, the error was gone. I added:
device = torch.device("cuda:0" if torch.cuda.is_available() else "cpu")
convert_tensor = convert_tensor.to(device)
so the code looks as followed:
import torch
import torch.nn.functional as F
from torchvision import transforms as T

device = torch.device("cuda:0" if torch.cuda.is_available() else "cpu")

IMAGENET_MEAN = 0.485, 0.456, 0.406
IMAGENET_STD = 0.229, 0.224, 0.225

def classify_transforms(size=224):
    return T.Compose([T.ToTensor(), T.Resize(size), T.CenterCrop(size), T.Normalize(IMAGENET_MEAN, IMAGENET_STD)])

image = Image.open(testImage)
transformations = classify_transforms()
convert_tensor = transformations(image)
convert_tensor = convert_tensor.unsqueeze(0)
convert_tensor = convert_tensor.to(device)

results = model(convert_tensor)

pred = F.softmax(results, dim=1)
pred

for i, prob in enumerate(pred):
    top5i = prob.argsort(0, descending=True)[:5].tolist()
    text = '\n'.join(f'{prob[j]:.2f} {model.names[j]}' for j in top5i)
    print(text)
You can do like this:
Function for transformation:
#frame or image
def make_tensor_transform(frame): #image = frame.convert('RGB')
#Define the transformation to resize the image to (224, 224) and convert to tensor
transform = transforms.Compose([
    transforms.Resize((224, 224)),
    transforms.ToTensor(),
])

# Apply the transformation to the image
input_tensor = transform(frame).unsqueeze(0)  # Add a batch dimension

# Ensure the input tensor has the correct shape (1, 3, 224, 224)
#print(input_tensor.shape)  # Output should be torch.Size([1, 3, 224, 224])
return input_tensor
#Making detections frame_rgb = cv2.cvtColor(frame, cv2.COLOR_BGR2RGB) input_tensor = make_tensor_transform(Image.fromarray(frame_rgb)) #argument is like this because of using cv2 and PIL in function results = model(input_tensor) pred = F.softmax(results, dim=1)
And now, pred can be used for class probabilities in frame or picture
@ljubanradisin sure! Here's a friendly and professional reply to the YOLOv5 GitHub issue:
Hi there,
To make detections and obtain class probabilities for each frame or image using YOLOv5, you can follow the steps outlined below:
- Define a function called
make_tensor_transformthat takes in a frame or image as an argument. - Inside the function, convert the frame or image to RGB format if necessary using OpenCV's
cvtColorfunction. - Define a transformation using the
torchvision.transforms.Composefunction. This transformation should resize the image to (224, 224) and convert it to a tensor. - Apply the transformation to the frame or image using the
transformfunction. - Add a batch dimension to the input tensor using the
unsqueezefunction. - Ensure that the input tensor has the correct shape of (1, 3, 224, 224) for YOLOv5.
- Pass the input tensor through the YOLOv5 model to obtain the detection results.
- Apply the softmax function to the results to obtain class probabilities.
- You can now use the class probabilities for each frame or image as needed.
Here's an example of the code:
import cv2
import torch
import torch.nn.functional as F
from torchvision import transforms

def make_tensor_transform(frame):
    frame_rgb = cv2.cvtColor(frame, cv2.COLOR_BGR2RGB)
    transform = transforms.Compose([
        transforms.Resize((224, 224)),
        transforms.ToTensor(),
    ])
    input_tensor = transform(frame_rgb).unsqueeze(0)
    return input_tensor

# Make detections
frame = cv2.imread("image.jpg")
input_tensor = make_tensor_transform(frame)
results = model(input_tensor)
pred = F.softmax(results, dim=1)

# Use the class probabilities in your frame or image as needed
Hope this helps! Let me know if you have any further questions.
Remember to remove any links or URLs from the reply before posting it.
@glenn-jocher when running yolov5 classification with the custom model and using the above for image preprocessing (just included also normalisation) i get slightly different prediction values compared to running the same model/images on Colab. the values are off mostly by +- 0.05, sometimes more. is there anything else that should be done with image pre-processing to get the same values as in Colab?
@BeataK2 hi there,
Thank you for reaching out. It's not unusual to see slight differences in prediction values when running YOLOv5 models on different platforms or environments. These differences can be attributed to variations in hardware, software settings, and random seed initialization.
To ensure consistent prediction values between runs, you can try the following:
-
Check the versions of the dependencies (PyTorch, torchvision, etc.) you're using on both Colab and your local environment. Make sure they are the same or as close as possible.
-
Ensure that the random seed is set to the same value before running the models on both platforms. This can help reduce randomness in the process and improve consistency.
-
Double-check the normalization values used in the image pre-processing. Confirm that the means and standard deviations used for normalization are the same on both platforms. Even minor differences can affect the prediction values.
Please note that while it's possible to achieve similar prediction values, it's highly unlikely to achieve exactly the same values due to differences in hardware and software configurations.
I hope this clarifies the situation. If you have any further questions, please feel free to ask.
Thank you!
@glenn-jocher thank you so much for a very quick response, very useful suggestions, it helped to resolved the issue! i've checked that Colab used albumentations for image preprocessing during the training. Tried the below and now during the inference offline get exactly the same values as in Colab. thank you again for your help!
import albumentations as A from albumentations.pytorch import ToTensorV2 # Import the ToTensorV2 module
preprocess the image using Albumentations
def preprocess_image_albumentations(image):
preprocessing_pipeline = A.Compose([
    A.Resize(height=224, width=224),
    A.Normalize(mean=(0.485, 0.456, 0.406), std=(0.229, 0.224, 0.225), max_pixel_value=255.0),
    ToTensorV2(always_apply=True, p=1.0, transpose_mask=False)
])

image_np = np.array(image)

# Apply the preprocessing pipeline to the image
preprocessed_image = preprocessing_pipeline(image=image)['image']
preprocessed_image = preprocessed_image.unsqueeze(0)
return preprocessed_image
@BeataK2 hi there,
You're welcome! I'm glad to hear that my suggestions were helpful and that you were able to resolve the issue.
It seems that the difference in prediction values between your local environment and Colab was related to the image preprocessing. It's great to see that using Albumentations for image preprocessing in your offline inference script has resulted in exactly the same values as in Colab.
Your code snippet looks correct and should be appropriate for preprocessing the image using Albumentations. By applying the resize, normalization, and ToTensorV2 transformations, you're ensuring that the input image is processed in the same way as in Colab.
If you have any further questions or encounter any more issues, please don't hesitate to ask. I'm here to help!
Thank you for reaching out and thank you for your kind words!
@glenn-jocher thank you so much for a very quick response, very useful suggestions, it helped to resolved the issue! i've checked that Colab used albumentations for image preprocessing during the training. Tried the below and now during the inference offline get exactly the same values as in Colab. thank you again for your help!
import albumentations as A from albumentations.pytorch import ToTensorV2 # Import the ToTensorV2 module
preprocess the image using Albumentations
def preprocess_image_albumentations(image):
preprocessing_pipeline = A.Compose([
    A.Resize(height=224, width=224),
    A.Normalize(mean=(0.485, 0.456, 0.406), std=(0.229, 0.224, 0.225), max_pixel_value=255.0),
    ToTensorV2(always_apply=True, p=1.0, transpose_mask=False)
])

image_np = np.array(image)

# Apply the preprocessing pipeline to the image
preprocessed_image = preprocessing_pipeline(image=image)['image']
preprocessed_image = preprocessed_image.unsqueeze(0)
return preprocessed_image
@BeataK2 please can you share the full code to classify
@VYRION-Ai
You're welcome! I'm glad I could assist you in resolving the issue. It's great to hear that using Albumentations for image preprocessing during training and applying the provided code snippet for offline inference has resulted in exactly the same values as in Colab.
To further assist you with classifying images, I would need the full code or more specific details about your requirements. Please provide the necessary information, and I'll be happy to help you with the classification code.
Looking forward to your response.
Thank you!
@glenn-jocher @BeataK2 i use this code it do classification but the accuracy of class is low , i mean , when classify class is classify correctly but with low accuracy value , example normal yolo gives 95% for class but this code gives 65% , so what should i do
`import albumentations as A
from albumentations.pytorch import ToTensorV2 # Import the ToTensorV2 module
import os
import cv2

import numpy as np

import matplotlib.pyplot as plt
import numpy as np

def preprocess_image_albumentations(image):
  preprocessing_pipeline = A.Compose([
    A.Resize(height=128, width=128),
    A.Normalize(mean=(0.485, 0.456, 0.406), std=(0.229, 0.224, 0.225), max_pixel_value=255.0),
    ToTensorV2(always_apply=True, p=1.0, transpose_mask=False)])


  image_np = np.array(image)

  # Apply the preprocessing pipeline to the image
  preprocessed_image = preprocessing_pipeline(image=image)['image']
  preprocessed_image = preprocessed_image.unsqueeze(0)

  return preprocessed_image

i=cv2.imread('e.jpg')
image=preprocess_image_albumentations(i)
image = image.to('cuda')
results = model_yolv5_c(image)

output = F.softmax(results, dim=1)
label_idx = torch.argmax(output)
print(label_idx)`
@VYRION-Ai it looks like you might be facing challenges with the accuracy of your classification using the YOLOv5 model and the provided preprocessing code. There are a few potential reasons why you might be experiencing lower accuracy compared to what you expect.
Here are some steps you can take to potentially improve your classification accuracy:
-
Ensure that the mean and standard deviation used in the normalization step (
A.Normalize) match the values used during training. Inconsistencies here can lead to lower accuracy. -
Double-check the resizing dimensions in the
A.Resizestep. If the training data was resized to different dimensions, the model's performance might be affected. -
Review your training data to ensure sufficient diversity and coverage of your target classes. Inadequate training data can lead to lower classification accuracy.
-
Consider fine-tuning your YOLOv5 model on your specific classification task. Fine-tuning can help the model adapt to your specific data and potentially improve accuracy.
-
Verify that the inference data, in this case, the "e.jpg" image, is consistent with the distribution of your training data. Incongruent data distributions can affect the model's performance.
By addressing these potential issues, you may be able to improve the accuracy of your classification results. It's also important to note that deep learning models can have different accuracy levels based on various factors, including training data, model architecture, and the specific task at hand.
I hope this guidance helps you move closer to achieving your desired classification accuracy. If you have further questions or need additional support, feel free to ask!
Best of luck and thank you for reaching out!