yolov5
 yolov5 copied to clipboard
Load YOLOv5 from PyTorch Hub ⭐
📚 This guide explains how to load YOLOv5 🚀 from PyTorch Hub https://pytorch.org/hub/ultralytics_yolov5. See YOLOv5 Docs for additional details. UPDATED 26 March 2023.
Before You Start
Install requirements.txt in a Python>=3.7.0 environment, including PyTorch>=1.7. Models and datasets download automatically from the latest YOLOv5 release.
pip install -r https://raw.githubusercontent.com/ultralytics/yolov5/master/requirements.txt
💡 ProTip: Cloning https://github.com/ultralytics/yolov5 is not required 😃
Load YOLOv5 with PyTorch Hub
Simple Example
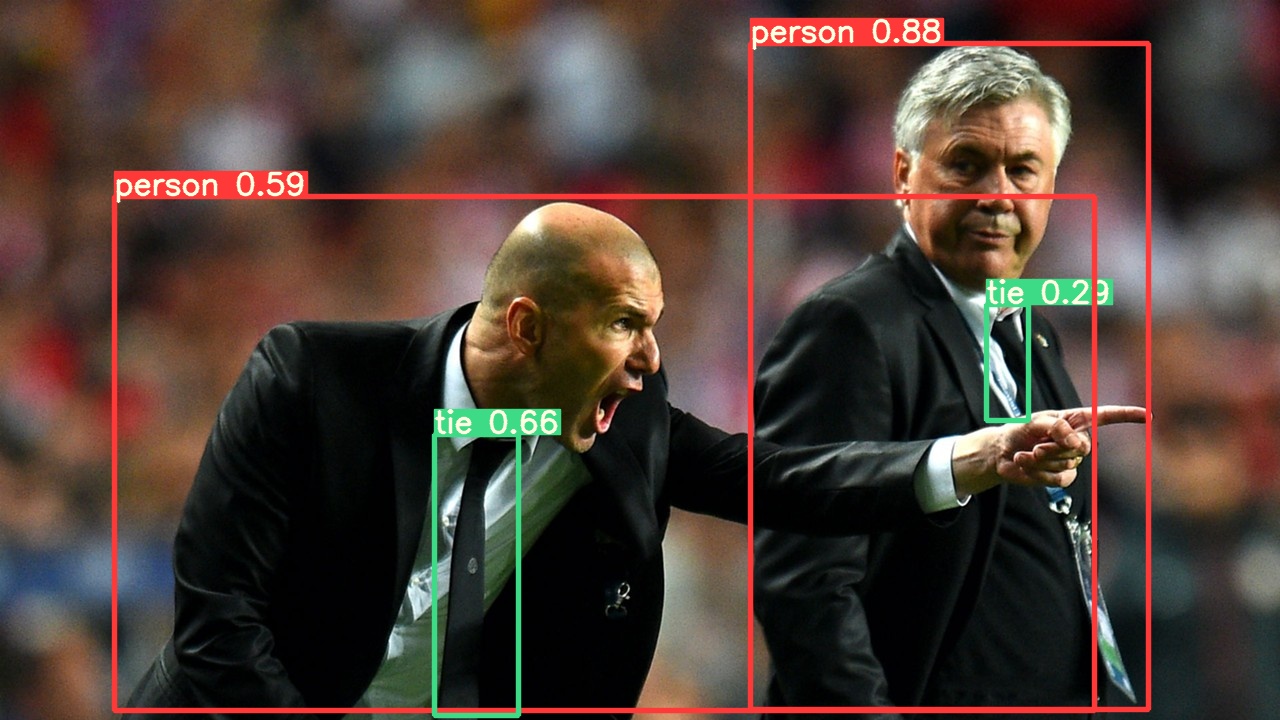
This example loads a pretrained YOLOv5s model from PyTorch Hub as model and passes an image for inference. 'yolov5s' is the lightest and fastest YOLOv5 model. For details on all available models please see the README.
import torch

# Model
model = torch.hub.load('ultralytics/yolov5', 'yolov5s')

# Image
im = 'https://ultralytics.com/images/zidane.jpg'

# Inference
results = model(im)

results.pandas().xyxy[0]
#      xmin    ymin    xmax   ymax  confidence  class    name
# 0  749.50   43.50  1148.0  704.5    0.874023      0  person
# 1  433.50  433.50   517.5  714.5    0.687988     27     tie
# 2  114.75  195.75  1095.0  708.0    0.624512      0  person
# 3  986.00  304.00  1028.0  420.0    0.286865     27     tie
Detailed Example
This example shows batched inference with PIL and OpenCV image sources. results can be printed to console, saved to runs/hub, showed to screen on supported environments, and returned as tensors or pandas dataframes.
import cv2
import torch
from PIL import Image
# Model
model = torch.hub.load('ultralytics/yolov5', 'yolov5s')
# Images
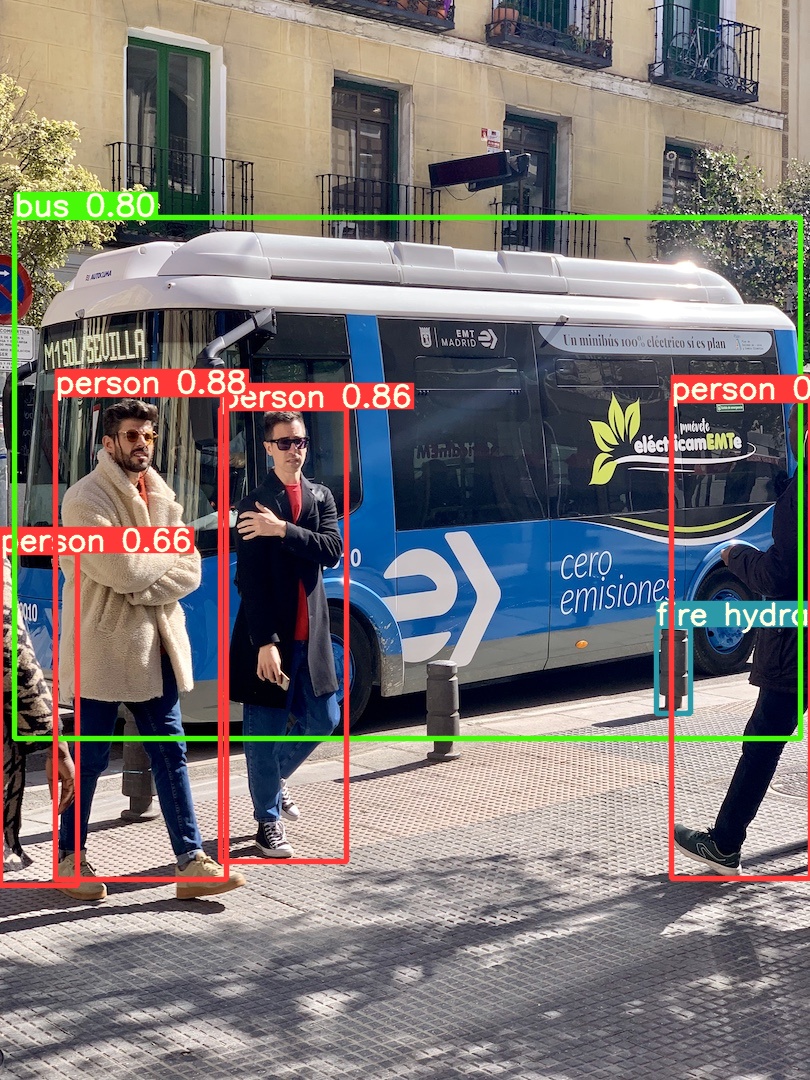
for f in 'zidane.jpg', 'bus.jpg':
torch.hub.download_url_to_file('https://ultralytics.com/images/' + f, f) # download 2 images
im1 = Image.open('zidane.jpg') # PIL image
im2 = cv2.imread('bus.jpg')[..., ::-1] # OpenCV image (BGR to RGB)
# Inference
results = model([im1, im2], size=640) # batch of images
# Results
results.print()
results.save() # or .show()
results.xyxy[0] # im1 predictions (tensor)
results.pandas().xyxy[0] # im1 predictions (pandas)
# xmin ymin xmax ymax confidence class name
# 0 749.50 43.50 1148.0 704.5 0.874023 0 person
# 1 433.50 433.50 517.5 714.5 0.687988 27 tie
# 2 114.75 195.75 1095.0 708.0 0.624512 0 person
# 3 986.00 304.00 1028.0 420.0 0.286865 27 tie
For all inference options see YOLOv5 AutoShape() forward method:
https://github.com/ultralytics/yolov5/blob/30e4c4f09297b67afedf8b2bcd851833ddc9dead/models/common.py#L243-L252
Inference Settings
YOLOv5 models contain various inference attributes such as confidence threshold, IoU threshold, etc. which can be set by:
model.conf = 0.25  # NMS confidence threshold
      iou = 0.45  # NMS IoU threshold
      agnostic = False  # NMS class-agnostic
      multi_label = False  # NMS multiple labels per box
      classes = None  # (optional list) filter by class, i.e. = [0, 15, 16] for COCO persons, cats and dogs
      max_det = 1000  # maximum number of detections per image
      amp = False  # Automatic Mixed Precision (AMP) inference

results = model(im, size=320)  # custom inference size
Device
Models can be transferred to any device after creation:
model.cpu()  # CPU
model.cuda()  # GPU
model.to(device)  # i.e. device=torch.device(0)
Models can also be created directly on any device:
model = torch.hub.load('ultralytics/yolov5', 'yolov5s', device='cpu') # load on CPU
💡 ProTip: Input images are automatically transferred to the correct model device before inference.
Silence Outputs
Models can be loaded silently with _verbose=False:
model = torch.hub.load('ultralytics/yolov5', 'yolov5s', _verbose=False) # load silently
Input Channels
To load a pretrained YOLOv5s model with 4 input channels rather than the default 3:
model = torch.hub.load('ultralytics/yolov5', 'yolov5s', channels=4)
In this case the model will be composed of pretrained weights except for the very first input layer, which is no longer the same shape as the pretrained input layer. The input layer will remain initialized by random weights.
Number of Classes
To load a pretrained YOLOv5s model with 10 output classes rather than the default 80:
model = torch.hub.load('ultralytics/yolov5', 'yolov5s', classes=10)
In this case the model will be composed of pretrained weights except for the output layers, which are no longer the same shape as the pretrained output layers. The output layers will remain initialized by random weights.
Force Reload
If you run into problems with the above steps, setting force_reload=True may help by discarding the existing cache and force a fresh download of the latest YOLOv5 version from PyTorch Hub.
model = torch.hub.load('ultralytics/yolov5', 'yolov5s', force_reload=True) # force reload
Screenshot Inference
To run inference on your desktop screen:
import torch
from PIL import ImageGrab

# Model
model = torch.hub.load('ultralytics/yolov5', 'yolov5s')

# Image
im = ImageGrab.grab()  # take a screenshot

# Inference
results = model(im)
Multi-GPU Inference
YOLOv5 models can be be loaded to multiple GPUs in parallel with threaded inference:
import torch
import threading

def run(model, im):
  results = model(im)
  results.save()

# Models
model0 = torch.hub.load('ultralytics/yolov5', 'yolov5s', device=0)
model1 = torch.hub.load('ultralytics/yolov5', 'yolov5s', device=1)

# Inference
threading.Thread(target=run, args=[model0, 'https://ultralytics.com/images/zidane.jpg'], daemon=True).start()
threading.Thread(target=run, args=[model1, 'https://ultralytics.com/images/bus.jpg'], daemon=True).start()
Training
To load a YOLOv5 model for training rather than inference, set autoshape=False. To load a model with randomly initialized weights (to train from scratch) use pretrained=False. You must provide your own training script in this case. Alternatively see our YOLOv5 Train Custom Data Tutorial for model training.
model = torch.hub.load('ultralytics/yolov5', 'yolov5s', autoshape=False)  # load pretrained
model = torch.hub.load('ultralytics/yolov5', 'yolov5s', autoshape=False, pretrained=False)  # load scratch
Base64 Results
For use with API services. See https://github.com/ultralytics/yolov5/pull/2291 and Flask REST API example for details.
results = model(im)  # inference

results.ims # array of original images (as np array) passed to model for inference
results.render()  # updates results.ims with boxes and labels
for im in results.ims:
    buffered = BytesIO()
    im_base64 = Image.fromarray(im)
    im_base64.save(buffered, format="JPEG")
    print(base64.b64encode(buffered.getvalue()).decode('utf-8'))  # base64 encoded image with results
Cropped Results
Results can be returned and saved as detection crops:
results = model(im)  # inference
crops = results.crop(save=True)  # cropped detections dictionary
Pandas Results
Results can be returned as Pandas DataFrames:
results = model(im)  # inference
results.pandas().xyxy[0]  # Pandas DataFrame
Pandas Output (click to expand)
print(results.pandas().xyxy[0])
#      xmin    ymin    xmax   ymax  confidence  class    name
# 0  749.50   43.50  1148.0  704.5    0.874023      0  person
# 1  433.50  433.50   517.5  714.5    0.687988     27     tie
# 2  114.75  195.75  1095.0  708.0    0.624512      0  person
# 3  986.00  304.00  1028.0  420.0    0.286865     27     tie
Sorted Results
Results can be sorted by column, i.e. to sort license plate digit detection left-to-right (x-axis):
results = model(im)  # inference
results.pandas().xyxy[0].sort_values('xmin')  # sorted left-right
Box-Cropped Results
Results can be returned and saved as detection crops:
results = model(im)  # inference
crops = results.crop(save=True)  # cropped detections dictionary
JSON Results
Results can be returned in JSON format once converted to .pandas() dataframes using the .to_json() method. The JSON format can be modified using the orient argument. See pandas .to_json() documentation for details.
results = model(ims)  # inference
results.pandas().xyxy[0].to_json(orient="records")  # JSON img1 predictions
JSON Output (click to expand)
[
{"xmin":749.5,"ymin":43.5,"xmax":1148.0,"ymax":704.5,"confidence":0.8740234375,"class":0,"name":"person"},
{"xmin":433.5,"ymin":433.5,"xmax":517.5,"ymax":714.5,"confidence":0.6879882812,"class":27,"name":"tie"},
{"xmin":115.25,"ymin":195.75,"xmax":1096.0,"ymax":708.0,"confidence":0.6254882812,"class":0,"name":"person"},
{"xmin":986.0,"ymin":304.0,"xmax":1028.0,"ymax":420.0,"confidence":0.2873535156,"class":27,"name":"tie"}
]
Custom Models
This example loads a custom 20-class VOC-trained YOLOv5s model 'best.pt' with PyTorch Hub.
model = torch.hub.load('ultralytics/yolov5', 'custom', path='path/to/best.pt')  # local model
model = torch.hub.load('path/to/yolov5', 'custom', path='path/to/best.pt', source='local')  # local repo
TensorRT, ONNX and OpenVINO Models
PyTorch Hub supports inference on most YOLOv5 export formats, including custom trained models. See TFLite, ONNX, CoreML, TensorRT Export tutorial for details on exporting models.
💡 ProTip: TensorRT may be up to 2-5X faster than PyTorch on GPU benchmarks 💡 ProTip: ONNX and OpenVINO may be up to 2-3X faster than PyTorch on CPU benchmarks
model = torch.hub.load('ultralytics/yolov5', 'custom', path='yolov5s.pt')  # PyTorch
                                                            'yolov5s.torchscript')  # TorchScript
                                                            'yolov5s.onnx')  # ONNX
                                                            'yolov5s_openvino_model/')  # OpenVINO
                                                            'yolov5s.engine')  # TensorRT
                                                            'yolov5s.mlmodel')  # CoreML (macOS-only)
                                                            'yolov5s.tflite')  # TFLite
                                                            'yolov5s_paddle_model/')  # PaddlePaddle
Environments
YOLOv5 may be run in any of the following up-to-date verified environments (with all dependencies including CUDA/CUDNN, Python and PyTorch preinstalled):
-
Notebooks with free GPU:


- Google Cloud Deep Learning VM. See GCP Quickstart Guide
- Amazon Deep Learning AMI. See AWS Quickstart Guide
-
Docker Image. See Docker Quickstart Guide

Status
![]()
If this badge is green, all YOLOv5 GitHub Actions Continuous Integration (CI) tests are currently passing. CI tests verify correct operation of YOLOv5 training, validation, inference, export and benchmarks on MacOS, Windows, and Ubuntu every 24 hours and on every commit.
Can I ask about the meaning of the output? How can I reconstruct as box prediction results via the output? Thanks
@rlalpha if want to run inference, put the model in .eval() mode, and select the first output. These are the predictions, which may then be filtered via NMS:

@rlalpha I've updated pytorch hub functionality now in c4cb78570cfca23d7e0a5aa7b4ee7e8c6b8d998c to automatically append an NMS module to the model when pretrained=True is requested. Anyone using YOLOv5 pretrained pytorch hub models must remove this last layer prior to training now:
model.model = model.model[:-1]
Anyone using YOLOv5 pretrained pytorch hub models directly for inference can now replicate the following code to use YOLOv5 without cloning the ultralytics/yolov5 repository. In this example you see the pytorch hub model detect 2 people (class 0) and 1 tie (class 27) in zidane.jpg. Note there is no repo cloned in the workspace. Also note that ideally all inputs to the model should be letterboxed to the nearest 32 multiple. The second best option is to stretch the image up to the next largest 32-multiple as I've done here with PIL resize.

@rlalpha I've updated pytorch hub functionality now in c4cb785 to automatically append an NMS module to the model when
pretrained=Trueis requested. Anyone using YOLOv5 pretrained pytorch hub models must remove this last layer prior to training now:model.model = model.model[:-1]Anyone using YOLOv5 pretrained pytorch hub models directly for inference can now replicate the following code to use YOLOv5 without cloning the ultralytics/yolov5 repository. In this example you see the pytorch hub model detect 2 people (class 0) and 1 tie (class 27) in zidane.jpg. Note there is no repo cloned in the workspace. Also note that ideally all inputs to the model should be letterboxed to the nearest 32 multiple. The second best option is to stretch the image up to the next largest 32-multiple as I've done here with PIL resize.
I got how to do it now. Thank you for rapid reply.
@rlalpha @justAyaan @MohamedAliRashad this PyTorch Hub tutorial is now updated to reflect the simplified inference improvements in PR #1153. It's very simple now to load any YOLOv5 model from PyTorch Hub and use it directly for inference on PIL, OpenCV, Numpy or PyTorch inputs, including for batched inference. Reshaping and NMS are handled automatically. Example script is shown in above tutorial.
@glenn-jocher calling model = torch.hub.load('ultralytics/yolov5', 'yolov5l', pretrained=True) throws error:
Using cache found in /home/pf/.cache/torch/hub/ultralytics_yolov5_master
Traceback (most recent call last):
  File "<frozen importlib._bootstrap>", line 971, in _find_and_load
  File "<frozen importlib._bootstrap>", line 955, in _find_and_load_unlocked
  File "<frozen importlib._bootstrap>", line 665, in _load_unlocked
  File "<frozen importlib._bootstrap_external>", line 678, in exec_module
  File "<frozen importlib._bootstrap>", line 219, in _call_with_frames_removed
  File "/home/pf/.cache/torch/hub/ultralytics_yolov5_master/models/yolo.py", line 15, in <module>
    from models.common import Conv, Bottleneck, SPP, DWConv, Focus, BottleneckCSP, Concat, NMS, autoShape
  File "/home/pf/.cache/torch/hub/ultralytics_yolov5_master/models/common.py", line 8, in <module>
    from utils.datasets import letterbox
ModuleNotFoundError: No module named 'utils.datasets'; 'utils' is not a package

Process finished with exit code 1
@pfeatherstone thanks for the feedback! Can you try with force_reload=True? Without it the cached repo is used, which may be out of date.
import torch
model = torch.hub.load('ultralytics/yolov5', 'yolov5s', pretrained=True, force_reload=True)
Still doesn't work. I get the following errors:
Downloading: "https://github.com/ultralytics/yolov5/archive/master.zip" to /home/pf/.cache/torch/hub/master.zip
Traceback (most recent call last):
  File "<frozen importlib._bootstrap>", line 971, in _find_and_load
  File "<frozen importlib._bootstrap>", line 955, in _find_and_load_unlocked
  File "<frozen importlib._bootstrap>", line 665, in _load_unlocked
  File "<frozen importlib._bootstrap_external>", line 678, in exec_module
  File "<frozen importlib._bootstrap>", line 219, in _call_with_frames_removed
  File "/home/pf/.cache/torch/hub/ultralytics_yolov5_master/models/yolo.py", line 15, in <module>
    from models.common import Conv, Bottleneck, SPP, DWConv, Focus, BottleneckCSP, Concat, NMS, autoShape
  File "/home/pf/.cache/torch/hub/ultralytics_yolov5_master/models/common.py", line 8, in <module>
    from utils.datasets import letterbox
ModuleNotFoundError: No module named 'utils.datasets'; 'utils' is not a package
Error in atexit._run_exitfuncs:
Traceback (most recent call last):
  File "/usr/local/pycharm-2020.2/plugins/python/helpers/pydev/pydevd.py", line 1785, in stoptrace
    debugger.exiting()
  File "/usr/local/pycharm-2020.2/plugins/python/helpers/pydev/pydevd.py", line 1471, in exiting
    sys.stdout.flush()
ValueError: I/O operation on closed file.

Process finished with exit code 1
@pfeatherstone I've raised a new bug report in https://github.com/ultralytics/yolov5/issues/1181 for your observation. This typically indicates a pip package called utils is installed in your environment, you should pip uninstall utils.
Hi!
I try load model and apply .to(device), but i receive exception: RuntimeError: Expected all tensors to be on the same device, but found at least two devices, cuda:0 and cpu!
@Semihal please raise a bug report with reproducible example code. Thank you.
NMS parameters are model.autoshape() attributes. You can modify them to whatever you want. i.e. model.conf = 0.5 before running inference.
https://github.com/ultralytics/yolov5/blob/784feae30a1a792cd4e28c5dcb51618e6e5d20b5/models/common.py#L121-L127
@p9anand see the autoshape forward method for available arguments: https://github.com/ultralytics/yolov5/blob/94a7f55c4e5cca3dfe4de0bd0793173d5b152ec5/models/common.py#L131-L138
Custom model loading has been simplified now with PyTorch Hub in PR https://github.com/ultralytics/yolov5/pull/1677 🚀
Custom Models
This example loads a custom 20-class VOC-trained YOLOv5s model 'yolov5s_voc_best.pt' with PyTorch Hub.
model = torch.hub.load('ultralytics/yolov5', 'custom', path_or_model='yolov5s_voc_best.pt')
model = model.autoshape()  # for PIL/cv2/np inputs and NMS
Where can I see the code for the results methods offered through pytorch hub? i.e results.print(), results.save(), etc
@EconML results is a Detections() instance, defined in models/common.py:
https://github.com/ultralytics/yolov5/blob/c0ffcdf998aa0e00f1f39e79ee8124b74b53d23f/models/common.py#L190-L191
#I want to know how show the result in OpenCV cv.imshow
Now these results work well, as follows results.print() # print results to screen results.show() # display results results.save() # save as results1.jpg, results2.jpg... etc.
But I want to know how to cv2.imshow("Results", ????)
@Lifeng1129 I've heard this request before, so I've created and merged a new PR #1897 to add this capability. To receive this update you'll need to force_reload your pytorch hub cache:
model = torch.hub.load('ultralytics/yolov5', 'yolov5s', pretrained=True, force_reload=True)
Then you can use the new results.render() method to return you a list of np arrays representing the original images annotated with the predicted bounding boxes. Note that cv2 usage of the images will require a RGB to BGR conversion, i.e.:
results = model(imgs)
im_list = results.render()
cv2.imshow(im_list[0][..., ::-1])  # show image 0 with RGB to BGR conversion
@glenn-jocher , loading the model using torch.hub is a great functionality. Nevertheless, I am trying to deploy the custom trained model in an isolated environment and it's being weird...
I sucessfully generate the model using torch.hub, save it and load it again in the same py script (test.py):

However, when I try to load the model from the previously saved file in a second py script (test2.py), it fails:

Both scripts are in the same location:

What's the best way to do this? Thanks in advance
@jmanuelnavarro hub does not need network connectivity. Load the model with your first method as that's working.
@dan0nchik that's a good question. There's no capability for this currently. It would be nice to have something like results.save('path/to/dir') right?
@dan0nchik I've implemented your feature idea in PR #2179. You can now pass a directory to save results to:
results.save()  # save to current directory
results.save('path/to/dir')  # save to specific directory
Hello again
Can you please add a flag or something to the display function, so original picture names would be saved?
For example:
results.save(save_orig_names=True) # save as results_zidane.jpg, results_bus.jpg... etc.
I've tried to implement that, but I couldn't test :(