HyperkinDukeBootanim
 HyperkinDukeBootanim copied to clipboard
Xbox One Hyperkin Duke Controller - Info about changing bootanimation
HyperkinDukeBootanim
Xbox One Hyperkin Duke Controller Technical research and info about changing the boot/startup-animation
Demo
WARNING
This page describes actions that might damage your device or firmware. Proceed with care! Everything you do is under your own responsibility! No guarantee for correctness of this information is given! You will void your device's warranty!
How to
- Disassemble controller
- Dump the flash chip
- Split out the FAT16 image from the flash dump
- Copy your desired animation video to the filesystem
- Inject the modified FAT16 image back into the flash image
- Write the new data to flash chip
- Test functionality!
- Assemble controller
- Profit
Photos
Check out this page for photos of the device internals:
Photos
USB interface
USB VID: 0x2e24
USB PID: 0x0652
Bootloader mode ?
- Hold Start + Back-button, then plug in the controller
Controller gets detected with following USB interface:
VID: 0x11c0
PID: 0x5500
SoC
Chip Id: GPL32705B (Generalplus)
Product Brief: Generalplus website
Possibly related sourcecode: Github
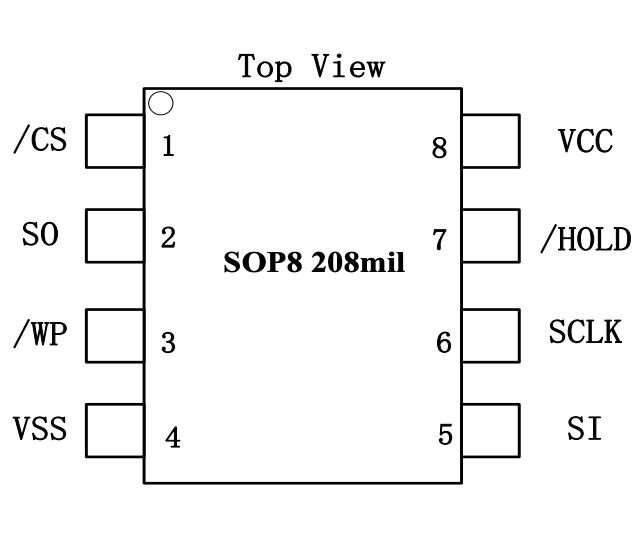
Flash Chip
Chip Id: YC25Q32B (Mfg: YC CHIP)
Packaging: SOIC-8
Size: 4MB
Datasheet: YC Chip Website
Tools
This repository holds following tools:
- convert_video.sh -> Bash script wrapper around ffmpeg video conversion command
- flashdump_tool.py -> Python tool to extract/inject filesystem image and extract bootloader & nvram
Converting a video file
The original bootanimation is 7.96 seconds long, lets assume 8 seconds is also fine
In this example ffmpeg is used for the transcoding
ffmpeg \
  -i input.mp4 \         # Input video file
  -an \                  # Ditch audio stream
  -c:v mjpeg \           # Encode as MJPEG
  -s 240x320 \           # Output resolution: 240x320
  -aspect 3:4 \          # Aspect ratio
  -filter:v fps=fps=25 \ # Frames per second
  -vf "transpose=2" \    # Optional: Rotate 90 degress counter-clockwise
  -ss 00:00:02 -t 8 \    # Optional: Trim video (Start at second 2, duration of 8 seconds)
  test.avi               # Output filename
Check if resulting file looks nice and plays, then copy it into the FAT16 filesystem image.
Dumping / Flashing
Via hardware flasher
The hardware programmer MiniPro TL866II Plus supports it.
Chip gets detected as:
- ACE ACE25QC320G
- BOYA Micro BY25Q32AS
Via SPI
SPI is also an option according to the datasheet.
Raspberry Pi + flashrom can likely be used to interact... (not verified)
UART
Seems unavailable (via stock bootloader at least...)
Memory content
0x00000000-0x00002000 NVRAM
0x00002000-0x0008D000 Bootloader
0x0008D000-0x0010D000 <EMPTY SPACE>
0x0010D000-0x00400000 FAT16 Filesystem image
Bootloader
ALOT of debug strings, bootloader referenced as "GP DV BootLoader v2.2".
Use flash dump tool to extract it from the flash dump.
Disassemble by choosing "ARM Little-Endian" and Load Address "0x2000".
FAT16 filesystem image
Contains a single file, test.avi.
Input #0, avi, from 'test.avi':
  Metadata:
    encoder         : Lavf57.41.100
  Duration: 00:00:07.96, start: 0.000000, bitrate: 1229 kb/s
    Stream #0:0: Video: mjpeg (MJPG / 0x47504A4D), yuvj420p(pc, bt470bg/unknown/unknown), 240x320 [SAR 1:1 DAR 3:4], 1225 kb/s, 25 fps, 25 tbr, 25 tbn, 25 tbc
Checksums
Apparently none for the FAT16 filesystem image.
Mounting the FAT16 image for modification
Linux/Unix
Simply use mount (with msdos-utils / vfat support installed ofc)
mkdir /tmp/fat16volume
mount image.bin /tmp/fat16volume
# Copy new bootanim
cp new_test.avi /tmp/fat16volume/test.avi
sync
# Unmount again
umount /tmp/fat16volume
Windows
Use something like OSFMount
Credits / Sources
Disclaimer
This project is in no way endorsed by or affiliated with Hyperkin (R), or any associated subsidiaries, logos or trademarks.