thunder-client-support
 thunder-client-support copied to clipboard
Thunder Client is a lightweight Rest API Client Extension for VS Code.
![]()
Thunder Client


Thunder Client is a lightweight Rest API Client Extension for Visual Studio Code, hand-crafted by Ranga Vadhineni with a simple and clean design. The source code is not open source. You can report any Bugs Or Feature requests here.
- Voted as #10 Product of the day on Product Hunt
- Website - www.thunderclient.com
- Follow Us for updates - Twitter, LinkedIn
Story behind Thunder Client
- Read Launch Blog Post on Medium
Milestones
- 1 Million downloads on July 13, 2022
- 500K downloads on Dec 20, 2021
- Extension launched on Mar 31, 2021
Menu
- How to Use
- Tech
- Features
- Git Sync
- Code Snippet
- Testing
- Environments
- Set Environment Variable
- Auth
- Cookies
- Path Variables
- System Variables
- Proxy
- Http/2
- Import/Export
- Keyboard Shortcuts
- VS Code Settings
- Contribution
- Privacy
How to Use
- Install the extension, click the Thunder Client icon on the Action Bar.
- From the sidebar click
New Requestbutton to test API - Video: youtube.com/watch?v=NKZ0ahNbmak
- Minimum VS Code version now required is
v1.65.0

Tech
- Thunder Client is built with Javascript, Typescript, Flexbox, Ace Editor, Got, Nedb.
Main Features
- Lightweight Rest API Client for VS Code
- Simple & Easy to use UI
- Supports Collections and Environment variables.
- Scriptless Testing: Test API response easily with GUI based interface .
- Themes: The extension supports VS Code themes.
- Offline & Local Storage: Works offline and saves all the requests data locally on your device.
Git Sync
This feature is useful to share requests with team by saving data in git project.
Integration with the Git is supported by below VS Code settings, choose any one as required. To view Thunder Client settings, open VS Code settings UI and search for Thunder Client to view all the extension settings.
- Save To Workspace: (Recommended) Enable this setting when you like to save requests data in current workspace, this will create
thunder-testsfolder in root of workspace. The extension will load the data automatically when you open the project in VS Code.Workspace Relative Path(Optional): The default location ofthunder-testsfolder is root of workspace. Use settingWorkspace Relative Pathto specify different relative path.(see below examples)- Make sure the
Workspace Relative Pathsetting is Workspace setting not User setting. - Example 1: To save in Child folder of workspace then relative path is
FolderNameorChild/FolderName - Example 2: To save in Parent folder of workspace then relative path is
../
- Custom Location: Use this setting when you like save all the requests data in one fixed location, enter the full folder path to save the data.
- Supports relative path to user root directory. use prefix $HOME. e.g
$HOME/Documents/folderName
- Supports relative path to user root directory. use prefix $HOME. e.g
- WARNING: The Environment file which stores the secrets also saved in the same git folder (see Note: 1 below).
- Note 1: The environments will be stored in
thunderEnvironment.jsonfile, which will be part of thunder-tests folder. If you like to exclude any secrets fromthunderEnvironment.jsonfile then useLocal Environmentto store values locally on your computer - Note 2: Files changes are not detected by the extension yet, if you pulled changes from git, click Reload icon in sidebar.
- Note 3: Please restart VS Code after updating settings.
Code Snippet
The code snippet generation is available for following languages. Open request view and click icon {} to see Code Tab.
Key Features
- Supports most languages including Flutter Dart, PHP Laravel, C#, JS, Python, Swift etc..
- Updates the code snippet in
real-timeas you make changes to Request - You can save the code snippet to
fileor open the snippet on VS Codetabusing

- C# - HttpClient
- cURL
- Dart Http
- Javascipt Fetch & Axios
- Php Laravel
- PowerShell
- Python requests & http.client
- and other languages are powered by httpsnippet
Scriptless Testing
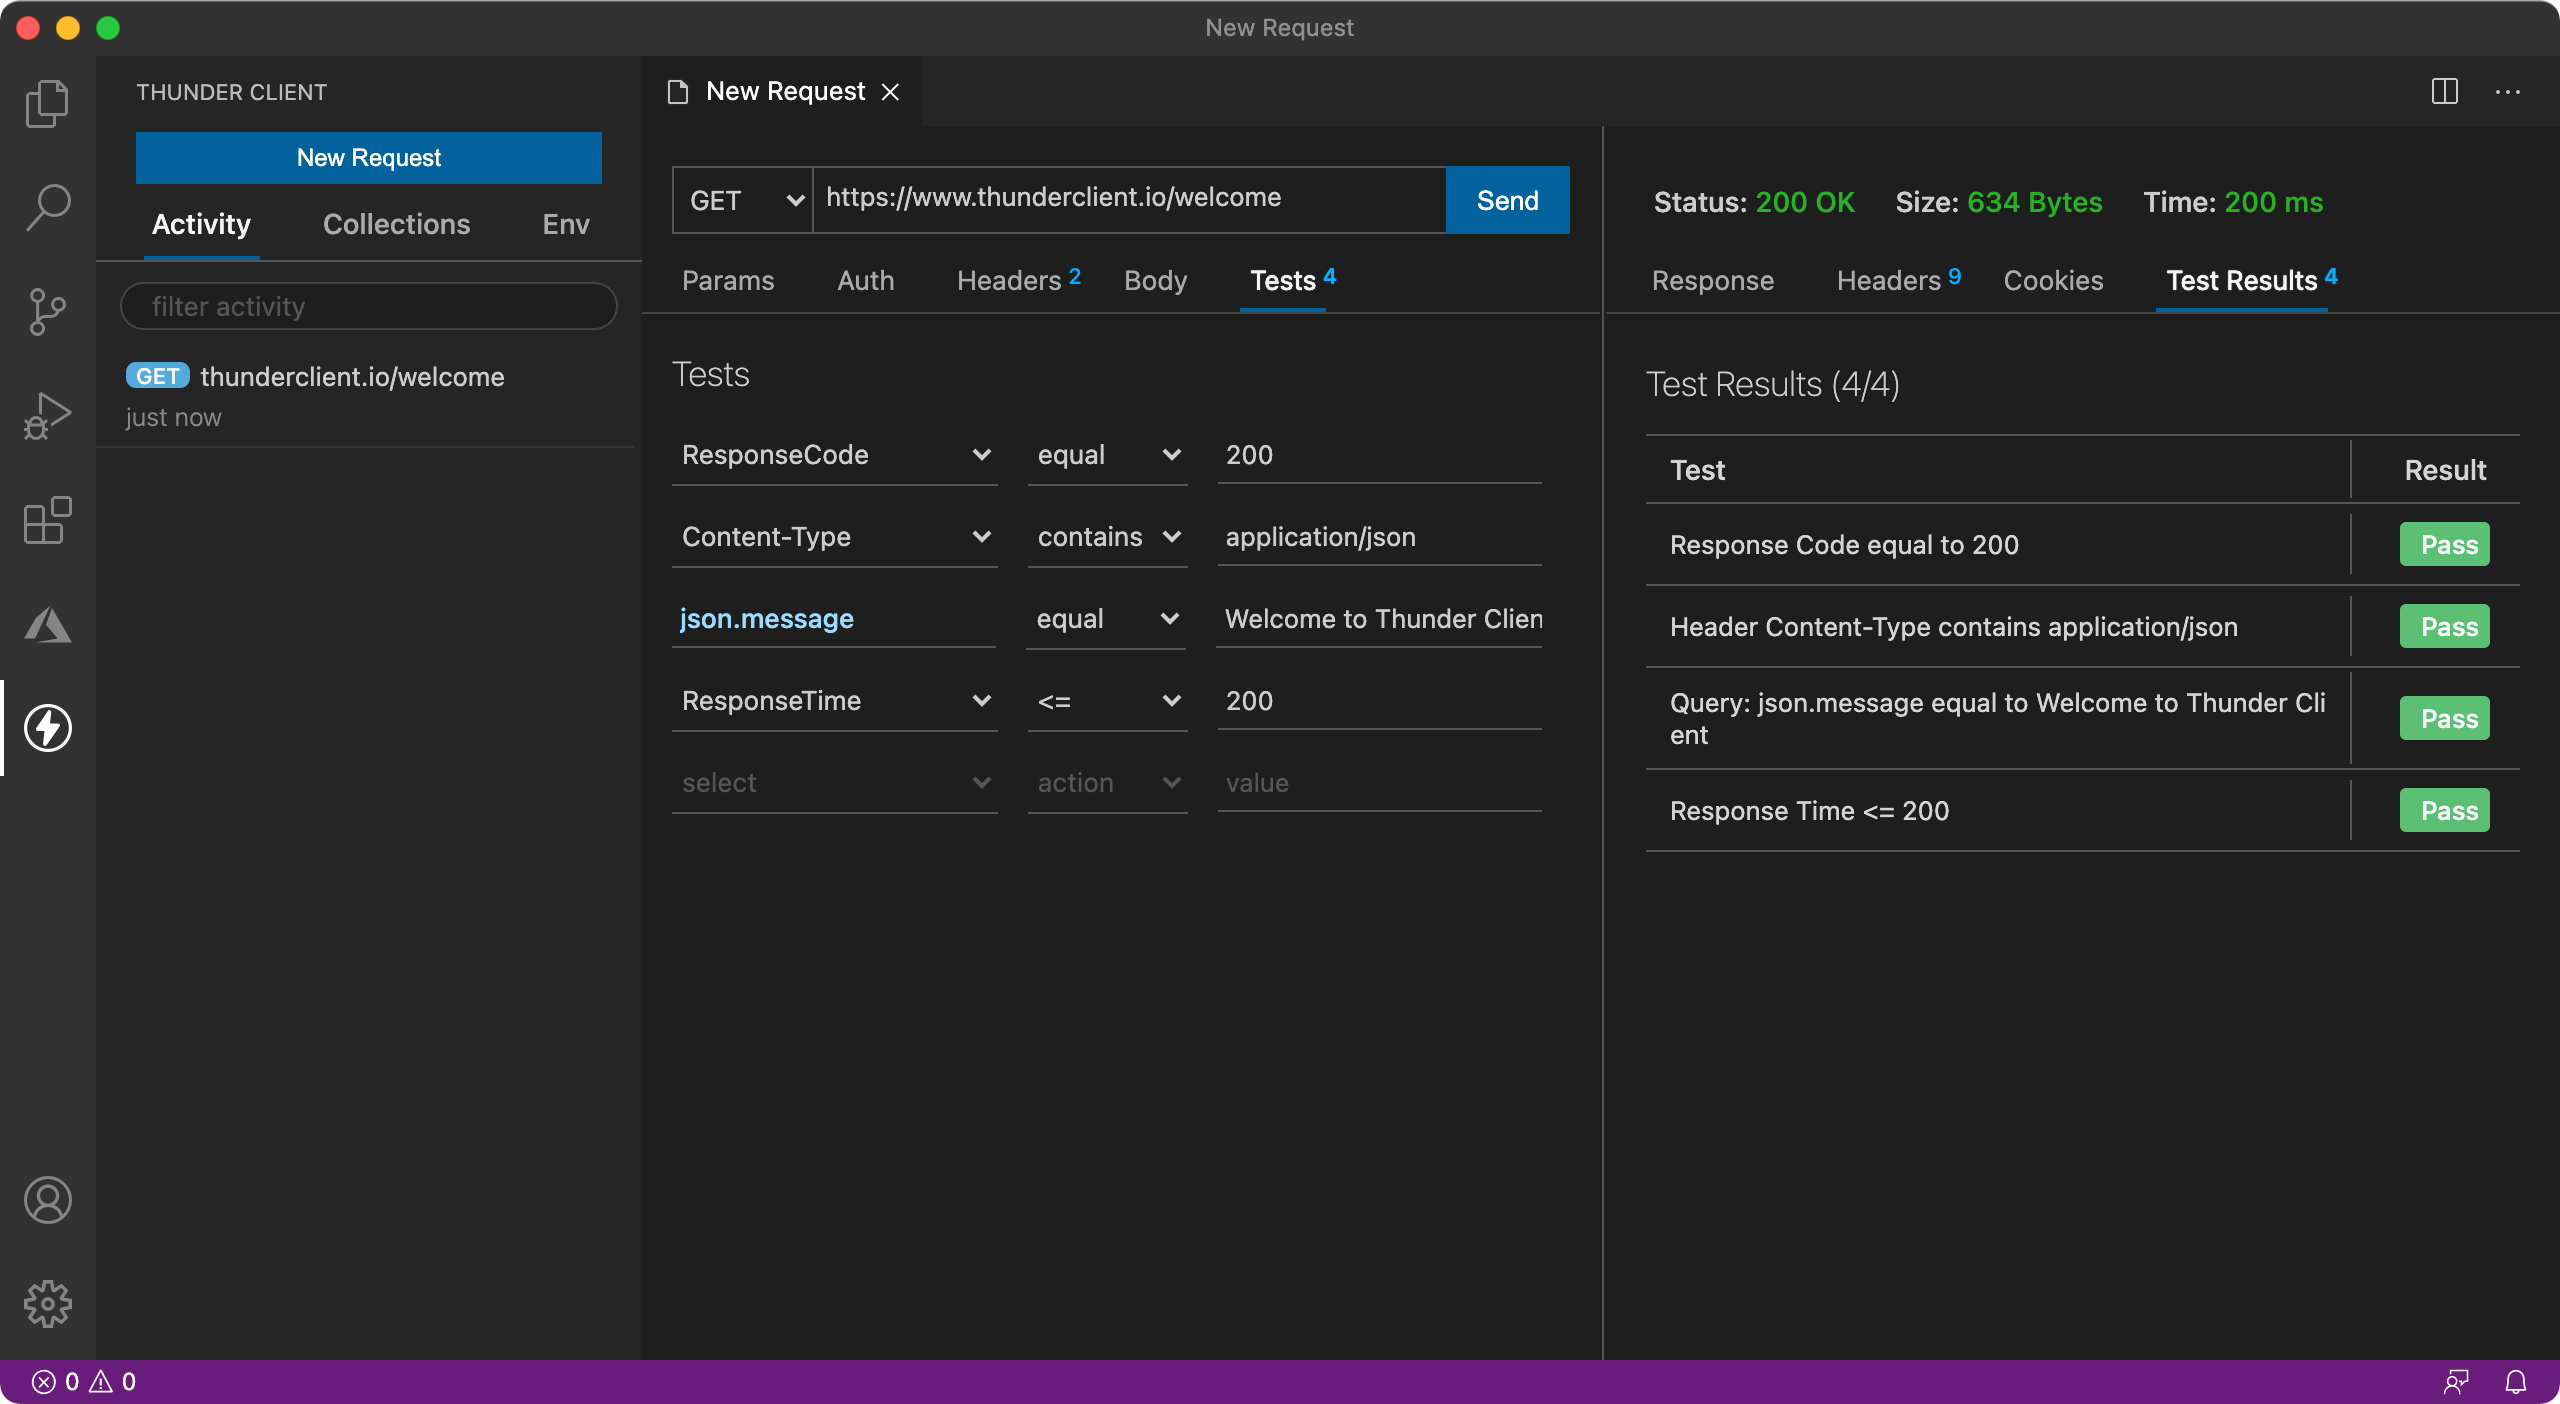
- We need to write a lot of boilerplate code in Postman and other clients to do basic testing using scripting like status code equal 200. So I implemented GUI based tests, where you select a couple of dropdowns to do most standard tests very easily without any scripting knowledge.
- Tests can be done for strings, numbers, count, and type checking
Json schemavalidation- Setting
env variablesis also possible in the Tests section - Re-arrange tests order using drag and drop
- Use Json Query Tests for
Xml Response. ( Xml is converted to Json for tests )
Environment Variables

The following environments can be used in Thunder Client ranked from least precedence to highest precedence.
-
OS Environment Variables: You can use OS System environment variables as global variables using the format
{{variable}} -
Local Environment: You can use Local Environment to save secrets and transient tokens locally on your computer, useful to exclude
secretsfrom git project. This environment is aglobal typeand the variables are available to all collections. The values will not be saved in mainthunderEnvironement.jsonfile (See above image option 3) -
Global Environment: You can use Global Environment to save variables and share with all the collections. The values will stored in main
thunderEnvironment.jsonfile. (See above image option 2) -
env file: You can use
.env filesin Thunder Client. To use a .env file follow the below steps- Create an Environment (using option 1 in img)
- Open the Environment view, then you will see the option
Link to .env file - Select the .env file and save it, Now you can use the variables in the Requests using
{{variable}} - The env file variables format should be in:
key=value name=thunder number=25543 -
Active Environment: To use environment variables, you need to make it active using the options menu
...then selectSet Active. -
Attach Env to Collection: (Optional) You can attach an environment to a collection from the Collection Settings view. Use this option when you like to link multiple collections to multiple environments. The values in this environment will take precedence over the active environment. If you change environments frequently, this option is not recommended. Please see the example below:
CollectionA -> EnvA
CollectionB -> EnvB
CollectionC -> EnvC
How to use Environment Variables
- To use env variables use the format
{{variableName}}, you can use variables in Query Params, Headers, Body & Tests
Import Env
- You can import Thunder Client, Postman and .env files using the Import Menu Option ( see above image option 4), more details here
Set Environment Variable
Setting environment variables is supported in the Tests tab. Follow the steps below:
- Create an environment first from the Env tab if it's not already created.
- In the Tests tab, select the
Set Env Variabledropdown option. (The action will automatically becomesetTo.) - Enter the appropriate source of variable value in the left input box:
- Header: Enter
header.headerNamewhereheaderNameis the response header name. - Cookie: Enter
cookie.cookieNamewherecookieNameis the response cookie name. - JSON Response: Enter
json.propertyNamewherepropertyNameis the JSON key in the response body. - Text Response: Enter the
textkeyword. This sets the entire response body to the variable. - Custom Value: To set any custom value manually, Just type the text as required in the left input e.g
processing - Clear Value: To clear values use
nullkeyword in the left input. - Delete Variable: To delete a variable completely use
deletekeyword in left input.
- Header: Enter
- In the value input, enter a variable name in the
{{variableName}}format.- When it matches a variable name in Env, it will turn green. If the variable doesn't exist, it will be created.
- Now execute the request. You will see the variable value set in the Env tab.
- If you don't see the change in the Env tab, close and re-open the tab to refresh it.
Set Env with Scope
The default location will be Active Environment when you use {{variable}}. You can use a scope to control which environment variable to set the value explicitly
- To set a variable in local environment use
{{variable, local}} - To set a variable in global environment use
{{variable, global}} - (optional) To set a variable in active environment use
{{variable, active}}, Use this format only when you have attached Environment to Collection, otherwise{{variable}}format should be used
Auth
-
OAuth 2.0 when grant type is Authorization Code the callback url needs to be entered into your oauth server trusted redirect url list.
-
OAuth authentication credentials are sent via header or body, please select appropriate one based on your server requirement.
-
Manual SSL Certificates
- Provide ssl certificate paths for auth, using relative path to workspace or absolute paths.
- Use the Certificates VS Code setting, see example below
"thunder-client.certificates": [
        {
            "host": "thunderclient.io",
            "certPath": "ssl/cert.pem",
            "keyPath": "ssl/keyfile.key",
            "pfxPath": "ssl/pfx.p12",
            "passphrase": "test"
        },
        {
            "host": "localhost:8081",
            "pfxPath": "/Users/test/Documents/ssl/pfx.p12",
            "passphrase": "test"
        },
        {
            "host": "testing.com",
            "certPath": "ssl/cert.pem",
            "keyPath": "ssl/keyfile.key"
        },
    ]
Cookies
- You can create or modify cookies using the
Cookieheader in the request. - To Clear existing cookies for the request, use
Clear Allbutton in the Cookies Tab

Path Variables
Path variables are supported using the format {variable} in the url field
- e.g 1:
https://www.thunderclient.com/details/customer/{customerId} - e.g 2:
https://www.thunderclient.com/details/{customerId}{name}/
System Variables
The system variables are useful to generate random/dynamic data for use in request query params or body. The format is {{#variableName}}
- {{#guid}} - generates random uuid
- {{#string}} - generates random string
- {{#number}} - generates random number between 1 to 1000000
- Custom Range: use
{{#number, min, max}}, e.g:{{#number, 100, 999}}
- Custom Range: use
- {{#email}} - generates random email
- {{#date}} - generates unix date timestamp in milliseconds
- Custom date format: use
{{#date, 'YYYY-MM-DD hh:mm:ss:fff'}}, the format should be in single quote. - Unix timestamp: use
{{#date, 'X'}}, this will output unix timestamp in seconds.
- Custom date format: use
- {{#dateISO}} - generates date ISO format
- {{#bool}} - generates true or false
- {{#enum, val1, val2, val3,...}} generates one of the enum values (comma separated) provided
- e.g
{{#enum, red, green, blue}} - e.g
{{#enum, 1, 2, 3}}
- e.g
Proxy
- Proxy is supported using VS Code proxy setting. format
http://username:password@host:port - exclude Proxy Host List: Use this setting to exclude hosts from proxy, supports comma separated values e.g:
abc.com,xyz.com
Http/2
- To send request using Http/2 protocol, please select
HTTP/2option in VS Code settings for Http Version
Import/Export
- The following import of Collections & Environments supported
- Postman 2.1.0 format
- Insomnia v4 json file
- Open API v3 json or yaml files
- Thunder Client
- You can import or export Thunder Client collections and environment data.
- Import Curl is now supported from Activity tab. Keyboard shortcut
Cmd/Ctrl + u - Import of .env files also supported, select
Importfrom Env tab and choose .env file
How to Import Collection
- Select the
Collectiontab from the sidebar - Click the
Menuicon ( see image ), and selectImportorImport from Url - Now select a file from Postman, Thunder Client, Insomnia, or Open API.

How to Convert to Postman Format
- First Export Thunder Client collection/environment to a .json file, Then convert to Postman format using the below options
- From Command Palette -
Convert To Postman Formatoption available - From the Sidebar menu at the Top
(...)selectConvert To Postman Format
Keyboard Shortcuts
Ctl+Shift+P: From Command Palette- Thunder Client - New Request
- Thunder Client - Run Last Request
- Thunder Client - Import Curl
- Thunder Client - Change Environment
- Thunder Client - Convert To Postman Format
Cmd/Ctrl + Enter: To execute the request.Enteron request url field to send request.Cmd/Ctrl + sSave Request without run.Cmd/Ctrl + clickon request in Sidebar will open in new tabCmd/Ctrl + sEnvironment view save data.Cmd/Ctrl + eChange Active Environment.Alt+Shft + fFormat Post Body data.Cmd/Ctrl + uImport CurlAlt + zToggle Word wrap on responseEscapeto cancel Response full screen mode
VS Code Settings
To see all the Thunder Client VS Code settings
- Open VS Code settings View, then search for
Thunder Client - From Sidebar View -> Click
...menu at the top, then clickExtension Settings
Contribution
- Documentation: if you like to improve documentation, please submit PR.
- Suggestions to further improve the product.
Privacy
- Basic anonymised analytics data is collected using vscode-extension-telemetry, No Personal or request data is collected. You can opt out using VS Code Settings details here
- There is no backend or cloud sync, all the data is stored locally on your computer.
Metadata
Owner
Metadata
Thunder Client is a lightweight Rest API Client Extension for VS Code.