navim
 navim copied to clipboard
A full-blown IDE based on Neovim (or Vim) with better navigation.
Navim · 

A full-blown IDE based on Neovim (or Vim) with better navigation.
Table of Contents
- Key Mapping
- Basic Installation
- Advanced Settings
- Advanced Installation
- Plugins
- Coding Style
- Tags
- Credits
- License
Key Mapping
You don't need to remember any key mapping, as navigation bar will show up immediately after the leader key (Space by default) is pressed.
Default <Leader> is Space, <LocalLeader> is ,. For example, Space s s search the word under cursor. As shown below, key mapping is carefully-chosen.
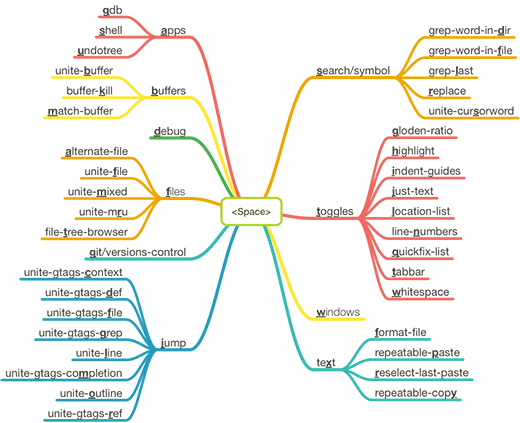
Most of key mapping is denite centric. More key mapping is listed here:
| Key Mapping | Description |
|---|---|
| Left and Right | previous buffer, next buffer |
| Ctrl+h and Ctrl+l | move to window in the direction of hl |
| Ctrl+j and Ctrl+k | move to window in the direction of jk |
| Ctrl+w o | maximize or restore current window in split structure |
| Q | close windows and delete the buffer (if it is the last buffer window) |
Basic Installation
Basic installation is simple:
pip3 install --upgrade pip neovim
git clone --recursive https://github.com/taohexxx/navim ~/.config/nvim
Make links if you are using Vim:
mv ~/.vim ~/.vim.backup
mv ~/.vimrc ~/.vimrc.backup
ln -s ~/.config/nvim ~/.vim
ln -s ~/.config/nvim/init.vim ~/.vimrc
Startup vim and dein will detect and ask you install any missing plugins.
Advanced Settings
Plugins are nicely organised in layers. There are many ready-to-use layers (javascript, navigation, scm, web, etc.) and you can add your own ones.
Private layers can be added to private_layers/. And Private plugins can be added to private_bundle/. The content of these two directory is ignored by Git.
It is completely customisable using a ~/.navimrc file. Just copy .navimrc.sample to ~/.navimrc and modify anything.
After restart Neovim (or Vim), run call dein#clear_state() || call dein#update() to apply changes.
Global Variables
In most instances, modify g:navim_settings in ~/.navimrc should meet your needs.
| Key | Value | Description |
|---|---|---|
layers |
'c', 'completion', 'editing', ... |
files in layers/ or private_layers/ |
additional_plugins |
'joshdick/onedark.vim', ... |
github repo |
encoding |
'utf-8', 'gbk', 'latin1', ... |
files in encoding/ |
bin_dir |
'/usr/local/bin', ... |
bin directory for cscope, ctags, gdb, ... |
clang_dir |
'/usr/local', ... |
install directory for clang |
cscopeprg |
'gtags-cscope', 'cscope', ... |
cscope program |
explorer_plugin |
'defx', 'nerdtree' |
|
statusline_plugin |
'airline', 'lightline' |
|
completion_plugin |
'deoplete', 'coc', 'ycm' |
|
syntaxcheck_plugin |
'ale', 'syntastic' |
|
colorscheme |
'solarized', 'molokai', 'jellybeans' |
use other colorschemes in additional_plugins or layers is supported |
powerline_fonts |
1, 0 |
requires fonts |
nerd_fonts |
1, 0 |
requires fonts |
Use :echo g:navim_setting in Neovim (or Vim) to check for runtime settings.
Advanced Installation
macOS
YouComplete only support Neovim or MacVim.
Install Neovim (Recommended)
pip install --upgrade pip
pip3 install --upgrade pip
pip install --user --upgrade neovim
pip3 install --user --upgrade neovim
brew tap neovim/neovim
brew update
brew reinstall --HEAD neovim
Make alias
alias vi='nvim'
alias vim="nvim"
alias vimdiff="nvim -d"
If <C-h> does not work in neovim, add these line to ~/.zshrc
infocmp $TERM | sed 's/kbs=^[hH]/kbs=\\177/' > $TERM.ti
tic $TERM.ti
Execute the :UpdateRemotePlugins and restart Neovim.
Install MacVim
brew install macvim --with-luajit --override-system-vim
Make alias
alias vi="mvim -v"
alias vim="mvim -v"
alias vimdiff="mvim -d -v"
Install GLOBAL
brew install global
Select Auto Completion
Select auto completion plugins between Deoplete, Coc and YouCompleteMe.
- Deoplete: Zero configuration without LSP support. If you don't write C++ or Java, use this.
- Coc: Simple initialization with LSP support. If you write C++ or Java, use this.
- YouCompleteMe: Complicated initialization with LSP support. Not recommanded.
Auto Completion with Deoplete
Add this line to ~/.navimrc:
let g:navim_settings.completion_plugin = 'deoplete'
Auto Completion with Coc
Add this line to ~/.navimrc:
let g:navim_settings.completion_plugin = 'coc'
Install Node.js.
brew install node
Write your ~/.config/nvim/coc-settings.json. For example, using c++ with ccls:
{
  "languageserver": {
    "ccls": {
      "command": "ccls",
      "args": ["--log-file=/tmp/ccls.log"],
      "filetypes": ["c", "cpp", "cuda", "objc", "objcpp"],
      "rootPatterns": [
        ".ccls",
        "compile_commands.json",
        ".vim/",
        ".git/",
        ".hg/"
      ],
      "initializationOptions": { "cache": { "directory": ".ccls-cache" } }
    }
  },
  "suggest.triggerAfterInsertEnter": true,
  "suggest.noselect": false,
  "suggest.enablePreview": true,
  "suggest.minTriggerInputLength": 2,
  "suggest.acceptSuggestionOnCommitCharacter": true
}
You need to install coc extensions manually like this for the first time: :CocInstall coc-snippets coc-highlight coc-lists.
Auto Completion with YouCompleteMe (Quick Compile)
Add this line to ~/.navimrc:
let g:navim_settings.completion_plugin = 'ycm'
Compile ycm_core
cd ~/.config/nvim/bundle/repos/github.com/Valloric/YouCompleteMe/
./install.sh --all
# or
# ./install.sh --clang-completer --go-completer --js-completer
Check for ~/.config/nvim/bundle/repos/github.com/Valloric/YouCompleteMe/third_party/ycmd/libclang.dylib and ~/.config/nvim/bundle/repos/github.com/Valloric/YouCompleteMe/third_party/ycmd/ycm_core.so, done
TypeScript Support
yarn global add typescript
Auto Completion with YouCompleteMe (Full Compile)
Try this if quick compile does not work.
Add this line to ~/.navimrc:
let g:navim_settings.completion_plugin = 'ycm'
Clone
mkdir -p ~/.config/nvim/bundle/repos/github.com/Valloric/
cd ~/.config/nvim/bundle/repos/github.com/Valloric/
git clone https://github.com/Valloric/YouCompleteMe
cd YouCompleteMe/
git submodule update --init --recursive
Compile ycm_core
Download clang from http://llvm.org/releases/download.html to ~/local/src/ and compile ycm_core
mkdir -p ~/local/src/
cd ~/local/src/
tar xf clang+llvm-6.0.0-x86_64-apple-darwin.tar.xz
mkdir -p ~/local/src/ycm_build/
cd ~/local/src/ycm_build/
cmake -G "Unix Makefiles" -DPATH_TO_LLVM_ROOT=~/local/src/clang+llvm-6.0.0-x86_64-apple-darwin . ~/.config/nvim/bundle/repos/github.com/Valloric/YouCompleteMe/third_party/ycmd/cpp
cmake --build . --target ycm_core --config Release
Check for ~/.vim/bundle/YouCompleteMe/third_party/ycmd/libclang.dylib and ~/.vim/bundle/YouCompleteMe/third_party/ycmd/ycm_core.so, done
Compile regex (Optional)
cmake -G "Unix Makefiles" . ~/.config/nvim/bundle/repos/github.com/Valloric/YouCompleteMe/third_party/ycmd/third_party/cregex
cmake --build . --target _regex --config Release
Check for ~/.config/nvim/bundle/repos/github.com/Valloric/YouCompleteMe/third_party/ycmd/third_party/cregex/regex_3/_regex.so, done
Go Support
cd ~/.config/nvim/bundle/repos/github.com/Valloric/YouCompleteMe/third_party/ycmd/third_party/gocode
go build
JavaScript Support
cd ~/.config/nvim/bundle/repos/github.com/Valloric/YouCompleteMe/third_party/ycmd/third_party/tern_runtime
yarn install --production
TypeScript Support
yarn global add typescript
Project Configuration
Download https://raw.githubusercontent.com/Valloric/ycmd/master/cpp/ycm/.ycm_extra_conf.py to your project directory
Windows
git clone --recursive https://github.com/taohexxx/navim %userprofile%\AppData\Local\nvim
run nvim.exe before run nvim-qt.exe
Plugins
Coding Style
EditorConfig is supported.
Create an .editorconfig in any parent directory for consistent coding styles.
Tags
~/.config/nvim/tags/*.tags will be auto added.
Help
Credits
Built with :heart:. I wanted to give special thanks to all of the following projects and people, because I learned a lot and took many ideas and incorporated them into my configuration.