create-t3-app
 create-t3-app copied to clipboard
End to End Tutorial Proposal
Is your feature request related to a problem? Please describe.
There are no docs. I always say, "an open source project without docs is an open source project that doesn't exist." create-t3-app has admirably managed to buck this trend and comes close to contradicting the maxim entirely.
It's almost certainly the most successful open source project I've ever seen without a single line of documentation beyond the init command. But personally, I like projects with docs and I like projects with good docs even more.
Describe the solution you'd like
A tutorial that walks through, step by step, how to create, develop, test, and deploy a T3 app. I already have a blog post that's about 90% complete that does this (but without tests cause YOLO). However, it definitely wouldn't make sense in the docs. It has a lot of commentary and history in it (not to mention stupid jokes galore).
There's also opinionated decisions I'm making that might not be the consensus choice of the creators, maintainers, and current contributors. There needs to be heavy buy in on every single decision. This will end up being the way many people will be introduced to the framework, experience how it operates, and internalize how it should be properly used.
With all that said, I think the commands, code, and sequence of steps here can serve as a starting point for an RFC or general proposal. Others can provide feedback and tell me what stuff needs to be added or removed. After we're happy with a flow (unless someone else wants to do it) I can also fill in prose explanations.
Right now I have the most minimal explanations so it's not just a sequence of code and commands, but there's lots of things being left out in terms of actual explanation of what the code and commands are doing.
Btw you can check out a draft for the blog post here if you're curious or want to provide any notes.
Describe alternatives you've considered
The alternative is not having a tutorial, which is probably a bad idea. It's not happening yet, but one day noobs and not the uber nerds will show up asking how to use this thing. If you don't want to have to personally walk through how to use it with every single person, you'll need a tutorial.
Considerations for the Team
Once you decide to make a tutorial, there's many open questions around what it should be and why. I'd break down the types of considerations that should be made into two categories: do's and don't. You need to decide what to include but also what to leave out.
Decide what you want to leave out because it is
- Common, expected knowledge
- Overly complex and unrelated to teaching how the framework functions
- A bad practice
- Doesn't scale (in a scenario that will actually happen)
- Deployment provider specific
- Incompatible with Windows
Decide what you want to include and ask the following questions
- What should be included because it's a good practice and will set the learner up for success later down the line in their app's lifecycle?
- What type of project should be built?
- What features should the project have to ensure that the important parts of the framework are covered and explained in a way that is easy to follow?
- What features will show off the framework's strong suits and capabilities most?
- Where is the project going to be deployed?
- I think the smarter choice is to have one "blessed" option with more added over time by contributors and companies looking to get you onto their platform.
- You'll eventually want instructions for the top 4-5 platforms spanning options across:
- VMs
- Containers
- Serverless functions
Get to the Code
With all that preamble out of the way, here's the outline and a couple expected questions about it.
Getting Started Tutorial Outline
- Create t3 App
- Provision a PostgreSQL Database with Railway
- Install and Configure Railway CLI
- Initialize Railway Project
- Run Prisma Migration
- Create Blog Posts
- Create a Posts Endpoint
- Query API and Create Posts Component
- Deploy to Vercel
Why Did You Do INSERT THING?
Q: Why is it a blog? Blogs are dumb.
Correct, but blogs make sense and are a simple mental model so it removes cognitive overhead which helps when you're already learning potentially four new tools at once. A blog is also something people can make personal and expand out into a bigger general personal site.
Blogs can also easily be extended to have authentication to ensure other users can't create, update, or delete posts and even authorization if you create roles such as Follower (Read only), Author (Read and Write only), Editor (Read, Write, Update and Delete), and Admin (can delete posts and even the author or editor themselves).
Q: Why Railway? Aren't there like eight ways to host a free Postgres database in 2022?
Because Railway is the best.
Q: Why PostgreSQL? Don't you know Prisma supports Microsoft SQL Server?
Same answer.
Q: Why Vercel?
Cloudflare would have taken longer to figure out.
Q: Why isn't there auth?
Cause I don't know how and if this goes the way it has gone with most other frameworks you're all gonna spend multiple months going through a bunch of different ways of doing it until settling on something you think is best/most secure. Then after you implement it you'll realize people want something else. People will also want some combination of about five different third party auth providers that all work differently.
At this point you either write docs to explain all that stuff or you start telling people, "we don't support that and we're not going to help you figure out how to make that work so go use something else." Which I know is already mentioned in the README, I'm just letting you know what's gonna happen, you're welcome to do whatever you want with this information.
Create t3 App
To get started with create-t3-app, run any of the following three commands and follow the questions in the command prompt:
npx create-t3-app@latest
yarn create t3-app
pnpm dlx create-t3-app@latest
The following CLI options are currently available:
| Option | Description |
|---|---|
--noGit |
Explicitly tell the CLI to not initialize a new git repo in the project |
-y, --default |
Bypass the CLI and use all default options to bootstrap a new t3-app |
[dir] |
Include a directory argument with a name for the project |
Give your project a name and pass the defaults option to download all four add-ons.
pnpm dlx create-t3-app my-sweet-t3-app -y
cd my-sweet-t3-app
pnpm add -D vercel
pnpm dev
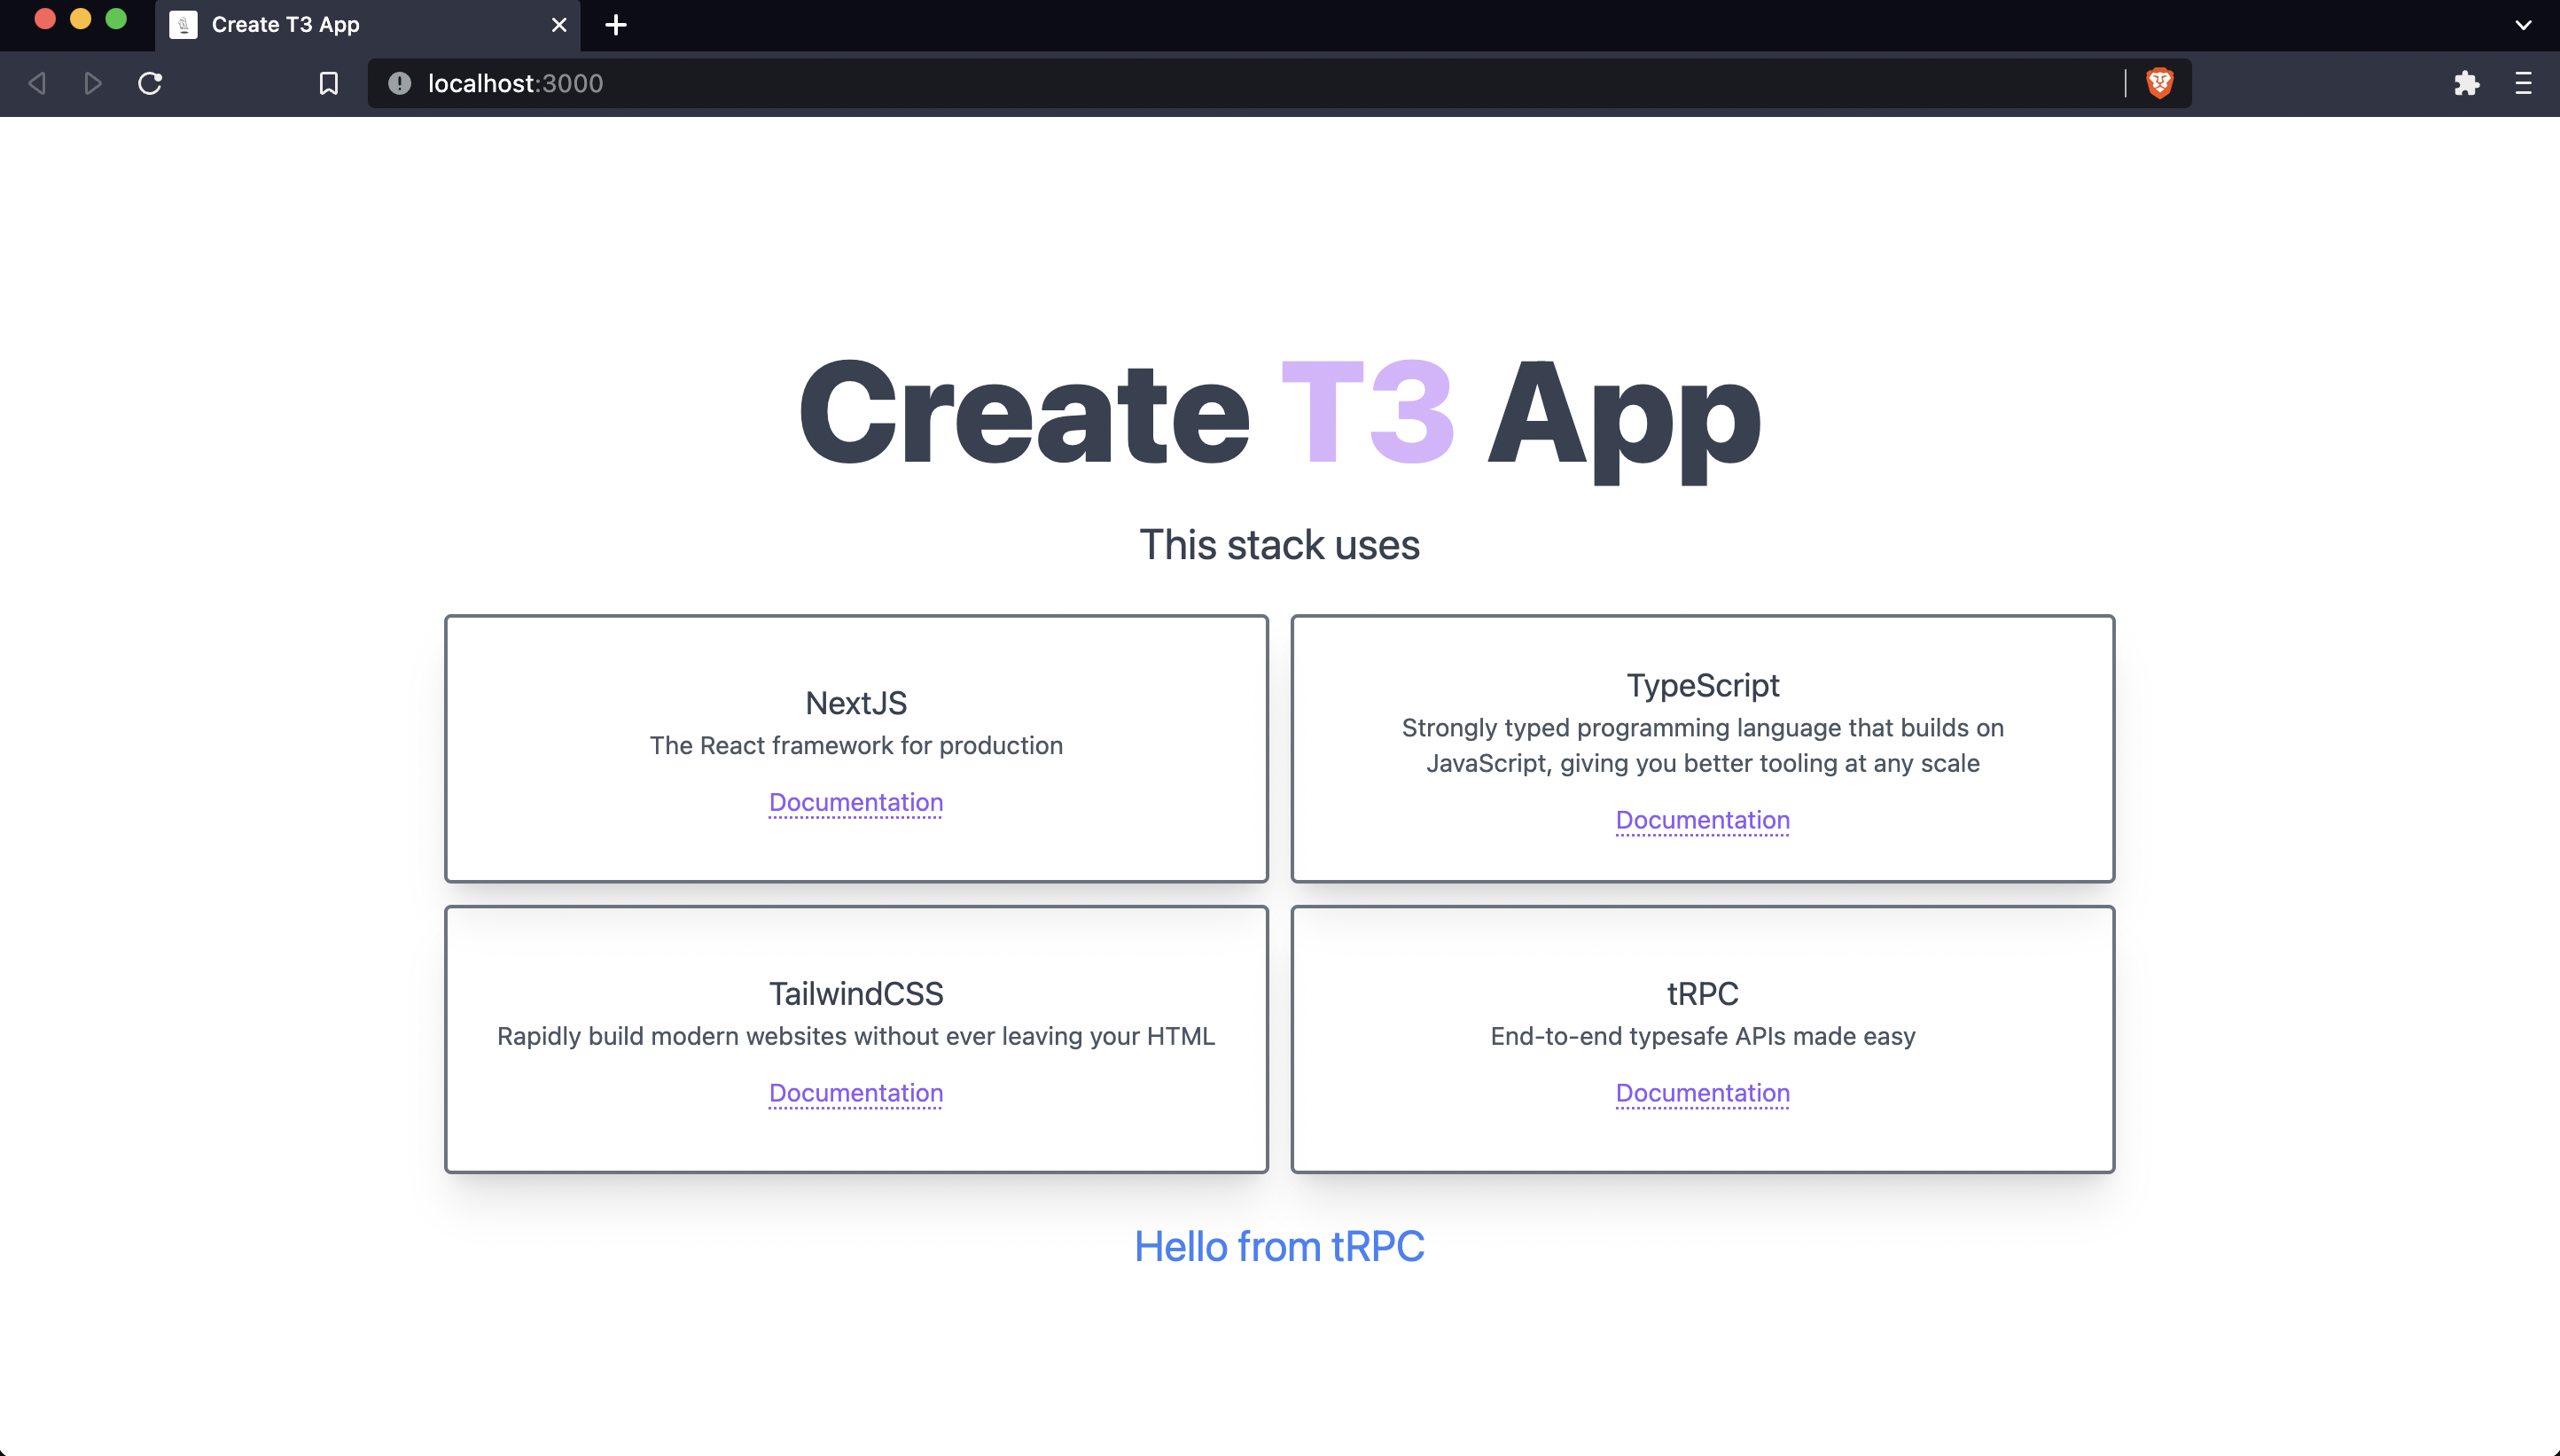
Open localhost:3000 to see the generated project.
Provision a PostgreSQL Database with Railway
Open schema.prisma and update the datasource to the PostgreSQL provider. In addition to the current models in the schema, add a Post model with an id, title, body, and createdAt time stamp.
// prisma/schema.prisma

generator client {
    provider = "prisma-client-js"
}

datasource db {
    provider = "postgresql"
    url      = env("DATABASE_URL")
}

model Post {
  id        Int      @id @default(autoincrement())
  title     String
  body      String
  createdAt DateTime @default(now())
}
Install and Configure Railway CLI
Create a Railway account and install the Railway CLI.
railway login
If you are unable to login through the browser, run
railway login --browserlessinstead.
Initialize Railway Project
Initialize a project, select "Empty Project," and give your project a name.
railway init
Add a plugin to your Railway project and select PostgreSQL to provision the database.
railway add
Set the DATABASE_URL environment variable in .env.
echo DATABASE_URL=`railway variables get DATABASE_URL` > .env
Run Prisma Migration
pnpm prisma migrate dev --name init
pnpm prisma generate
Create Blog Posts
Author's Note: At this point, there are at least five different ways you can write data to your database through Prisma or Railway. I've used them all and the main trade off you're weighing is:
- Dashboards that are seemingly simple but might have unexpected bugs
- Complexity/required expertise of SQL but with the certainty you're doing exactly what you think you're doing to your database.
We don't need to necessarily recommend one way over any others, but practically speaking we should probably pick one or two for the tutorial instead of showing all of these because that would be confusing.
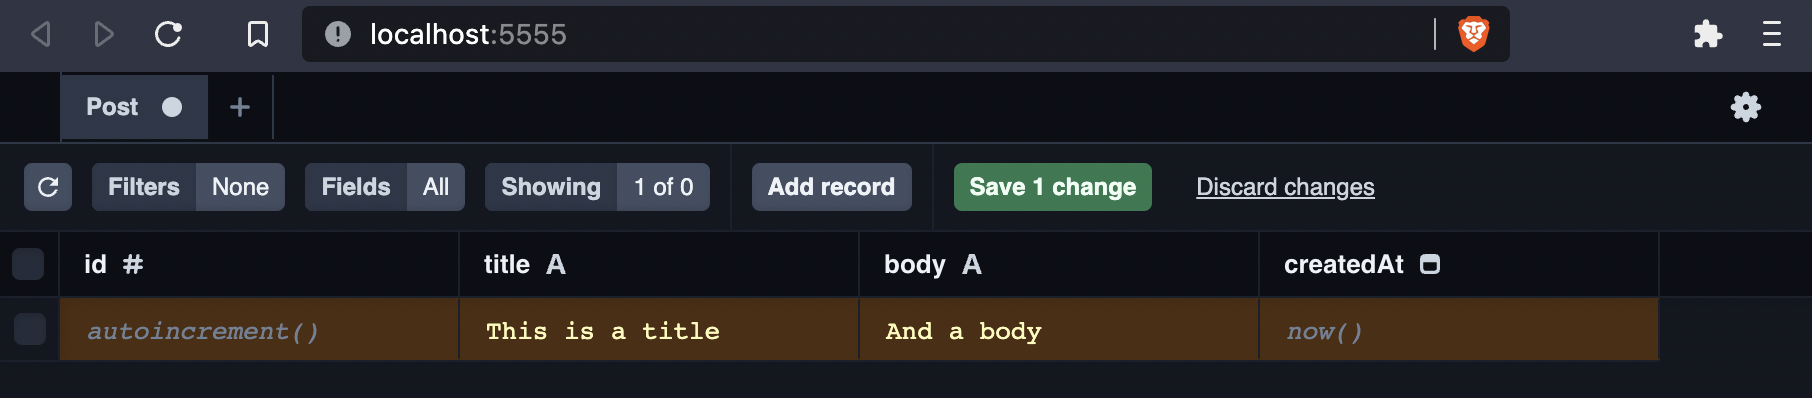
Run Prisma Studio on Localhost
pnpm prisma studio
Open localhost:5555 to create a post.
Enter Data into the Railway Dashboard UI
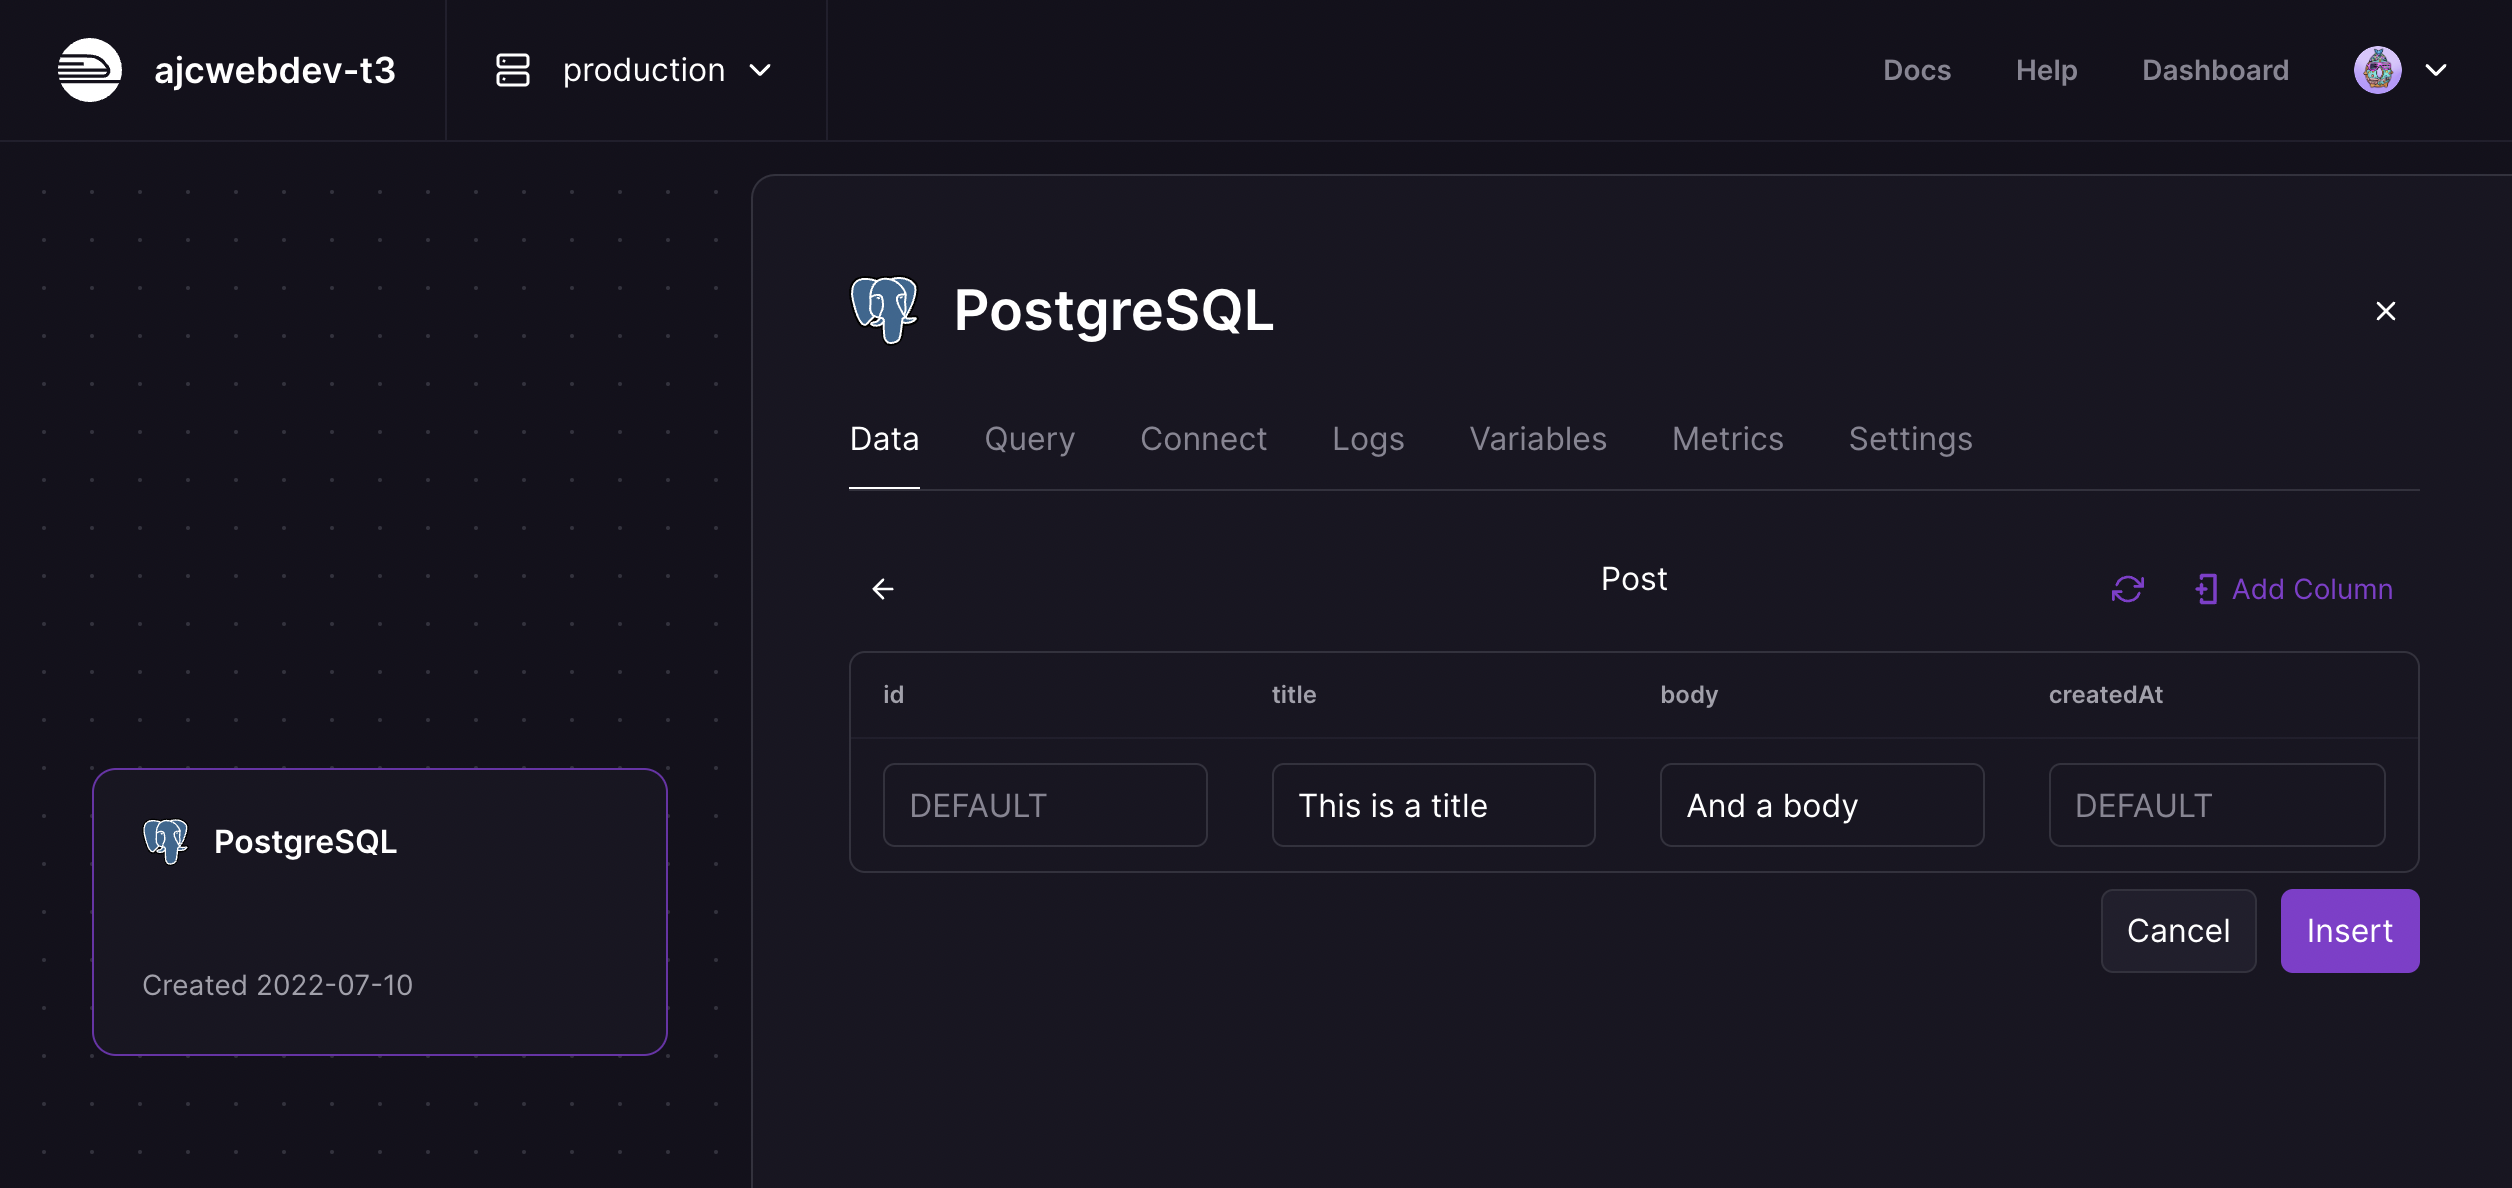
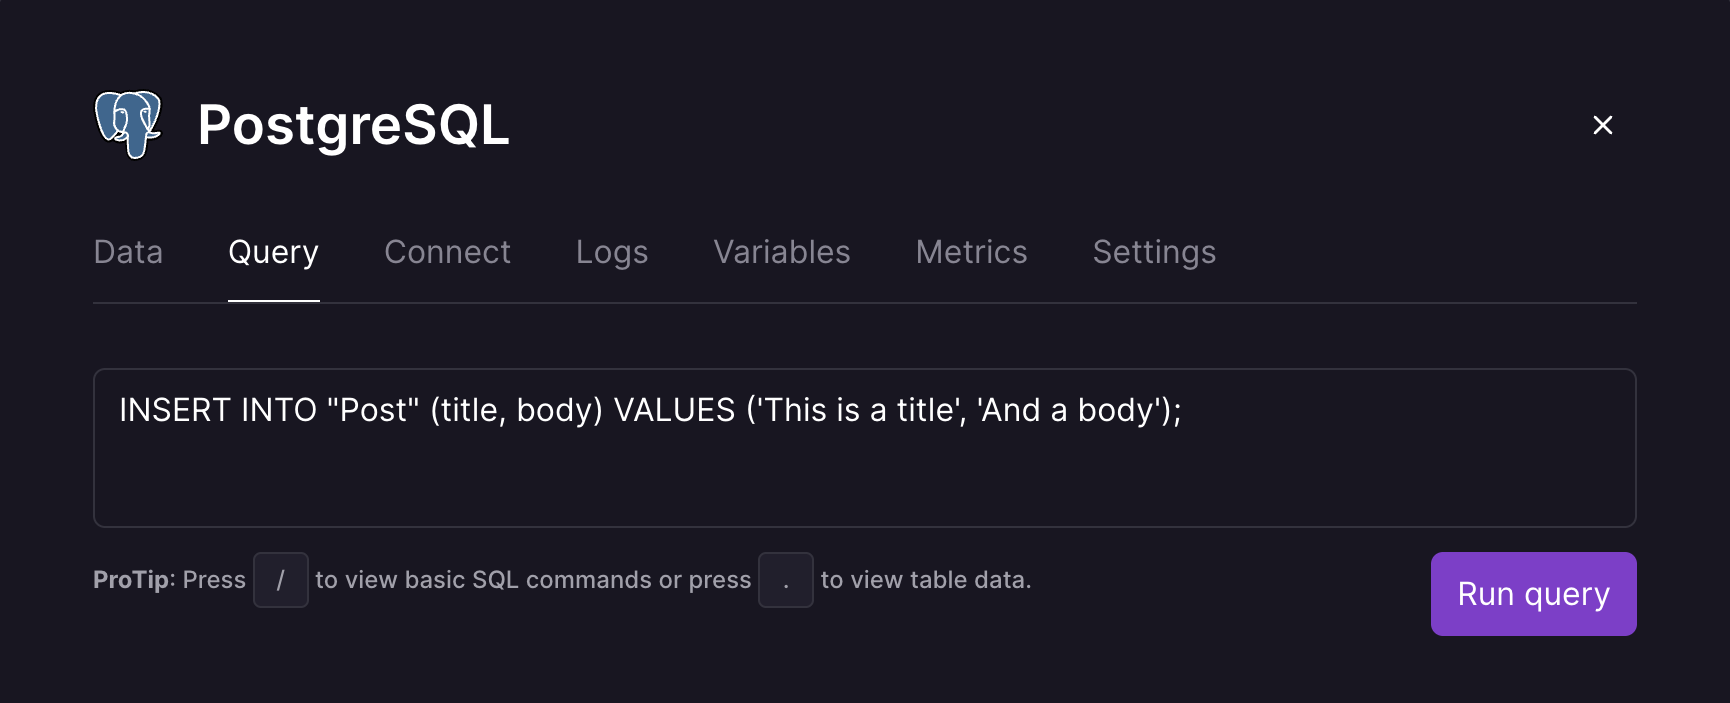
Send Raw SQL through the Railway Dashboard
INSERT INTO "Post" (title, body) VALUES ('This is a title', 'And a body');
Connect with psql
Copy the psql command from the Connect Tab on the Railway dashboard.
PGPASSWORD=supersecretpasswordawwyeah psql -h containers-us-west-85.railway.app -U postgres -p 5537 -d railway
Create a Posts Endpoint
Create a posts.ts file in src/pages/api.
echo > src/pages/api/posts.ts
Run prisma.post.findMany() and return the response as a JSON object.
// src/pages/api/posts.ts

import type { NextApiRequest, NextApiResponse } from "next"
import { prisma } from "../../server/db/client"

const posts = async (req: NextApiRequest, res: NextApiResponse) => {
  const posts = await prisma.post.findMany()
  res.status(200).json(posts)
}

export default posts
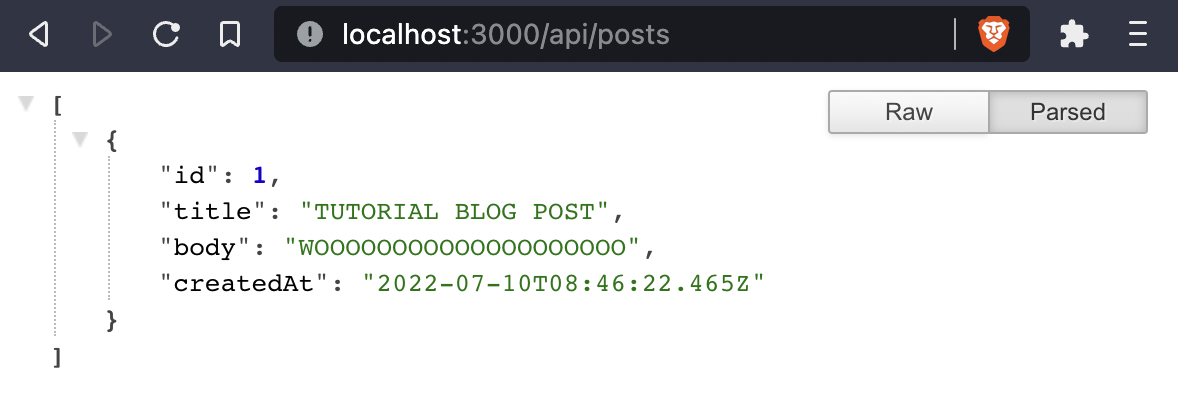
Open localhost:3000/api/posts to see the JSON returned from the database.
Query API and Create Posts Component
Authors Note: TODO
Was planning on using Alex's tRPC Cell implementation unless anyone has objections to my blatant attempt at injecting Redwood features into the framework. I know data fetching is always a contentious topic.
But regardless of how the data fetching is done, I'm going to need some help styling the post components and laying them out on the page to make them look as nice as the home page. We'll have a title, body, and date to display for each component and they'll be returned as a list of posts in an array.
Deploy to Vercel
pnpm vercel --env DATABASE_URL=YOUR_DATABASE_URL_HERE
Open my-sweet-t3-app.vercel.app.
I like this. I think it would make sense to include a tutorial on the landing page site create.t3.gg.
I agree with this, especially if you are a beginner (like me) the documentation/tutorial will definitely help me to create applications using the t3 stack
PS: The docs/tutorial should also say what package manager it is using (for example pnpm)
I've put together the start of a follow-the-bouncing-ball tutorial, much based on @ajcwebdev's example above, but compressed a bit to mostly just the steps involved without extra details - mostly for folk like me who've already done it a few times and just want a checklist as they go:
- https://github.com/AshSimmonds/t3-stack-tutorial-and-resources#instructions
I've put together the start of a follow-the-bouncing-ball tutorial, much based on @ajcwebdev's example above, but compressed a bit to mostly just the steps involved without extra details - mostly for folk like me who've already done it a few times and just want a checklist as they go:
this is really cool! im gonna watch the video
Thanks for all the suggestions and notes so far, keep them coming! Seems like people mostly dig the idea so I'll go ahead and do a full write up and open a PR once it's ready.
Just to set expectations, I've got a full time job and a ton of side projects already, but I should be able to complete a first draft on the tutorial sometime around the middle of August.
Loving T3 ❤️
Really appreciate the time you've taken to put this article together!
I have a couple of suggestions/thoughts:
- Could you add details/example for submitting data and showing errors (validation, etc) in the UI? This is another beginner area worth documenting for those getting started. It would be great to see a working CRUD example 😄
- I think auth and other features could be added as smaller articles (to make them more digestible).
- Might be worth using an
examples/repo int3-ossto provide docs and usage examples.
I also wrote a tutorial check it out. https://www.nexxel.dev/blog/ct3a-guestbook
Alright, I've got an updated draft for the tutorial. But first, to address the previous question. nexxel's tutorial covers both submitting data with forms and auth. That will be the best material at this time for those specific tasks. That will be covered in the tutorial but not in this first chapter. I plan to have a three part tutorial that will cover:
- Everything outlined in this issue
- Using forms for writing data and mutations
- Authentication
The goal is to have the main tutorial be as comprehensive as possible so other guides and tutorials can be shorter or explain the instructions more tersely.
Getting Started Tutorial Outline
- Introduction
- CLI Options
- Getting Started
- Project Structure
- Provision PostgreSQL Database
- Add Posts Model to Prisma Schema
- Install CLI and Initialize Railway Project
- Run Database Migration
- Create a Blog Post
- Query Posts with tRPC
- Create Post Router
- Query Posts with useQuery
- Add Cells for Declarative Data Fetching
- Create Default Query Cell
- Create Post Page
- Deploy to Vercel
Introduction
To get started with create-t3-app, run any of the following three commands and follow the questions in the command prompt:
npx create-t3-app@latest
yarn create t3-app
pnpm dlx create-t3-app@latest
CLI Options
The following CLI options are currently available:
| Option | Description |
|---|---|
--noGit |
Explicitly tell the CLI to not initialize a new git repo in the project |
-y, --default |
Bypass CLI and use all default options to bootstrap new t3-app |
[dir] |
Include a directory argument with a name for the project |
--noInstall |
Generate project without installing dependencies |
Getting Started
Give your project a name and pass the defaults option to download all four add-ons.
pnpm dlx create-t3-app my-sweet-t3-app -y
cd my-sweet-t3-app
pnpm add -D vercel
pnpm dev
Open localhost:3000 to see the generated project.
Project Structure
If we ignore the configuration files in the root of our project then our folder and file structure includes the following:
.
├── prisma
│   └── schema.prisma
├── public
│   └── favicon.ico
└── src
    ├── env
    │   ├── client.mjs
    │   ├── schema.mjs
    │   └── server.mjs
    ├── pages
    │   ├── _app.tsx
    │   ├── api
    │   │   ├── auth
    │   │   │   └── [...nextauth].ts
    │   │   ├── examples.ts
    │   │   ├── restricted.ts
    │   │   └── trpc
    │   │       └── [trpc].ts
    │   └── index.tsx
    ├── server
    │   ├── db
    │   │   └── client.ts
    │   └── router
    │       ├── context.ts
    │       ├── example.ts
    │       ├── index.ts
    │       ├── protected-example-router.ts
    │       └── protected-router.ts
    ├── styles
    │   └── globals.css
    ├── types
    │   └── next-auth.d.ts
    └── utils
        └── trpc.ts
Provision PostgreSQL Database
Add Posts Model to Prisma Schema
Open schema.prisma and update the datasource to the PostgreSQL provider.
// prisma/schema.prisma

generator client {
  provider = "prisma-client-js"
}

datasource db {
  provider = "postgresql"
  url      = env("DATABASE_URL")
}
Add a Post model with an id, title, description, body, and createdAt timestamp.
// prisma/schema.prisma

model Post {
  id                String    @id
  title             String
  description       String
  body              String
  createdAt         DateTime  @default(now())
}
Uncomment all appearances of @db.Text on the Account model.
// prisma/schema.prisma

model Account {
  id                String    @id @default(cuid())
  userId            String
  type              String
  provider          String
  providerAccountId String
  refresh_token     String?   @db.Text
  access_token      String?   @db.Text
  expires_at        Int?
  token_type        String?
  scope             String?
  id_token          String?   @db.Text
  session_state     String?
  user              User      @relation(fields: [userId], references: [id], onDelete: Cascade)

  @@unique([provider, providerAccountId])
}
Install CLI and Initialize Railway Project
Create a Railway account and install the Railway CLI. If you are unable to login through the browser, run railway login --browserless instead.
railway login
Run railway init, select "Empty Project," and give your project a name. To provision the database, add a plugin to your Railway project with railway add and select PostgreSQL.
railway init
railway add
Set the DATABASE_URL environment variable for your database and create a .env file to hold it.
echo DATABASE_URL=`railway variables get DATABASE_URL` > .env
Run Database Migration
Run a migration with prisma migrate dev to generate the folders and files necessary to create a new migration. We will name our migration init with the --name argument. After the migration is complete, generate the Prisma client with prisma generate.
pnpm prisma migrate dev --name init
pnpm prisma generate
Create a Blog Post
Create a blog post with the following command:
INSERT INTO "Post" (id, title, description, body) VALUES (
  '1',
  'A Blog Post Title',
  'This is the description of a blog post',
  'The body of the blog post is here. It is a very good blog post.'
);
This SQL command can be entered directly into the text area under the Query tab. Click "Run query" and then add two more blog posts.
Query Posts with tRPC
Create Post Router
Create a file where we will initialize a router instance called postRouter to query for all of our posts. Add a query endpoint to that router with the .query() method.
echo > src/server/router/post.ts
// src/server/router/post.ts

import { prisma } from "../db/client"
import { Prisma } from "@prisma/client"
import { createRouter } from "./context"

const defaultPostSelect = Prisma.validator<Prisma.PostSelect>()({
  id: true, title: true, description: true, body: true, createdAt: true
})

export const postRouter = createRouter()
  .query('all', {
    async resolve() {
      return prisma.post.findMany({
        select: defaultPostSelect,
      })
    },
  })
Import postRouter and use the .merge() method to combine all routers into a single appRouter instance.
// src/server/router/index.ts

import superjson from "superjson"
import { createRouter } from "./context"
import { exampleRouter } from "./example"
import { postRouter } from "./post"
import { protectedExampleRouter } from "./protected-example-router"

export const appRouter = createRouter()
  .transformer(superjson)
  .merge("example.", exampleRouter)
  .merge("post.", postRouter)
  .merge("question.", protectedExampleRouter)

export type AppRouter = typeof appRouter
Query Posts with useQuery
Open src/pages/index.tsx to query all posts and display them on the home page.
// src/pages/index.tsx

const Posts = () => {
  const postsQuery = trpc.useQuery(['post.all'])

  return (
    <div>
      {postsQuery.data
        ? <p>{JSON.stringify(postsQuery.data)}</p>
        : <p>Loading..</p>
      }
    </div>
  )
}

const Home: NextPage = () => {
  return (
    <>
      <Head>...</Head>

      <main>
        <h1>...</h1>
        <div>...</div>

        <Posts />
      </main>
    </>
  )
}
Add Cells for Declarative Data Fetching
Cells are specifically focused on common data fetching outcomes. They give developers the ability to avoid writing any conditional logic since a cell will manage what happens during the following four potential states of your data fetching:
- Success - Display the response data
- Failure - Handle the error message and provide instructions to the user
- Empty - Show a message or graphic communicating an empty list
- Loading - Show a message or graphic communicating the data is still loading
Create Default Query Cell
createQueryCell is used to bootstrap DefaultQueryCell which can be used anywhere in your application.
mkdir src/pages/post
echo > src/pages/post/\[id\].tsx
echo > src/utils/DefaultQueryCell.tsx
// src/utils/DefaultQueryCell.tsx

import { TRPCClientErrorLike } from "@trpc/client"
import NextError from "next/error"
import type { AppRouter } from "../server/router/index"
import {
  QueryObserverIdleResult,
  QueryObserverLoadingErrorResult,
  QueryObserverLoadingResult,
  QueryObserverRefetchErrorResult,
  QueryObserverSuccessResult,
  UseQueryResult,
} from "react-query"

type JSXElementOrNull = JSX.Element | null

type ErrorResult<TData, TError> =
  | QueryObserverLoadingErrorResult<TData, TError>
  | QueryObserverRefetchErrorResult<TData, TError>

interface CreateQueryCellOptions<TError> {
  error: (query: ErrorResult<unknown, TError>) => JSXElementOrNull
  loading: (query: QueryObserverLoadingResult<unknown, TError>) => JSXElementOrNull
  idle: (query: QueryObserverIdleResult<unknown, TError>) => JSXElementOrNull
}

interface QueryCellOptions<TData, TError> {
  query: UseQueryResult<TData, TError>
  error?: (query: ErrorResult<TData, TError>) => JSXElementOrNull
  loading?: (query: QueryObserverLoadingResult<TData, TError>) => JSXElementOrNull
  idle?: (query: QueryObserverIdleResult<TData, TError>) => JSXElementOrNull
}

interface QueryCellOptionsWithEmpty<TData, TError>
  extends QueryCellOptions<TData, TError> {
  success: (query: QueryObserverSuccessResult<NonNullable<TData>, TError>) => JSXElementOrNull
  empty: (query: QueryObserverSuccessResult<TData, TError>) => JSXElementOrNull
}
interface QueryCellOptionsNoEmpty<TData, TError>
  extends QueryCellOptions<TData, TError> {
  success: (query: QueryObserverSuccessResult<TData, TError>) => JSXElementOrNull
}

export function createQueryCell<TError>(
  queryCellOpts: CreateQueryCellOptions<TError>,
) {
  function QueryCell<TData>(opts: QueryCellOptionsWithEmpty<TData, TError>): JSXElementOrNull
  function QueryCell<TData>(opts: QueryCellOptionsNoEmpty<TData, TError>): JSXElementOrNull
  function QueryCell<TData>(opts:
    | QueryCellOptionsNoEmpty<TData, TError>
    | QueryCellOptionsWithEmpty<TData, TError>,
  ) {
    const { query } = opts

    if (query.status === 'success') {
      if ('empty' in opts &&
        (query.data == null ||
          (Array.isArray(query.data) && query.data.length === 0))
      ) {
        return opts.empty(query)
      }
      return opts.success(query as QueryObserverSuccessResult<NonNullable<TData>, TError>)
    }

    if (query.status === 'error') {
      return opts.error?.(query) ?? queryCellOpts.error(query)
    }
    if (query.status === 'loading') {
      return opts.loading?.(query) ?? queryCellOpts.loading(query)
    }
    if (query.status === 'idle') {
      return opts.idle?.(query) ?? queryCellOpts.idle(query)
    }
    return null
  }
  return QueryCell
}

type TError = TRPCClientErrorLike<AppRouter>

export const DefaultQueryCell = createQueryCell<TError>({
  error: (result) => (
    <NextError
      title={result.error.message}
      statusCode={result.error.data?.httpStatus ?? 500}
    />
  ),
  idle: () => <div>Loading...</div>,
  loading: () => <div>Loading...</div>,
})
Add byId query to Post router in post.ts.
// src/server/router/post.ts

import { prisma } from "../db/client"
import { Prisma } from "@prisma/client"
import { TRPCError } from "@trpc/server"
import { z } from "zod"
import { createRouter } from "./context"

const defaultPostSelect = Prisma.validator<Prisma.PostSelect>()({
  id: true, title: true, description: true, body: true, createdAt: true
})

export const postRouter = createRouter()
  .query('all', {
    async resolve() {
      return prisma.post.findMany({
        select: defaultPostSelect,
      })
    },
  })

  .query('byId', {
    input: z.object({ id: z.string() }),
    async resolve({ input }) {
      const { id } = input
      const post = await prisma.post.findUnique({
        where: { id },
        select: defaultPostSelect,
      })
      if (!post) {
        throw new TRPCError({
          code: 'NOT_FOUND',
          message: `No post with id '${id}'`,
        })
      }
      return post
    },
  })
Create Post Page
Import DefaultQueryCell in src/pages/post/[id].tsx and create a component called PostPage. Return DefaultQueryCell and pass postQuery to query and data to success.
// src/pages/post/[id].tsx

import type { NextPage } from "next"
import { useRouter } from "next/router"
import Head from "next/head"
import { DefaultQueryCell } from "../../utils/DefaultQueryCell"
import { trpc } from "../../utils/trpc"

const PostPage: NextPage = () => {
  const id = useRouter().query.id as string
  const postQuery = trpc.useQuery([
    'post.byId',
    { id }
  ])

  return (
    <DefaultQueryCell
      query={postQuery}
      success={({ data }) => (
        <>
          <Head>
            <title>{data.title}</title>
            <meta name="description" content={data.description} />
          </Head>

          <main>
            <h1>{data.title}</h1>
            <p>{data.body}</p>
            <em>
              Created {data.createdAt.toLocaleDateString()}
            </em>
          </main>
        </>
      )}
    />
  )
}

export default PostPage
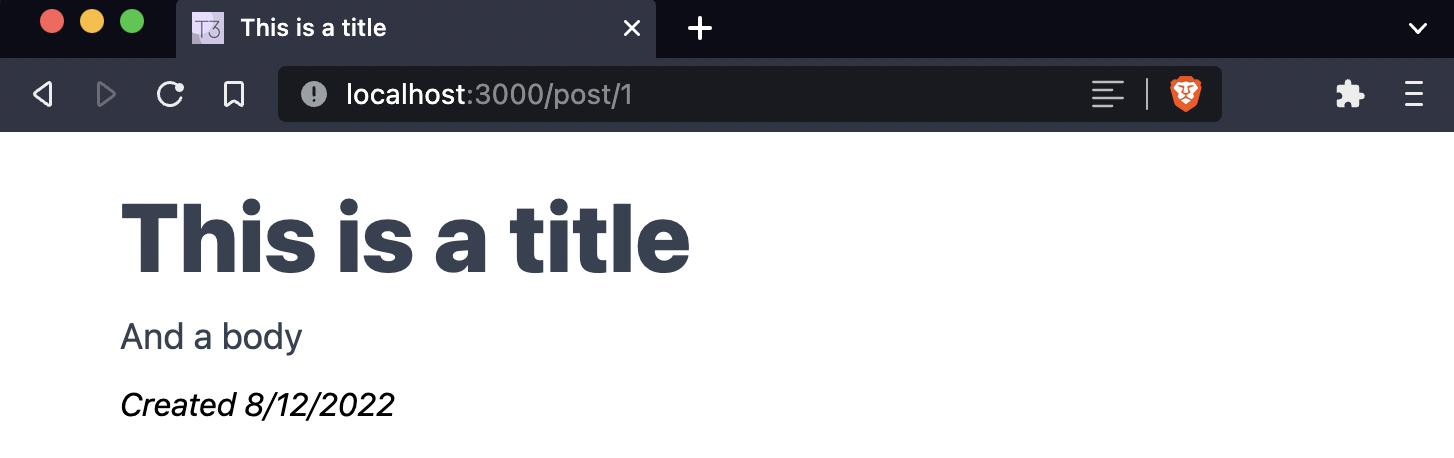
Open localhost:3000/post/1 to see your first blog post.
Import DefaultQueryCell in src/pages/index.tsx along with Link so we can link to each blog post's page.
// src/pages/index.tsx

import type { NextPage } from "next"
import Head from "next/head"
import Link from "next/link"
import { trpc } from "../utils/trpc"
import { DefaultQueryCell } from "../utils/DefaultQueryCell"

type BlogPostProps = {
  id: string
  title: string
}

const Home: NextPage = () => {
  const postsQuery = trpc.useQuery(['post.all'])

  return (
    <>
      <Head>...</Head>

      <main>
        <h2>...</h2>
        <div>...</div>

        <h2>Posts</h2>

        {postsQuery.status === 'loading'}

        <DefaultQueryCell
          query={postsQuery}
          success={({ data }: any) => (
            data.map(({id, title}: BlogPostProps) => (
              <Link key={id} href={`/post/${id}`}>
                <p>{title}</p>
              </Link>
            ))
          )}
          empty={() => <p>WE NEED POSTS!!!</p>}
        />
      </main>
    </>
  )
}

export default PostPage
Deploy to Vercel
Commit your current changes and create a new repository on GitHub with the GitHub CLI.
git add .
git commit -m "ct3a"
gh repo create ajcwebdev-t3 --public --push \
  --source=. \
  --description="An example T3 application with Next.js, Prisma, tRPC, and Tailwind deployed on Vercel." \
  --remote=upstream
pnpm vercel --env DATABASE_URL=YOUR_DATABASE_URL_HERE
Open my-sweet-t3-app.vercel.app.
Blog post is live for anyway who wants to check it out.
a first look at create-t3-app
A fullstack, typesafe React framework with Next.js, tRPC, Prisma, and Tailwind deployed on Vercel.
Outline
- Introduction
- Create t3 App
- Provision PostgreSQL Database
- Query Posts with tRPC
- Add Cells for Declarative Data Fetching
- Deploy to Vercel
- Resources
Wow this is beginner friendly (even if you don't understand some of the code, the docs explain what part of that code is)
Fantastic suggestion. I think it may also be helpful to add links to NextAuth's tips to adding Google's Authentication Plugins, or even better some form of best practices for each technology. I wonder if we all watch a Youtuber / Streamer who goes through best practices a lot who we can link to for each subject @TheoBr 🤔
Thank you for the inclusion @juliusmarminge and thanks to everyone else who chipped in with other written material, this is amazing stuff!