raspberry_ninja
 raspberry_ninja copied to clipboard
Publish or capture VDO.Ninja streams with Python (Raspberry Pi, Linux, Mac, Windows WSL)
 Raspberry Ninja
Turn your Raspberry Pi or Nvidia Jetson into a ninja-cam with hardware-acceleration enabled! This lets you publish live streaming video and audio directly to your web browser or OBS instance using VDO.Ninja. Achieve very low streaming latency over the Internet or a LAN; all for free.
It also has the ability to record remote VDO.Ninja streams to disk, without needing to transcode, and can broadcast a low-latency video stream to multiple viewers at time.
Preface
The core concepts and code used in this project can be reused for other projects; most Linux systems, and a large variety of embedded systems; potentially even smartphones. There's a focus of supporting Raspberry Pis and Nvidia Jetson systems, which includes offering pre-built images and install scripts. Other Linux system users should still be able to use the code, but setup support will be limited.
Youtube video demoing: https://youtu.be/J0qqXxHNU_c

Please note, as an alternative to this low-level approach to publishing with a Rpi, please consider using something like a Chromebook, especially if not connecting over a wired LAN network. Packet loss isn't tolerated well with this script yet, so you need a prestine connection for things to work well.
If you wish to play a video back, using a Raspberry pi, try this "kiosk" mode image that can be found here: https://awesomeopensource.com/project/futurice/chilipie-kiosk. Raspberry Pis seem to handle video playback in Chromium-based browsers pretty well; it's just the encoding they don't do well in browser yet.
Setup for a Raspberry Pi
See the raspberry_pi sub-folder for instructions on installing and setting up a Raspberry Pi. Jump there now
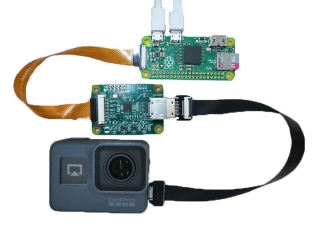
A Raspberry Pi works fairly well with a CSI-connected camera, but USB-based cameras currently struggle a bit with older Raspberry Pi models. As a result, consider buying an Nvidia Jetson Nano 2GB instead of a Raspberry Pi if looking to jump into this all. Also, the RPI Zero W 1 and RPi 3 both don't have the greatest WiFi built-in, while the Raspberry Pi Zero 2 seems to work rather well. Without good connectivity, you may find yourself facing frame-drops and stutter. HDMI to CSI adapters do work, but they may be limited to 25-fps and can be finicky still with some camera sources; audio over HDMI is also a bit tricky to setup currently.
Setup for an Nvidia Jetson
Please see the nvidia_jetson folder for details on installation. Jump there now
Nvidia Jetsons work well with USB-connected cameras and have a selection of compatible CSI-cameras well. You may need to buy WiFi adapter if it is not included.
Setup for Linux Desktops
Requirements:
You'll want to install Gstreamer 1.16 or newer; emphasis on the newer. You'll need to ensure libnice, srtp, sctp, and webrtcbin are part of that install, along with any media codecs you intend to use.
Python3 is also required, along with websockets. If you have PIP installed, pip3 install websockets can get you going there.
Usage
You should be able to run the publshing script simply with python3 publish.py, however lots of options are available for customizing as desired.
$ python3 publish.py
To get the list of supported commands with your version of the code, run python3 publish.py --help.
Sample help output: ( what's shown below may not be up-to-date)
usage: publish.py [-h] [--streamid STREAMID] [--server SERVER]
                  [--bitrate BITRATE] [--width WIDTH] [--height HEIGHT]
                  [--framerate FRAMERATE] [--test] [--hdmi] [--v4l2 V4L2]
                  [--rpicam] [--nvidiacsi] [--alsa ALSA] [--pulse PULSE]
                  [--raw] [--h264] [--nvidia] [--rpi] [--novideo] [--noaudio]
                  [--pipeline PIPELINE]

optional arguments:
  -h, --help            show this help message and exit
  --streamid STREAMID   Stream ID of the peer to connect to
  --server SERVER       Handshake server to use, eg:
                        "wss://wss.vdo.ninja:443"
  --bitrate BITRATE     Sets the video bitrate. This is not adaptive, so
                        packet loss and insufficient bandwidth will cause
                        frame loss
  --width WIDTH         Sets the video width. Make sure that your input
                        supports it.
  --height HEIGHT       Sets the video height. Make sure that your input
                        supports it.
  --framerate FRAMERATE
                        Sets the video framerate. Make sure that your input
                        supports it.
  --test                Use test sources.
  --hdmi                Try to setup a HDMI dongle
  --v4l2 V4L2           Sets the V4L2 input device.
  --rpicam              Sets the RaspberryPi input device.
  --nvidiacsi           Sets the input to the nvidia csi port.
  --alsa ALSA           Use alsa audio input.
  --pulse PULSE         Use pulse audio (or pipewire) input.
  --raw                 Opens the V4L2 device with raw capabilities.
  --bt601               Changes the input color profile when in raw mode to BT601
  --h264                For PC, instead of VP8, use x264.
  --vp8                 VP8 encoder instead of h264; likely software-based
  --nvidia              Creates a pipeline optimised for nvidia hardware.
  --rpi                 Creates a pipeline optimised for raspberry pi hadware.
  --novideo             Disables video input.
  --noaudio             Disables audio input.
  --omx                 An alternative hardware encoder for the RPi; glitches, but faster?
  --pipeline PIPELINE   A full custom pipeline
  --record STREAMID     Specify a remote stream ID to record; this will disable publishing mode
  --midi                MIDI transport; can forward/recieve MIDI to remote browser/device
  --save                Will save a local copy of the outbound stream to disk (MKV format)
  --rotate DEGREES      Will rotate the video by 90, 180 , or 270 degrees
  --multiviewer         Allows for multiple viewers at a time; this can increase bandwidth usage of course
Changing video input sources
Using gst-device-monitor-1.0 will list available devices and their 'caps', or settings. This can help determine what GStreamer pipeline changes need to be made in the script or getting info about what video format options are available for your device.
To help further debug, gst-launch-1.0 can be used to test a pipeline out before adding it to the script. For for added reference, here is an example Pipeline for the Rasbperry Pi to enable UVC-based MJPEG video capture support is:
gst-launch-1.0 v4l2src device=/dev/video0 io-mode=2 ! image/jpeg,framerate=30/1,width=1920,height=1080 ! jpegparse ! nvjpegdec ! video/x-raw ! nvvidconv ! "video/x-raw(memory:NVMM)" ! omxh264enc ! "video/x-h264, stream-format=(string)byte-stream" ! h264parse ! rtph264pay config-interval=-1 ! application/x-rtp,media=video,encoding-name=H264,payload=96 ! fakesink
Notice how we used device = OUR_AUDIO_DEVICE_NAME to specify the audio device we want to use, and we configure the device to read and decode JPEG, as that is what our device in this case supports.
The Raspberry_Ninja publish.py script automatically tries to create a pipeline for you, based on the command line arguments passed, but you can override that at a code level with your own pipeline if easier as well.
Adding an audio source
The script will use the default system ALSA audio output device, although you can override that using the command line arguments or via manually setting a gstreamer pipeline at the code level.
To get details of available audio devices, assuming pulseaudio is installed, running the following from the command line will give us access to audio device IDs
pactl list | grep -A2 'Source #' | grep 'Name: ' | cut -d" " -f2
resulting in..
alsa_input.usb-MACROSILICON_2109-02.analog-stereo
alsa_output.platform-sound.analog-stereo.monitor
alsa_input.platform-sound.analog-stereo
In this example, an HDMI audio source is the first in the list, so that is our device name. Your device name will likely vary.
Pulse audio and ALSA audio command-line arguments can be passed to setup audio, without needing to tweak Gstreamer pipelines manually. The defaults I think will use the system ALSA default device.
How to Run:
Ensure the pi/jetson is connected to the Internet, via Ethernet is recommended for best performance. You'll also very likely need to ensure a camera and/or microphone input are connected; this can also be a USB UVC device, supported CSI-based camera, or other selectable media inputs. It technically might be possible to even select a pipe to stream from, although this is a fairly advanced option.
Run using:
python3 publish.py --streamid SomeStreamID --bitrate 2000
In Chrome, open this link to view:
https://vdo.ninja/?password=false&view=SomeStreamID
One viewer at a time can work at the moment, although I am hoping to address this limitation shortly.
If you run with sudo, you might get a permissions error when using audio.
Auto-starting the script on boot
A guide on how to setup a RPI to auto-stream on boot can be found in the Rasbperry Pi folder, along with details on how to configure the WiFi SSID and password without needing to SSH in first.
Hardware options
Of the Raspberry Pi devices, the Raspberry Pi 4 or the Raspberry Pi Zero 2 are so far the best options on this front, depending on your needs. Any of the Nvidia Jetson devices should work fine, but only the Jetson Nano 2GB, 4GB, and NX have been tested and validated. If you wish to use other Jetson devices, you'll need to setup and install Gstreamer 1.19 yourself on those systems, as no pre-built image will be provided at this time. (Unless someone wishes to donate the hardware that is) Any other Linux system or SBC embedded system is on the user to setup and install at this point, but they should closely follow the same steps that the Nvidia Jetson uses.
Camera options
There's plenty of options for the Rasbperry Pi and Nvidia Jetson when it comes to cameras and HDMI adapters. The easiest option for a Raspberry Pi is to use one of the official Raspberry Pi camera. These are normally just plug an play on both platforms and well supported.
USB cameras are options, but currently with Raspberry Pi devices these are only supported up to around 720p30. USB 3.0 devices are even less supported, as you need to ensure the Raspberry Pi you are using supports USB 3.0; for example, a Camlink will not work on a Raspberry Pi 3.
If low-light is important to you, the Sony IMX327 and IMX462 series of sensors might appeal to you. They are generally designed for security camera applications, but with the use of an IR Filter, you can make them adequate for use a standard video cameras. These options may require additional gstreamer and driver work to have work however, so they are for more advanced-users at this time. Having purchased an IMX327 for myself, the low-light is incredible, but driver support requires significant effort to get working on a Raspberry Pi. ISP processing on a Pi is limited as well, so white-balance, HDR, and exposure controls might be insufficient for your application.
Links for such low-light cameras:
https://www.uctronics.com/arducam-for-raspberry-pi-ultra-low-light-camera-1080p-hd-wide-angle-pivariety-camera-module-based-on-1-2-7inch-2mp-starvis-sensor-imx462-compatible-with-raspberry-pi-isp-and-gstreamer-plugin.html (requires some extra driver install work currently - will try to support in the future natively)
https://www.amazon.ca/VEYE-MIPI-327E-forRaspberry-Jetson-XavierNX-YT0-95-4I/dp/B08QJ1BBM1 (requires some extra driver install work)
https://www.e-consystems.com/usb-cameras/sony-starvis-imx462-ultra-low-light-camera.asp (USB-based, so might be best suitable for a Jetson at the moment, and may not require complex drivers)
You can buy IR Filters, or you can buy lenses that come with IR filters, if needed, for pretty cheap. Many are designed for security applications, so be aware. https://fulekan.aliexpress.com/store/1862644
HDMI Input options
As per HDMI adapters, a 1080p30 USB 2.0 HDMI to MJPEG adapter can usually be had for $10 to $20, although there are many fake offerings out there. I've tested a $12 MACROSILICON HDMI to USB adapter, and it works pretty well with the Jetson (and OK with the RPI), although finding a legitimate one might be tricky. On a Raspberry Pi 4, 1080p30 is posssible with the HDMI to USB adapter, but audio currently then goes out of sync; at 720p though, audio stays in sync with the video more frequently. Audio sync issues might be resolved in the future with more system tuning.
There's another option though, and that is to use an HDMI to CSI adapter for Raspberry Pis, such as the C780A ($29 USD) https://www.aliexpress.com/item/1005002861310912.html, although the frame rate of an HDMI to CSI option is limited to 1080p25 (due to 2 CSI lanes only). It's also slightly more expensive than the HDMI to USB alternative. The RPi Compute Module boards seem to have four-lanes of CSI available though, so 30-fps might be achivable there if you buy the compatible board (C780B ?)
Audio is also more challenging when dealing with the HDMI to CSI adapters, as you need to connect audio from the board via I2S to the RPi. This isn't easy to do with some of the HDMI to CSI boards, but there are a couple options where this is a trival step.
Please note before buying that there are different HDMI to CSI2 boards, and they might look similar, but they are definitely not equal.
- X630 boards seem to have a solder-free audio support (via an addon board; X630-A2) and 1080p25 support; there's a nice YouTube guide on setting it up https://www.youtube.com/watch?v=lJL2Ihs1aYg and a kit available to make it all a breeze; https://geekworm.com/products/x630?variant=39772641165400.
- C779 boards do not support audio (hardware problem), making it quite challenging to use. But it is often the cheapest option. I don't recommend this option.
- C780 boards supposedly has fixed the audio issue of the C779 boards, but they remain untested by me yet. It appears they have good audio support and a 4-lane option (C780B) for the RPi Compute module boards, but most users will proabably need the two-lane C780A.
- Boards by Auvidea, like the B100, B101, or B102, have audio support via I2S it seems. These are more expensive options though, and there is mention of RPi Compute Module support with some of these Auvidea boards as well. I haven't tested these boards yet.
- I haven't tested the Geekworm HC100 board yet, but it seems similar to the B100/B101. Might require some light soldering to get audio support? Not sure.
HDMI to CSI boards are not plug-and-play currently, as they do require a couple tweaks to the boot file at the very least, and maybe an update to the EDID file. (script provided for that). Depending on the video input signal, you might need to further tweak settings, such as colorimetery settings. This not really an issue with the HDMI to USB adapters, as they convert to a very standard MJPEG format, making them more plug and play friendly.
Please share with the community what works well for you and what did not.
MIDI options
When using the --midi parameter, video and audio are disabled. Instead, the script can send and recieve MIDI commands over VDO.Ninja. Supports plug-and-play, although you may need to install python-rtmidi using pip3 first.
Incoming MIDI messages will be forwarded to the first MIDI device connected to the Pi. Adding &midiout to the viewer's view-link will have that remote browser send any MIDI messages (such as from a USB DJ Controller) to the raspberry_ninja publish.py script, which will then be forwarded to the first local MIDI device
Outgoing MIDI messages will be sent to connected viewers, and if those connected viewers have &midiin added to their view-links, those MIDI commands will be forwarded to the connected MIDI devices.
If using a virtual MIDI device on the remote viewer's computer, such as loopMIDI, you can target that as both a source and target for MIDI commands. This is especially useful for connecting VDO.Ninja to DJ software applilcations, like Mixxx or Serato DJ Pro, which supports mapping of MIDI inputs/outputs.
Please note, the raspberry_ninja publish.py script can both send and recieve MIDI commands over a single peer connection, which is a bit different than how video/audio work currently. It's also different than how browser to browser currently is setup, where a sender won't ever request MIDI data, yet the raspberry_ninja code does allow the sender to both send and receive MIDI data.
midi demo video: https://youtu.be/Gry9UFtOTmQ
Note:
-
Installation from source is pretty slow and problematic on a rpi; using system images makes using this so much easier.
-
Please use the provided backup server for development purposes; that wss server is
wss://apibackup.vdo.ninja:443and for viewing:https://backup.vdo.ninja -
Passwords must be DISABLED explicitly as this code does not yet have the required crypto logic added yet. Things will not playback if you leave off
&password=false -
The current code does not dynamically adjust resolution to combat frame loss; rather it will just drop frames. As a result, having a high quality connection between sender and viewer is required. Consider lowering the bitrate or resolution if problems persist.
-
Speedify.com works on Linux and embedded devices, providing network bonding and fail-over connections. The install instructions are pretty easy and can be found here: https://support.speedify.com/article/562-install-speedify-linux (not sponsored)
TODO:
-
Add an option for dynamic resolution, based on packet loss indicators. (advanced)
-
Fix VP8/VP9 recordings and add muxing to the H264 recordings (moderate)
-
Have an option to "playback" an incoming stream full-screened on a pi or jetson, to use as an input to an ATEM mixer.
-
Add a jitter buffer to the recording mode (moderate)
-
Add support for passwords and group rooms (steve)
-
Make easier to use for novice users; perhaps adding a local web-interface or config file accessible via an SD card reader via Windows. These options could then allow for setting of wifi passwords, device, settings, stream IDs, etc, without needing to SSH in or using nano/vim. (moderate)
-
Add a QR-code reader mode to the app, as to setup Stream ID, bitrate, and WiFi passwords using a little website tool. (moderate)
-- Add drivers for Arducam as default in installation build script and include in image
- Have gstreamer/python automatically detect the input devices, settings, system, and configure things automatically. Allowing for burn, plug, and boot, without needing to log in via SSH at all.
Further Reading:
Details on WebRTC mechanics, Gstreamer, debugging issues, and discussion of Hardware encoders: https://cloud.google.com/solutions/gpu-accelerated-streaming-using-webrtc
Metadata
Owner
Metadata
Publish or capture VDO.Ninja streams with Python (Raspberry Pi, Linux, Mac, Windows WSL)