electroncapture
 electroncapture copied to clipboard
Playback video in a frameless electron app for screen-sharing and window capture
Update: If looking to just use VDO.Ninja on PC/Mac, you do not need to use Electron capture. Previously (2020/2021) it was needed, but as of 2022, OBS Studio works quite well with VDO.Ninja directly via a browser source. Electron Capture offers some benefits, but it is optional. Please join me on discord at https://discord.vdo.ninja for help.
This is the Electron Capture app,
Created for VDO.Ninja users, it can provide users a clean way of window capturing websites. In the case of VDO.Ninja, it may offer a more flexible and reliable method of capturing live video than the browser source plugin built into OBS.
Jump to Downloads Section

Why ?
On some systems the OBS Browser Source plugin isn't available or doesn't work all that well, so this tool is a viable alternative. It lets you cleanly screen-grab just a video stream without the need of the Browser Source plugin. It also makes it easy to select the output audio playback device, such as a Virtual Audio device: ie) https://vb-audio.com/Cable/ (Windows & macOS; donationware) or VAC (Windows @ https://vac.muzychenko.net/), or Loopback (macOS).
The app can also be set to remain on top of other windows, attempts to hide the mouse cursor when possible, provides accurate window sizes for 1:1 pixel mapping, and supports global system hotkeys (CTRL+M on Windows, for example).
Windows users may find it beneficial too, as it offers support for VDO.Ninja's &buffer audio sync command and it has robust support for video packet loss. In other words, it can playback live video better than OBS can, with fewer video playback errors and with better audio/video sync. If you have a spare monitor, it may at times be worth the hassle to use instead of OBS alone.
The Electron Capture app uses recent versions of Chromium, which is more resistant to desync, video smearing, and other issues that might exist in the native OBS browser source capture method. More benefits listed here
Lastly, since playback is agnostic, you can window-capture the same video multiple times, using one copy in a mixed-down live stream, while using a window-capture to record a clean full-resolution isolated video stream. Both YouTube, Twitch, Facebook, and more are supported in this regard, where a full-window clean output option is available for those sites as well.
Video guide on how to use Electron Capture

Settings and Parameters
| Parameter | Alias | Description | Example values | Notes |
|---|---|---|---|---|
| --width | --w | Window width | 1280 | Value in px |
| --height | --h | Window height | 720 | Value in px |
| --x | X position on screen | 1 | Left side is 1 | |
| --y | Y position on screen | 1 | Top side is 1 | |
| --pin | --p | Pin window on top | (Takes no values) | Display this window always on top. |
| --url | --u | Set a custom link on start | https://vdo.ninja/?view=aCustomID | You can push and pull with single links or rooms. |
| --title | --t | Set a custom window title | Guest 1 | Handy for use with OBS window capture |
| --node | --n | Use advanced features | true | Enable with true. Allows for screen capture, global hotkeys, prompts and more. |
| --hwa | --a | Hardware acceleration | false | Disable with false |
- note: Use the --help command to get the most recent available commands and options
The default frameless resolution of the capture window is 1280x720. The app automatically accounts for high-DPI displays, so it is always 1:1 pixel-accurate with the specified resolution on even Apple Retina displays.
The optional Command Line arguments can be seen as examples below, along with their default values.
elecap.exe --width 1280 --height 720 --url 'https://vdo.ninja/electron' --title 'my Window name' --x 1 --y 1 --node 1
or for example
./elecap -w 1280 -h 720 -u 'https://vdo.ninja/electron' -t 'my Window name' --x 10 --y 10 -n 1
If running from Windows command prompt, any ampersand "&" characters will need to be escaped with a "^" character, as seen below:
C:\Users\Steve\Desktop>elecap -t feed2 --url https://vdo.ninja/?view=ePz9hnx^&scene^&codec=h264^&room=SOMETHINGTEST123
You can also use it like this, if you are in the same folder as the app itself:
elecap.exe --node true --title feed2 --url "https://vdo.ninja/?view=ePz9hnx&scene&codec=h264&room=SOMETHINGTEST123"
If running from a Windows batch file with the goal of launching multiple instances at a time, try the following:
start elecap.exe -t feed1 -u https://vdo.ninja/?view=2P342n5^&scene^&codec=h264^&room=SOMETHINGTEST123
timeout /T 1
start elecap.exe -t feed2 -u https://vdo.ninja/?view=ePz9hnx^&scene^&codec=h264^&room=SOMETHINGTEST123
timeout /T 1
start elecap.exe -t feed3 -u https://vdo.ninja/?view=12342n5^&scene^&codec=h264^&room=SOMETHINGTEST123
timeout /T 1
start elecap.exe -t feed4 -u https://vdo.ninja/?view=eP543hnx^&scene^&codec=h264^&room=SOMETHINGTEST123
timeout /T 1
start elecap.exe -t feed5 -u https://vdo.ninja/?view=432n5^&scene^&codec=h264^&room=SOMETHINGTEST123
timeout /T 1
start elecap.exe -t feed6 -u https://vdo.ninja/?view=eP654x^&scene^&codec=h264^&room=SOMETHINGTEST123
timeout /T 1
start elecap.exe -t feed7 -u https://vdo.ninja/?view=76542n5^&scene^&codec=h264^&room=SOMETHINGTEST123
timeout /T 1
start elecap.exe -t feed8 -u https://vdo.ninja/?view=gfd9hnx^&scene^&codec=h264^&room=SOMETHINGTEST123
- Please note, do not use double-quotes, rather single-quotes, if needing to enclose text via the command line.
- Please also note,the use ot timeout /T 1, as adding a delay between loading apps allows them to load correctly
- x and y position is available in v1.5.2 and up; x or y values must be greater than 0.

If you right-click the application, you'll get a context menu with additional options. Changing resolutions dynamically is an option, for example.
Screen-share, global hotkeys, and user-prompts
screen sharing
Starting with version 1.6.0, to enable screen-share support and some other features, the app needs Node Integration enabled; aka, Elevated Privileges. This will allow remote websites to run node-based code, which is a security concern if visiting untrusted websites.
You can enable Elevated Privileges for the app via the command line with --node 1 or in the app by right-clicking and selecting "Elevate Privileges" from the context-menu. If right-clicking to enable this mode, the app may reload the page afterwards.
A unique feature about the Electron Capture app is that it can auto-select a screen or window when screen-sharing with VDO.Ninja, without user-input. Adding to the VDO.Ninja URL, &ss=1 will select display 1, &ss=2 for the second display, etc. Or specify a window with &ss=window_name_here.
To select Screen 1 automatically on load, for example you can do:
elecap.exe --node 1 --url "https://vdo.ninja/beta/?ss=1&autostart"
or to select Discord automatically
elecap.exe --node 1 --url "https://vdo.ninja/beta/?ss=Discord&autostart"
It's also possible to select audio-only when screen sharing via Electron Capture with VDO.Ninja; you do not need to select a video if you wish to share audio-only.
global hotkeys
Global Hotkeys, such as CTRL+M, are supported. CTRL+M will mute the mic, in the most recently opened window. You can assign a custom global hot-key in VDO.Ninja, and it will be respected by Electron Capture. (VDO.Ninja Settings -> User -> Global Hotkey)
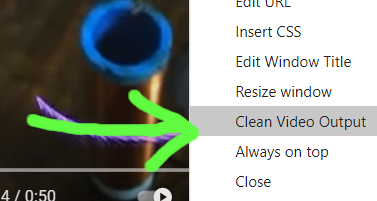
Youtube has a built-in automatic ad-skipper added, and for both Youtube, Twitch, and more, when watching a video, you can full-window the video, allowing for clean video capture. This option is available via the context menu of Electron Capture; just right-click somewhere on the page that is empty and select Clean Video Output.
Audio Output
A popular way of outputting audio from the Electron Capture app into OBS is done using a virtual audio cable. Some such cables include:
Mac Audio Options: https://rogueamoeba.com/loopback/ (macOS & non-free, but excellent), and https://existential.audio/blackhole/ (macOS & free) (and more here https://github.com/steveseguin/vdoninja/wiki/FAQ#macaudio)
Windows Audio Option: https://www.vb-audio.com/Cable/ (donationware)
If you intend to have more than a 6 virtual audio cables, you can try VAC instead of VB Cables, as VAC seems to support dozens of virtual audio cables, while VB Cable supports just a few: https://vac.muzychenko.net/
You can also use some advanced URL parameters to output the audio to specific channels. The following link links the parameters and the outcome, based on device/software used: https://docs.google.com/spreadsheets/d/1R-y7xZ2BCn-GzTlwqq63H8lorXecO02DU9Hu4twuhuA/edit?usp=sharing
You can still capture audio via OBS Browser source, appending &novideo to the URL to disable video. Appending &noaudio to the Electron Capture URL would conversely disable audio there, allowing you to capture audio with OBS browser source and video with Electron Capture. The audio/video sync might be slightly off in this setup, but not noticible in most cases.
Changing the audio output device
If you right click the app when on a site, you can change the audio output device for that site. This is useful for setting a Youtube or VDO.Ninja video to output to a virtual audio cable or headphones, rather than playout via the default audio device.
On macOS, this is especially helpful since there is a lack of audio routing controls.
Please note: To use this feature, you will need to elevate the app's privilleges, which can expose the user to security issues on untrusted websites.
Syphon Output
While there is no native Syphon or NDI output option yet available, one user has mentioned a solution for some users: http://www.sigmasix.ch/syphoner/
Automation Workflows with VDO.Ninja
You can see a quick start / cheat sheet guide for example uses of the app with VDO.Ninja here: https://github.com/steveseguin/vdo.ninja/blob/quickstart/automation/cheatsheet_obsn_automation.md
Notes on Using and Closing the App
For Windows users:
-
Right click to bring up the context menu, which allows you to close the app. You can also press ALT-F4 in many cases.
-
You can disable hardware-assisted rendering by passing '-a 0' to the command line when lauching; this can help hide the windows mouse cursor with some setups when using BitBlt capture mode.
-
You can use the Win+Tab key combo on Windows 10 machines to create a secondary desktop and load the Electron Capture into that. In this way, you can hide your electron capture windows, yet still have them be available to OBS for window-capture. This is a great option for window-capturing without on computers with limited desktop screen space.
For Mac users:
-
You can hover your mouse cursor over the top-left corner of the app to show the close button.
-
Also note, the top portion of the app is draggable, so you can move it around to place it accordingly. It is also resizable.
-
Multiple versions of the app can run on macOS; just make a copy of the file with a different name to open up a new window.
-
Desktop audio capture with screen share is not supported by Electron (https://www.electronjs.org/docs/latest/api/desktop-capturer#caveats)
-
You need to enable Screen Capture support in the macOS security preferences for the app to enable desktop capture support on macOS 10.15 Catalina or higher. Yuo also need to enable elevated privillges in the Electron Capture app itself.
-
If capturing the window with OBS, you can use either DISPLAY CAPTURE with a WINDOW CROP -or- WINDOW CAPTURE
--- WINDOW CAPTURE will have a video delay of up to ~800ms, but Windows can be stacked without issue
--- DISPLAY CAPTURE will have no delay, but the windows cannot be stacked, which could be a problem if you only have one screen
Links to downloads below.
You can find the newest release builds of the app here: https://github.com/steveseguin/electroncapture/releases or see below.
Please note that the Electron Capture app does not auto-update to newer versions of Chromium. This can become a security issue if it is left to become out of date. It's also recommended to not use the Electron Capture app with websites and remote VDO.Ninja peers that you do not trust.
Windows Version
There are two versions for Windows. An installer for x64 systems. There's also a portable version, which is larger in size, but supports x64 and x86 (32-bit) systems. The portable version requires no install and is easier to use from the command-line or from a batch file.
New release here: https://github.com/steveseguin/electroncapture/releases/
If you have problems, try a different version or contact me on Discord.
Mac Version
-
Newest version can be found here: https://github.com/steveseguin/electroncapture/releases/
-
If having problems, there's an older version here (v1.1.3) https://github.com/steveseguin/electroncapture/releases/download/1.1.3/obsn-1.1.3.dmg
If on version of Electron doesn't work for you all that well, try a different version. There may be some issues with rounded edges depending on you macOS version and the Electron version used.
Linux Version
There are two pre-build versions of Electron Capture available currently. One built for PopOS and another for Raspbian. Those builds are here: https://github.com/steveseguin/electroncapture/releases/tag/2.5.0
For most Linux users though, we're recommending Linux users build it themselves. Details below
Getting the correct nodejs/npm versions can be hard on linux, but using snap can help there.
sudo apt-get update
sudo apt-get install snapd -y
sudo snap install node --classic --channel=14
Next, close the shell and open a new one, to ensure the installation is completed.
To get the actual app source code and to build a distributable version, see below
git clone https://github.com/steveseguin/electroncapture
cd electroncapture
npm install
npm run build:linux
The file you need to run will be in the dist folder.
Building for the Raspberry Pi
If you want to compile on Raspberry Pi, it's possible, but keep in mind the GPU may not work without also patching Electron.js to support the GPU. Currently you'll need to run it without hardware-acceleration disabled, which is rather disappointing. Contributions that can help fix this are welcomed.
Anyways, this is all much like with the Linux install, but we also need to install fpm before trying to build the app.
sudo apt-get update
sudo apt-get install snapd -y
sudo apt-get remove nodejs -y
sudo snap install node --classic --channel=14

 ## close the current terminal shell and open a new one here ##

sudo apt install ruby ruby-dev -y
sudo gem install fpm
We also need to build the app using build:rpi instead of build:linux, as we need to target ARM versus x64.
git clone https://github.com/steveseguin/electroncapture
cd electroncapture
npm install
npm run build:rpi
You should get a .deb file in the dist file with this option. If you install the deb file, it should appear in the Raspbian start menu, under Other -> ElectronCapture
This will probably file if you do not disable the GPU / hardware-acceration within the Electron Capture app first, but who knows -- maybe you can get it working?
Building from source on Windows
You'll also need nodejs and npm installed.
If on Windows, you can find the NPM/Nodejs install files here: https://nodejs.org/en/download/current/
and then to get the source code for Electron Capture,
git clone https://github.com/steveseguin/electroncapture.git
cd electroncapture
To just run the app from source without building, you can:
npm install
npm start
If you get an error about node versions, you can install the required version with something like this:
npm install -g [email protected]
npm install
npm run build:win32
Building the app from source on macOS :
- For Mac, please also see this issue for building: https://github.com/electron-userland/electron-builder/issues/3828
The basic idea is is to first install node, npm, and git. Then to clone and build the folder:
git clone https://github.com/steveseguin/electroncapture.git
cd electroncapture
npm install -g [email protected]
npm install
npm run build:darwin
If you need to sign the build, for distribution, you can then try:
npm install
export appleId={[email protected]}
export appleIdPassword={app-specific-password-here}
sudo -E npm run build:darwin
Trouble-shooting -- if can't hide cursor when window capturing using OBS:
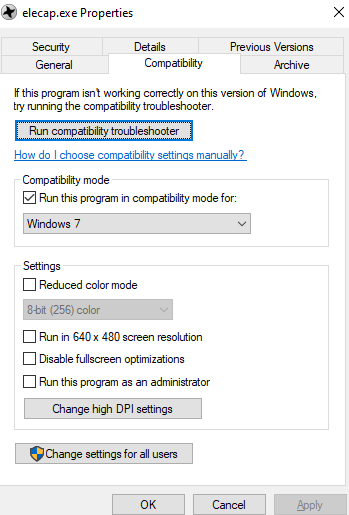
Change the capture method in OBS to "BitBlt"and uncheck the Capture Cursor. Also make sure OBS runs in compatibility mode for win 7, so you don't get a black screen

Adding &nocursor to VDO.Ninja will hide the cursor in that browser window, but that often isn't enough. If the above fails, make sure you are window capturing with OBS using the same display adapter for both OBS and the Electron window.
Lastly, if that still doesn't help, you can try Windows + Tab (on windows), and host the Electron Capture app on the secondary windows desktop. Window+Tab back to the main one and select the window then. You may need to toggle between the two desktops after selecting the window to capture, to get it to show in OBS, but it is one way of hiding the mouse.
You can also drag the Electron Capture far off screen, so the cursor can't approach it really.
Issues with dependencies when compiling
Sometimes a dependency won't update to the value stated in the package.json.
This option might be able to update the package.json to the newest version of dependencies automatically,
npx npm-check-updates -u
npm install
Seems to work with newer npm versions
Thank you
"Electron capture is one process that unstable atoms can use to become more stable. " - https://education.jlab.org/glossary/electroncapture.html

Metadata
Owner
Metadata
Playback video in a frameless electron app for screen-sharing and window capture