Dual boot Chrome OS with Windows 10 Bios Legacy / UEFI (MBR/GPT) without any error at all. [By creating chromos.img]
Go down to @ameyjoshi3068 post. ⬇️⬇️⬇️⬇️⬇️⬇️⬇️⬇️
https://github.com/sebanc/brunch/issues/1088#issuecomment-853543435
I really appreciate your efforts. I think this guide is worth suggesting to add in Wiki. But still we cannot neglect some things(Too long, region specific language. I will try to correct them and add a comment. Sebanc will take final decision of this.
will you please copy your guide here in edit mode? and paste it here This will be helpful for me (I am using same images as yours)
Sorry it was my mistake.
just edit your comment and copy everything inside write box.
paste it here and share the txt
Sorry it was my mistake. just edit your comment and copy everything inside
writebox. paste it here and share the txt
https://pastebin.ubuntu.com/p/mY4Bbw5QFf/
Hello! Dear, Dearer, Dearest ladies and gentleman of curious world who want to try Chrome OS on their laptop running UEFI or BIOS Legacy 64 bit (X64) .It definitely runs a lot faster than windows even with low RAM.
NOTE:- Dual booting is not natively supported with BIOS/MBR devices. If you want to try Chrome OS via full disk install, then view For BIOS/MBR Devices
Find whether your PC supports UEFI or MBR/BIOS
So let's start
Downloads
Download these files first
File 1. Linux Mint ISO file Select Cinnamon
File 2. Go to This Website and click on the three line button at top left corner and select table now find your recommended image and download it.
Currently:
- "rammus" is the recommended image for devices with Intel CPU up to 9th gen.
- "zork" is the image to use for AMD Ryzen (Just change /kernel with /kernel-5.10 in step 9 of "grub2WIn).
- "grunt" is the image to use for AMD Stoney Ridge.
you can also find more useful information on Main Page
File 3. go to Releases and download the latest release.
File 4(Optional). Download and install Grub2Win If you want to dual boot with windows.
File 5(Only for BIOS/MBR devices) Download and extract mbr_support.tar.gz in your Chrome OS folder.(You can find it on homepage)

For UEFI devices.
Procedure
-
create a new folder "Chrome OS" and extract file no 3 there.
-
extract file no. 2 in the same folder and rename it as
recovery.bin. -
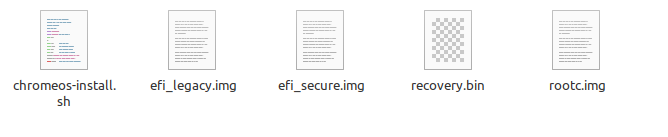
Now, folder Chrome OS should contain these files.
-
create live USB of Linux mint. guide here
-
after USB Device is created, copy "Chrome OS" folder in your it.
-
Insert USB and restart your PC.
-
Press your boot hot key list here
-
Select your usb drive name.
-
Take a hammer and press the enter key 🤣😂 Joke here
Ok jokes aside lets continue
-
Make sure you are connected to internet. press Ctrl+Alt+t
-
Paste the following code in terminal
sudo apt update
sudo apt install gparted pv cgpt figlet -y
-
Open Gparted from menu.
-
Select the drive in which you store your data [If you are having a single** c** drive then select it ]
-
Now, Right click on it and select RESIZE/MOVE OPTION
-
In the box labeled with Free space following (mib) type
internal storage you want in chrome os in mb + 11264
For example, I want 32 GB internal storage, I will type
44032inFree space following (mib)box
NOTE:- now eat almonds and remember this number 🧠 Just Kidding, Write it somewhere.
-
Click on Resize/Move button
-
Now right click on the new unallocated space and select New option.
-
Now in the file system box select ext4 and click on the add button.
-
Click on the green tick button (Apply all operations)

-
Select the newly created partition and right click.
-
Click on information and copy its path. Let us say, the path is APPLE.

- Open terminal once again and run the following commands
mkdir -p ~/tmpmount
sudo mount APPLE ~/tmpmount
You can exit terminal.
-
open files app and go to the file system folder
-
select cdrom folder
-
Here you will find Chrome OS folder
-
right click on an empty area and select open in terminal
-
then the most important step come here
type the command
sudo bash chromeos-install.sh -src recovery.bin -dst ~/tmpmount/chromeos.img
DO NOT press Enter
-
Now fetch the number from step15. use calculator and divide the number by 1024. This is your size. if it is in point then take the value without point for ex 20.6 ~ 20 50.1 ~ 50 61.7 ~ 61
-
now give size to your chromeos.img by typing -s and size in gb
for ex -s 19 -s 49 -s 60
at the end your command should look like this
sudo bash chromeos-install.sh -src recovery.bin -dst ~/tmpmount/chromeos.img -s 60
-
this time seriously take an hammer and kill the ENTER button
-
after completion you will get an message telling ChromeOS disk image created.
NOTE:- If you got "Not enough space" error, then just reduce the size by 1 and try again.
- Copy the lines which appear after disk image creation. Your configuration will be different than mine.
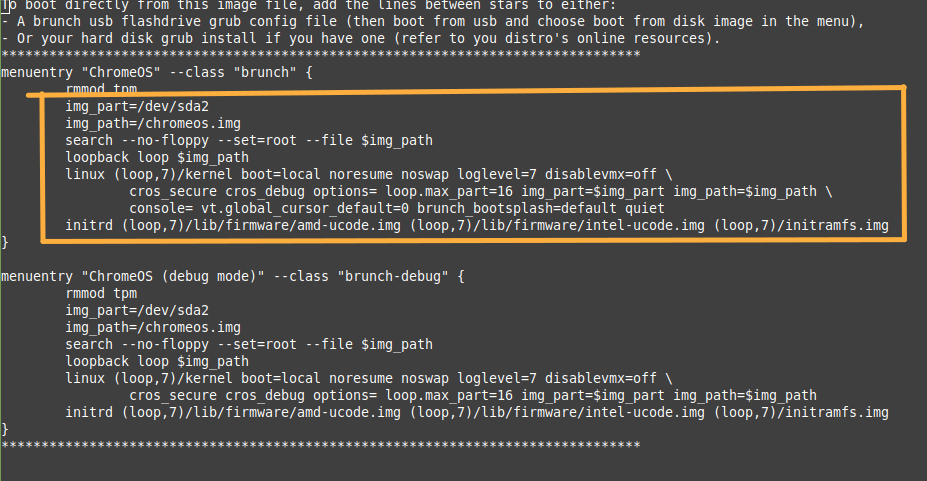
- Create a new text file in Chrome OS folder and paste them.
Now It's time to say goodbye to linux. Restart your PC and log in to Windows.
Setup Grub2Win
-
Install and open grub2win.
-
It may asks you about EFI. Select YES only if you have UEFI.
-
Follow the steps
-
After it is opened click manage boot menu

- Add a new entry.

-
Now, select custom code and enter the name"Chrome OS".
-
Click on "edit custom code"
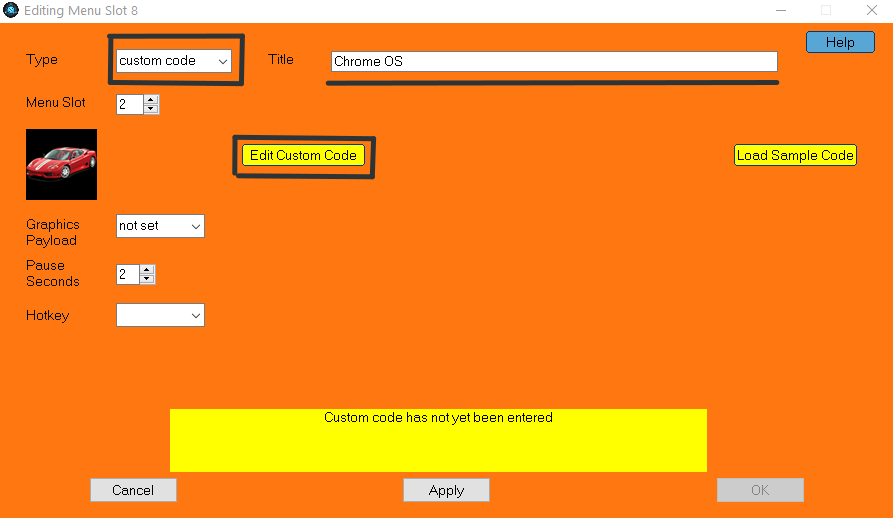
-
Go to Chrome OS folder and open the text file we have saved from linux and copy the code.
-
Come back to the notepad opened by grub2win and paste the code.
This one is my example

-
Save the file and exit notepad.
-
Click "Apply" and "OK"
Note:- Never press cancel or exit by cross button after exiting notepad. If you do, changes will not be saved.
-
Now, Restart your PC. You should see Grub2win.
-
Select Chrome OS (with keyboard)(mouse doesn't work)
-
Get some Pepsi and show your swag with chrome os.

For BIOS/MBR devices
-
Follow guide mentioned above upto step 11 in "Procedure" section of "For UEFI".
-
Extract mbr_support.tar.gz in Chrome OS folder (overwriting files when requested).
-
right click on an empty area and select open in terminal
-
Enter this command
sudo bash chromeos-install.sh -src recovery.bin -dst chromeos.img
- Done. Simply restart your pc and wait. Chrome OS will be ready to use.
Thanks, With love ❤️ Team brunch #HappyChromeOSjourney
Now Its final. Please tell any issues Now
@ameyjoshi3068 did you booted successfully on your laptop? I am asking this because I am getting error: partition not found error: you need to load the kernel first
I think it is happening because when I first done that perfectly I was in legacy But I recently reinstalled win 10 in UEFI.
And while making the img in ubuntu I am getting Partition 3: No space left on device Par.......4: No space left on device And continued upto Partition 12 and then it gives Chrome OS disk image created.
I tried installing in UEFI and it worked fine. I dont have legacy bios PC I have not changed any important steps from your guide.
The error you got "No space left on device" seems to be responsible for failed boot. Have you tried installing with instructions from readme.md and got no error?
@ameyjoshi3068 I got the error not during the boot but while creating the disk img in the terminal. So there is no relation with failed boot that is another topic.
Sorry for delayed reply, I was busy in some irl stuff
I will add an pull request to add the link of this guide in readme.md And I will also try to add whole guide in wiki.
I cannot replace guide given in readme with this. Because though anyone can use it brunch project is not made for beginners.
The error you got "No space left on device" seems to be responsible for failed boot. Have you tried installing with instructions from readme.md and got no error?
https://github.com/sebanc/brunch/issues/769#issuecomment-753536795 This is not a serious issue.
@ameyjoshi3068 And what about error:no such partition error:you need to load the kernel first During boot.
If you have installed Chrome OS on NTFS partition, then try it on ext4. cross check your grub configuration, cross check partition number, try recreating chromeos.img
Read this https://github.com/sebanc/brunch/issues/77#issuecomment-627695332
Just for clarity, I am understanding of this issue during boot is on MBR/ BIOS device
If it is on UEFI device, then the only culprit seems to be your grub configuration or corrupted image
And if your device supports both UEFI and MBR then check your BIOS configuration, whether it is set to UEFI or MBR. Both UEFI and MBR version of OS on same pc mostly causes trouble.
Sorry, I have been very busy... Thanks a lot for the detailed guide :) it looks great and is now referred to in the main Readme
@ameyjoshi3068 And what about error:no such partition error:you need to load the kernel first During boot.
Even I have the same issue
@simplyrajatgupta Please edit this issue and I will also remove BIOS/MBR part from the guide. Since there are reports that dual booting in MBR/BIOS actually doesn't work.
@ameyjoshi3068 And what about error:no such partition error:you need to load the kernel first During boot.
Even I have the same issue
@supersri811 I am having a solution for that
- Follow the UEFI guide (carefully without any spelling mistakes) upto step 31 and after that copy everything written inside the star box.
menuentry ...............
.........................../initrarmfs.img
-
While setting up grub2win write the menuentry Chromeos class debug ............ Code
-
Now remove rmmod tpm and **menuentry ........ debug ** line and also don't forget to remove
}
At the end. 4.restart your pc.
Hello! Dear, Dearer, Dearest ladies and gentleman of curious world who want to try Chrome OS on their laptop running UEFI or BIOS Legacy 64 bit (X64) .It definitely runs a lot faster than windows even with low RAM.
NOTE:- Dual booting is not natively supported with BIOS/MBR devices. If you want to try Chrome OS via full disk install, then view For BIOS/MBR Devices
Find whether your PC supports UEFI or MBR/BIOS
So let's start
Downloads
Download these files first
File 1. Linux Mint ISO file Select Cinnamon
File 2. Go to This Website and click on the three line button at top left corner and select table now find your recommended image and download it.
Currently:
- "rammus" is the recommended image for devices with Intel CPU up to 9th gen.
- "zork" is the image to use for AMD Ryzen (Just change /kernel with /kernel-5.10 in step 9 of "grub2WIn).
- "grunt" is the image to use for AMD Stoney Ridge.
you can also find more useful information on Main Page
File 3. go to Releases and download the latest release.
File 4(Optional). Download and install Grub2Win If you want to dual boot with windows.
File 5(Only for BIOS/MBR devices) Download and extract mbr_support.tar.gz in your Chrome OS folder.(You can find it on homepage)
For UEFI devices.
Procedure
- create a new folder "Chrome OS" and extract file no 3 there.
- extract file no. 2 in the same folder and rename it as
recovery.bin.- Now, folder Chrome OS should contain these files.
- create live USB of Linux mint. guide here
- after USB Device is created, copy "Chrome OS" folder in your it.
- Insert USB and restart your PC.
- Press your boot hot key list here
- Select your usb drive name.
- Take a hammer and press the enter key 🤣😂 Joke here
Ok jokes aside lets continue
- Make sure you are connected to internet. press Ctrl+Alt+t
- Paste the following code in terminal
sudo apt update
sudo apt install gparted pv cgpt figlet -y
- Open Gparted from menu.
- Select the drive in which you store your data [If you are having a single** c** drive then select it ]
- Now, Right click on it and select RESIZE/MOVE OPTION
- In the box labeled with Free space following (mib) type
internal storage you want in chrome os in mb + 11264For example, I want 32 GB internal storage, I will type
44032inFree space following (mib)boxNOTE:- now eat almonds and remember this number 🧠 Just Kidding, Write it somewhere.
- Click on Resize/Move button
- Now right click on the new unallocated space and select New option.
- Now in the file system box select ext4 and click on the add button.
- Click on the green tick button (Apply all operations)
- Select the newly created partition and right click.
- Click on information and copy its path. Let us say, the path is APPLE.
- Open terminal once again and run the following commands
mkdir -p ~/tmpmount
sudo mount APPLE ~/tmpmountYou can exit terminal.
- open files app and go to the file system folder
- select cdrom folder
- Here you will find Chrome OS folder
- right click on an empty area and select open in terminal
- then the most important step come here
type the command
sudo bash chromeos-install.sh -src recovery.bin -dst ~/tmpmount/chromeos.imgDO NOT press Enter
- Now fetch the number from step15. use calculator and divide the number by 1024. This is your size. if it is in point then take the value without point for ex 20.6 ~ 20 50.1 ~ 50 61.7 ~ 61
- now give size to your chromeos.img by typing -s and size in gb
for ex -s 19 -s 49 -s 60
at the end your command should look like this
sudo bash chromeos-install.sh -src recovery.bin -dst ~/tmpmount/chromeos.img -s 60
- this time seriously take an hammer and kill the ENTER button
- after completion you will get an message telling ChromeOS disk image created.
NOTE:- If you got "Not enough space" error, then just reduce the size by 1 and try again.
- Copy the lines which appear after disk image creation. Your configuration will be different than mine.
- Create a new text file in Chrome OS folder and paste them.
Now It's time to say goodbye to linux. Restart your PC and log in to Windows.
Setup Grub2Win
- Install and open grub2win.
- It may asks you about EFI. Select YES only if you have UEFI.
- Follow the steps
- After it is opened click manage boot menu
- Add a new entry.
- Now, select custom code and enter the name"Chrome OS".
- Click on "edit custom code"
- Go to Chrome OS folder and open the text file we have saved from linux and copy the code.
- Come back to the notepad opened by grub2win and paste the code.
This one is my example
- Save the file and exit notepad.
- Click "Apply" and "OK"
Note:- Never press cancel or exit by cross button after exiting notepad. If you do, changes will not be saved.
- Now, Restart your PC. You should see Grub2win.
- Select Chrome OS (with keyboard)(mouse doesn't work)
- Get some Pepsi and show your swag with chrome os.
For BIOS/MBR devices
- Follow guide mentioned above upto step 11 in "Procedure" section of "For UEFI".
- Extract mbr_support.tar.gz in Chrome OS folder (overwriting files when requested).
- right click on an empty area and select open in terminal
- Enter this command
sudo bash chromeos-install.sh -src recovery.bin -dst chromeos.img
- Done. Simply restart your pc and wait. Chrome OS will be ready to use.
Thanks, With love ❤️ Team brunch #HappyChromeOSjourney
Hey @ameyjoshi3068 I tried this method carried out each and every method properly but when I executed the command to create the ChromeOS image it made many partitions of my drive and messed it all up, I don't know why I created images many time they weren't successful but this never happened. Any suggestions or should I try once more?