cp2077-respector
 cp2077-respector copied to clipboard
A Cyberpunk 2077 mod for managing player builds in the form of spec files containing player experience, attributes, skills, perks, and equipment, with useful extra features.
Respector
A Cyberpunk 2077 mod for managing player builds in the form of spec files containing player experience, attributes, skills, perks, and equipment, with useful extra features.
- New Game Plus: Transfer your character and equipment between playthroughs. You can try each life path while keeping the experience gained from other playthroughs, replay the same mission with different abilities and equipment, etc.
- Character Respec: Adjust your Attributes and restore all spent Perk Points to redistribute them.
- Build Management: Try different builds switching them on the fly while playing, share builds with others.
- Item Management: Create item packs (eg. "Stash Wall Weapons", "Legendary Outfits").
- Quick Tweaks: Get items and resources, unlock vehicles, manipulate facts with ease just by typing the in-game name of a thing in the search bar.
Requirements
- Cyber Engine Tweaks 1.20.0
- Cyberpunk 2077 1.6
Installation
- Download the release archive.
- Extract it into the Cyberpunk 2077 installation folder.
You should have <Cyberpunk 2077>/bin/x64/plugins/cyber_engine_tweaks/mods/respector directory now.
Usage
Specs
The main concept of the mod is the spec file. Spec defines:
- Character Level
- Street Cred
- Attributes
- Skills and their progression
- Perks
- Unused points
- Equipped gear
- Weapons with attachments and mods
- Clothing with mods
- Quick use items
- Equipped cyberware
- Cyberware with mods
- Quickhacks
- Backpack items
- Crafting components
- Crafting recipes
- Own vehicles
To get kind of New Game Plus experience, you need to save a spec in one playthrough and load that spec in another playthrough. This will transfer your character and equipment from one playthrough to another.
Spec files are human readable and designed to be created and edited manually. Here is a portion of the spec file to get the overall idea:
Character = {
    Level = 50,
    StreetCred = 50,
    Attributes = {
        Body = 20,
        Reflexes = 18,
        TechnicalAbility = 20,
        Intelligence = 9,
        Cool = 4,
    },
    Skills = {
        Athletics = 20,
        Annihilation = 20,
        StreetBrawler = 11,
        Assault = 18,
        Handguns = 18,
        Blades = 15,
        Crafting = 19,
        Engineering = 20,
        BreachProtocol = 7,
        Quickhacking = 9,
        Stealth = 4,
        ColdBlood = 4,
    },
    Perks = {
        ...,
        Engineering = {
            Bladerunner = 2, -- Max: 2 / Increase damage to drones, mech and robots by 20/40%.
            Tesla = 3, -- Max: 3 / Increase the charge multiplier for Tech weapons by 15/35/55%.
            Insulation = 1, -- Max: 1 / Grants immunity to shock.
            FuckAllWalls = 1, -- Max: 1 / Reduces the charge amount needed for Tech weapons ...
            LicketySplit = 2, -- Max: 2 / Tech weapons charge time is reduced by 10/20%.
            Superconductor = 1, -- Max: 1 / Tech weapons ignore Armor.
            Revamp = 1, -- Max: 0+ / Increases damage Tech weapons by 25%, increases charge ...
        },
        ...
    },
},
Equipment = {
    -- WIDOW MAKER / Weapon / Tech / Legendary
    {
        id = "Preset_Achilles_Nash_Legendary",
        seed = 4114643488,
        slots = {
            -- E255 PERCIPIENT / Rare
            -- ADS Time -0.13% / Range +0.31
            { slot = "Scope", id = "w_att_scope_long_02", seed = 442254023, upgrade = "Rare" },
            -- COUNTERMASS / Epic
            { slot = "Mod1", id = "SimpleWeaponMod11" },
            -- WEAKEN / Rare
            { slot = "Mod2", id = "SimpleWeaponMod13" },
            -- CRUNCH / Epic
            { slot = "Mod3", id = "SimpleWeaponMod01", upgrade = "Epic" },
            -- CRUNCH / Epic
            { slot = "Mod4", id = "SimpleWeaponMod01", upgrade = "Epic" },
        },
        equip = 2,
    },
    -- MAXDOC MK.1 / Consumable / Meds / Uncommon
    { id = "FirstAidWhiffV0", equip = 3, qty = 149 },
    ...
},
Cyberware = {
    -- NETWATCH NETDRIVER MK.5 / Cyberware / Operating System / Legendary
    {
        id = "NetwatchNetdriverLegendaryMKV",
        seed = 1441747907,
        slots = {
            -- SYSTEM RESET / Legendary
            { slot = "Program1", id = "SystemCollapseLvl4Program" },
            -- SYNAPSE BURNOUT / Epic
            { slot = "Program2", id = "BrainMeltLvl3Program" },
            -- SHORT CIRCUIT / Rare
            { slot = "Program3", id = "EMPOverloadLvl2Program" },
            -- REBOOT OPTICS / Rare
            { slot = "Program4", id = "BlindLvl2Program" },
            -- PING / Rare
            { slot = "Program5", id = "PingLvl2Program" },
        },
        equip = true,
    },
    ...
},
Crafting = {
    Recipes = {
        "Preset_Zhuo_Eight_Star", -- BA XING CHONG / Legendary
        ...
    }
},
Vehicles = {
    "v_sport1_quadra_turbo_r_player", -- TURBO-R V-TECH
    ...
}
You can edit spec files with a simple text editor. By default, spec files are stored in the specs directory of the mod.
This entire example, including comments, is generated by the mod.
Here is the full example.
In the samples/specs
directory you can find sample specs with comments explaining some details about spec features.
Packs
Every section of the spec file is optional and can be omitted. For example, it's possible to create the spec containing only items, thus allowing creation of item packs.
In the samples/packs
directory you can find packs of different categories.
To get stuff from a pack just drop it to the specs directory and then load the spec you want.
These packs can also be used as a reference to find the ID of item of intereset.
All items have in-game names, and many of them even have full descriptions and stats.
Scripting
Beside declarative syntax the spec format also allows scripting. Here is the example of the scripted spec that for every legendary clothing mod creates a clothing item filled with that mod in each slot.
Console
To access the mod from the console you have to use GetMod():
Respector = GetMod("respector")
Then you can call mod functions using the Respector global object.
Respector.LoadSpec(specName)
Loads spec named specName.
Calling without parameters Respector.LoadSpec() will load spec with
a default name from the configuration.
Respector.SaveSpec(specName, specOptions)
Saves spec with the name specName and using specOptions.
If name is empty or nil, then the default name from the configuration is used.
Overwrites a spec file with the same name if existing.
Available options for specOptions are:
| Option | Values | Default | Description |
|---|---|---|---|
character |
bool |
true |
If enabled, the character levels, attributes, skills, and perks will be added to the spec. |
allPerks |
bool |
false |
If enabled, all perks will be saved in the spec, including those not purchased. If disabled, only purchased perks will be saved. |
equipment |
bool |
true |
If enabled, the currently equipped items will be added to the spec. |
cyberware |
bool |
true |
If enabled, the currently equipped cyberware will be added to the spec. |
backpack |
bool |
true |
If enabled, items in the backpack will be added to the spec. |
components |
bool |
true |
If enabled, crafting components will be added to the spec. |
recipes |
bool |
true |
If enabled, crafting recipes will be added to the spec. |
vehicles |
bool |
true |
If enabled, own vehicles will be added to the spec. |
itemFormat |
"auto","hash","struct" |
"auto" |
The preferred ItemID format for use in item specs:"auto" – Use hash name whenever possible."hash" – Always use a raw hash value (eg. 0x00000018026C324A)."struct" – Always use a struct with hash and length (eg. { hash = 0x026C324A, length = 27 }). |
keepSeed |
"auto","always" |
"auto" |
How to save the RNG seed in item specs:"auto" – Save the seed only for items that can be randomized."always" – Always save the seed for all items. |
timestamp |
bool |
false |
If enabled, saves the spec with a name appended with the current date and time (eg. V-201210-042037). Useful to never overwrite existing spec files, only create new ones. |
Any particular option and specOptions parameter itself can be omitted.
In this case, the default option values will be used.
The defaults for most of the options can be changed in the configuration.
For example, Respector.SaveSpec("Legend", { itemFormat = "hash", recipes = false, timestamp = true })
will create a spec named Legend-210105-142037 (assuming it's January 5, 2021, 14:20)
containing everything but crafting recipes and having hash values for item IDs instead of names.
Calling without parameters Respector.SaveSpec() will save the spec with a default name, overwriting the existing one, and using all default options.
Respector.SaveSnap()
Saves spec with a default name appended with the current date and time.
Has the same results as Respector.SaveSpec(nil, { timestamp = true }) but is slightly shorter.
Respector.ExecSpec(specData)
Applies spec defined by specData. The format of the spec data is the same as for spec files.
For example, this useful snippet Respector.ExecSpec({ Character = { Perks = {} } })
will reset all purchased Perks and restore spent Perk Points.
GUI
The mod window opens with the Cyber Engine Tweaks console,
which is usually opened with the backtick (`) or tilde (~) key.
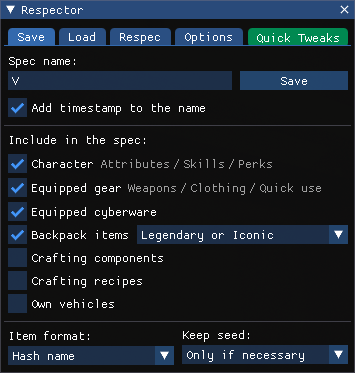
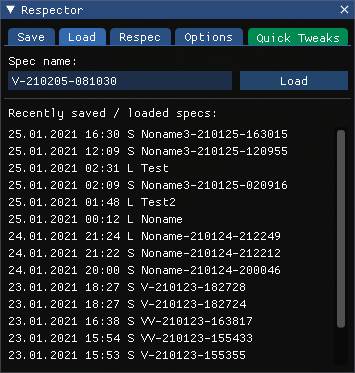
Save / Load
The mod has a simple GUI that allows you to save and load specs. You can choose the options for saving specs and see recent history.
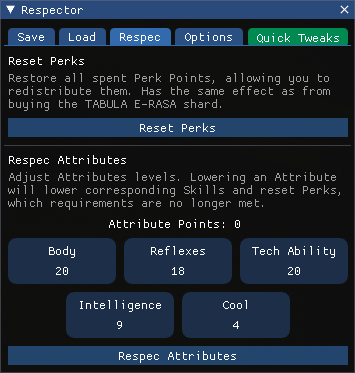
Respec
Here you can reset Perk Points, like with the TABULA E-RASA shard, and respec the Attributes. Lowering an Attribute will lower the corresponding Skills and reset the Perks, which requirements are no longer met.
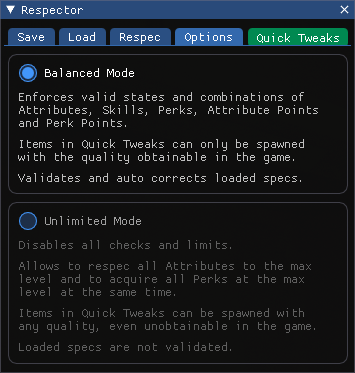
Options
Here you can switch the operating mode. If you are using a character that exceeds the base game limits and are using other mods that exceed the base game capabilities, then you will probably need to enable Unlimited Mode in order for the mod to properly handle your build.
Quick Tweaks
Hitting green button will open another window with Quick Tweaks.
Start the search by typing in your query or by selecting a recent search from the list. Middle clicking on the recent search will remove it from the list.
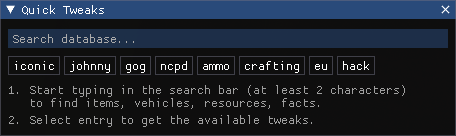
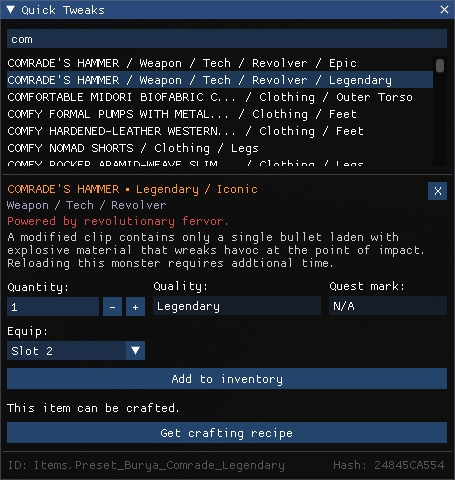
You can find a different kind of things in the database. For example, weapons that you can produce right there or unlock for crafting.
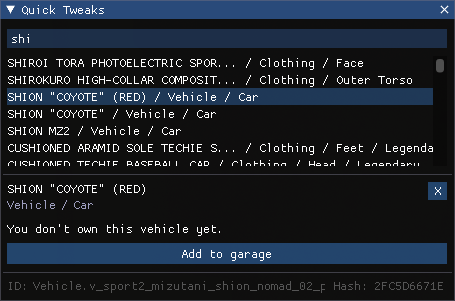
Another example is a vehicle that you can unlock for yourself if you haven't done so before:
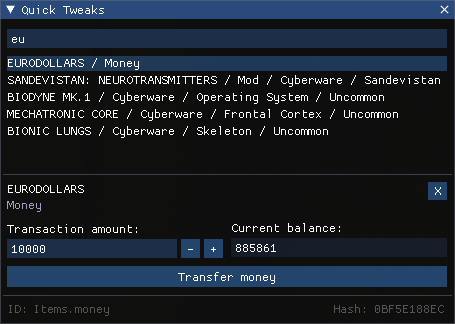
Also, you can find game facts. They indicate what you have done or can do.

The classic cheat is also there:
Some items can be found by group tags. For example, to find all parts of the Corpo Set outfit you can use simple request:
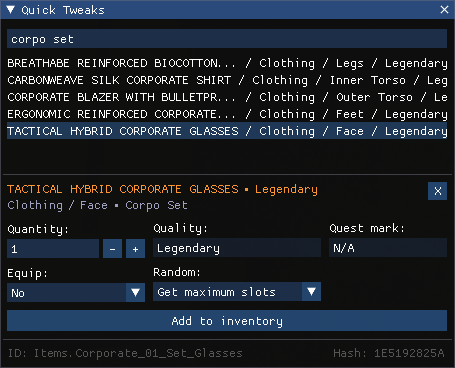
For clothing items there is an extra option to always get the max mod slots.
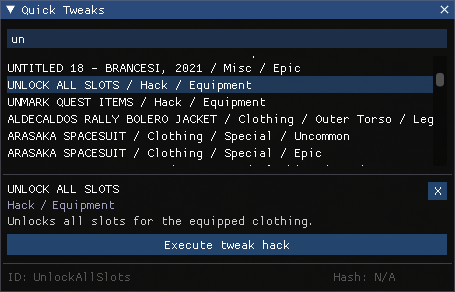
There are also a couple of simple hacks:
Configuration
The configuration is stored in the config.lua file.
| Parameter | Default | Options | Description |
|---|---|---|---|
specsDir |
"" |
string |
The directory for storing spec files. If empty then the specs dir of the mod is used. |
defaultSpec |
"V" |
string |
The defalt spec name. Used when saving and loading without specifying a spec name (aka quick saving an quick loading). |
defaultOptions |
{...} |
{...} |
Default options for saving specs. See spec options for details. |
useGui |
true |
bool |
Enables the GUI. |
useModApi |
true |
bool |
Enables API access using GetMod(). |
A copy of the config file with default values can be found at samples/config/defaults.lua.
TODO
- Ability to manage the individual stats of the weapon.
Credits
- yamashi, WSSDude420 and Cyber Engine Tweaks team
- WolvenKit, WopsS, rfuzzo, Rick Gibbed, PixelRick and all researchers
- NLDW#1337, clairepliz4647, all contributors to public spreadsheets and wikis