lovelace-mushroom
 lovelace-mushroom copied to clipboard
Build a beautiful Home Assistant dashboard easily
🍄 Mushroom
![]()


What is mushroom ?
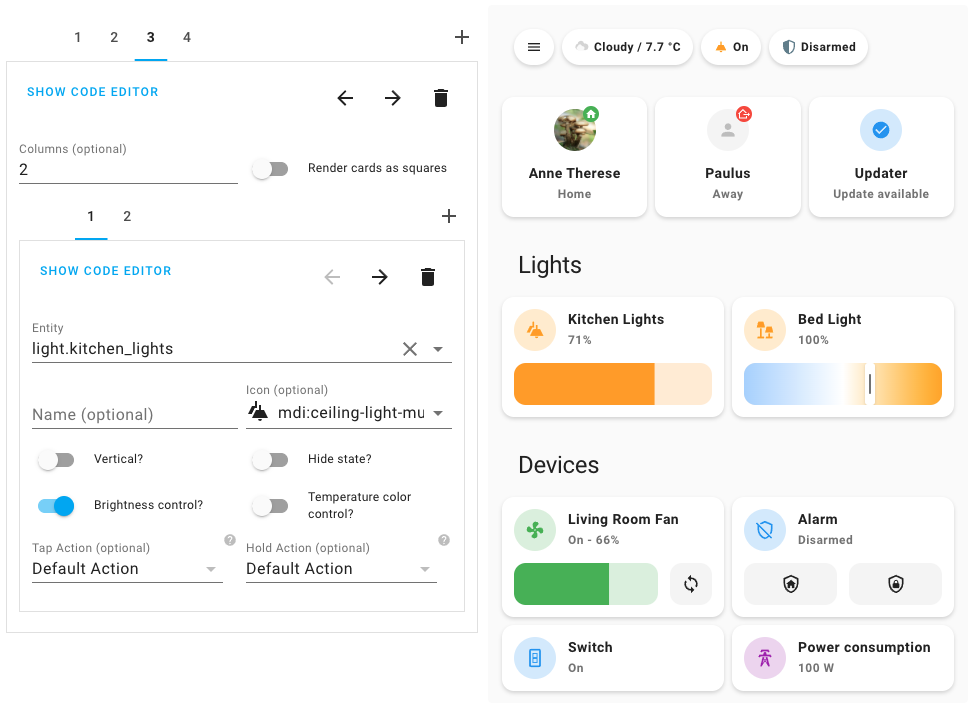
Mushroom is a collection of cards for Home Assistant Dashboard UI.
Mushroom mission is to propose easy to use components to build your Home Assistant dashboard.
Features
- 🛠 Editor for all cards and and all options (no need to edit
yaml) - 😍 Icon picker
- 🖌 Color picker
- 🚀 0 dependencies : no need to install another card.
- 🌈 Based on Material UI colors
- 🌓 Light and dark theme support
- 🎨 Optional theme customization
- 🌎 Internationalization
The goal of Mushroom is not to provide custom card for deep customization. You can use the excellent UI Lovelace Minimalist and Button card plugins for this.
Installation
HACS
Mushroom is available in HACS (Home Assistant Community Store).
- Install HACS if you don't have it already
- Open HACS in Home Assistant
- Go to "Frontend" section
- Click button with "+" icon
- Search for "Mushroom"
Manual
- Download
mushroom.jsfile from the [latest-release]. - Put
mushroom.jsfile into yourconfig/wwwfolder. - Add reference to
mushroom.jsin Dashboard. There's two way to do that:- Using UI: Settings → Dashboards → More Options icon → Resources → Add Resource → Set Url as
/local/mushroom.js→ Set Resource type asJavaScript Module. Note: If you do not see the Resources menu, you will need to enable Advanced Mode in your User Profile - Using YAML: Add following code to
lovelacesection.resources: - url: /local/mushroom.js type: module
- Using UI: Settings → Dashboards → More Options icon → Resources → Add Resource → Set Url as
Usage
All the Mushroom cards can be configured using Dashboard UI editor.
- In Dashboard UI, click 3 dots in top right corner.
- Click Edit Dashboard.
- Click Plus button to add a new card.
- Find one of the Custom: Mushroom card in the list.
Cards
Different cards are available for differents entities :
- 🚨 Alarm card
- 🪟 Cover card
- 🪄 Entity card
- 💨 Fan card
- 💡 Light card
- 🙋 Person card
- 🛠 Template card
- 🔔 Chips card
- ✏️ Title card
- 📦 Update card
- 🧹 Vacuum card
- 📺 Media card
- 🔒 Lock card
- 💧 Humidifier card
- 🌡 Climate card
Theme customization
Mushroom works without theme but you can add a theme for better experience by installing the Mushroom Themes. If you want more information about themes, check out the official Home Assistant documentation about themes.
Development server
Home assistant demo
You can run a demo instance of Home Assistant with docker by running:
npm run start:hass
Once it's done, go to Home Assistant instance http://localhost:8123 and start configuration.
Windows Users
If you are on Windows, either run the above command in Powershell, or use the below if using Command Prompt:
npm run start:hass-cmd
Development
In another terminal, install dependencies and run development server:
npm install
npm start
Server will start on port 5000.
Home assistant configuration
Once both Home Assistant and mushroom are running, you have to add a resource to Home Assistant UI:
- Enable
Advanced Modein your profile page - Go to Dashboard Resources and add the ressource
http://localhost:5000/mushroom.js:
Settings → Dashboards → More Options icon → Resources → Add Resource → Set URL ashttp://localhost:5000/mushroom.js→ Set Resource type asJavaScript Module.
Build
You can build the mushroom.js file in dist folder by running the build command.
npm run build
Maintainer steps to add a new language
- To be compatible with Home Assistant, language tags have to follow BCP 47. A list of most language tags can be found here: IANA subtag registry. Examples:
fr,fr-CA,zh-Hans. - Create a new file
{language_code}.jsonwith your language code in the translation folder. Examples:fr.json. - Import your file into the
localize.ts fileand add your language in thelanguagesrecord. - Don't forget to test locally with the development server by choosing the language with the Home Assistant UI in your profile.
Credits
The design is inspired by 7ahang’s work on Behance and Ui Lovelace Minimalist.