soundlights
 soundlights copied to clipboard
Console-based Audio Visualizer for Alsa
Soundlights
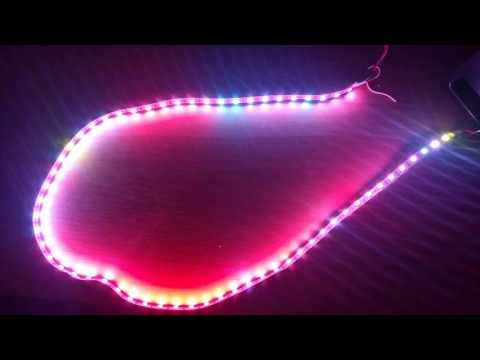
Soundlights built on top of cava with Raspberry Pi/ESP8266 and NeoPixel Strip.
Installation:
- build cava with (full instruction available below):
./autogen.sh
./configure
make
Raspberry PI
- install expect;
- install rpi_ws281x on your Raspberry Pi;
- copy
soundlights/soundlights.pyto your Raspberry Pi.
Connect NeoPixel Strip to Raspberry Pi:
- ground → ground PIN;
- power → 3.3V PIN;
- logic → GPIO PIN 18.
Usage:
unbuffer ./cava -p soundlights/cava_config | ssh [email protected] sudo python soundlights.py
ESP8266
- connect ESP8266 board to your wifi;
- upload
soundlights/esp/main.pyto your ESP8266.
Connect NeoPixel Strip to your board:
- ground → ground PIN;
- power → 3.3V PIN;
- logic → GPIO PIN 5 (D01 on my board).
Usage:
unbuffer ./cava -p soundlights/cava_config | python cava/soundlights/esp/client.py
Original readme
Console-based Audio Visualizer for ALSA (MPD and Pulseaudio)
by Karl Stavestrand
Now with more colors! Use hex codes in config, for example:
background = '#253552'
foreground = '#FF479C'
(hex code must be within '')

thanks to anko for the gif, here is the recipe.
Table of Contents generated with DocToc
- What it is
- Build requirements
-
Getting started
- Installing manually
- Uninstalling
- openSUSE
- Fedora
- Arch
- Ubuntu
-
Capturing audio
- From Pulseaudio monitor source (Easy, default if supported)
- From ALSA-loopback device (Tricky)
- From mpd's fifo output
- Running via ssh
-
Font notes
- In ttys
- In terminal emulators
- Latency notes
-
Usage
- Controls
- Configuration
- Thanks
What it is
C.A.V.A. is a bar spectrum audio visualizer for the Linux terminal using ALSA, pulseaudio or fifo buffer for input.
This program is not intended for scientific use. It's written to look responsive and aesthetic when used to visualize music.
Build requirements
- FFTW
- ncursesw dev files (bundled in ncurses in arch)
- ALSA dev files
- Pulseaudio dev files
Only FFTW is actually required for CAVA to compile, but for maximum usage and preformance ncurses and pulseaudio and/or alsa dev files are recommended. Not sure how to get the pulseaudio dev files for other distros than debian/ubuntu or if they are bundled in pulseaudio.
All the requirements can be installed easily in all major distros:
Debian/Raspbian:
apt-get install libfftw3-dev libasound2-dev libncursesw5-dev libpulse-dev
ArchLinux:
pacman -S base-devel fftw ncurses
openSUSE:
zypper install alsa-devel ncurses-devel fftw3-devel
Fedora:
dnf install alsa-lib-devel ncurses-devel fftw3-devel
Iniparser is also required, but if it is not allready installed a bundled version will be used.
To run the autogen script you will also need automake, libtool and git.
Getting started
./autogen.sh
./configure
make
You can use the following for compilation options:
--enable-debug          	enable debug messages and frequency table output
--enable-legacy_iniparser	enable legacy iniparser mode necessary to build cava with iniparser < 4.0
For example, turning on debugging messages:
./configure --enable-debug
Installing manually
Install cava to default /usr/local:
make install
Or you can change PREFIX, for example:
./configure --prefix=PREFIX
Uninstalling
make uninstall
openSUSE
On openSUSE you need to add jubalh's home repository to install cava via zypper. For example for Tumbleweed do:
zypper ar -f http://download.opensuse.org/repositories/home:/jubalh/openSUSE_Tumbleweed/home:jubalh.repo
zypper in cava
If you use 13.2 or 13.1 just replace openSUSE_Tumbleweed with openSUSE_13.2, adjust it to your version.
Fedora
Arch
Cava is in AUR.
yaourt -S cava
Ubuntu
Michael Nguyen has added CAVA to his PPA, it can be installed with:
sudo add-apt-repository ppa:tehtotalpwnage/ppa
sudo apt-get update
sudo apt-get install cava
All distro specific instalations sources might be out of date.
Capturing audio
From Pulseaudio monitor source (Easy, default if supported)
First make sure you have installed pulseaudio dev files and that cava has been built with pulseaudio support (it should be automatically if the dev files are found).
If you're lucky all you have to do is to uncomment this line in the config file under input:
method = pulse
If nothing happens you might have to use a different source than the default. The default might also be your microphone. Look at the config file for help.
From ALSA-loopback device (Tricky)
Set
method = alsa
in config file
ALSA can be difficult because there is no native way to grap audio from an output. If you want to capture audio straight fom the output (not just mic or line-in), you must create an ALSA loopback interface, then output the audio simultaneously to both the loopback and your normal interface.
To create a loopback interface simply run:
sudo modprobe snd_aloop
Hopefully your aplay -l should now contain a loopback interface.
To make it presistent across boot add the line snd-aloop to "/etc/modules". To keep it form beeing loaded as the first soundcard add the line options snd-aloop index=1 to "/etc/modprobe.d/alsa-base.conf", this will load it at '1'. You can replace '1' with whatever makes most senes in your audio setup.
Playing the audio through your Loopback interface makes it possible for cava to to capture it, but there will be no sound in your speakers. In order to play audio on the loopback interface and your actual interface you must make use of the ALSA multi channel.
Look at the inculded example file example_files/etc/asound.conf on how to use the multi channel. I was able to make this work on my laptop (an Asus UX31 running Ubuntu). But i had no luck with the ALSA method on my Rasberry PI (Rasbian) with an USB DAC. The PulseAudio method however works perfectly on my PI.
Read more about the ALSA method here.
If you are having problems with the alsa method on Rasberry PI, try enabling mmap by addin the following line to /boot/config.txt and reboot:
dtoverlay=i2s-mmap
From mpd's fifo output
Add these lines in mpd:
audio_output {
    type                    "fifo"
    name                    "my_fifo"
    path                    "/tmp/mpd.fifo"
    format                  "44100:16:2"
}
Uncomment and change input method to fifo in the config file.
The path of the fifo can be specified with the source parameter.
I had some trouble with sync (the visualizer was ahead of the sound). Reducing the ALSA buffer in mpd fixed it:
audio_output {
        type            "alsa"
        name            "My ALSA"
        buffer_time     "50000"   # (50ms); default is 500000 microseconds (0.5s)
}
Running via ssh
To run via ssh to an external monitor, redirect output to /dev/console:
~# ./cava <> /dev/console >&0 2>&1
exit with ctrl+z then run 'bg' to keep it running after you log out.
(You must be root to redirect to console. Simple sudo is not enough: Run sudo su first.)
Font notes
Since the graphics are simply based on characters, performance is dependent on the terminal font.
In ttys
If you run this in a TTY the program will change the font to the included cava.psf (actually a slightly modified "unifont").
In console fonts it seems that only 256 Unicode characters are supported, probably because they are bitmap fonts. I could not find a font with Unicode characters 2581-2587 (the 1/8 - 7/8 blocks used on the top of each bar to increase resolution).
So in cava.psf, the characters 1-7 are actually replaced by Unicode characters 2581-2587. When cava exits, it changes the font back. If cava exits abnormally and you notice that 1-7 are replaced by partial blocks, just change the font with setfont.
Actually, setfont is supposed to return the default font, but this usually isn't set. I haven't found another way to get the current font. So cava sets the font to "Lat2-Fixed16" when interrupted. All major distros should have it. It will revert to your default font at reboot.
In terminal emulators
In terminal emulators like xterm, the font settings is chosen in the software and cannot be changed by an application. So find your terminal settings and try out different fonts and settings. Also character spacing affects the look of the bar spectrum.
Speed preformance is also different, urxvt is the best I found so far, while Gnome-terminal is quite slow.
Cava also disables the terminal cursor, and turns it back on on exit, but in case it terminates unexpectedly, run setterm -cursor on to get it back.
Tip: Cava will look much nicer in small font sizes. Use a second terminal emulator for cava and set the font size to 1. Warning, can cause high CPU usage and latency if the terminal window is too large!
Latency notes
If you see latency issues (sound before image) in a terminal emulator, try increasing the font size. This will reduce the number of characters that have to be shown.
If your audio device has a huge buffer, you might experience that cava is actually faster than the audio you hear. This reduces the experience of the visualization. To fix this, you try decreasing the buffer settings in your audio playing software.
Usage
Usage : cava [options]
Visualize audio input in terminal.

Options:
	    -p          path to config file
	    -v          print version
Exit with ctrl+c or q.
If cava quits unexpectedly or is force killed, echo must be turned on manually with stty -echo.
Controls
| Key | Description |
|---|---|
| up / down | increase/decrease sensitivity |
| left / right | increase/decrease bar width |
| c / b | change forground/background color |
| r | Reload configuration |
| q or CTRL-C | Quit C.A.V.A. |
Configuration
As of version 0.4.0 all options are done in the config file, no more command-line arguments!
By default a configuration file is located in $XDG_CONFIG_HOME/cava/config or $HOME/.config/cava/config, but cava can also be made to use a different file with the -p option. Look in the default config file for details on the different options.
Sending cava a SIGUSR1 signal, will force cava to reload its configuration file. Thus, it behaves as if the user pressed r in the terminal. One might send a SIGUSR1 signal using pkill or killall.
For example:
$ pkill -USR1 cava
Examples on how the equalizer works:
[eq]
1=0
2=1
3=0
4=1
5=0

[eq]
1=2
2=2
3=1
4=1
5=0.5

Thanks
Contributors:
- Karl Stavestrand - creator
- CelestialWalrus
- anko
- livibetter
Also thanks to dpayne for figuring out how to find the pulseaudio default sink name.