me
 me copied to clipboard
学习 MacOS 开发 (17.1: NSImage)
app.swift
import SwiftUI

if let nsImage = NSImage(byReferencingFile: "/Users/nonocast/Pictures/Samples/dance.jpg"), nsImage.isValid {
  print(nsImage)
}
输出
<NSImage 0x600001bd8dc0 Size={459.83999999999997, 307.19999999999999} RepProvider=<NSImageURLReferencingRepProvider:0x600002ac83c0 url:file:///Users/nonocast/Pictures/Samples/dance.jpg reps:(
    "NSBitmapImageRep 0x6000001d4310 Size={459.83999999999997, 307.19999999999999} ColorSpace=(not yet loaded) BPS=8 BPP=(not yet loaded) Pixels=1916x1280 Alpha=NO Planar=NO Format=(not yet loaded) CurrentBacking=nil (faulting) CGImageSource=0x600002ac9fe0"
)>>
关于NSImage和NSBItmapImageRep的关系见这篇文章: Working with Images - Cocoa in a Nutshell [Book]
The relationship between NSImage and NSImageRep in the Application Kit is powerful and has important architectural ramifications. NSImage provides a high-level interface to Cocoa’s image manipulation capabilities by defining functionality that is independent of the image’s data format. This functionality includes drawing and compositing, which was discussed previously, as well as tasks such as loading and saving image data (which may seem to depend on the data’s format, but is implemented in a way that hides the details from clients) and setting/getting attributes of the image such as its display size.
A browse through NSImage’s methods reveals that many are used to manage image representations. Image representations are instance of subclasses of NSImageRep; they are bridges between the high-level abstraction of NSImage and the image’s data-dependent representation. That is, NSImageRep and its subclasses let NSImage work with multiple formats of data, ranging from EPS and PDF formats to the most prevalent bitmapped image data formats.
- NSImage主要负责对外协调,对内管理NSImageRep List
- NSImageRep的子类包括了 NSPDFImageRep, NSEPSImageRep, NSPictImageRep, NSCachedImageRep, NSCustomImageRep, NSBitmapImageRep
- 其中又以NSBitmapImageRep最为常用,Bitmap又支持TIFF, BMP, JPEG, PNG, Raw image data
这让我想起了Xcode中的1x,2x,3x
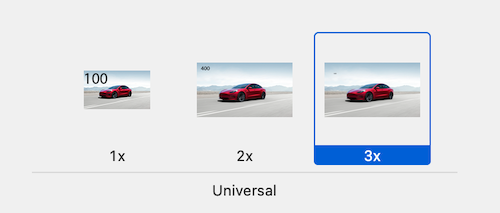
let nsImage = NSImage(named: "tesla")
print(nsImage)
Optional(<NSImage 0x6000018a8be0 Name=tesla Size={100, 58} RepProvider=<NSImageArrayRepProvider: 0x600002ba4e50, reps:(
    "NSCGImageRep 0x600000ae0b90 Size={100, 58} ColorSpace=sRGB IEC61966-2.1 colorspace BPS=0 Pixels=100x58 Alpha=NO AppearanceName=NSAppearanceNameSystem",
    "NSCGImageRep 0x600000ae0c30 Size={100, 58} ColorSpace=sRGB IEC61966-2.1 colorspace BPS=0 Pixels=100x58 Alpha=NO AppearanceName=NSAppearanceNameSystem",
    "NSCGImageRep 0x600000ae0d70 Size={200, 116.5} ColorSpace=sRGB IEC61966-2.1 colorspace BPS=0 Pixels=400x233 Alpha=NO AppearanceName=NSAppearanceNameSystem",
    "NSCGImageRep 0x600000ae0e10 Size={200, 116.5} ColorSpace=sRGB IEC61966-2.1 colorspace BPS=0 Pixels=400x233 Alpha=NO AppearanceName=NSAppearanceNameSystem"
)>>)
可见一个NSImage确实支持多张图片(即NSImageRep)。
A CGImage can only represent bitmaps. Operations in CoreGraphics, such as blend modes and masking require CGImageRefs. If you need to access and change the actual bitmap data, you can use CGImage. It can also be converted to NSBitmapImageReps.
简而言之,CGImage没啥用。
let cgImage = nsImage.cgImage(forProposedRect: nil, context: nil, hints: nil)
写入二进制文件
  let header = Data([0x00, 0x01, 0x02])
  do { try header.write(to: URL(fileURLWithPath: "header")) } catch { print(error) }
检查header文件
➜  stat -f "%z bytes" header
3 bytes
➜ xxd header
00000000: 0001 02                                  ...
➜
➜  xxd -b header
00000000: 00000000 00000001 00000010                             ...
另存为JPG或PNG
- NSBitmapImageRep对应一张图片,所以不管是NSImage还是CGImage保存成图片都需要先得到NSBitmapImageRep
- NSImage - NSBitmapImageRep - Data
- CGImage - NSBitmapImageRep - Data
// case 1: NSImage - NSBitmapImageRep - Data
if let nsImage = NSImage(byReferencingFile: "/Users/nonocast/Pictures/Samples/tesla.png"), nsImage.isValid {
  // check the image
  if let rep = nsImage.representations.first as? NSBitmapImageRep {
    print("\(rep.pixelsWide)x\(rep.pixelsHigh)")

    if let bmpData = rep.representation(using: .bmp, properties: [:]) {
      print(bmpData)
      do { try bmpData.write(to: URL(fileURLWithPath: "tesla.bmp")) } catch { print(error) }
    }
    if let pngData = rep.representation(using: .png, properties: [:]) {
      print(pngData)
      do { try pngData.write(to: URL(fileURLWithPath: "Tesla.png")) } catch { print(error) }
    }
    if let jpegData = rep.representation(using: .jpeg, properties: [:]) {
      print(jpegData)
      do { try jpegData.write(to: URL(fileURLWithPath: "tesla.jpg")) } catch { print(error) }
    }
  }

  // case 2: CGImage - NSBitmapImageRep - Data
  if let cgImage = nsImage.cgImage(forProposedRect: nil, context: nil, hints: nil) {
    let bitmapRep = NSBitmapImageRep(cgImage: cgImage)
    if let pngData = bitmapRep.representation(using: .png, properties: [:]) {
      do { try pngData.write(to: URL(fileURLWithPath: "tesla.png")) } catch { print(error) }
    }
  }

} else {
  print("load image FAILED")
}
从零绘制图片
let size = CGSize(width: 200, height: 200)
let image = NSImage(size: size, flipped: true, drawingHandler: { _ -> Bool in
  guard let context = NSGraphicsContext.current?.cgContext else {
    return false
  }
  context.setFillColor(NSColor.yellow.cgColor)
  context.fill(CGRect(x: 0, y: 0, width: 200, height: 200))

  context.setLineWidth(1)
  context.setStrokeColor(NSColor.red.cgColor)
  context.addArc(center: CGPoint(x: 100, y: 100), radius: 3, startAngle: 0, endAngle: .pi * 2, clockwise: true)
  context.drawPath(using: .stroke)
  context.addArc(center: CGPoint(x: 100, y: 100), radius: 30, startAngle: 0, endAngle: .pi * 2, clockwise: true)
  context.drawPath(using: .stroke)
  context.addArc(center: CGPoint(x: 100, y: 100), radius: 100, startAngle: 0, endAngle: .pi * 2, clockwise: true)
  context.drawPath(using: .stroke)

  let font = NSFont.systemFont(ofSize: 48)
  let string = NSAttributedString(string: "Hi", attributes: [.font: font])
  string.draw(at: CGPoint(x: 30, y: 30))

  return true
})
if let data = image.tiffRepresentation {
  print(data)
  let rep = NSBitmapImageRep(data: data)
  let jpegData = rep?.representation(using: .png, properties: [:])
  do { try jpegData?.write(to: URL(fileURLWithPath: "canvas.png")) } catch { print(error) }
}
运行后生成的图片如下:

缩放图片
这里我偷懒了,其实就是比例计算
guard let nsImage = NSImage(byReferencingFile: "/Users/nonocast/Pictures/Samples/tesla.png"), nsImage.isValid else {
  return
}
let size = CGSize(width: 300, height: 300)
let image = NSImage(size: size, flipped: false, drawingHandler: { _ -> Bool in
  guard let context = NSGraphicsContext.current?.cgContext else {
    return false
  }
  context.setFillColor(NSColor.white.cgColor)
  context.setStrokeColor(NSColor.darkGray.cgColor)
  context.fill(CGRect(x: 0, y: 0, width: 300, height: 300))
  context.setLineWidth(7)
  context.stroke(CGRect(x: 0, y: 0, width: 300, height: 300))
  if let rep = nsImage.representations.first as? NSBitmapImageRep {
    rep.draw(in: NSRect(x: (300 - 267) / 2, y: (300 - 155) / 2, width: 267, height: 155))
  }
  return true
})
if let data = image.tiffRepresentation {
  print(data)
  let rep = NSBitmapImageRep(data: data)
  let jpegData = rep?.representation(using: .png, properties: [:])
  do { try jpegData?.write(to: URL(fileURLWithPath: "target.png")) } catch { print(error) }
}
运行后生成的图片如下:

参考阅读
- UIImage vs. CIImage vs. CGImage. As someone coming from a web… | by Randall Leung | Medium
- NSImage 生成 PNG 格式图片 - 简书
- SwiftUI图片处理(缩放、拼图)
- 在 Swift 裡頭操作 Bytes | zonble
- NSImage extensions for easy resizing, cropping and saving png images.
- Resize UIImage Without Stretching [Updated For Swift 5] -Swift: CGRect, CGSize & CGPoint. You’re (probably) doing it wrong | by Andyy Hope | Swift Programming | Medium
- Introduction to Cocoa Drawing Guide