stable-diffusion-video-maker
 stable-diffusion-video-maker copied to clipboard
Video generation tool for Stable Diffusion.
Stable Diffusion Video Maker (sdvm)
sdvm is a video generation tool for Stable Diffusion. The code is based on CrossAttentionControl which supports prompt editing.
Features
- interpolate between seeds, prompts, and prompt edit weights.
- can insert different number of frames between keyframes.
- keyframes can be animated using different curves (linear, bezier, bezier2...)
- supports negative prompts
- cache keyframes
- encode video using ffmpeg
- upsampling using RealESRGAN
Google Colab notebook:
 https://colab.research.google.com/drive/15x55IoGOZHqozTPKDlX7ZBG0duTV-lj4?usp=sharing
Dependencies:
- python libraries:
torch transformers diffusers==0.4.1 numpy PIL tqdm difflib librosa realesrgan - executable:
ffmpeg
Example code 1:
import sdvm

v = sdvm.VideoMaker('project_name',
                    prompt='dog with hat',
                    num_frames=10,
                    fps=10,
                    increase_mode=sdvm.IncreaseMode.linear)

v.add(edit_weights=[('hat', -0.5)], seed=1001)
v.add(edit_weights=[('hat', 1.5)], seed=1001)
v.add(prompt='cat', negative_prompt='yellow', seed=1002, num_frames=15, increase_mode=sdvm.IncreaseMode.bezier)

# creates images in sdout folder
v.make()

# encode video file and display in python notebook
v.encode(show=True)
Example code 2:
import sdvm

prompt = "windows wallpaper"
negative = "computer screen, text, button, menu, frame"

v = sdvm.VideoMaker('windows_wallpaper',
                    prompt=prompt,
                    negative_prompt=negative,
                    num_frames=30,
                    width=768, height=512,
                    increase_mode=sdvm.IncreaseMode.bezier)

seeds = [1001, 1002, 1003, 1004, 1005, 1006]
seeds.extend([3001, 3002, 3003, 3004, 3005])
seeds.extend([4002, 4005, 4006])
seeds.extend([5001, 5002, 5003, 5004, 5005, 5006])
for seed in seeds:
    v.add(seed)

v.make()
v.upsample() # upsample and create video file

Example code 3 (animate using audio):
v = sdvm.VideoMaker('paint_art_3',
                    prompt='smooth flowing paint, award winning, digital art',
                    num_frames=100,
                    fps=10)

v.add(3987830111, edit_weights=[('flowing', -10), ('paint', 5)])
v.add(1002      , edit_weights=[('flowing',  -5), ('paint', 0)])
v.add(1009      , edit_weights=[('flowing', -10), ('paint', 5)])
v.add(1009      , edit_weights=[('flowing',   0), ('paint', 0)])
v.add(1021      , edit_weights=[('flowing', -10), ('paint', 5)])
v.add(1035      , edit_weights=[('flowing',  -5), ('paint', 5)])

# save frame images to sdout
v.make()

# load mp3 to extract audio info (strength, beats, perc, harm)
v.load_audiofile('Lift Motif - Kevin MacLeod.mp3')

harm = v.audiopeak.harm
perc = v.audiopeak.perc

angle_arr = []
zoom_arr = []

# use some algorithm to calculate zoom, angle for each frame.
angle = 0.0
for frame in range(v.total_audio_frames):
    zoom = 1.0 + 0.05*perc[frame] + 0.3*(frame/450)
    angle -= perc[frame]

    angle_arr.append(angle)
    zoom_arr.append(zoom)

# make animations map. each key must have value for each frame.
animations = {}
animations['angle'] = angle_arr
animations['zoom'] = zoom_arr

# read frames from sdout and process using animations parameters and save to processed folder
v.animate(animations)
v.encode(processed=True)

Workflow
The workflow is for Google Colab or Jupyter Notebook.
1. load model
# You need to provide your huggingface account token if the model needs to be downloaded.
sdvm.init_model(auth_token='hf_your_huggingface_access_token')

# You can pass model id. 'CompVis/stable-diffusion-v1-4' is the default model.
sdvm.init_model('runwayml/stable-diffusion-v1-5', auth_token='hf_your_huggingface_access_token')

# If the model is already downloaded and default model is used, calling init_model is optional.
# The library will load the model when creating the first image.
2. initialize VideoMaker
v = sdvm.VideoMaker('project_name',
                    width=512,
                    height=512,
                    num_inference_steps=35,
                    fps=10,
                    prompt='photo of a tiger', # default prompt
                    negative_prompt='',
                    num_frames=90, # default num of frames for interpolation between keyframes.
                    )
3. generate and test images for keyframes
use generate to test images.
# generate and display 10 images from seed 101 to 110
v.generate(seed=101, count=10,
           prompt='photo of a cat',
           negative_prompt='',
           edit_weights=[],
           )

# generate and display 6(default) images using seed 101 - 106, with the project prompt.
v.generate(101)
generate() save images to cache folder, so it doesn't have to regenerate images next time.
4. add keyframes
# add first keyframe ( add one key frame )
v.add(seed=106, prompt='photo of a cat')

# add second keyframe
# will add 29 frames for interpolation from first keyframe, and second keyframe
v.add(103, num_frames=30)

# project will have 31 frames.
v.show()
   0   0.0s | photo of a cat (106)
  30   3.0s | photo of a tiger (103)
# show all keyframe images in project
# It won't regenerate the images if found in cache.
v.preview()

# show also can display images along side text.
v.show(show_image=True)
generate(), preview(), and show(show_image=True) share image cache.
5. make
make renders each frame to sdout folder. If an image file already exists for the frame, it skips and advances to the next frame. If you want to regenerate all frames. you can call clean(). It will delete all files in sdout.
# v.clean()
v.make()
You can also do a partial make by passing overwrite when adding keyframe.
v.add(seed=1001)                  # keyframe 1
# overwrite frames in between keyframe 1 & 2
v.add(seed=1002, overwrite=True)  # keyframe 2
# overwrite frames in between keyframe 2 & 3
v.add(seed=1003)                  # keyframe 3
v.add(seed=1004, overwrite=False) # keyframe 4
v.add(seed=1005)                  # keyframe 5
This will overwrite frames between keyframe 1 to keyframe 2(inclusive). It will maintain the overwrite status if the overwrite is not passed. So it will also overwrite frames between keyframe 2 and keyframe 3(inclusive).
6. encode
encodes all frames from sdout using ffmpeg. File is saved in ./projects/project_name/project_name.mp4.
v.encode(show=True)
7. upsample
upsample using RealESRGAN (4x). Frames from sdout is upscaled and saved in 'upsample' folder. Then encoded to ./projects/project_name/project_name_upsample.mp4.
v.upsample()
Editing weights
prompt = 'the quick brown fox jumps over the lazy dog'

# assign weight to single word
edit_weights = [('brown', -1.0) ]

# assign weight to each word
edit_weights = [('brown', 1.5), ('lazy', -1) ]

# assign weight using token indices (index starts with 1, which is 'the')
edit_weights = [(1, -1)]

# assign same weight to multiple words
edit_weights = [(['quick', 'brown'], -1)]

# You can print the indices of the tokens:
import crossattentioncontrol
crossattentioncontrol.print_token(prompt)
IncreaseMode
increase_mode can be set when initializing the VideoMaker class. It's default value is linear. Keyframes are interpolated using the increase_mode curve. It's also possible to assign increase_mode when adding a keyframe. This will interpolate using the curve between the previous keyframe.
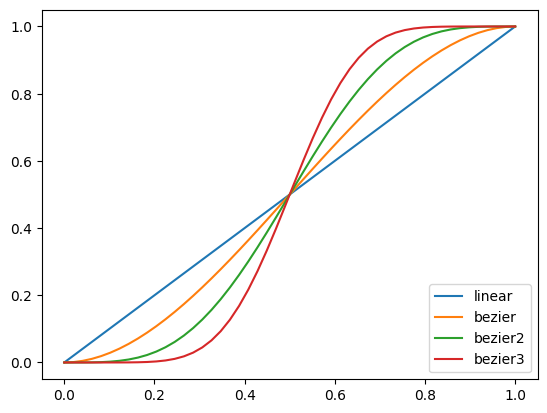
Here's a graph of the curves:
Video comparison:
If you experience jumps when using bezier curves, you can add f suffix. bezierf, bezier2f, bezier3f rounds values so there is no jumps around the keyframes.

Project Folder Structure:
- projects/project_name is the root of the project. (
projectsfolder can be changed by passing basepath when initializing VideoMaker) - projects/project_name/sdout : SD images are stored here.
- projects/project_name/project_name.mp4 : video file path
- projects/project_name/upsample : upsampled images.
- projects/project_name/project_name_upsample.mp4 : upsampled video file path
Credits:
-
Cross Attention Control with Stable Diffusion : https://github.com/bloc97/CrossAttentionControl
-
Upsampling code : https://github.com/nateraw/stable-diffusion-videos