atelier
 atelier copied to clipboard
Personal dotfiles, shell scripts—my self-contained graphical shell environment for Debian GNU/Linux, based on xorg, dwm, sxhkd, and urxvt.
dotfiles—"atelier"


![]()
![]()
shimeji miku © 2010 canary yellow
This is my primary computing setup, a self-contained graphical shell environment for Debian GNU/Linux.
- Git is used to maintain an identical and reproducible setup across any number of machines.
- A series of procedural post-install scripts in
~/.once.ddocument and reproduce system-wide deviations from a fresh install.- Git hooks ensure a consistent running environment even when the underlying state changes.
- A suite of unit tests ensures a reproducible installation with each revision.
Detailed installation instructions are provided, along with some documentation for the most essential components.
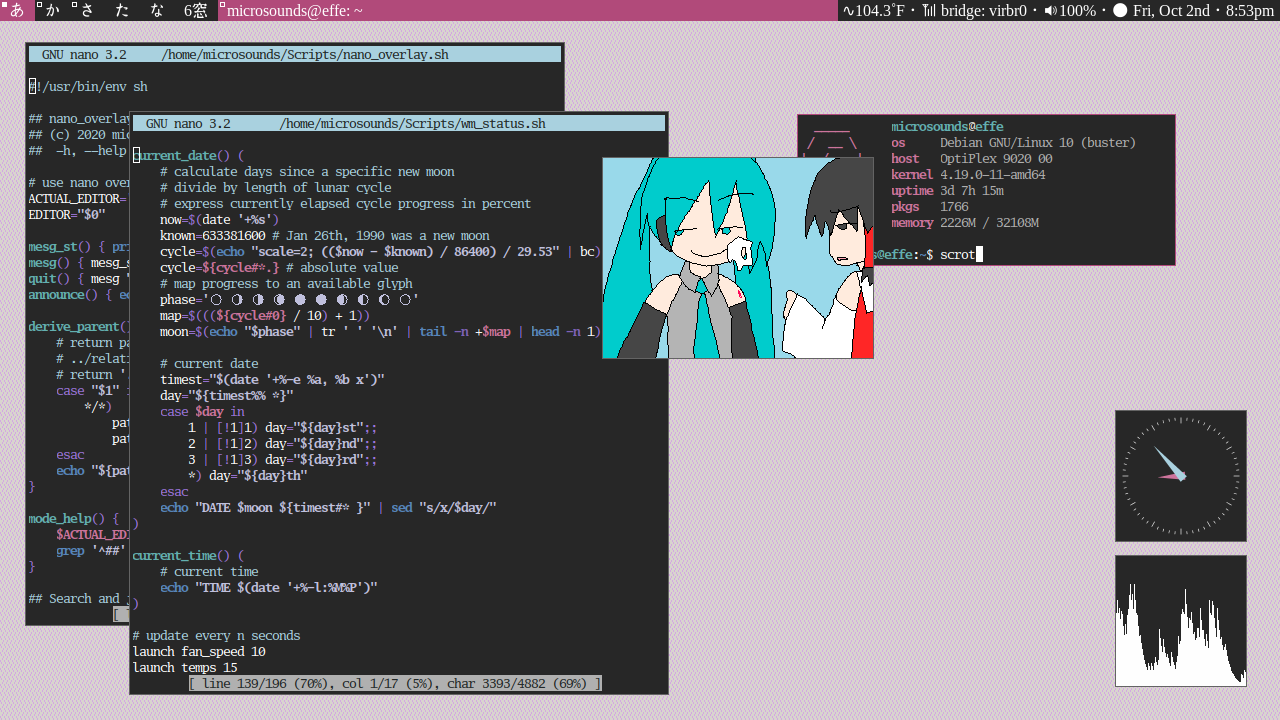 Pictured: Debian stable, a "graphical shell" environment consisting mostly of xorg, dwm, sxhkd and various urxvt clients.
Quick start
[OPTIONAL] Instructions for a Debian base install with debootstrap for BIOS/UEFI x86 systems.
Installing Debian using debootstrap
WARNING
This is a quick reference on usingdebootstrapto install Debian manually without using the official Debian installer. This is not a comprehensive tutorial on *NIX concepts, you should have some familiarity with administrating a GNU/Linux system before continuing.
-
Boot into a Debian Live CD environment with any DE and partition your boot disk with
gparted.You should always keep a Live CD install media around for use as a rescue disk, regardless of installation method. I only do it this way because I don't feel like using
fdisk.To install packages in the live environment,
apt-get updatefirst and thenapt-get install gparted.Suggested boot disk layouts:
- Legacy BIOS systems that support MBR/
msdospartition tables
# MBR disks support a maximum of 4 primary partitions [ primary part. (root) ] [ extended partition ] [ logical part. (swap) ] [ logical part. (home) ] # example /etc/fstab /dev/sda1 / ext4 defaults 0 1 /dev/sda5 none swap defaults 0 0 /dev/sda6 /home ext4 defaults 0 2- Modern UEFI systems that support GPT/
gptpartition tables
# EFI partition must be FAT32 and at least 32MiB
[ EFI partition ] [ root partition ] [ swap partition ] [ home partition ]

# example /etc/fstab
/dev/sda1	/boot/efi   vfat	defaults	0	2
/dev/sda2	/           ext4	defaults	0	1
/dev/sda3	none        swap	defaults	0	0
/dev/sda3	/home       ext4	defaults	0	2
NOTE
If your machine uses a slow eMMC-based boot disk, I recommendf2fsfor modestly improved performance instead ofext4. Support for booting fromf2fsis not provided by default in Debian.
See this tutorial on adding requiredf2fsmodules toinitramfsfor more info. - Legacy BIOS systems that support MBR/
-
Mount your newly created filesystem in
/mnt, including your home partition to/mnt/homeif you made one. -
Install
debootstrapand install the Debian base system into/mnt.-
debootstrap --arch [eg. i386, amd64] stable /mnt https://deb.debian.org/debian- See https://www.debian.org/ports/ for a full list of platforms available.
-
-
Chroot into your new system, all actions from this point onward are within your chrooted system.
$ sudo su - $ for f in proc sys dev run; do mount --make-rslave --rbind /$f /mnt/$f; done $ chroot /mnt /bin/bash -
Configure your
/etc/fstabto taste.- Try
lsblk -f >> /etc/fstabto identify disks byUUID=...instead of device name.
- Try
-
Customize your locale by installing and
dpkg-reconfigure'nglocales, andtzdata. -
Edit
/etc/hostnameand/etc/hostswith your preferred hostname. -
Install a suitable linux kernel.
- Find a suitable kernel meta-package to install with
apt-cache search ^linux-image | grep 'meta'.
- Find a suitable kernel meta-package to install with
-
Install
network-managerand the bootloader packagegrub2.grub2does not install to your boot disk automatically, use the following:- Build initial grub configuration with
/sbin/update-grub - For BIOS (installs to magic sector at start of disk)
-
/sbin/grub-install --root-directory=/ /dev/sda
-
- For UEFI (installs to EFI partition mounted in
/boot/efi)-
/sbin/grub-install --root-directory=/ --efi-directory=/boot/efi /dev/sda
-
- Build initial grub configuration with
-
Give your
rootuser a password, create your normal user, and assign it a password also.- eg.
useradd -m USERNAME -s /bin/bash; passwd USERNAME
- eg.
-
You should now have a working system, login as your user and skip to Step 2 in the Quick start below.
- You can reboot from the Live CD environment at this point to check your work but it's not required.
- Install Debian stable, perform a base install with no DE selected and no standard utilities when prompted.
-
Do not perform these steps on
tty1,xinitwill launch withoutdwmpresent and you will be kicked.
-
Do not perform these steps on
- Install
git,wget, andsudo, then add yourself to thesudogroup.- Log back in to apply changes to group membership.
- Bootstrap the system automatically with a hard git reset from this repo, this is done only once.
$ git clone --bare {GIT_REMOTE}/atelier ~/.config/meta $ git --git-dir=$HOME/.config/meta --work-tree=$HOME reset --hard # Invoke the login shell to apply changes made to the environment $ exec $SHELL -l - Run
post-installin the shell to run post-install scripts automatically. Do not run as root.- Sets up the package manager, installs essential packages, window manager, text editor, etc.
- Reboot to finish.
-
xinitstarts automatically upon login totty1.
-
Quick start on Termux for Android
NOTE
Android-specific functionality depends on features provided byTermux:APIandTermux:Widgetadd-on apps and must be installed along with Termux.
This is meant to be a lightweight port with modifications, do not initiate a fullpost-install.
- Install
git, and bootstrap the system usinggit reset --hardas described above. - Post-install: Run only
~/.once.d/a0-android-termux.sh- Applies android-specific hacks and termux specific dotfiles for theming and softkeys.
- When pulling from upstream, stash changes or
git reset --hardto prevent merge conflicts.- Use
patch -p1 < ~/.termux/diff.patchto restore changes if stash is lost.
- Use
See attached notes for overview of changes from a standard Linux environment.
List of supported platforms
Full graphical shell environment
- Any conventional BIOS/UEFI-compliant x86-based Personal Computer
- x86-based Chromebooks in Developer Mode (SeaBIOS), or liberated with UEFI firmware (Coreboot).
- See https://chrultrabook.github.io/docs/ for more information on unlocking your bootloader.
-
Next Thing Co. PocketC.H.I.P armhf-based portable ~~toy computer~~ linux handheld
-
Final NTC-provided Debian 8 (jessie) OS images from 2016 come with out-of-tree
4.4.13-ntc-mlckernel pinned, upgradeable to 10 (buster).
-
Final NTC-provided Debian 8 (jessie) OS images from 2016 come with out-of-tree
Single-user minimal shell environment
- Bootstrapping in virtualized container instances for use in CI/CD workflows
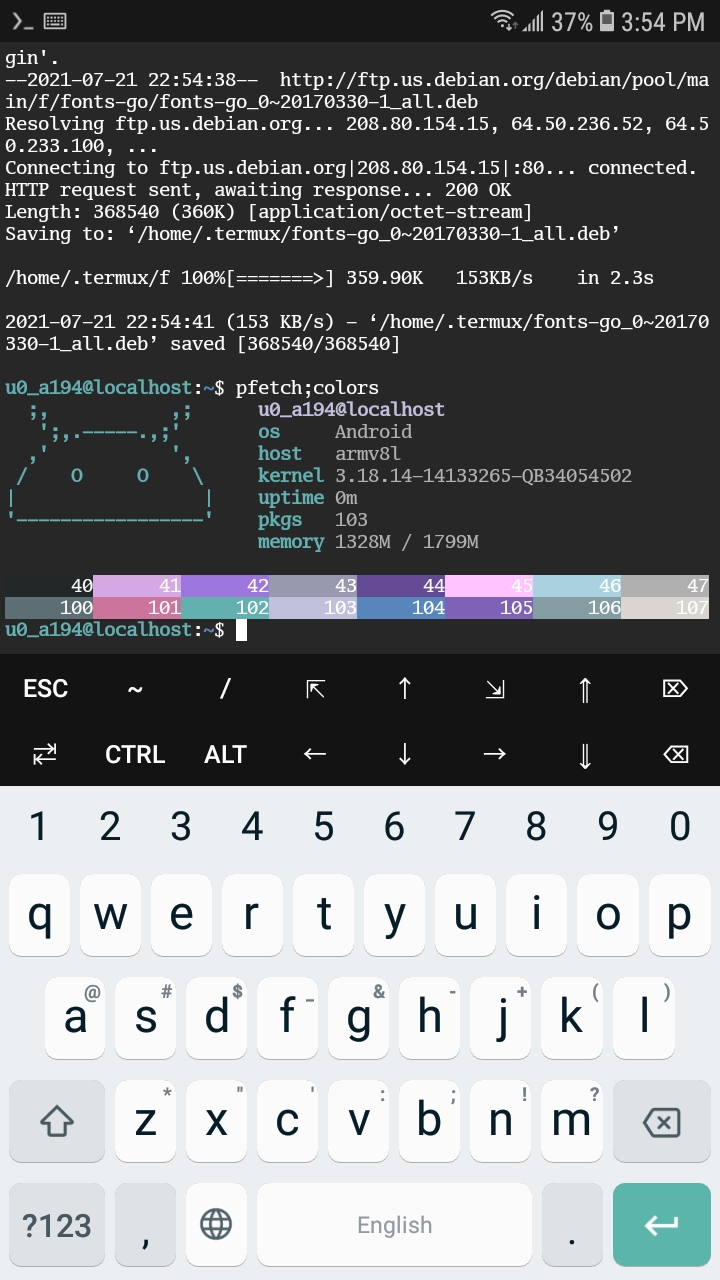
- Termux terminal emulator and Linux environment for Android
- Non-standard *NIX environment, currently only supports a subset of available features.
On declarative OSes
While it might be easy to draw parallels to my setup and NixOS, my system completely avoids the horrors of "containerization" and the innumerable drawbacks to adopting declarative functional OSes like NixOS and GNU Guix.
They're in my shortlist of timesink software ecosystems that I don't want anything to do with, along with the Rust programming language, equally cult-like in their usage and online communities, all of of which require significant changes to your toolchain and computing lifestyle, requiring you to adapt to their limitations when it really should be the other way around.
Usage notes
Using git meta
For local-scope changes, files in $HOME are versioned and mangled in place using Git.
-
$HOMEis treated as the detached working tree for a git bare repo located at~/.config/meta - The
metaalias prefixes all git commands with--git-dir=$HOME/.config/meta --work-tree=$HOME -
meta statuswill ignore files not manually added or tracked by this git repo.-
This is achieved using the
status.showUntrackedFilesoption and not via manually updating~/.gitignoreas is commonly done.
-
This is achieved using the
- Invoking
gitoutside of a valid git directory will append themetaalias automatically.-
initandclonecommands are unaffected.
-
Using ~/.once.d post-install scripts
All system-wide changes are performed through automated scripts located in ~/.once.d, you can run them all at once with shell function post-install.
Each script is self-contained, you can run them individually, anytime.
- Some scripts apply only to specific hardware configurations, and will exit even if they are run.
- Scripts affecting
systemdor the bootloader will be skipped in virtualized container contexts. - Locally installed software is installed to
~/.local/binwhen possible.
| series | function |
|---|---|
0* |
System-wide changes performed through the package manager. |
1* |
Changes to ~/.local file hierarchy, such as locally installed software and resources. |
2* |
System-wide changes that bypass the package manager, such as changes to /etc.These are hacks. |
c* |
System-wide changes affecting chromebook hardware only. |
a* |
Android-specific hacks only. |
p* |
NTC PocketCHIP-specific hacks only. |
Essential and *optional package groups
-
~/.comfortsdescribes a list of non-optional package groups that will be installed through the package manager.- Optional package groups are marked with an *asterisk, you will be prompted to approve these at runtime.
Essential and *persistent upstream utilities
-
~/.comforts-gitdescribes the full list of utilities compiled and installed from their upstream git sources.-
Repos must have a typical
./configureand/ormake install PREFIX=...metaphor to build correctly. -
Sources marked with an *asterisk will be persistently installed to
~/.config/${URL##*/}
-
Repos must have a typical
Installation can be customized with user-provided executable install ~~hacks~~ scripts, named {pre,post}-run.
These can be placed in ~/.config/upstream or at the root of a persistently installed utility's install directory as described above
Rationale for doing things this way is summarized in commit 2fe1c3745.
Applying changes automatically after state change
For git operations that change the underlying state of the git meta working tree in $HOME, such as merges, pulling from remote, or checking out an older commit, post-install scripts that have changed will be re-run automatically git post-merge hook symlinked to ~/.local/lib/apply-changes to ensure a consistent environment.
For changes that affect currently running programs, apply-changes will alert the user if the X session or user login should be restarted to finish applying changes.
Window manager status bar
Status bar daemon xwin-statusd is forked
and piped to xsetroot at startup to provide a concise dwm status bar conditionally listing the following status information when available, including:
- ⚿
ssh-agentstatus- Lists the number of active keys added to the agent, if any.
- ∿ Avg. CPU temperature in ˚F / ↻ Fan speed in RPM
- On laptops with active cooling, CPU temps are replaced with fan speed when fans spin up.
- 📶 Network status
-
Lists name of first active network device reported by
network-manager.
-
Lists name of first active network device reported by
- ↯
acpistatus and battery life / 🔌 Power draw-
Reports
acpibattery life information, including net energy-rate in watts as reported by UPower.
-
Reports
- 🔉 PulseAudio sink status
- Reports volume and status of the currently active audio sink, detects headphone use.
- 🌦 Geolocated current weather (via wttr.in)
- Their API caching is very aggressive, emitting stale data often, downtime is common, only displayed when available.
- 🌔 Moonphase and current date
- Expresses the ordinal date and the current phase of the moon.
- ⌛ Current time
- Expresses the current time in AM/PM.
Status bar output is suppressed to display notification text from notify-send when available, see attached notes for more info.
Window manager keybinds
Keyboard layouts and secondary layers are handled by keyd globally for better quality of life on non-standard keyboards.
At the X server level, keybinds are handled by a mix of ~~xkb~~, dwm, sxhkd and fcitx5 in such a way to avoid keybind stomping.
Caps Lock is remapped to Super_L on all platforms.
dwm keybinds are the defaults with several exceptions, the modkey Mod1 is super instead of alt because many alt combinations are already taken by other applications I use.
Alt-based keybinds are kept to a minimum because these are commonly taken by applications.
| shift + | alt + | key |
|---|---|---|
| kill window | F4 | |
| counter-clockwise | switch focused window | tab |
Super-based keybinds meant for system and window manager functions.
| shift + | super + | key |
|---|---|---|
| float window[toggle] | monocle window[toggle] | space |
| set as master window[toggle] | terminal | return |
| launcher | p | |
| file manager | e | |
| ssh-add[toggle] | backspace | |
| partial screenshot | screenshot | |
| reserved | scroll lock | |
| reserved | pause | |
| reboot | shutdown | F1 |
| hibernate | sleep | F2 |
| hibernate + reboot | display off | F3 |
| configure networking | calculator | F4 |
| configure displays | switch active display[toggle] | F5 |
| minimum brightness | lower brightness 10% | F6 |
| maximum brightness | raise brightness 10% | F7 |
| configure audio | mute[toggle] | F8 |
| lower volume 5% | F9 | |
| raise volume 5% | F10 | |
| randomize wallpaper | F11 | |
| reserved | F12~F24 |
Special keybinds that don't fit in other categories.
| alt + | ctrl + | key[special] |
|---|---|---|
| switch input method[toggle] | space | |
| clipboard manager | ; | |
| task manager | delete | |
| syslog | insert |
Generic 74-key Chromebook layout
Search key is Super_L, most missing keys are hidden behind Right Alt layer.
Power key has been remapped to delete for better usability.
Function F1-F10 are in the usual places, F11 is lesser used and hidden behind Right Alt.
| right alt + | key | remarks |
|---|---|---|
| prior | up | |
| next | down | |
| home | left | |
| end | right | |
| XF86Back | F1 | Right Alt + F* may not work on pre-EC chromebooks |
| XF86Forward | F2 | |
| XF86Reload | F3 | |
| F11 | F4 | opens fullscreen mode in most browsers |
| XF86LaunchA | F5 | |
| lower brightness 10% | F6 | |
| raise brightness 10% | F7 | |
| mute[toggle] | F8 | |
| lower volume 5% | F9 | |
| raise volume 5% | F10 | |
| F11 | delete | same as power key, keystroke repeat not available |
| delete | backspace | keystroke repeat works fine |
Some environment notes
X server invocation
No display manager is used, login to tty1 to start the graphical shell.
All daemons and services required to support the graphical shell are initialized along with the X server and are terminated when the user terminates the session.
systemd unit services, cronjobs and similar mechanisms are avoided whenever possible.
At startup, startx will pass hardware-specific xorg.conf files to the X server, to enable hardware compositing on supported hardware and eliminate screen tearing.
Xorg's security model forbids non-root users from passing arbitrary config files to the X server unless said configs are located in one of several "blessed" directories.
Post-install scripts will create symlink /etc/X11/$(id -u)-override that points to ~/.config/xorg to override this behavior.
Optional X Window configuration
~/.xrandr
For use with multi-monitor and/or complicated display setups, you can override the default display layout with one or more commands to xrandr saved to optional config file ~/.xrandr
# e.g. two monitors, right is mounted vertically
--output HDMI-0 --auto --primary --rotate normal
--output HDMI-1 --auto --right-of HDMI-0 --rotate right
Commands in this file are passed to xrandr-cycle line by line at startup if it exists.
For example, this configuration would suit a 2 monitor layout with the right monitor mounted vertically.
~/.xdecor
You can designate one or more paths to directories containing images or videos for use as a wallpaper using optional config file ~/.xdecor
# prefixing with ~/ is acceptable
~/Pictures/some/path
/media/sd_card/some/path
If it exists, xwin-decor will randomly pick a directory and file within it and set it as the wallpaper on startup.
In the case of video files, a random video frame from that file will be taken and set as the wallpaper using ffmpeg.
X resources and theming
For consistency, xinit, dwm and other scripts make use of the C preprocessor to mangle config files and configure color schemes.
Theme settings and individual color schemes are stored as C header files containing preprocessor macros representing color hex codes in ~/.local/include.
This directory is appended to $C_INCLUDE_PATH at login.
- Using shell function
reloadwill reload changes to.xresourcesand hard-reset your current terminal instance. - Use command
paletteto soft-reset color scheme using OSC terminal escapes without losing the current shell.
Optionally, you can apply another existing color scheme by naming it as an argument. This can be useful when dealing with TUI applications that force their own background colors.
List of available macros
-
{FG,BG}COLORfor terminal fg/bg colors -
{FG,BG}LIGHTfor UX highlight colors -
COLOR0..COLOR15for the 16 standard ANSI terminal colors -
FN_{TERM,HEADER,TEXT}for specific font faces -
FN_{TERM,HEADER}_JPfor matching fallback fonts -
FN_{TERM,HEADER,TEXT}_SIZEfor matching font sizes -
FN_EMOJIfor specifying fallback emoji glyphs -
FN_EMOJI_SIZEfor specifying fallback emoji glyph sizes
Issues with HiDPI scaling
HiDPI display setups are currently not supported, 96dpi is assumed everywhere.
HiDPI scaling brings up innumerable display issues in every category of graphical software including electron-based applications that require polluting scripts and dotfiles to smooth out toolkit scaling issues. Maintaining mixed-DPI multi-monitor setups in X11 is even more painful.
As of posting, I don't have a >1080p monitor to motivate such changes,
I'm not about to pepper my scripts with toolkit-specific environment variables and conditional logic to support HiDPI scaling.
See ~/.local/include/theme.h for more info.
Non-standard commands
Several commands are extended to include impure functions, such as purposefully mangling config files, and have the following precedence when multiple versions exist:
- Interactive shell functions defined in
~/.bashrc - Non-interactive shell library executables in
~/.local/lib- Shell script snippets used by multiple scripts to reduce clutter.
- Normal executables and symlinks in
~/.local/bin- Some are shell functions promoted to scripts so they'll work in
dmenuor outside of a terminal context.
- Some are shell functions promoted to scripts so they'll work in
-
/usr/binsystem-wide executables
Interactive shell
The prompt path will feature embedded git information provided by path-gitstatus highlighting the root of a git worktree and it's status.
Outside of git worktrees, the path component will be mangled by path-shorthand and be truncated to the last $PATH_WIDTH characters (default is 50) for improved usability.
Termux for Android
Single-user shell environment should work as expected on Termux without root access or changes to $PREFIX/etc with several caveats described below.
Post-install scripts make the following adjustments statically for existing scripts.
These adjustments will also be saved as a diff patch in ~/.termux/diff.patch in case these changes are overwritten with git.
Termux:Widget
Scripts in ~/.shortcuts are meant for use with Termux:Widget which can be found wherever you got Termux.
This is an optional add-on to Termux that lets you launch foreground or background scripts from an Android homescreen widget.
See the project page for documentation and environment notes, it's important to note that scripts launched this way do not source ~/.profile or ~/.bashrc like they would running from a Termux instance.
You must give Termux permission to display over other apps via Settings > Apps > Display over other apps for this add-on to work properly.
Standard file descriptors
Shell scripts on Android systems without root access have no access to standard file descriptors /dev/std{in,out,err}, use /proc/self/fd/{0,1,2} instead.
ESC sequences
Using \\\\e to insert escape literals in scripts works for some OSC codes, but not all, use octal \\\\33 when in doubt.
$PREFIX
Previously, termux-chroot was used to ensure FHS-compliance, but it introduced unacceptable performance speed.
Use Termux's own provided envvar $PREFIX to refer to standard filesystem locations within scripts or interactively, e.g. $PREFIX/tmp which expands to /data/data/com.termux/files/usr/tmp.
In practice, shell script shebangs don't need to be rewritten, Termux already rewrites these with some hidden voodoo I don't care to understand.
Background processes since Android 11
The customized Android images that ship from Chinese and Korean manufacturers since version 11 have become far more aggressive in pruning "phantom" processes (daemons) in the pursuit of better battery life.
You may experience issues with processes backgrounded with the & operator being throttled or killed when multitasking outside of Termux. Daemons that fork without becoming a child process or exec'ing the same process that called it may be killed immediately or shortly after leaving Termux if not called in foreground mode.
In order to prevent Android from prematurely pruning ssh-agent while multitasking, it is called as the parent process for the current shell.
Termux developers recommend their very own termux-services for running common daemons.
Launch daemons in foreground mode without forking and preferably with wakelock acquired from the Notification Bar or with termux-wake-lock if you wish to run a long-running task without being throttled by the operating system.
If you don't mind the limitations of Termux:Widget, you can also run long-running scripts as a headless background tasks by putting it in ~/.shortcuts/tasks.
ssh-agent fingerprint SSH authentication
WARNING
This is an ongoing experiment in balancing convenience and security, your threat model may find the barebones security provided by fingerprint sensors unacceptable.
ssh-agent is set up to call termux-ssh-askpass which uses
Android's hardware-backed keystore to generate an OpenSSH key passphrase using the fingerprint lock on your Android device.
Specifically, a hardware-backed inaccessible RSA 4096-bit private key named default is generated during post-install
and stored in the security chip on the device which is only made available during a short validity period after a successful fingerprint unlock.
This inaccessible private key is used to sign the matching public key for the portable OpenSSH private key being unlocked by ssh-agent and friends
to produce a passphrase from the signed nonce value emitted by the security chip on your Android device.
Simply put, this allows for fingerprint-based SSH authentication, a massive quality of life improvement over entering case-sensitive passphrases on a smartphone.
Important considerations
-
Both the
termux-apipackage and the companion add-on appTermux:APIavailable from the same place you got Termux are required for this functionality to work. -
There is no chance of vendor or device lock-in, as you are not using key material from the security chip as your OpenSSH key.
- The nonce value is not important, it's just convenient seed data used to produce a reproducible passphrase that requires your fingerprint to unlock.
- The key material locked in the hardware-backed keystore is also not important, you are simply using it to generate passphrases for your existing portable OpenSSH keys.
-
Even though someone with physical access to your Android device could modify the hardware keystore without authentication and could replace keys with identically named keys that have an unlimited validity period, they will not be the same key material used to sign and your portable OpenSSH keys will still be safe.
-
You understand that by replacing passphrases with biometrics, your fingerprint reader becomes your single point of failure, you have been warned.
Initial setup
To setup your existing OpenSSH keys for fingerprint-based SSH authentication, use the output of termux-ssh-askpass as your new passphrase in ssh-keygen.
new_pass="$(termux-ssh-askpass ~/.ssh/id_rsa)"
ssh-keygen -p -f ~/.ssh/id_rsa -N "$new_pass" -F 'old passphrase'
cd
-
The contents of
$OLDPWDis preserved acrossbashsessions. -
cdoffers the following extensions:opt function ...,...., etc.Shorthand for ../../,../../../and so on.-f <query>Interactive fuzzy find and jump into a sub-directory with fzf
chromium
NOTE
On first-run,chromiumwill momentarily exit and restart to rebuild configuration and enable use of externally customized color options.
chromium is not meant to be user-serviceable or configurable through plaintext without using system-wide group policy features, chromium is a shell script extended to mangle user-hostile internal state files to match the persistent plaintext configs described below:
-
~/.config/chromium/preferences.conf-
Main browser preferences stored as JSON in
Default/Preferences.
-
Main browser preferences stored as JSON in
-
~/.config/chromium/local_state.conf-
Chromium experiment flags stored as JSON in
Local State.
-
Chromium experiment flags stored as JSON in
C preprocessor syntax is also accepted, hex color values in the form #RRGGBB will be converted to a signed integer representing 0xBBGGRRAA in two's complement hexadecimal with AA (alpha channel) always set to 0xFF
-
~/.config/chromium/omnibox.sql-
Omnibox settings and Tab-to-search keyword shortcuts stored as SQLite in
Default/Web Data.
-
Omnibox settings and Tab-to-search keyword shortcuts stored as SQLite in
Managed policy overrides
chromium is managed by /etc/chromium/policies/managed/extensions.json, set up during post-install, which automatically installs several useful extensions on first-run, including uBlock Origin.
Configuring Vimium
Use of Vimium is considered optional, as I haven't figured out a way to configure it automatically on first-run.
Its configuration resides in ~/.config/chromium/vimium
Run configure.sh to rebuild vimium-options.json for importing back into Vimium by hand.
An ongoing experiment
chromium has proven difficult to configure non-interactively time and time again.
Plaintext chromium configuration is an ongoing experiment of mine.
| non-interactive functionality | status |
|---|---|
| first-run config rebuild | works |
| applying persistent chromium settings | works |
| applying persistent chromium flags | works |
| applying persistent omnibox settings | works |
| extension install on first-run | works (via group policy) |
| applying persistent extension settings | no |
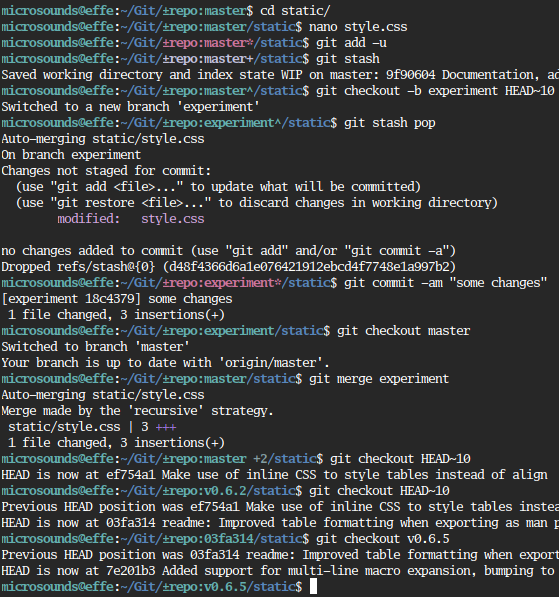
git
git aliases are defined in ~/.gitconfig or implemented in interactive shell function git()
See Usage Notes for more information.
-
This is a critical component of the graphic shell environment, some aliases are cumulative in nature.
alias function metaAppends --git-dir=$HOME/.config/meta --work-tree=$HOMEto agitcommand.
(Added implicitly when outside a git directory.)past,summaryOutlines the last 17 commits made before HEADwith a commit graph.futureOutlines the next 17 commits made after HEADwith a commit graph.rwcheckout1 commit backward, alias forcheckout HEAD~1ffcheckout1 commit forward towardmasterlist-filesList all tracked filenames in repo, ideally for use with xargs.edit-tree [query]Interactive tracked plaintext file tree, opens file with $EDITORin new window ifXis running.flattenAutomatically melds --fixup/squashcommits out of existence starting from the root commit.recommitStages changes to worktree and commit --amends them as part of the last commit.checkinCommit all changes immediately with a generic timestamp and hostname commit message. shoveRuns checkinand pushes immediately.syncRuns git meta pulland then recurses through~/Gitand runsgit pullon every existinggitrepo found.vacuumRuns git meta gcand then recurses through~/Gitand runsgit gcon every existinggitrepo found.
nano
NOTE
nanokeybind macros make use of inline non-printable control characters, you must usenanoorcat -vto view~/.nanorccorrectly.
-
nanois an alias fornano-overlaywhich mangles config files and offers the following extended options:opt function -e, --ctags <tag> <#>Jumps into file containing ctagsdefinition matching<tag>.
Optional<#>selects from multiple matches,allwill open all of them.-c, --ctags-dict <file1>...Enable project-wide autocomplete by appending condensed dictionary of all ctagskeywords to all files.
Dictionary will be removed upon exiting.-f, --encrypt <file>Open AES encrypted text file with a plaintext password.
File will be created if it doesn't exist.-j, --rsa <file>Open AES encrypted text file with generic RSA keypair in PEM format.
File will be created if it doesn't exist.-s, --ssh-sign <file>Open AES encrypted text file with a nonce value signed with SSH private key.
File will be created if it doesn't exist.-i, --identity <key>Use an OpenSSL compatible keypair to encrypt/decrypt.
Can be a private key or a public key with private half stored inssh-agent -
Once inside the actual
nano, the following keybind macros are available:key function M-0Execute current line as shell command and pipe contents of buffer as stdin.
Destructively replaces entire contents of buffer, useful for formatting.M-1Execute current line as shell command and paste output in current buffer.
Commands within inline comments are accepted.M-2Select token underneath cursor and jump into its ctagsdefinition(s) within the same shell.
Requires validtagsfile in current or a parent directory.M-4Select token underneath cursor and jump into its ctagsdefinition(s) in a new terminal window.
Requires validtagsfile in current or a parent directory.
notify-send
This particular notify-send implements only -t for expiration time in seconds,
because it doesn't tie into any dbus-based notification daemon implementing the Desktop Notifications spec.
Instead, it's just a shell script that writes to a named pipe that gets picked up by xwin-statusd as a simple way to implement OSD text and single-line notifications.
Unlike other implementations, you can pass notifications/OSD text as an argument or via stdin without using xargs.
sc (spreadsheet calculator)
sc supports macros to some degree, but its macro implementation is difficult to understand and there aren't many examples of it being used successfully anywhere that I've managed to find.
Instead, the shell function sc() offers an easier to understand macro system for statically mangling .sc spreadsheet files at runtime.
-
scwill automatically run any executable sharing the same initial name as the.scfile.-
eg.
sheet1.scwill runsheet1.sc.1,sheet1.scx, etc. if they exist in the same directory and are executable at runtime.
-
eg.
- You can write an arbitrarily complex pre-run macro script in any language, so long as it's made aware of its own filename at runtime.
-
Because the
scfile format is plaintext, you can generatescsyntax with just a shell script.
-
Because the
sc pre-run macro example scripts
-
A macro script for an inventory spreadsheet that color-codes cells when specific strings are found.
#!/usr/bin/env sh # apply colors to specific strings in column B file="${0%.*}" # derive .sc file name from name of this script # remove all instances of color from the file in place { rm "$file"; egrep -v '^color' > "$file"; } < "$file" cat <<- EOF >> "$file" # set some non-default colors color 3 = @black;@red color 4 = @black;@yellow color 5 = @black;@green EOF # select only string cells from column B, apply colors based on string contents # sc format: leftstring B2 = "example string" egrep '^((left|right)string|label)' < "$file" | while read -r cmd cell _ str; do case "$cell" in B*) case "$str" in *broken*) echo "color $cell:$cell 3";; *bad*) echo "color $cell:$cell 4";; *working*) echo "color $cell:$cell 5";; esac;; esac done >> "$file" -
A macro script that extracts specific fields from a spreadsheet and mangles them into arbitrary JSON data, I use this to update my figure collection page on my personal site.
-
scis very old and predates most notions of CSV or tab delimited data, the easiest way to extract fields with spaces is useexpectto output a colon separated table using theTcommand "interactively", write it to the default filename ending in.cln, and then delete it when finshed.
#!/usr/bin/env sh # generate simplified JSON data for website file="${0%.*}" expect <<- EOF > /dev/null spawn sc "$file" expect "sc 7.16" { send -- "T\\\\n" } expect "i> tbl" { send -- "\\\\n Q\\\\n" expect eof } EOF # replace empty colon delimited fields with '(null)' for consistency # yes this is very ugly cat "${file%.*}.cln" \ | sed -e '/^::/d' -e 's/^:/(null):/g' -e 's/::/:(null):/g' \ -e 's/::/:(null):/g' -e 's/:$/:(null)/g' \ | tr ':' '\\\\t' | cut -f1-5 | tail -n +5 | while read -r status id key desc; do case "$desc" in knockoff*|counterfeit*|fake*) id="x$id";; *) case "$status" in unopened|displayed|storage);; wishlist) id="w$id";; *) id="p$id";; esac;; esac year="${desc#* }" desc="${desc% $year}" desc="$(echo "$desc" | sed "s/'/\\\\\\\\\\\\\\\\'/g")" # escape quotes printf "\\\\t[ '%s', '%s', '%s (%s)' ],\\\\n" \ "$id" "$key" "$desc" "$year" done > "${file%.*}.json" rm -f "${file%.*}.cln" -
Games
A few Linux-compatible games I like that also can be fetched easily via the internet exist in this repo as scripts that auto-install the game on first run. Because these scripts install proprietary software they are not included during the post-install, some implementation notes are included.
Proprietary games will be installed to ~/.local/opt, configuration beyond the initial installation is outside the scope of this repo.
minecraft
minecraft launches or installs UltimMC offline launcher, and a Java runtime environment if not already installed.
UltimMC is a fork of MultiMC which allows you to play any version of Minecraft Java Edition offline with or without a paid Minecraft account, it can manage your mods, resource packs and saved worlds as "instances" you can import or export freely.
While you can play online multiplayer normally with a legitimate paid account, you can also login with just a username on 3rd-party servers that specifically allow unauthenticated ("pirate" or "cracked") clients.
Regardless of which Minecraft version you prefer, using vanilla optimization mods such as Sodium, Lithium, and FerriteCore can improve framerate, performance lag, and GPU utilization by 2.5x or more.
Minimum requirements for acceptable performance:
- any integrated gfx introduced since ~2008 or so
- 2GB of disk space
- 1GB of RAM
genshin-impact
WARNING
Genshin Impact 4.0.0+ requires at least 170GB of disk space to unzip the game, this is on top of of the install size of 32-bit + 64bit Wine which is 1.3GB.
genshin-impact launches or installs the Windows version of Genshin Impact from official sources.
Before version 3.8.0, this script used a certain Linux patch that disabled the Linux-hostile anticheat software. Because it patched game files, it violated MiHoYo's terms of service and you risked banning your account if used.
While newer versions don't officially support Linux, the game now runs on Wine with some tweaks, patching game files is no longer required. To date, nobody has reported being banned for playing on a Steam Deck running Linux-based SteamOS.
Refer to troubleshooting guides for Windows or Linux-specific problems if you have issues running the game or logging in.
Camera movement issues
A common problem is mouse camera movement being extremely sensitive or unresponsive after switching workspaces, to fix:
- Go to
Settingsand set display resolution to any windowed mode. - Click anywhere on the virtual Wine desktop to focus on it.
- Click on the Genshin Impact titlebar to focus it, make sure it turns blue.
- Go to
Settingsand switch back to fullscreen, mouse movement should now work correctly.
As a workaround, try to get into the habit of switching to a windowed resolution before focusing away from the game.
Manual installation
After installing the launcher, if you have barely enough disk space (at least 90GB) for the game but not for unzipping, the Windows troubleshooting guide includes direct download links to the required .zip files.
You can unzip in-memory with half the disk space required using wget -O - [url] | busybox unzip directly into ~/.local/opt/genshin-impact/drive_c/Program Files/Genshin Impact/Genshin Impact Game.
Even if you used the official installer, if you want to download language packs other than English, I would suggest this method, because downloading it in-game (15-18GB) is very slow and cannot be done in the background.
Usage
Wine 5.3 or later is required, various prerequsite tools are installed along with the game. Since this is a Windows game running over Wine using various hacks, this installation script and the steps required are awful and anything but automatic, read the script to understand what is being done before installing.
During the installation, a Wine prefix will be set up, some winetricks, prerequisite MSVC frameworks, along with the official installer will be downloaded and installed, install everything as it pops up.
Follow the xmessage prompts as they pop up.
Run genshin-impact to launch the game directly, use -l flag to open the official launcher to install updates when needed, -m to use mangohud profiler and -- to stop accepting flags, all other flags will be passed to the game executable.
Minimum requirements for acceptable performance:
- 2c4t CPU introduced since ~2008 or so (eg. i5-530, Athlon II X2, etc.)
- GPU with Vulkan-compatible GPU (Linux only.)
- 2GB VRAM (RX 550, GT 1030 or similar.)
- 170GB of disk space
- 8GB of RAM
- an always-on internet connection (this is a live-service F2P gacha!)
Metadata
Owner
Metadata
Personal dotfiles, shell scripts—my self-contained graphical shell environment for Debian GNU/Linux, based on xorg, dwm, sxhkd, and urxvt.