Blog
 Blog copied to clipboard
React工作原理浅析
前言
之前自己看了些资料和代码,这里尝试通过实现一个类react的框架,来理解下react的工作流程,写文章也是对自己思路的一个整理,如有谬误还请大家帮忙指出。
主要内容
- 什么是React Element
- ReactDOM的render实现
- jsx与React Element
- React reconcile过程简介
- React Component实现
- Fiber简介
- 基于Fiber的代码实现
没有包含的内容
- 生命周期
- context
- ref ps: 另外一些地方,只是概念介绍和react实际实现存在差异,但基本原理是相同的 e.g. reconcile的过程为了简洁起见,并没有将key的作用考虑进去。
MiniReact
React Element
根据Dan在React Components, Elements, and Instances里的讲解,react element是指
An element is not an actual instance. Rather, it is a way to tell React what you want to see on the screen. You can’t call any methods on the element. It’s just an immutable description object with two fields: type: (string | Component) and props: Object.*
简单来说,react element是我们要绘制的页面结构的javascript描述 举个例子,下方这样的页面结构
<div class="container">
  <span class="item">hello</span>
  <span class="item">world</span>
</div>
所对应的react element如下
{
  type: "div",
  props: {
    className: "container",
    children: [{
      type: "span",
      props: {
        className: "item",
        children: "hello"
      }
    }, {
      type: "span",
      props: {
        className: "item",
        children: "world"
      }
    }]
  }
}
可以看出react element是一个典型的树状结构。而React初次渲染的过程就是把react element转换为dom节点的过程,假设我们已经有了一个上面这样的react element对象,下面来看下ReactDom.render是如何把react element转换为dom树的。
ReactDom.render的实现
我们需要做的是遍历react element树来生成dom节点,对于树状结构最容易想到的遍历方式就是递归,于是有了下面的伪代码:
/**
* 把react elements渲染成dom节点
* @param {MiniReactElement} element
* @param {HTMLElement} container
* @return {void}
*/
const render = (element, container) => {
  // 如果element为文本元素
  if (!element.type) {
    const node = createTextNode();
    container.appendChild(node);
    return;
  }
  const node = document.createElement(element.type);
  // 添加properties
  addPropertiesForNode(node);
  // 添加event listener
  addEventListenerForNode(node);
  // 递归遍历children, 生成子树
  children.forEach(child => {
    render(child, node);
  });
  container.appendChild(node);
}
渲染函数有了,那react element又是如何生成的呢,我们知道在react里是通过jsx来描述react elements的,那来看下jsx到底做了哪些工作?
jsx与React Elements
下面是babel repl中的截图
 可以看到babel其实是把jsx转换成了对React.createElement方法的调用
通过查看
可以看到babel其实是把jsx转换成了对React.createElement方法的调用
通过查看@babel/plugin-transform-react-jsx的说明,看到可以通过给jsx加注释的方式来自定义转换后的函数
 现在只要我们实现了MiniReact.createElement方法,就可以直接在代码里通过jsx来描述react elements了
因为它做的工作只是返回一个javascript对象,所以实现起来还是比较简单
现在只要我们实现了MiniReact.createElement方法,就可以直接在代码里通过jsx来描述react elements了
因为它做的工作只是返回一个javascript对象,所以实现起来还是比较简单
/**
* 生成MiniReact Element
* @param {string} type 组件类型,e.g. div, section, span
* @param {object} config 组件需要接收的props
* @param {[]} args 组件的children
*/
const createElement = (type, config, ...args) => {
 const props = Object.assign({}, config, {
   children: flattenArray(args),
 })
 return {
   type,
   props,
 }
}
到目前为止基本实现了,从『数据』到『dom节点』的初始渲染过程
 那当数据更新时,我们可以重新生成新的elements,然后调用render生成新的dom树。再把root container的innerHTML改为新生成的dom树就完成了页面的更新。
但这样做有两个问题:
那当数据更新时,我们可以重新生成新的elements,然后调用render生成新的dom树。再把root container的innerHTML改为新生成的dom树就完成了页面的更新。
但这样做有两个问题:
- 虽然我们的改变,理论上只影响一小部分页面,但整个dom都被替换了。
- 我们的数据状态目前为止只能是全局的。
先来解决第一个问题,我们在update的过程中引入reconcile。
reconcile过程简介
- reconcile是一个diff虚拟树的过程,首先我们得记录下之前生成的虚拟树
- diff过程中会存在对dom的操作,我们需要保存element对应的dom节点
于是引入一个新的数据结构instance:
/**
* @typedef {Object} Instance
* @property {MiniReactElement} element
* @property {HTMLElement} dom
* @property {Instance[]} childrenInstances
* instance是MiniReactElement渲染到dom后的一种表示
*/

把之前生成dom树的render函数重命名为instantiate, 返回值为instance类型
/**
* 返回instance对象
* @param {MiniReactElement} element
* @return {Instance}
*/
const instatiate = (element) => {
 const instance = {
   element,
 }
 // 处理文本节点
 if (!element.type) {...}
 const node = document.createElement(element.type);
 // 设置attributes和listener
 updateDomProperties(node, [], props);
 const childInstances = props.children.map(instatiate);
 const childDoms = childInstances.map(instance => instance.dom);
 childDoms.forEach(dom => node.appendChild(dom));
 return Object.assign({}, instance, { dom: node, childInstances });
}
保存之前生成的instance对象
/**
* 保存上次渲染生成的instance对象
* @type {Instance}
*/
let rootInstance = null;

/**
* @param {MiniReactElement} element
* @param {HTMLElement} container
*/
const render = (element, container) => {
 const preRootInstance = rootInstance;
 rootInstance = reconcile(container, preRootInstance, element);
}
/**
 * 对比新老instance,完成dom树的更新
 * @param {HTMLElement} container
 * @param {Instance} preInstance
 * @param {MiniReactElement} element
 * @return {Instance} newInstance
 */
const reconcile = (container, preInstance, element) => {
 // 旧的节点需要删除
 if (!element) {
   container.removeChild(preInstance.dom);
   return null;
 }
 // 新增节点
 if (!preInstance) {
  const newInstance = instatiate(element);
  container.appendChild(newInstance.dom);
  return newInstance;
 }
 // 类型不一致,替换节点
 if (preInstance.element.type !== element.type) {
   const newInstance = instatiate(element);
   container.replaceChild(preInstance.dom, newInstance.dom);
   return newInstance;
 }
 const newInstance = {
   element,
 };
 if (preInstance.element.type === element.type) {
  // 类型一致,复用节点
  newInstance.dom = preInstance.dom;
  updateDomProperties(preInstance.dom, preInstance.element.props, element.props);
 }
 // 递归调用reconcile, 生成childInstance
 newInstance.childInstances = reconcileChildren(preInstance, newInstance);
 return newInstance;
}
/**
 * 递归调用reconcile生成childInstances
 * @param {Instance} preInstance
 * @param {MiniReactElement} element
 * @return {Instance[]}
 */
const reconcileChildren = (preInstance, newInstance) => {
  const element = newInstance.element;
  const count = Math.max((preInstance && preInstance.childInstances.length) || 0, (element.props && element.props.children.length) || 0);
  const newChildrenInstances = [];
  for (let i = 0; i < count; i++) {
    const preChildInstance = (preInstance && preInstance.childInstances[i]) || null;
    const child = element.props && element.props.children[i];
    const childInstance = reconcile(newInstance.dom, preChildInstance, child);
    newChildrenInstances.push(childInstance);
  }
  return newChildrenInstances;
}
添加了reconcile之后发现,只有被影响到的节点会更新啦~, 那全局state的问题怎么解决呢,我们知道react 16之前只有react的类组件是可以有自己的state的,那现在我们来引入Component
Component与state
首先,我们需要有一个Component基类来供自定义组件继承
class Component {
 constructor(props) {
  this.props = props;
  this.state = this.state || {};
 }
 setState(partialState) {
  this.state = Object.assign({}, this.state, partialState);
 /**
  * reconcile的过程,我们需要在当前实例上能访问到,
  * 之前的instance。我们把它保存在实例的__internalInstance上,为了把类组件的实例和instance
  * 区分开,这里我们把类组件的实例叫做publicInstance
  * /
  const instance = this.__internalInstance;
  reconcile(instance.dom.parentNode, instance, instance.element);
 }
 render() {
  return null;
 }
}
当在elements中引入自定义的Component后,意为着element.type可以是一个function, 而不再只能是dom节点的tagName, 我们来更改instatiate函数的实现
/**
* 返回instance对象
* @param {MiniReactElement} element
* @return {Instance}
*/
const instatiate = (element) => {
  let { type, props } = element;
  if (typeof type === "function") {
    const newInstance = {
      element,
    };
    if (typeof type.prototype.render === "function") {
      // 类组件
      const publicInstance = createPublicInstance(element, newInstance);
      const childElement = publicInstance.render();
      const childInstance = instatiate(childElement);
      Object.assign(newInstance, {
        dom: childInstance.dom,
        childInstance, publicInstance
      });
      return newInstance;
    }
    // 函数组件
    const childElement = type(props);
    const childInstance = instatiate(childElement);
    Object.assign(newInstance, { childInstance, dom: childInstance.dom });
    return newInstance;
  }
 // 原有逻辑 {...}
}

/**
 * 创建与Component相关的publicInstance
 * @param {MiniReactElement} element
 */
const createPublicInstance = (element, newInstance) => {
  const { type, props } = element;
  const publicInstance = new type(props);
  publicInstance.__internalInstance = newInstance;
  return publicInstance;
}
另外reconcile的过程也需要少许更改
/**
 * 对比新老instance,完成dom树的更新
 * @param {HTMLElement} container
 * @param {Instance} preInstance
 * @param {MiniReactElement} element
 * @return {Instance} newInstance
 */
export const reconcile = (container, preInstance, element) => {
 // 旧的节点需要删除 {...}
 // 新增节点 {...}
 // 类型不一致,替换节点 {...}
 // 类型一致
 if (typeof preInstance.element.type === "function") {
   let childElement;
   if (typeof element.type.prototype.render === "function") {
     // 类组件
     preInstance.publicInstance.props = element.props;
     childElement = preInstance.publicInstance.render();
   } else {
     // 函数组件
     childElement = element.type(element.props);
   }
   const childInstance = reconcile(
      container,
      preInstance.childInstance,
      childElement
    );
   Object.assign(preInstance, { childInstance, })
   return preInstance;
 }
 // 原有处理dom更新逻辑 {...}
}
至此,我们引入了component从而支持了局部的state, 页面现在可以进行部分刷新了~ 上面列举的内容,与React 16之前的结构还是基本类似的,React 16主要的不同是它引入了fiber架构,那啥是fiber呢?
Fiber简介
Fiber是React 16以后引入的新的reconciliation算法,它的名称来自于React实现中的Fiber数据组构。 引入Fiber的目的是实现增量渲染:
把渲染工作分段并可以插入到多个帧内的能力
通俗的讲就是reconciliation的过程在16之后是可中断/暂停/继续的,它带来的优势主要是渲染任务现在支持区分优先级了。e.g.像用户交互类的渲染会更优先得到响应,而像从服务器读取数据这种IO操作就会被安排一个较低的优先级。
具体差异可以参见这个triangle动画的例子:Fiber vs Stack Demo
Fiber tree

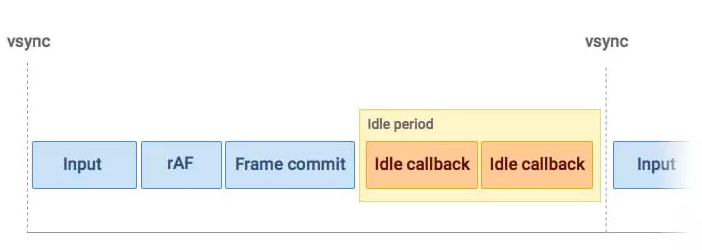
有了fiber结构,我们可以把之前基于callstack的数据结构切换到链表,这样就有了暂停的先决条件, 那怎么判断何时暂停呢? 借助requestIdleCallback, 它提供了一种在浏览器空闲的情况下执行代码的机会
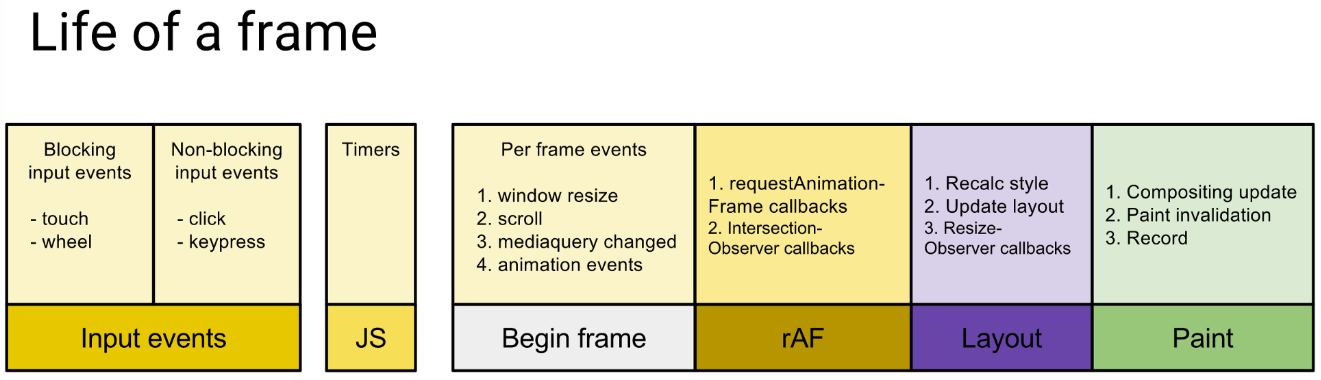
浏览器一帧的周期内所做的工作:
requestIdleCallback的执行时机:
下面来看下循环遍历fiber tree的伪代码:
let wipRoot = {
 dom: container,
 props: {
   children: [element],
 },
 alternate: currentRoot,
}
let nextUnitWork = wipRoot;
window.requestIdleCallback(workLoop);
function workLoop(idleDeadline) {
 while (idleDeadline.timeRemaining() > 1 || idleDeadline.didTimeout) {
   nextUnitWork = performUnitWork(nextUnitWork);
 }
 if (nextUnitWork) {
   window.requestIdleCallback(workLoop);
 }
}
performUnitWork做的工作主要如下:
- 对于非HostComponent,生成子组件的elements
- reconcileChildren
- 返回nextUnitWork
/**
 * 1. 创建dom节点
 * 2. 返回nextUnitWork
 * @return {Fiber}
 */
const performUnitWork = (fiber) => {
  if (typeof fiber.type === "function") {
    if (typeof fiber.type.prototype.render === "function") {
      // 类组件
    } else {
      wipFiber = fiber;
      hooksIdx = 0;
      fiber.props.children = [fiber.type(fiber.props)]
    }
  }
  reconcileChildren(fiber);
  if (fiber.child) {
    return fiber.child;
  }
  if (fiber.sibling) {
    return fiber.sibling;
  }
  let parent = fiber.return;
  while (!parent.sibling && parent.return) {
    parent = parent.return;
  }
  if (parent.sibling) {
    return parent.sibling;
  }
  return null;
}
reconcileChildren的作用主要是
- 对比新/老vdom,把改动点推入effectList
- 构建fiber树
const reconcileChildren = (wipFiber) => {
  const elements = wipFiber.props.children;
  let oldFiber = wipFiber.alternate && wipFiber.alternate.child;
  let index = 0;
  let prevSibling = null;
  while (index < elements.length || oldFiber) {
    if (index < elements.length) {
      const element = elements[index];
      const newFiber = {
        type: element.type,
        props: element.props || {},
        return: wipFiber,
        alternate: oldFiber,
        dom: null,
        hooks: [],
      };
      // 新增节点
      if (!oldFiber) {
        newFiber.effectTag = EFFECT_TAG.NEW;
        effectList.push(newFiber);
      }else if (oldFiber.type !== newFiber.type) {
        newFiber.alternate = null;
        oldFiber.effectTag = EFFECT_TAG.DELETE;
        effectList.push(oldFiber);
      } else if (oldFiber.type === newFiber.type) {
        newFiber.dom = oldFiber.dom;
        newFiber.stateNode = oldFiber.stateNode;
        const changeNeeded = Array.from(new Set([...getKeys(newFiber.props), ...getKeys(oldFiber.props)]))
          .some(key => newFiber.props[key] !== oldFiber.props[key])
        if (changeNeeded) {
          newFiber.effectTag = EFFECT_TAG.UPDATE;
          effectList.push(newFiber);
        }
      }
      if (!wipFiber.child) {
        wipFiber.child = newFiber;
      }
      if (prevSibling) {
        prevSibling.sibling = newFiber;
      }
      prevSibling = newFiber;
      index++;
    } else {
      // 需删除节点
      oldFiber.effectTag = EFFECT_TAG.DELETE;
      effectList.push(oldFiber);
    }
    if (oldFiber) {
      oldFiber = oldFiber.sibling || null;
    }
  }
}
最后生成提交渲染的过程放在commitRoot函数中,它做的工作主要是通过遍历effectlist来生成dom树,这个过程不贴代码了,感觉兴趣的同学可以自己实现下,需要注意的地方是commitRoot的过程是不可中断的。 这里主要再介绍下hooks的实现,从上面的代码可以看到fiber对象上有一个叫做hooks的数组,performUnitWork生成当前节点的elements时,会重设一个叫做hooksIdx的变量,而useState所做的工作是
- 生成hook对象
- 把hook对象推入fiber上的hooks数组
- 当setValue被调用时,把newValue推入hook对象上的queue, 启动新一轮的workLoop
export const useState = (initV) => {
  const oldHook = wipFiber.alternate &&
    wipFiber.alternate.hooks &&
    wipFiber.alternate.hooks[hooksIdx];
  const hook = {
    state: oldHook ? oldHook.state : initV,
    queue: [],
  };
  wipFiber.hooks.push(hook);
  hooksIdx++;
  const actions = oldHook ? oldHook.queue : [];
  actions.forEach(action => {
    hook.state = typeof action === "function" ? action(hook.state) : action;
  });
  const setState = (newV) => {
    hook.queue.push(newV);
    wipRoot = {
      dom: currentRoot.dom,
      alternate: currentRoot,
      props: currentRoot.props,
    }
    nextUnitWork = wipRoot;
    window.requestIdleCallback(workLoop);
  }
  return [hook.state, setState];
}
其他用于保存数据的hooks的实现原理,应该也基本类似。。
想介绍的内容大概就是这些,肯定有写的不准确的地方,希望大家帮忙指正,我这边会进行修改的, 一边写文档一边犯懒癌😂,还是得多写吧,anyway, 希望对大家理解react工作原理有所帮助, 2020新年快乐🎉🎉🎉