microless
 microless copied to clipboard
Using docker and nodejs to build Microservice
![]()
Microservice framework for node.js to make container-based microservice web applications and APIs more enjoyable to write. Micro is based on koa.js, allowing you to use all the features that koa has.
Docs
Features
Make microservice reachable
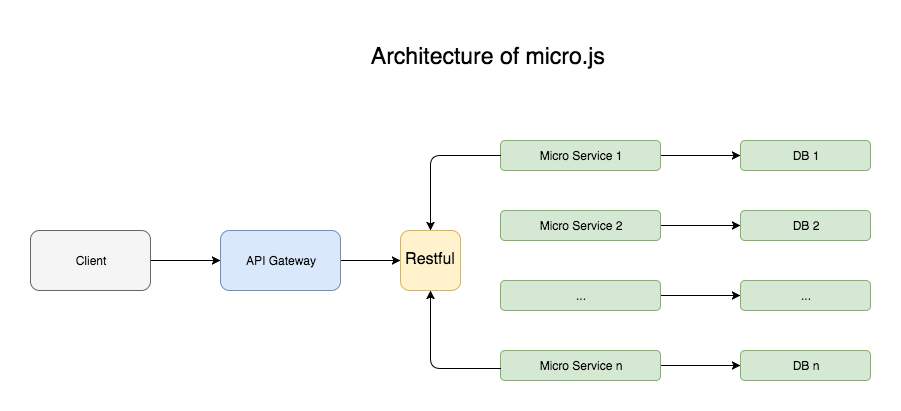
- Deploying microservices with docker containers, using docker stack deploy and docker swarm
- Transferring the data between the services via JSON strings and RESTful API
- Every single serivice has it's own database
- API Gateway serves as the controlling unit, which controls the whole system.You can do some universal works like auth or log
- Using docker deploy to manage containers and services
- Easily Integrated with koa middlewares
Installation
Install Docker
please visit docker doc
ATTENTION: docker swarm and docker-compose is also needed.
Install Microless
Microless requires node v7.6.0 or higher for ES2015 and async function support.
$ npm install microless --save
Getting started
The example shows the ability to start a python container using microless, you can get the source code in folder example
Write Python Code
from flask import Flask

app = Flask(__name__)

@app.route("/")
def hello():
    html = "<h3>Hello {name}!</h3>"
    return html.format(name="world")

if __name__ == "__main__":
    app.run(host='0.0.0.0', port=80)
This program will run a python server at port 80.
Write Dockerfile
# Use an official Python runtime as a parent image
FROM python:2.7-slim

# Set the working directory to /app
WORKDIR /app

# Copy the current directory contents into the container at /app
ADD . /app

# Install any needed packages specified in requirements.txt
RUN pip install Flask

# Make port 80 available to the world outside this container
EXPOSE 80

# Run app.py when the container launches
CMD ["python", "app.py"]
This Dockerfile defines a image which can start a python server at port 80.
Write Compose File
Save as docker-compose.yml
version: "2"
services:
  web:
    image: 'example_web'
    build: .
    ports:
      - "4000:80"
This compose file starts a python container called web with exposed port 4000, which uses the above Dockerfile.
For more details please visit docker docs.
Write Microless Code
// import microless
const Micro = require('microless');

// config restful api routers
const routers = {
  '/': {
    method: 'get' // define the request method
  }
}

var micro = new Micro({

  name: 'test', //project name

  compose: {
    src: './docker-compose.yml' //docker compose file
    dockerfile: '.'
  },

  // router to microservice
  modems: {

    // name in docker compose files
    web: {
      configs: routers,
    }

  },

  server: {
    port: 3001
  }
});
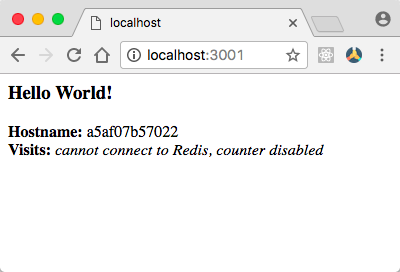
This will run the service in a docker container named 'example_web_1'.
Then the project will run at port 3001.
When you visit http://locahost:3001, you will see the result from python programs, every single request from http://locahost:3001 will automatically router to the right microservice.
Other Configs
Compose
Compose defines the src of file docker-compose and dockefile
  compose: {
    src: './docker-compose.yml', //default is './docker-compose.yml'
    dockerfile: '.' //dockerfile directory, default is .
  }
Modems
Modems mainly defines the router to microservice. Every single request from http://locahost:3001 will automatically router to the right microservice, so your router configs in the microless must as same as the router defined in the microservice.
For example, if you define a container called web in docker-compose.yml, you must write web as a key in modems like this:
  modems: {
    web: {
      configs: routers
    },

    a: {
      configs: aRouters
    },

    ...
  }
Router Configs
A symbol config is like this:
  const routers = {
    '/': {
      //called when route ends
      afterRoute: function(ctx, next, response) {
        ctx.body = response.body;
      },
      method: 'get'
    },

    '/shit/:id': {
      //called when route ends
      afterRoute: function(ctx, next) {
        ctx.body = 'shit api 0.1, params=' + JSON.stringify(this.params);
      },
      method: 'get'
    }
  }
There are two attributes that router config has:
-
method: required, defines a http request method -
afterRoute: optional, called when route ends, you can handle the result from microservice and display it in other way.when you use this attribute, you must writectx.body = xxx, otherwise you would see a blank page.
P.S. The router follows the koa-router.
Error Handling in Modems
Currently, microless has three error handling methods when modem to a microservice:
  modems: {
    web: {
      configs: routers,

      //called when modem on error
      onError: function(ctx, next, error) {
        ctx.body = error;
      },

      //called when method not supported
      methodNotSupported: function(ctx, next, error) {

      },

      //called when route not found
      routeNotFound: function(ctx, next, error) {

      }
    }
  }
-
onError: optional, called when modem on error. -
methodNotSupported: optional, called when method not supported. -
routeNotFound: optional, called when route not found.
Server
Server just has one attribute:
-
port: required, defines the main port of the service.
Error Handling
-
onSuccess: optional, called when successfully exectuing docker-compose -
onError: optional, called when exectuing docker-compose failed
A complete start code is like this:
const Micro = require('../src');

const routers = {
  '/': {
    //called when route ends
    afterRoute: function(ctx, next, response) {
      ctx.body = response.body;
    },
    method: 'get'
  },

  '/shit/:id': {
    //called when route ends
    afterRoute: function(ctx, next) {
      ctx.body = 'shit api 0.1, params=' + JSON.stringify(this.params);
    },
    method: 'get'
  }
}

var micro = new Micro({

  name: 'test',

  compose: {
    src: './docker-compose.yml',
    dockerfile: '.'
  },

  modems: {
    web: {
      configs: routers,

      //called when modem on error
      onError: function(ctx, next, error) {
        ctx.body = error;
      },

      //called when method not supported
      methodNotSupported: function(ctx, next, error) {

      },

      //called when route not found
      routeNotFound: function(ctx, next, error) {

      }
    }
  },

  server: {
    port: 3001
  },

  //called when successfully exectuing docker-compose
  // onSuccess: function() {

  // },

  //called when exectuing docker-compose failed
  onError: function(error) {
    console.log(error);
  }
});
Enjoy your microservice with docker and nodejs :)
For more visit author's website: ivydom