blog
 blog copied to clipboard
优雅的使用CSS MODULE
在上一篇文章:让React支持Less中,我介绍了如何在使用了
create-react-app后,暴露webpack配置的方法,这次我们来看看如何让我们更优雅的使用CSS Module
其实crate-react-app创建的React工程,默认支持Css Module,我们可以将css命名为xxx.module.css,然后在组件中引入,即可使用,就像下面这段代码一样
import React, { Component } from 'react';
import styles from './Button.module.css'; // 将 css modules 文件导入为 styles
import './another-stylesheet.css'; // 导入常规 CSS 文件

class Button extends Component {
  render() {
    // 作为 js 对象引用
    return <button className={styles.error}>Error Button</button>;
  }
}
编译之后的结果如下:
<button class="Button_error_ax7yz"></div>
这样,我们就避免了在大型团队中,由于不能按照规范进行css命名而造成的命名全局污染,但这还是有一些问题,如每次都要写对象名,然后使用.来调用其样式,并且样式的命名在官方也被推荐使用小驼峰的方式,像我这种使用-和_已经很久的人来讲,非常的不适应。
所以,我们来继续折腾吧...(不折腾的coder,跟咸鱼有什么区别 ~ ^_^)
首先,我一直使用typescript,所以,要先安装react的css module类型说明
npm install --save @types/react-css-modules
接下来,还要安装两个支持包:
npm install --save babel-plugin-react-css-modules
npm install --save postcss-less
打开 config/webpack.config.js 文件进行编辑
找到 module/rules/oneOf,其下有一个 test: /\.(js|mjs|jsx|ts|tsx)$/ 选项内容,找到plugins插件选项,添加我们刚刚安装的 babel-plugin-react-css-modules
...
[
	'react-css-modules',
	{
		webpackHotModuleReloading: true,
		autoResolveMultipleImports: true,
		generateScopedName: '[name]__[local]___[hash:base64:5]',
		filetypes: {
			'.less': {
				syntax: 'postcss-less',
			}
		}
	}
],
...
请注意:generateScopedName选项很重要
接下来,在需要的loader配置中,添加选项,如我用的是Less,配置如下:
{
	test: lessRegex,
		exclude: lessModuleRegex,
			use: getStyleLoaders(
				{
					importLoaders: 1,
					sourceMap: isEnvProduction && shouldUseSourceMap,
					modules: {
						// getLocalIdent: getCSSModuleLocalIdent,
						localIdentName: '[name]__[local]___[hash:base64:5]'
					},
				},
				'less-loader'
			),
				// Don't consider CSS imports dead code even if the
				// containing package claims to have no side effects.
				// Remove this when webpack adds a warning or an error for this.
				// See https://github.com/webpack/webpack/issues/6571
				sideEffects: true,
},
	// Adds support for CSS Modules, but using SASS
	// using the extension .module.scss or .module.sass
	{
		test: lessModuleRegex,
			use: getStyleLoaders(
				{
					importLoaders: 1,
					sourceMap: isEnvProduction && shouldUseSourceMap,
					modules: {
						getLocalIdent: getCSSModuleLocalIdent
					},
				},
				'less-loader'
			),
	},
如果我们的样式文件的命名不会有module字样,则可以不需要配置lessModuleRegex项,这里我没有配置,只配置了lessRegex选项,也就是说,以后我的样式文件都是xxx.less的命名规范
这里有一个特别要注意的,就是localIdentName选项,一定要和上面的generateScopedName选项的值一样,否则样式不会生效,但也不会报错
最后我们来测试一下,在Button组件中添加button.less文件
// button.less

@t-color: #ccc;

.button {
  text-align: center;
  .btn-click {
    background: #f30;
    color: #ffffff;

    padding: 5px 10px;
    border-radius: 4px;
    margin: 5px;
  }
  .btn-text {
    font-size: 30px;
    font-weight: 700;
    color: @t-color;
    position: relative;
    &::after {
      content: 'abc';
      position: absolute;
      bottom: -30px;
      right: -50px;
    }
  }
}
Button.tsx是这样的:
import React from 'react';
import './button.less';

export interface IButtonProps {}

const Button: React.FC<IButtonProps> = props => {
  return (
    <div styleName="button">
      <div styleName="btn-click" role="button">Click Me</div>
      <p styleName="btn-text">我是一段用来测试的文字</p>
    </div>
  )
}

export default Button;
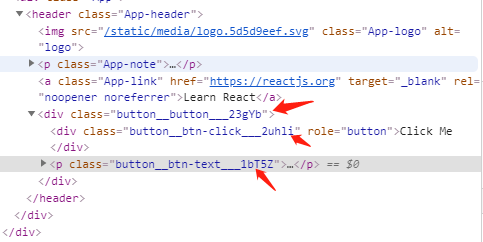
至此,我们就配置和测试完毕,需要注意的是,在JSX或TSX中,不再使用className来引用样式模块,而是使用styleName