obsidian-mindmap-nextgen
 obsidian-mindmap-nextgen copied to clipboard
Create mind maps from your obsidian markdown files
Mindmap NextGen

Obsidian plugin to view your notes as mindmaps using Markmap.
A similar plugin is available for Visual Studio Code.
Table of contents
- Usage
- "More options" menu
- Pin/Unpin
- Copy screenshot
- Collapse all
- Toggle toolbar
- Frontmatter
- Settings
- Coloring approaches
- Line thickness
- Highlight inline markmaps
- Use title as root node
- Markmap settings
- Other features
- Checkboxes
- LaTeX
- Installing
- Contributing
Usage
Open the command palette (cmd/ctrl-p) and begin typing the name of one of the 2 commands.
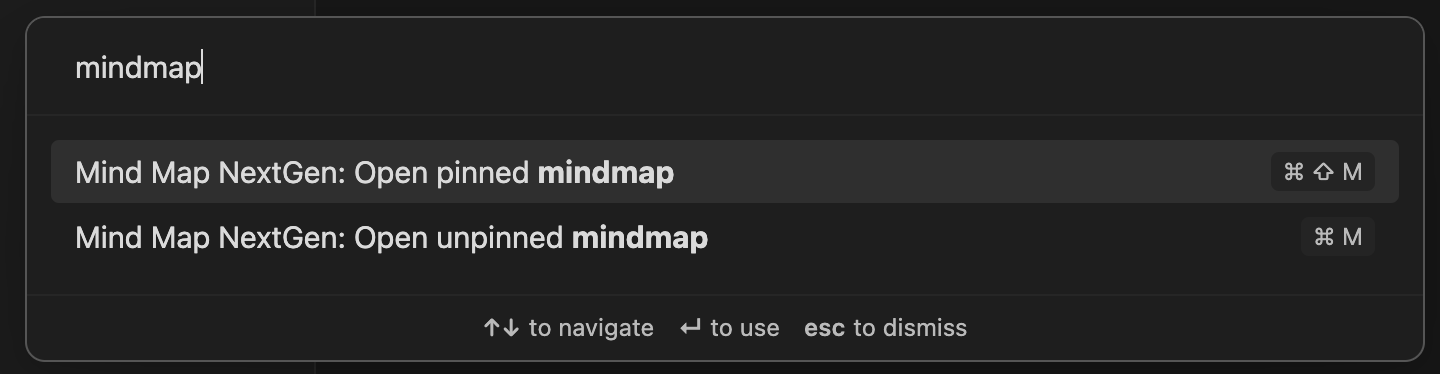
What's the difference between a pinned and an unpinned mindmap? A pinned mindmap is linked to a single Markdown document. An unpinned mindmap will update based on whichever document is the last one you clicked on.
You can also insert mindmaps inside your document using a Markdown code block tagged with "markmap". For example:
```markmap
# Mindmap
## Mindmap
```
"More options" menu
This is the menu in the top right of each tab.

Pin/Unpin
Switch the tab to unpinned, or pin it to the active document.
Copy screenshot
Copy a PNG of the mindmap to the clipboard. Background and text color are configurable in settings or the document's frontmatter.
Collapse all
Closes all mindmap nodes, leaving just the root visible
Toggle toolbar
Show or hide the toolbar in the bottom right of the mindmap
Other Features
Checkboxes
Checkboxes will be displayed in the mindmap like so:
# Housework
## Main
- [x] Dishes
- [ ] Cleaning the bathroom
- [x] Change the light bulbs
- [ ] something else
## [x] Also works on titles

LaTeX
LaTex expressions will be rendered in your mindmaps. Surround an inline expression with a dollar sign on either side.
$\frac{\partial f}{\partial t}$
Or use two dollar signs for a multiline expression.
$$
\frac{\partial f}{\partial t}
$$
Frontmatter
Some settings can be set in each document's frontmatter. Frontmatter settings take precedence over global settings, when set.
The plugin will use any of markmap's settings except for extraJs and extraCss).
Example:
---
markmap:
  screenshotTextColor: #28F48D
  highlight: true
  titleAsRootNode: true
---
Settings
Coloring approaches
There are three approaches to coloring the branches of the mindmap for you to choose from, either in plugin settings or each document's frontmatter.
Branch coloring
This mode will choose random colors per branch. "Color freeze level" decides at what depth the branches will stop changing colors.
Depth coloring
In this mode, branches are colored based on their depth in the mindmap. You can choose the first three levels' colors, plus a default color for levels deeper than three.
Single color
In this mode, all branches are the same color.
Line thickness
Set line thickness for the first three depth levels, and a default thickness for levels beyond that.
Highlight inline markmaps
Frontmatter setting: highlight
Add a background to inline markmaps to make them stand out from the rest of the page.
Use title as root node
Frontmatter setting: titleAsRootNode
Generate mindmaps with the title at the bottom level, so you can avoid repeating the title.
Screenshot settings
Frontmatter settings: screenshotTextColor, screenshotBgColor
Decide what colors the screenshot function will use.
Take screenshots via the "More options" menu.
Markmap settings
There is a section in the plugin settings for adjusting the shape and size of different parts of the mindmap. It might seem confusing at first. You'll have to fiddle around with different combinations of settings to get it the way you like.
Installing
Search for "Mindmap NextGen" in the Community Plugins section in your Obsidian settings.
Compatibility
The obsidian version I have tested is v1.0.3, which is recommended to use at least version v1.0.0.
Manual installation
- Download the latest release
- Extract the obsidian-mindmap-nextgen folder from the zip to your vault's plugins folder:
<vault>/.obsidian/plugins/
Note: On some machines the.obsidianfolder may be hidden. On MacOS you should be able to pressCommand+Shift+Dotto show the folder in Finder. - Reload Obsidian
- If prompted about Safe Mode, you can disable safe mode and enable the plugin.
Nightly Installation
Before anything you will need the following tools installed on your machine:
- NodeJS
- NPM (comes with NodeJS)
- Git (optional)
- Open obsidian
- Go to
Settings>Community plugins. - On
Installed pluginsyou can find a folder icon in the end, click on it:

- Keep this folder open.
- You can directly click HERE to download the zip file. Or you can go to this repo and click on the green icon "CODE" and then "Download ZIP".
- Go to your Downloads folder, or wherever you have downloaded it.
- Extract the zip file.
- Copy the extracted folder to the folder you have open on step 3.
- Go to that extracted folder and open it on terminal (On Windows you can
Shift + Right Clickand then "Open Command Prompt Here" or "Open Powershell Here", and on Linux justRight Clickand click on "Open terminal here"). - Run
npm install. - Run
npm run dev. - Go to
Settings>Community pluginson Obsidian. - Reload the plugins folder, and then enable "Mindmap NextGen"
Contributing
Pull requests and issues are both welcome and appreciated. 😀
If you would like to contribute to the development of this plugin, please follow the guidelines provided in CONTRIBUTING.md.
Metadata
Owner
Metadata
Create mind maps from your obsidian markdown files