learn-ngrok
 learn-ngrok copied to clipboard
☁️ Learn how to use ngrok to share access to a Web App/Site running on your "localhost" with the world!
Learn ngrok
:cloud: Learn how to use ngrok
so that you can share
a Web App/Site running on your "localhost"
with anyone online!
Why?
You are working on a Web App/Site on your localhost,
but it's "not yet ready" to be "deployed"
Note: once you are ready to make your App/MVP "official", you should consider using Heroku as it does not require you to have your
localhostrunning (and it has good logging, "monitoring", "free tier", etc.).
See: github.com/dwyl/learn-heroku
What?
The official description on the website https://ngrok.com/product is:
"
ngrokexposeslocalservers behind NATs and firewalls to thepublicinternet over secure tunnels."
In plain (beginner friendly) English:
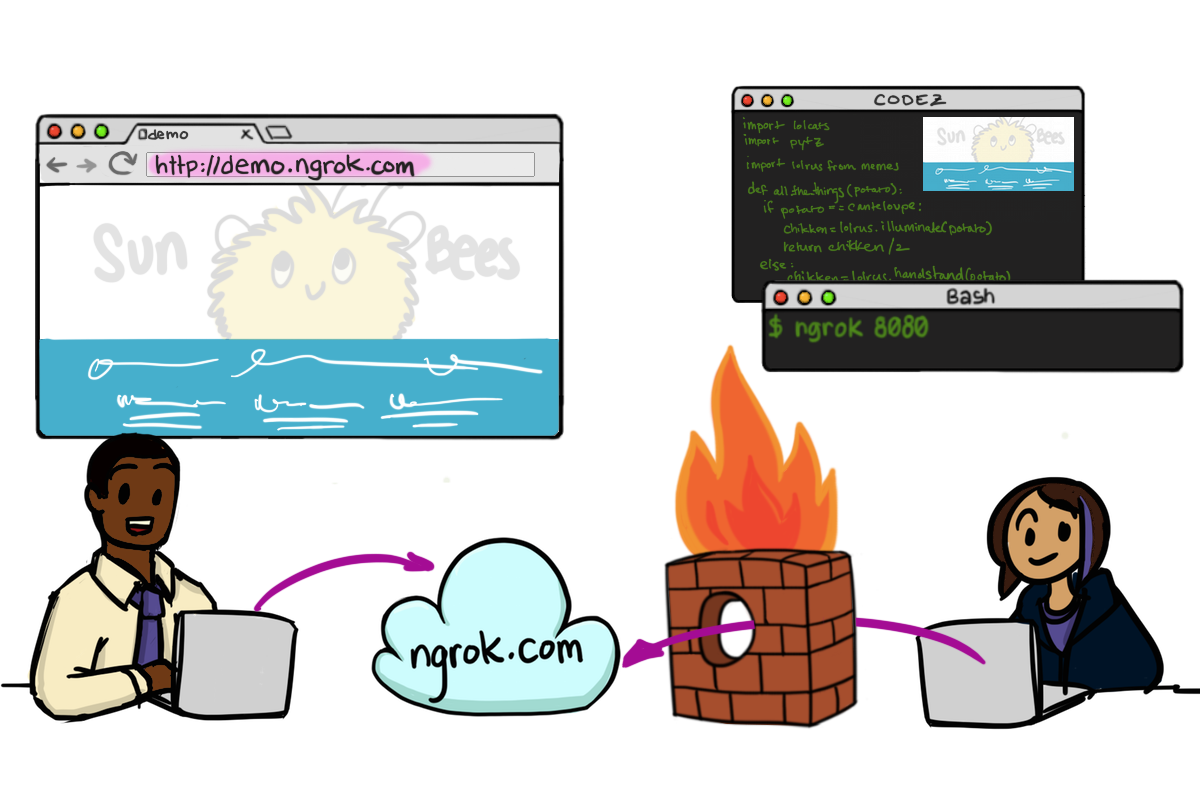
ngrokis a small piece of software that lets you run a web application
on yourlocalcomputer and (securely) share it with the world on apublicaddress ("URL").
Who?
Anyone working on a Web App/Site
and needs a quick/easy way to show or test it
without "deploying" it.
e.g: you are actively developing something
and deploying it to
Heroku
would be too time consuming.
When?
When Should I Use ngrok?
A great use-case is when you are in "development mode",
you have "live-reloading" enabled on your locahost
and you want any changes you make on your to be reflected
a mobile device without having to re-deploy.
Developing Somewhere with "Strict" Firewall Rules?
Often you will be on a network with strict firewall rules (blocked TCP ports) that do not allow you to share your app with your Mobile device! e.g: in Coffee Shops, Libraries or "Corporate" Networks.
In these cases ngrok is a great choice!
When Not to Use ngrok?
Avoid using ngrok when your app
is being actively used by people.
i.e: once your "MVP" is ready to be tested by "real users",
deploy it somewhere that is not your localhost
e.g: Heroku
How?
The official "getting started" guide is: https://dashboard.ngrok.com/get-started Is a good place to start, however we have "condensed" it down into just 4 steps!
1. Download & Install
First step on our quest is to download ngrok from the website:
https://ngrok.com/download
Mac?
If you use a Mac computer (and "homebrew") there's an easy way; Run the following command in your terminal:
brew cask install ngrok

Once you have successfully downloaded and installed ngrok.
2. Connect Your ngrok "Account" to Your locahost
If you have not already authenticated with ngrok
visit: https://dashboard.ngrok.com/user/login
We use our GitHub account to authenticate with ngrok
because they only asks for basic access:

Once authenticated, you should see a "Dashboard": https://dashboard.ngrok.com/get-started
If you scroll down you will see a section entitled:
"Connect your account"
e.g:

Copy-pasge and run the command in your terminal
(including your unique authtoken,
which you should not share BTW!)
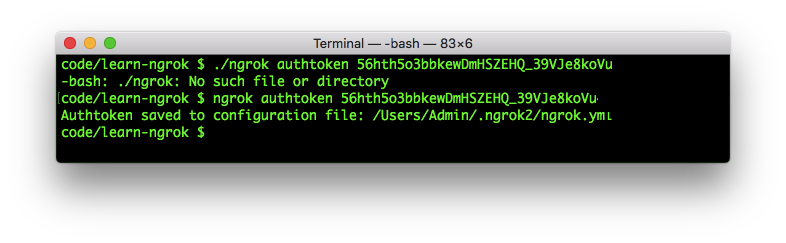
./ngrok authtoken 56hth5o3bbkewDmHSZEHQ_39VJe8koVu
Don't worry, this example is not a "valid" token, it's just for demo purposes.
Trouble-shooting ...
if you see an error:
-bash: ./ngrok: No such file or directory
simply remove the ./ in front of the ngrok command:
Thanks to: https://stackoverflow.com/questions/30188582/ngrok-command-not-found/43492639
3. Run Your app
Now it's time to run your app on your localhost.
Run which ever command you need (e.g: npm start or mix phx.server)
to start your app.
Make a note of the TCP Port your app is running on for step 4 below.
Don't Have an App?
If you don't already have an "App" to try/test ngrok,
you can simply "clone" this repository and try the "demo" App!
Copy-paste and run the following command:
git clone https://github.com/dwyl/learn-ngrok.git && cd learn-ngrok && npm install
(note: it take a few seconds for that command to run because it's installing the "live-server" dependency for running the app, be patient ...)
In your Terminal window you should see something like this:

Once the command has run it will start the "app"
and open it in your default web browser. e.g:

4. Start the ngrok "Tunnel"
Create the ngrok "tunnel" to your app
by running the following command
in a new terminal window
(different from the one where your app is running):
./ngrok http 4000
or (on Mac OSX):
ngrok http 4000
you should now see something similar to this:

This confirms that the ngrok forwarding the given URL
to your locahost on TCP Port 4000.
In our case the ngrok URL is https://f00ead01.ngrok.io
but yours will be a different random string as the sub-domain.
5. Visit the ngrok URL in your Web Browser
Open your Web Browser and visit: https://f00ead01.ngrok.io

Voilà! Your App on the public Internet!
(not that you had any doubt it would work ...)
To Quit ngrok simply use the Ctrl+C command.
Note: if you
quitngrokthe URL of your app will change. That's why the URL in the GIF below is different from this one ... if you want a fixed URL, you will need to pay for it.
6. But Wait, There's More!
Open the ngrok "inspector" http://localhost:4040
a new tab or browser window:

6.1 Make a Change in your App
If you make a simple change in your App,
you should see it update in the browser!
(the "demo" App has "live reloading"
if yours does not, simple refresh the browser window.)
e.g:

That's it!
Obviously
ngrokhas many more "advanced" features, we encourage you to read the docs if you need something specific: https://ngrok.com/docs
Any Questions?
If you have any questions, get "stuck" or want a more "advanced example", please open an issue: https://github.com/dwyl/learn-ngrok/issues