challenges-chef
 challenges-chef copied to clipboard
:book: Challenges Your Chef Skills By Solving Real Questions.
- Summary
#+BEGIN_HTML


![]() #+END_HTML
#+END_HTML
- CheatSheet File me [[https://github.com/DennyZhang/cheatsheet-kubernetes-A4/issues][Issues]] or star [[https://github.com/DennyZhang/cheatsheet-kubernetes-A4][this repo]].
See more challenges from Denny: [[https://github.com/topics/denny-challenges][#denny-challenges]]
** Scenario-101: Chef HelloWorld I
- Objective: Create a dummy cookbook, and test deployment in docker
- Requirements: #+BEGIN_EXAMPLE
- Use docker container to start a env with chef pre-installed
- Create a dummy cookbook and apply it #+END_EXAMPLE
- See more: [[Scenario-101][Scenario-101]]
** Scenario-102: Chef HelloWorld II
- Objective: Pure VM deployment
- Requirements: #+BEGIN_EXAMPLE
- Start a VM, install chef facility
- Create a dummy cookbook to install jq package
- Before install jq, run "apt-get update" by chef. So you need berkshelf.
- Enforce rubocop and foodcritic for code static check #+END_EXAMPLE
- See more: [[Scenario-102][Scenario-102]]
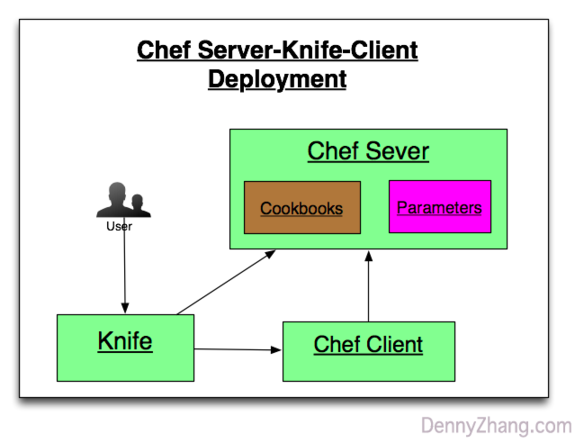
** Scenario-103: Chef HelloWorld III
- Objective: Setup chef server and chef client
- Requirements: #+BEGIN_EXAMPLE
- Start 3 containers to run chef server, knife workstation and chef client
- Install and configure knife
- From knife node run chef deployment in chef client node #+END_EXAMPLE
#+BEGIN_HTML
 #+END_HTML
- See more: [[Scenario-103][Scenario-103]]
- TODO
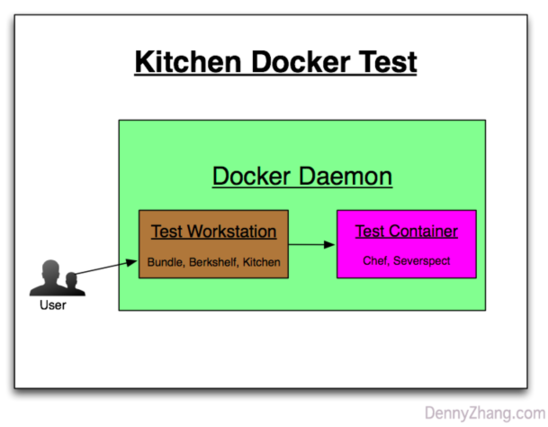
** Scenario-201: Enforce TDD For Your Chef Cookbooks I
- Objective: Test your cookbooks. Run kitchen docker in your laptop.
- Requirements: #+BEGIN_EXAMPLE
- Use kitchen to test your cookbook: start a container and test the logic
- Enforce kitchen verify logic via serverspec #+END_EXAMPLE
- See more: [[Scenario-201][Scenario-201]]
#+BEGIN_HTML
 #+END_HTML
** Scenario-202: Enforce TDD For Your Chef Cookbooks II
#+END_HTML
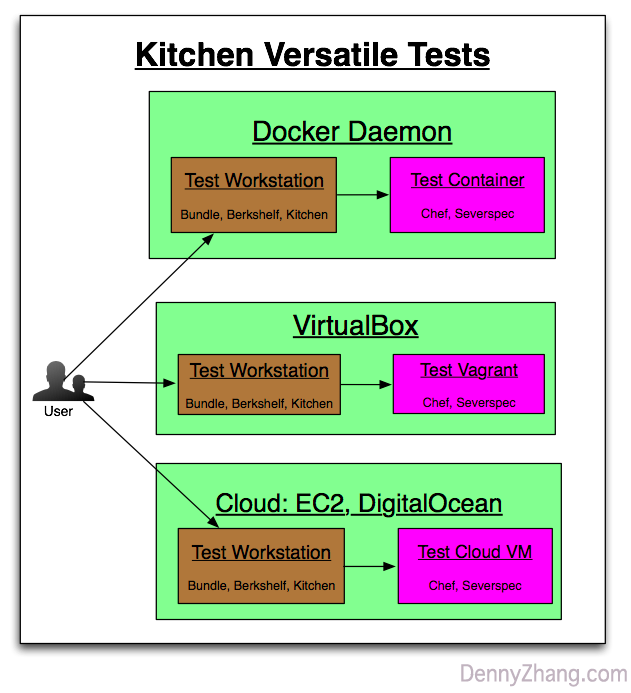
** Scenario-202: Enforce TDD For Your Chef Cookbooks II
- Objective: Deploy for 3 scenarios: docker, local VM and public cloud
- Requirements: #+BEGIN_EXAMPLE
- Use Kitchen to test local vm deployment
- Use Kitchen to test docker deployment
- Use Kitchen to test cloud VM deployment #+END_EXAMPLE
- See more: [[Scenario-202][Scenario-202]]
#+BEGIN_HTML
 #+END_HTML
** Scenario-301: Use Chef To Deploy Jenkins I
- Objective: Use chef to deploy one common service for real
- Requirements: #+BEGIN_EXAMPLE
- Deploy a standalone jenkins by chef
- Chef shall add one jenkins user
- Chef shall add a dummy job with slack notification enabled
- Run deployment in docker, vagrant and EC2
- Test both Ubuntu 14.04 and Centos 7 #+END_EXAMPLE
- See more: [[Scenario-301][Scenario-301]]
** Scenario-302: Use Chef To Deploy Jenkins II
- Objective: More Jenkins customization
- Requirements: #+BEGIN_EXAMPLE
- For better security, only registered user can login
- For better security, Jenkins listen on port 18080, instead of 8080
- When Jenkins is down, get alerts #+END_EXAMPLE
- See more: [[Scenario-302][Scenario-302]]
** Scenario-303: Use Chef To Deploy Jenkins II
- Objective: More Jenkins customization
- Requirements: #+BEGIN_EXAMPLE
- Use Jenkinsfile to create a Jenkins pipeline
- Enable and configure ThinBackup #+END_EXAMPLE
- See more: [[Scenario-303][Scenario-303]]
- TODO
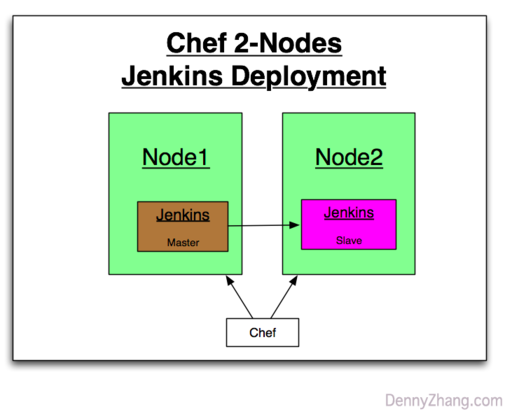
** Scenario-401: Use Chef To Deploy 2 Nodes Jenkins I
- Objective: Test and verify the deployment for both all-in-one and 2 nodes cluster
- Requirements: #+BEGIN_EXAMPLE
- Test 2 nodes jenkins cluster deployment in docker
- Use Jenkinsfile to configure Jenkins
- Define Jenkins pipeline #+END_EXAMPLE
#+BEGIN_HTML
 #+END_HTML
- See more: [[Scenario-303][Scenario-303]]
- TODO
#+BEGIN_HTML
 #+END_HTML
- More Resources License: Code is licensed under [[https://www.dennyzhang.com/wp-content/mit_license.txt][MIT License]].
- Useful links #+BEGIN_EXAMPLE https://github.com/chef-cookbooks/jenkins https://github.com/jenkinsci/pipeline-examples #+END_EXAMPLE
#+BEGIN_HTML

- org-mode configuration :noexport:
#+STARTUP: overview customtime noalign logdone showall
#+DESCRIPTION:
#+KEYWORDS:
#+AUTHOR: Denny Zhang
#+EMAIL: [email protected]
#+TAGS: noexport(n)
#+PRIORITIES: A D C
#+OPTIONS: H:3 num:t toc:nil \n:nil @:t ::t |:t ^:t -:t f:t *:t <:t
#+OPTIONS: TeX:t LaTeX:nil skip:nil d:nil todo:t pri:nil tags:not-in-toc
#+EXPORT_EXCLUDE_TAGS: exclude noexport
#+SEQ_TODO: TODO HALF ASSIGN | DONE BYPASS DELEGATE CANCELED DEFERRED
#+LINK_UP:
#+LINK_HOME: -
--8<-------------------------- separator ------------------------>8-- :noexport:
- [#A] Routine job by chef :IMPORTANT:noexport:
Delete old client
knife client delete mdmsandbox -c ~/.chef/knife_mdm.rb -y knife node delete mdmsandbox -c ~/.chef/knife_mdm.rb -y
Delete cookbook
knife cookbook delete nagios3 -c ~/.chef/knife_mdm.rb -y ** update osc envs knife bootstrap www.oscgc.com --sudo -x ubuntu -N "dennytest" -c ~/.chef/knife_mdm.rb -V --node-ssl-verify-mode none *** Internal Jenkins: 192.168.1.184:4022 knife bootstrap 192.168.1.184 --sudo -x root -P totvsJenkins -p 4022 -N "[email protected]" -c ~/.chef/knife_mdm.rb -V --node-ssl-verify-mode none ** update mdm envs *** MDM offical nagios: 104.236.159.226:22 knife bootstrap 104.236.159.226 --sudo -x root -N "mdmnagios" -c ~/.chef/knife_mdm.rb -V --node-ssl-verify-mode none *** Internal sandbox: 10.165.4.67:7022 knife bootstrap 10.165.4.67 --sudo -x root -P sophia1 -p 7022 -N "dennysandbox" -c ~/.chef/knife_mdm.rb -V --node-ssl-verify-mode none *** Internal Jenkins: 10.165.4.67:4022 knife bootstrap 10.165.4.67 --sudo -x root -P totvsJenkins -p 4022 -N "mdmnjenkins" -c ~/.chef/knife_mdm.rb -V --node-ssl-verify-mode none *** MDM repo server, official Jenkins: 104.236.159.226:4022 knife bootstrap 104.236.159.226 --sudo -x root -P totvsRepo -p 4022 -N "mdmrepo" -c ~/.chef/knife_mdm.rb -V --node-ssl-verify-mode none
-r apt,jenkins-mdm -j "{"jenkins_mdm": {"jobs":"BuildMDMRepo", "enable_email_alerting":"1", "enable_job_scheduled":"1"}}"
http://104.236.159.226:18000 ssh -N -p 5022 -f [email protected] -L 18080:localhost:18080 -n /bin/bash1 http://127.0.0.1:18080 *** mdm all-in-one docker test docker pull denny/sshd:latest
docker run -d --privileged -t -p 2200:22 -i denny/sshd:latest /usr/sbin/sshd -D
knife bootstrap 104.236.180.184 --sudo -x root -P sophia1 -p 2200 -N "aiodocker" -c ~/.chef/knife_mdm.rb -V --node-ssl-verify-mode none -r apt,all-in-one -j "{"all-in-one": {"mgmt_timeout":"900000", "max_timeout":"960000"}, "app_mdm":{"cb_bucket_retries":"10", "cb_bucket_retryinterval":"10000", "cb_bucket_timeout": "100000"}}" *** mdm local all-in-one test box 192.168.50.11
knife bootstrap 192.168.50.11 --sudo -x vagrant -P vagrant -p 22 -N "dennylocalbox" -c ~/.chef/knife_mdm.rb -V --node-ssl-verify-mode none -r apt,all-in-one -j "{"all-in-one": {"enable_check":"0","enable_nagios":"0","mgmt_timeout":"900000", "max_timeout":"960000"}, "app_mdm":{"cb_bucket_retries":"10", "cb_bucket_retryinterval":"10000", "cb_bucket_timeout": "100000"}}" ** upload cookbooks by berks cd /Users/mac/Dropbox/private_data/project/chef/denny-chef-devops/cookbooks/devops-test berks install berks upload berks upload nagios3
upload cookbooks by knife
cd /Users/mac/Dropbox/private_data/work/totvs/code/mdmdevops/cookbooks/ ls -1 | xargs knife cookbook upload -c ~/.chef/knife_mdm.rb --force knife cookbook upload -c ~/.chef/knife_mdm.rb backupdir
delete cookbook
knife cookbook delete -c ~/.chef/knife_mdm.rb nagios3
list cookbooks
knife cookbook list -c ~/.chef/knife_mdm.rb ** ~/.berkshelf/config.json #+BEGIN_EXAMPLE { "chef": { "chef_server_url": "https://104.236.159.226:443/organizations/digitalocean", "node_name": "admin", "client_key": "/Users/mac/.chef/chef_dennyzhang.pem", "validation_client_name": "digitalocean-validator", "validation_key_path": "/Users/mac/.chef/dennyzhang-validator.pem" }, "ssl": { "verify": false } } #+END_EXAMPLE ** # --8<-------------------------- separator ------------------------>8-- ** DONE apt-get update CLOSED: [2015-04-26 Sun 17:21] -r apt
Test: apt-get update ** DONE [#A] enable email sending by gmail CLOSED: [2015-04-24 Fri 11:09] -r ssmtp -j "{"ssmtp": {"credential_method":"plain", "auth_username":"[email protected]", "auth_password":"file.navy1", "mailhub_name":"smtp.gmail.com", "mailhub_port":587}}"
Test:
ssmtp cookbook doesn't come with mailutils package installed
apt-get install mailutils yum install mailx
echo "This is a test mail." | mail -s "test mail" [email protected] ** HALF enable nagios3 for monitoring and auto reporting -r nagios3 -j "{"nagios": {"server_ip":"127.0.0.1", "client_ip_list":"127.0.0.1"}}"
Test: http://127.0.0.1/nagios nagiosadmin/password1234 ** DONE enable backup script CLOSED: [2015-04-24 Fri 11:22] -r backupdir -j "{"backupdir": {"dir_list":"/var/www/,/etc"}}"
Test: ** DONE enable hostname CLOSED: [2015-04-26 Sun 17:24] -r hostname -j "{"set_fqdn": "workstation.mdm.com"}"
Test: hostname -a hostname -f ** setup hub registry -r docker-registry2 ** # --8<-------------------------- separator ------------------------>8-- ** HALF enable mdm Jenkins -r apt,jenkins-mdm -j "{"jenkins_mdm": {"jobs":"BuildMDMRepo,UpdateSandboxMDM"}}" ** TODO run mdm all-in-one -r apt,all-in-one -j "{"mdm": {"repo_server":"10.165.4.67:18000"}}" ** # --8<-------------------------- separator ------------------------>8-- ** DONE [#A] Use osc chef server CLOSED: [2015-06-06 Sat 21:31] cd /Users/mac/Dropbox/private_data/osc/chef/iamdevops/cookbooks ls -1 | xargs knife cookbook upload -c ~/.chef/knife_osc.rb --force
knife bootstrap 192.168.1.185 --sudo -x root -P sophia1 -p 4022 -N "dennytest" -c ~/.chef/knife_osc.rb -V --node-ssl-verify-mode none -r apt,os-basic-auth -j "{"os_basic": {"enable_firewall":"0"}}"
- [#A] chef: a systems and cloud infrastructure automation framework :IMPORTANT:noexport: :PROPERTIES: :type: cloud :END:
chef's cookbook: /usr/local/src/chef/cookbooks/mycookbook | Num | Name | Summary | |-----+--------------+------------------------------------------------------------| | 1 | Resource | a statement of configuration policy | | 2 | Knife | upload items from the chef-repo to the Chef server | | 3 | workstation | | | 4 | cookbooks | fundamental unit of configuration and policy distribution. | |-----+--------------+------------------------------------------------------------| | 5 | recipes | | | 6 | Attribute | | | 7 | Databags | a global variable that is stored as JSON data | | 8 | Environments | | #+TBLFM: $1=@-1+1;N
-
chef server | Name | Summary | | /var/opt/chef-server | | | /var/chef/cache/cookbooks | | | /var/log/chef-server | | | /etc/chef-server | | | chef-server-ctl reconfigure | | | rpm -e chef-server | |
-
knife | Name | Summary | |---------------------+-------------------------------------------------------------------------------------------------------| | knife client list | | | knife user list | | | knife node list | | | knife cookbook list | | |---------------------+-------------------------------------------------------------------------------------------------------| | Upload cookbooks | knife cookbook upload -a | | Upload Data Bag | knife upload data_bags | | Upload Roles | knife role from file base.rb starter.rb webserver.rb | | Upload Environments | knife environment from file dev.rb production.rb | | Boostrap VM | knife bootstrap <EXTERNAL_ADDRESS> --sudo -x root -P ChangeMe1 -N "node1" --bootstrap-version 11.12.8 | | Configure Run_list | knife node run_list set node1 'role[webserver]' 'role[cron]' |
-
Misc command | Command | Summary | |-----------------------------------------------------------------------------------+----------------------------------------------------------| | chef-server-ctl test | | | knife configure --initial | | | sudo knife bootstrap 192.168.1.185 -x root -P ChangeMe -N centos --sudo | bootstrap a node | | /root/.chef/knife.rb | knife configuration | | /etc/chef/client.rb | chef client configuration | | knife node edit client1 | | |-----------------------------------------------------------------------------------+----------------------------------------------------------| | curl https://127.0.0.1:443/clients | | | curl https://centos-vm1.novalocal:443 | | | open https://FQDN-OR-IP-OF-CHEF-SERVER | admin/p@ssw0rd1; Make sure iptables doesn't ban 443 port | |-----------------------------------------------------------------------------------+----------------------------------------------------------| | knife cookbook create apache-tutorial-1 -o ./ | | | knife upload cookbooks cookbook-test | upload cookbook | | knife node run_list add node1.example.com cookbook-test | add run_list of a cookbook to a given node | | knife node run_list add centos187.osc.com 'recipe[don_cookbook1::testfile]' | add a recipe of a cookbook to a given node | | knife node run_list remove ubuntu.dennyzhang.com 'recipe[fluig-os::conf_history]' | | | knife node show dennyubuntu -r | show run_list | |-----------------------------------------------------------------------------------+----------------------------------------------------------| | chef-client | puppet agent | | chef-client -l debug | | | chef-client -i 3600 | poll every 3600 seconds for changes | | chef-client -S https://XXX -K /etc/chef/chef-validator.pem | |
-
The agents can be installed from the workstation using the knife tool that uses SSH for deployment, easing the installation burden. ** [#A] Linux install chef utility https://docs.chef.io/install_omnibus.html
curl -L https://www.opscode.com/chef/install.sh | bash *** DONE [#A] install chef facility with given version CLOSED: [2016-05-05 Thu 16:45] http://stackoverflow.com/questions/20205889/how-to-update-the-chef-client-version (echo "version=12.4.1"; curl -L https://www.opscode.com/chef/install.sh) | sudo bash ** DONE [#A] Chef server migration/backup/restore from chef 11 to chef 12 CLOSED: [2015-04-22 Wed 16:53] http://www.ameir.net/blog/archives/326-migrating-from-one-chef-server-to-another.html http://docs.chef.io/server_backup_restore.html
- install new chef server
knife backup export -D ~/chef-backup/ -c ~/.chef/knife-orig.rb knife backup restore -D ~/chef-backup -c ~/.chef/knife-new.rb *** migration spchef macs-MacBook-Air:.chef mac$ knife node list
macs-MacBook-Air:.chef mac$ knife backup restore -D ~/chef-backup WARNING: This will overwrite existing data! Do you want to restore backup, possibly overwriting exisitng data? (Y/N) y === Restoring clients === === Restoring users === ERROR: Failed to create user[admin]: #Net::HTTPBadRequest:0x007fcbbb44c468; skipping ERROR: Failed to create user[dennyadmin]: #Net::HTTPBadRequest:0x007fcbbb48f3d0; skipping ERROR: Failed to create user[kungadmin]: #Net::HTTPBadRequest:0x007fcbbb4c4990; skipping === Restoring nodes === Restoring nodes from /Users/mac/chef-backup/nodes/all-in-one-sp.json Restoring nodes from /Users/mac/chef-backup/nodes/on-premise-deployment.json Restoring nodes from /Users/mac/chef-backup/nodes/vapp_buxeo1mg2tlyoe1q1428409660944.json Restoring nodes from /Users/mac/chef-backup/nodes/vapp_cg6b5hwpk56elgr31420578177412.json Restoring nodes from /Users/mac/chef-backup/nodes/vapp_hjgyd06p8gc621vq1416950631623.json Restoring nodes from /Users/mac/chef-backup/nodes/vapp_j920on7cdlpdb8m41417812176580.json Restoring nodes from /Users/mac/chef-backup/nodes/vapp_n90igti0hp4za70j1420656472829.json Restoring nodes from /Users/mac/chef-backup/nodes/vapp_yxd6ik7lv9xrapcd1418151775033.json === Restoring roles === === Restoring data bags === === Restoring environments === === Restoring cookbooks === Restoring cookbook ["all-in-one"] WARNING: * * * * * * * * * * * * * * * * * * * * * * * * * * * * * * * * * * * * * * * * WARNING: The cookbooks: all-in-one exist in multiple places in your cookbook_path. A composite version of these cookbooks has been compiled for uploading.
IMPORTANT: In a future version of Chef, this behavior will be removed and you will no longer be able to have the same version of a cookbook in multiple places in your cookbook_path. WARNING: The affected cookbooks are located: all-in-one: /Users/mac/chef-backup/cookbooks/all-in-one /Users/mac/chef-backup/cookbooks/all-in-one-0.1.0 WARNING: * * * * * * * * * * * * * * * * * * * * * * * * * * * * * * * * * * * * * * * * Uploading all-in-one [0.1.0] Uploaded 1 cookbook. Restoring cookbook ["build-iso"] WARNING: * * * * * * * * * * * * * * * * * * * * * * * * * * * * * * * * * * * * * * * * WARNING: The cookbooks: build-iso exist in multiple places in your cookbook_path. A composite version of these cookbooks has been compiled for uploading.
IMPORTANT: In a future version of Chef, this behavior will be removed and you will no longer be able to have the same version of a cookbook in multiple places in your cookbook_path. WARNING: The affected cookbooks are located: build-iso: /Users/mac/chef-backup/cookbooks/build-iso /Users/mac/chef-backup/cookbooks/build-iso-0.1.0 WARNING: * * * * * * * * * * * * * * * * * * * * * * * * * * * * * * * * * * * * * * * * Uploading build-iso [0.1.0] Uploaded 1 cookbook. Restoring cookbook ["common-server"] WARNING: * * * * * * * * * * * * * * * * * * * * * * * * * * * * * * * * * * * * * * * * WARNING: The cookbooks: common-server exist in multiple places in your cookbook_path. A composite version of these cookbooks has been compiled for uploading.
IMPORTANT: In a future version of Chef, this behavior will be removed and you will no longer be able to have the same version of a cookbook in multiple places in your cookbook_path. WARNING: The affected cookbooks are located: common-server: /Users/mac/chef-backup/cookbooks/common-server /Users/mac/chef-backup/cookbooks/common-server-0.1.0 WARNING: * * * * * * * * * * * * * * * * * * * * * * * * * * * * * * * * * * * * * * * * Uploading common-server [0.1.0] Uploaded 1 cookbook. Restoring cookbook ["fluig-adsync"] WARNING: * * * * * * * * * * * * * * * * * * * * * * * * * * * * * * * * * * * * * * * * WARNING: The cookbooks: fluig-adsync exist in multiple places in your cookbook_path. A composite version of these cookbooks has been compiled for uploading.
IMPORTANT: In a future version of Chef, this behavior will be removed and you will no longer be able to have the same version of a cookbook in multiple places in your cookbook_path. WARNING: The affected cookbooks are located: fluig-adsync: /Users/mac/chef-backup/cookbooks/fluig-adsync /Users/mac/chef-backup/cookbooks/fluig-adsync-0.1.0 WARNING: * * * * * * * * * * * * * * * * * * * * * * * * * * * * * * * * * * * * * * * * Uploading fluig-adsync [0.1.0] Uploaded 1 cookbook. Restoring cookbook ["fluig-apache"] WARNING: * * * * * * * * * * * * * * * * * * * * * * * * * * * * * * * * * * * * * * * * WARNING: The cookbooks: fluig-apache exist in multiple places in your cookbook_path. A composite version of these cookbooks has been compiled for uploading.
IMPORTANT: In a future version of Chef, this behavior will be removed and you will no longer be able to have the same version of a cookbook in multiple places in your cookbook_path. WARNING: The affected cookbooks are located: fluig-apache: /Users/mac/chef-backup/cookbooks/fluig-apache /Users/mac/chef-backup/cookbooks/fluig-apache-0.1.0 WARNING: * * * * * * * * * * * * * * * * * * * * * * * * * * * * * * * * * * * * * * * * Uploading fluig-apache [0.1.0] Uploaded 1 cookbook. Restoring cookbook ["fluig-backup"] WARNING: * * * * * * * * * * * * * * * * * * * * * * * * * * * * * * * * * * * * * * * * WARNING: The cookbooks: fluig-backup exist in multiple places in your cookbook_path. A composite version of these cookbooks has been compiled for uploading.
IMPORTANT: In a future version of Chef, this behavior will be removed and you will no longer be able to have the same version of a cookbook in multiple places in your cookbook_path. WARNING: The affected cookbooks are located: fluig-backup: /Users/mac/chef-backup/cookbooks/fluig-backup /Users/mac/chef-backup/cookbooks/fluig-backup-0.1.0 WARNING: * * * * * * * * * * * * * * * * * * * * * * * * * * * * * * * * * * * * * * * * Uploading fluig-backup [0.1.0] Uploaded 1 cookbook. Restoring cookbook ["fluig-basic-os"] WARNING: * * * * * * * * * * * * * * * * * * * * * * * * * * * * * * * * * * * * * * * * WARNING: The cookbooks: fluig-basic-os exist in multiple places in your cookbook_path. A composite version of these cookbooks has been compiled for uploading.
IMPORTANT: In a future version of Chef, this behavior will be removed and you will no longer be able to have the same version of a cookbook in multiple places in your cookbook_path. WARNING: The affected cookbooks are located: fluig-basic-os: /Users/mac/chef-backup/cookbooks/fluig-basic-os /Users/mac/chef-backup/cookbooks/fluig-basic-os-0.1.0 WARNING: * * * * * * * * * * * * * * * * * * * * * * * * * * * * * * * * * * * * * * * * Uploading fluig-basic-os [0.1.0] Uploaded 1 cookbook. Restoring cookbook ["fluig-buildkit"] WARNING: * * * * * * * * * * * * * * * * * * * * * * * * * * * * * * * * * * * * * * * * WARNING: The cookbooks: fluig-buildkit exist in multiple places in your cookbook_path. A composite version of these cookbooks has been compiled for uploading.
IMPORTANT: In a future version of Chef, this behavior will be removed and you will no longer be able to have the same version of a cookbook in multiple places in your cookbook_path. WARNING: The affected cookbooks are located: fluig-buildkit: /Users/mac/chef-backup/cookbooks/fluig-buildkit /Users/mac/chef-backup/cookbooks/fluig-buildkit-0.1.0 WARNING: * * * * * * * * * * * * * * * * * * * * * * * * * * * * * * * * * * * * * * * * Uploading fluig-buildkit [0.1.0] Uploaded 1 cookbook. Restoring cookbook ["fluig-cluster"] WARNING: * * * * * * * * * * * * * * * * * * * * * * * * * * * * * * * * * * * * * * * * WARNING: The cookbooks: fluig-cluster exist in multiple places in your cookbook_path. A composite version of these cookbooks has been compiled for uploading.
IMPORTANT: In a future version of Chef, this behavior will be removed and you will no longer be able to have the same version of a cookbook in multiple places in your cookbook_path. WARNING: The affected cookbooks are located: fluig-cluster: /Users/mac/chef-backup/cookbooks/fluig-cluster /Users/mac/chef-backup/cookbooks/fluig-cluster-0.1.0 WARNING: * * * * * * * * * * * * * * * * * * * * * * * * * * * * * * * * * * * * * * * * Uploading fluig-cluster [0.1.0] Uploaded 1 cookbook. Restoring cookbook ["fluig-core"] WARNING: * * * * * * * * * * * * * * * * * * * * * * * * * * * * * * * * * * * * * * * * WARNING: The cookbooks: fluig-core exist in multiple places in your cookbook_path. A composite version of these cookbooks has been compiled for uploading.
IMPORTANT: In a future version of Chef, this behavior will be removed and you will no longer be able to have the same version of a cookbook in multiple places in your cookbook_path. WARNING: The affected cookbooks are located: fluig-core: /Users/mac/chef-backup/cookbooks/fluig-core /Users/mac/chef-backup/cookbooks/fluig-core-0.1.0 WARNING: * * * * * * * * * * * * * * * * * * * * * * * * * * * * * * * * * * * * * * * * Uploading fluig-core [0.1.0] Uploaded 1 cookbook. Restoring cookbook ["fluig-couchbase"] WARNING: * * * * * * * * * * * * * * * * * * * * * * * * * * * * * * * * * * * * * * * * WARNING: The cookbooks: fluig-couchbase exist in multiple places in your cookbook_path. A composite version of these cookbooks has been compiled for uploading.
IMPORTANT: In a future version of Chef, this behavior will be removed and you will no longer be able to have the same version of a cookbook in multiple places in your cookbook_path. WARNING: The affected cookbooks are located: fluig-couchbase: /Users/mac/chef-backup/cookbooks/fluig-couchbase /Users/mac/chef-backup/cookbooks/fluig-couchbase-0.1.0 WARNING: * * * * * * * * * * * * * * * * * * * * * * * * * * * * * * * * * * * * * * * * Uploading fluig-couchbase [0.1.0] Uploaded 1 cookbook. Restoring cookbook ["fluig-crontab"] WARNING: * * * * * * * * * * * * * * * * * * * * * * * * * * * * * * * * * * * * * * * * WARNING: The cookbooks: fluig-crontab exist in multiple places in your cookbook_path. A composite version of these cookbooks has been compiled for uploading.
IMPORTANT: In a future version of Chef, this behavior will be removed and you will no longer be able to have the same version of a cookbook in multiple places in your cookbook_path. WARNING: The affected cookbooks are located: fluig-crontab: /Users/mac/chef-backup/cookbooks/fluig-crontab /Users/mac/chef-backup/cookbooks/fluig-crontab-0.1.0 WARNING: * * * * * * * * * * * * * * * * * * * * * * * * * * * * * * * * * * * * * * * * Uploading fluig-crontab [0.1.0] Uploaded 1 cookbook. Restoring cookbook ["fluig-dev-os"] WARNING: * * * * * * * * * * * * * * * * * * * * * * * * * * * * * * * * * * * * * * * * WARNING: The cookbooks: fluig-dev-os exist in multiple places in your cookbook_path. A composite version of these cookbooks has been compiled for uploading.
IMPORTANT: In a future version of Chef, this behavior will be removed and you will no longer be able to have the same version of a cookbook in multiple places in your cookbook_path. WARNING: The affected cookbooks are located: fluig-dev-os: /Users/mac/chef-backup/cookbooks/fluig-dev-os /Users/mac/chef-backup/cookbooks/fluig-dev-os-0.1.0 WARNING: * * * * * * * * * * * * * * * * * * * * * * * * * * * * * * * * * * * * * * * * Uploading fluig-dev-os [0.1.0] Uploaded 1 cookbook. Restoring cookbook ["fluig-files"] WARNING: * * * * * * * * * * * * * * * * * * * * * * * * * * * * * * * * * * * * * * * * WARNING: The cookbooks: fluig-files exist in multiple places in your cookbook_path. A composite version of these cookbooks has been compiled for uploading.
IMPORTANT: In a future version of Chef, this behavior will be removed and you will no longer be able to have the same version of a cookbook in multiple places in your cookbook_path. WARNING: The affected cookbooks are located: fluig-files: /Users/mac/chef-backup/cookbooks/fluig-files /Users/mac/chef-backup/cookbooks/fluig-files-0.1.0 WARNING: * * * * * * * * * * * * * * * * * * * * * * * * * * * * * * * * * * * * * * * * Uploading fluig-files [0.1.0] Uploaded 1 cookbook. Restoring cookbook ["fluig-initialize"] WARNING: * * * * * * * * * * * * * * * * * * * * * * * * * * * * * * * * * * * * * * * * WARNING: The cookbooks: fluig-initialize exist in multiple places in your cookbook_path. A composite version of these cookbooks has been compiled for uploading.
IMPORTANT: In a future version of Chef, this behavior will be removed and you will no longer be able to have the same version of a cookbook in multiple places in your cookbook_path. WARNING: The affected cookbooks are located: fluig-initialize: /Users/mac/chef-backup/cookbooks/fluig-initialize /Users/mac/chef-backup/cookbooks/fluig-initialize-0.1.0 WARNING: * * * * * * * * * * * * * * * * * * * * * * * * * * * * * * * * * * * * * * * * Uploading fluig-initialize [0.1.0] Uploaded 1 cookbook. Restoring cookbook ["fluig-java"] WARNING: * * * * * * * * * * * * * * * * * * * * * * * * * * * * * * * * * * * * * * * * WARNING: The cookbooks: fluig-java exist in multiple places in your cookbook_path. A composite version of these cookbooks has been compiled for uploading.
IMPORTANT: In a future version of Chef, this behavior will be removed and you will no longer be able to have the same version of a cookbook in multiple places in your cookbook_path. WARNING: The affected cookbooks are located: fluig-java: /Users/mac/chef-backup/cookbooks/fluig-java /Users/mac/chef-backup/cookbooks/fluig-java-0.1.0 WARNING: * * * * * * * * * * * * * * * * * * * * * * * * * * * * * * * * * * * * * * * * Uploading fluig-java [0.1.0] Uploaded 1 cookbook. Restoring cookbook ["fluig-jenkins"] WARNING: * * * * * * * * * * * * * * * * * * * * * * * * * * * * * * * * * * * * * * * * WARNING: The cookbooks: fluig-jenkins exist in multiple places in your cookbook_path. A composite version of these cookbooks has been compiled for uploading.
IMPORTANT: In a future version of Chef, this behavior will be removed and you will no longer be able to have the same version of a cookbook in multiple places in your cookbook_path. WARNING: The affected cookbooks are located: fluig-jenkins: /Users/mac/chef-backup/cookbooks/fluig-jenkins /Users/mac/chef-backup/cookbooks/fluig-jenkins-0.1.0 WARNING: * * * * * * * * * * * * * * * * * * * * * * * * * * * * * * * * * * * * * * * * Uploading fluig-jenkins [0.1.0] Uploaded 1 cookbook. Restoring cookbook ["fluig-keystore"] WARNING: * * * * * * * * * * * * * * * * * * * * * * * * * * * * * * * * * * * * * * * * WARNING: The cookbooks: fluig-keystore exist in multiple places in your cookbook_path. A composite version of these cookbooks has been compiled for uploading.
IMPORTANT: In a future version of Chef, this behavior will be removed and you will no longer be able to have the same version of a cookbook in multiple places in your cookbook_path. WARNING: The affected cookbooks are located: fluig-keystore: /Users/mac/chef-backup/cookbooks/fluig-keystore /Users/mac/chef-backup/cookbooks/fluig-keystore-0.1.0 WARNING: * * * * * * * * * * * * * * * * * * * * * * * * * * * * * * * * * * * * * * * * Uploading fluig-keystore [0.1.0] Uploaded 1 cookbook. Restoring cookbook ["fluig-logrotate"] WARNING: * * * * * * * * * * * * * * * * * * * * * * * * * * * * * * * * * * * * * * * * WARNING: The cookbooks: fluig-logrotate exist in multiple places in your cookbook_path. A composite version of these cookbooks has been compiled for uploading.
IMPORTANT: In a future version of Chef, this behavior will be removed and you will no longer be able to have the same version of a cookbook in multiple places in your cookbook_path. WARNING: The affected cookbooks are located: fluig-logrotate: /Users/mac/chef-backup/cookbooks/fluig-logrotate /Users/mac/chef-backup/cookbooks/fluig-logrotate-0.1.0 WARNING: * * * * * * * * * * * * * * * * * * * * * * * * * * * * * * * * * * * * * * * * Uploading fluig-logrotate [0.1.0] Uploaded 1 cookbook. Restoring cookbook ["fluig-messaging"] WARNING: * * * * * * * * * * * * * * * * * * * * * * * * * * * * * * * * * * * * * * * * WARNING: The cookbooks: fluig-messaging exist in multiple places in your cookbook_path. A composite version of these cookbooks has been compiled for uploading.
IMPORTANT: In a future version of Chef, this behavior will be removed and you will no longer be able to have the same version of a cookbook in multiple places in your cookbook_path. WARNING: The affected cookbooks are located: fluig-messaging: /Users/mac/chef-backup/cookbooks/fluig-messaging /Users/mac/chef-backup/cookbooks/fluig-messaging-0.1.0 WARNING: * * * * * * * * * * * * * * * * * * * * * * * * * * * * * * * * * * * * * * * * Uploading fluig-messaging [0.1.0] Uploaded 1 cookbook. Restoring cookbook ["fluig-nagios"] WARNING: * * * * * * * * * * * * * * * * * * * * * * * * * * * * * * * * * * * * * * * * WARNING: The cookbooks: fluig-nagios exist in multiple places in your cookbook_path. A composite version of these cookbooks has been compiled for uploading.
IMPORTANT: In a future version of Chef, this behavior will be removed and you will no longer be able to have the same version of a cookbook in multiple places in your cookbook_path. WARNING: The affected cookbooks are located: fluig-nagios: /Users/mac/chef-backup/cookbooks/fluig-nagios /Users/mac/chef-backup/cookbooks/fluig-nagios-0.1.0 WARNING: * * * * * * * * * * * * * * * * * * * * * * * * * * * * * * * * * * * * * * * * Uploading fluig-nagios [0.1.0] Uploaded 1 cookbook. Restoring cookbook ["fluig-neo4j"] WARNING: * * * * * * * * * * * * * * * * * * * * * * * * * * * * * * * * * * * * * * * * WARNING: The cookbooks: fluig-neo4j exist in multiple places in your cookbook_path. A composite version of these cookbooks has been compiled for uploading.
IMPORTANT: In a future version of Chef, this behavior will be removed and you will no longer be able to have the same version of a cookbook in multiple places in your cookbook_path. WARNING: The affected cookbooks are located: fluig-neo4j: /Users/mac/chef-backup/cookbooks/fluig-neo4j /Users/mac/chef-backup/cookbooks/fluig-neo4j-0.1.0 WARNING: * * * * * * * * * * * * * * * * * * * * * * * * * * * * * * * * * * * * * * * * Uploading fluig-neo4j [0.1.0] Uploaded 1 cookbook. Restoring cookbook ["fluig-postcheck"] WARNING: * * * * * * * * * * * * * * * * * * * * * * * * * * * * * * * * * * * * * * * * WARNING: The cookbooks: fluig-postcheck exist in multiple places in your cookbook_path. A composite version of these cookbooks has been compiled for uploading.
IMPORTANT: In a future version of Chef, this behavior will be removed and you will no longer be able to have the same version of a cookbook in multiple places in your cookbook_path. WARNING: The affected cookbooks are located: fluig-postcheck: /Users/mac/chef-backup/cookbooks/fluig-postcheck /Users/mac/chef-backup/cookbooks/fluig-postcheck-0.1.0 WARNING: * * * * * * * * * * * * * * * * * * * * * * * * * * * * * * * * * * * * * * * * Uploading fluig-postcheck [0.1.0] Uploaded 1 cookbook. Restoring cookbook ["fluig-precheck"] WARNING: * * * * * * * * * * * * * * * * * * * * * * * * * * * * * * * * * * * * * * * * WARNING: The cookbooks: fluig-precheck exist in multiple places in your cookbook_path. A composite version of these cookbooks has been compiled for uploading.
IMPORTANT: In a future version of Chef, this behavior will be removed and you will no longer be able to have the same version of a cookbook in multiple places in your cookbook_path. WARNING: The affected cookbooks are located: fluig-precheck: /Users/mac/chef-backup/cookbooks/fluig-precheck /Users/mac/chef-backup/cookbooks/fluig-precheck-0.1.0 WARNING: * * * * * * * * * * * * * * * * * * * * * * * * * * * * * * * * * * * * * * * * Uploading fluig-precheck [0.1.0] Uploaded 1 cookbook. Restoring cookbook ["fluig-racagent"] WARNING: * * * * * * * * * * * * * * * * * * * * * * * * * * * * * * * * * * * * * * * * WARNING: The cookbooks: fluig-racagent exist in multiple places in your cookbook_path. A composite version of these cookbooks has been compiled for uploading.
IMPORTANT: In a future version of Chef, this behavior will be removed and you will no longer be able to have the same version of a cookbook in multiple places in your cookbook_path. WARNING: The affected cookbooks are located: fluig-racagent: /Users/mac/chef-backup/cookbooks/fluig-racagent /Users/mac/chef-backup/cookbooks/fluig-racagent-0.1.0 WARNING: * * * * * * * * * * * * * * * * * * * * * * * * * * * * * * * * * * * * * * * * Uploading fluig-racagent [0.1.0] Uploaded 1 cookbook. Restoring cookbook ["fluig-rest"] WARNING: * * * * * * * * * * * * * * * * * * * * * * * * * * * * * * * * * * * * * * * * WARNING: The cookbooks: fluig-rest exist in multiple places in your cookbook_path. A composite version of these cookbooks has been compiled for uploading.
IMPORTANT: In a future version of Chef, this behavior will be removed and you will no longer be able to have the same version of a cookbook in multiple places in your cookbook_path. WARNING: The affected cookbooks are located: fluig-rest: /Users/mac/chef-backup/cookbooks/fluig-rest /Users/mac/chef-backup/cookbooks/fluig-rest-0.1.0 WARNING: * * * * * * * * * * * * * * * * * * * * * * * * * * * * * * * * * * * * * * * * Uploading fluig-rest [0.1.0] Uploaded 1 cookbook. Restoring cookbook ["fluig-rmi"] WARNING: * * * * * * * * * * * * * * * * * * * * * * * * * * * * * * * * * * * * * * * * WARNING: The cookbooks: fluig-rmi exist in multiple places in your cookbook_path. A composite version of these cookbooks has been compiled for uploading.
IMPORTANT: In a future version of Chef, this behavior will be removed and you will no longer be able to have the same version of a cookbook in multiple places in your cookbook_path. WARNING: The affected cookbooks are located: fluig-rmi: /Users/mac/chef-backup/cookbooks/fluig-rmi /Users/mac/chef-backup/cookbooks/fluig-rmi-0.1.0 WARNING: * * * * * * * * * * * * * * * * * * * * * * * * * * * * * * * * * * * * * * * * Uploading fluig-rmi [0.1.0] Uploaded 1 cookbook. Restoring cookbook ["fluig-search"] WARNING: * * * * * * * * * * * * * * * * * * * * * * * * * * * * * * * * * * * * * * * * WARNING: The cookbooks: fluig-search exist in multiple places in your cookbook_path. A composite version of these cookbooks has been compiled for uploading.
IMPORTANT: In a future version of Chef, this behavior will be removed and you will no longer be able to have the same version of a cookbook in multiple places in your cookbook_path. WARNING: The affected cookbooks are located: fluig-search: /Users/mac/chef-backup/cookbooks/fluig-search /Users/mac/chef-backup/cookbooks/fluig-search-0.1.0 WARNING: * * * * * * * * * * * * * * * * * * * * * * * * * * * * * * * * * * * * * * * * Uploading fluig-search [0.1.0] Uploaded 1 cookbook. Restoring cookbook ["fluig-tomcat"] WARNING: * * * * * * * * * * * * * * * * * * * * * * * * * * * * * * * * * * * * * * * * WARNING: The cookbooks: fluig-tomcat exist in multiple places in your cookbook_path. A composite version of these cookbooks has been compiled for uploading.
IMPORTANT: In a future version of Chef, this behavior will be removed and you will no longer be able to have the same version of a cookbook in multiple places in your cookbook_path. WARNING: The affected cookbooks are located: fluig-tomcat: /Users/mac/chef-backup/cookbooks/fluig-tomcat /Users/mac/chef-backup/cookbooks/fluig-tomcat-0.1.0 WARNING: * * * * * * * * * * * * * * * * * * * * * * * * * * * * * * * * * * * * * * * * Uploading fluig-tomcat [0.1.0] Uploaded 1 cookbook. Restoring cookbook ["fluig-vmmanager-webapp"] WARNING: * * * * * * * * * * * * * * * * * * * * * * * * * * * * * * * * * * * * * * * * WARNING: The cookbooks: fluig-vmmanager-webapp exist in multiple places in your cookbook_path. A composite version of these cookbooks has been compiled for uploading.
IMPORTANT: In a future version of Chef, this behavior will be removed and you will no longer be able to have the same version of a cookbook in multiple places in your cookbook_path. WARNING: The affected cookbooks are located: fluig-vmmanager-webapp: /Users/mac/chef-backup/cookbooks/fluig-vmmanager-webapp /Users/mac/chef-backup/cookbooks/fluig-vmmanager-webapp-0.1.0 WARNING: * * * * * * * * * * * * * * * * * * * * * * * * * * * * * * * * * * * * * * * * Uploading fluig-vmmanager-webapp [0.1.0] Uploaded 1 cookbook. Restoring cookbook ["ntp"] WARNING: * * * * * * * * * * * * * * * * * * * * * * * * * * * * * * * * * * * * * * * * WARNING: The cookbooks: ntp exist in multiple places in your cookbook_path. A composite version of these cookbooks has been compiled for uploading.
IMPORTANT: In a future version of Chef, this behavior will be removed and you will no longer be able to have the same version of a cookbook in multiple places in your cookbook_path. WARNING: The affected cookbooks are located: ntp: /Users/mac/chef-backup/cookbooks/ntp /Users/mac/chef-backup/cookbooks/ntp-1.6.5 WARNING: * * * * * * * * * * * * * * * * * * * * * * * * * * * * * * * * * * * * * * * * Uploading ntp [1.6.5] Uploaded 1 cookbook. Restoring cookbook ["os-security"] WARNING: * * * * * * * * * * * * * * * * * * * * * * * * * * * * * * * * * * * * * * * * WARNING: The cookbooks: os-security exist in multiple places in your cookbook_path. A composite version of these cookbooks has been compiled for uploading.
IMPORTANT: In a future version of Chef, this behavior will be removed and you will no longer be able to have the same version of a cookbook in multiple places in your cookbook_path. WARNING: The affected cookbooks are located: os-security: /Users/mac/chef-backup/cookbooks/os-security /Users/mac/chef-backup/cookbooks/os-security-0.1.0 WARNING: * * * * * * * * * * * * * * * * * * * * * * * * * * * * * * * * * * * * * * * * Uploading os-security [0.1.0] Uploaded 1 cookbook. Restoring cookbook ["squid"] WARNING: * * * * * * * * * * * * * * * * * * * * * * * * * * * * * * * * * * * * * * * * WARNING: The cookbooks: squid exist in multiple places in your cookbook_path. A composite version of these cookbooks has been compiled for uploading.
IMPORTANT: In a future version of Chef, this behavior will be removed and you will no longer be able to have the same version of a cookbook in multiple places in your cookbook_path. WARNING: The affected cookbooks are located: squid: /Users/mac/chef-backup/cookbooks/squid /Users/mac/chef-backup/cookbooks/squid-0.5.2 WARNING: * * * * * * * * * * * * * * * * * * * * * * * * * * * * * * * * * * * * * * * * Uploading squid [0.5.2] Uploaded 1 cookbook. Restoring cookbook ["vsftpd"] WARNING: * * * * * * * * * * * * * * * * * * * * * * * * * * * * * * * * * * * * * * * * WARNING: The cookbooks: vsftpd exist in multiple places in your cookbook_path. A composite version of these cookbooks has been compiled for uploading.
IMPORTANT: In a future version of Chef, this behavior will be removed and you will no longer be able to have the same version of a cookbook in multiple places in your cookbook_path. WARNING: The affected cookbooks are located: vsftpd: /Users/mac/chef-backup/cookbooks/vsftpd /Users/mac/chef-backup/cookbooks/vsftpd-0.1.0 WARNING: * * * * * * * * * * * * * * * * * * * * * * * * * * * * * * * * * * * * * * * * Uploading vsftpd [0.1.0] Uploaded 1 cookbook. macs-MacBook-Air:.chef mac$ *** TODO [#A] chef_server_url parameter need to be updated #+BEGIN_EXAMPLE root@kitchen-identity-sandbox:~# cat /etc/chef/client.rb cat /etc/chef/client.rb log_level :info log_location STDOUT node_name 'all-in-one-sp' client_key '/etc/chef/client.pem' chef_server_url 'https://104.131.157.119/organizations/digitalocean' cache_type 'BasicFile' no_lazy_load true cache_options( :path => '/etc/chef/checksums' )
TODO: improve later
ssl_verify_mode :verify_none no_proxy 'no_proxy'root@kitchen-identity-sandbox:~# #+END_EXAMPLE *** web page: Migrating from one Chef server to another | ameir dot net http://www.ameir.net/blog/archives/326-migrating-from-one-chef-server-to-another.html **** webcontent :noexport: #+begin_example Location: http://www.ameir.net/blog/archives/326-migrating-from-one-chef-server-to-another.html ameir dot net
Get your geek on
Get your geek on
Home » Linux Luvin' » Migrating from one Chef server to another
Recent Posts
- Get nameservers from resolv.conf with Ruby
- Run multiple ssh commands in parallel with GNU Parallel
- Elasticsearch cluster administration notes
- Installing OpenVZ templates in Proxmox
- IMAP Append – Message contains bare newlines
Recent Comments
- Ameir Abdeldayem on Easy way to backup entire folders
- Ameir Abdeldayem on Run multiple ssh commands in parallel with GNU Parallel
- denny on Run multiple ssh commands in parallel with GNU Parallel
- denny on Easy way to backup entire folders
- Ivan on Running Proxmox behind a single IP address
Search for: [ ] Search Migrating from one Chef server to another 6
20 Apr, 2014 in Linux Luvin' by Ameir Abdeldayem
It happens — you’re on a server that just can’t be upgraded any further, and you need more resources. Or, you need to backup a Chef server. Or, you need to setup a QA instance. Or, you need to finally migrate from Chef 10 to Chef 11. Or, you have one of many other possible reasons, but you need to be able to stand up a new Chef instance, and not have to do a ton of work. If any of that applies to you, then this post is for you.
In the case where you’re migrating from one Chef server to another (i.e., the old one is going bye-bye), it would be very helpful to have your Chef server be CNAMEd (e.g. chef.company.com -> vm101.iad.company.com) or behind a load balancer/proxy where you can change targets easily. That way, you won’t need to update the client configs, and it’ll be an easy swap. Everything should “just work” ™.
First, we’ll make a copy of your knife.rb:
Shell [cp -a ~/.chef/knife{]
1 cp -a ~/.chef/knife{,-orig}.rb
Now, we’ll need to get access to your new Chef server via knife. You can do so by logging in as admin, and regenerating and saving a new private key. You can also create a new user here instead of using admin, but I advise against this, as any user you create will conflict with users of the same name from the old server. Yes, that means that if you’ve been using ‘admin’ as the main user, you may run into problems (but let’s just hope that you’ve been using per-person accounts).
Now, we’ll update your current knife.rb to reflect the new node information in it:
[... ]
1 ... 2 node_name 'admin' 3 client_key '/Users/user/.chef/new-server-admin.pem' 4 chef_server_url 'https://vm102.iad.company.com' 5 ...
It wouldn’t hurt to check that you have access to the new node by doing a knife user list .
Now, we’ll need to download all of the data from the “old” Chef server. To do so, we’ll be using the nifty ‘knife backup‘ plugin. To get it installed on OS X, I did:
Shell [sudo gem install kni]
1 sudo gem install knife-backup
Now, to finally back things up, we’ll do:
Shell [knife backup export ]
1 knife backup export -D ~/chef-backup/ -c ~/.chef/knife-orig.rb
Note that the argument after -D is the destination directory where all of the Chef data will go; this directory will automatically be created for you. The argument of -c tells knife which config file to use; we’ll, of course, be using the “old” server here. Also, if you only need to backup a certain set of data from your Chef server (e.g. only users and environments), you can specify that. See the knife backup documentation for details.
Now that we have all the data we need, we’ll need to push it up to the new server. This works much the same as the export:
Shell [knife backup restore]
1 knife backup restore -D ~/chef-backup
I left off the -c here because knife.rb is the default config file.
Once everything has been restored, your original user in Chef will now be available (you can verify this via the Chef Server UI). The amazing thing is that your keys have not changed, and can be used as-is. Chef Server keeps track of your public keys, so all of your private keys for all nodes /clients are still good.
This, now, is where you update your knife.rb to reflect your original user settings. If you’re running behind a load balancer/proxy, you can simply use your original config as-is after replacing the old server with the new one. If you’re doing the CNAME/A record route, you can do the same once DNS has propagated. Otherwise, you can overwrite your new config with your old one, and edit it to reflect the new server’s URL.
If your nodes are pointing to the wrong server in their client.rb, you can use knife ssh with sed to find/replace the server URLs.
If you’ll be accessing multiple Chef servers frequently enough, I highly recommend looking at the knife block plugin. That way, you can switch between different configurations with ease, including those for Berkshelf.
Leave a comment Cancel reply
Your email address will not be published. Required fields are marked *
Name * [ ]
Email * [ ]
Website [ ]
    [                                             ]
    [                                             ]
    [                                             ]
    [                                             ]
    [                                             ]
    [                                             ]
    [                                             ]
Comment [ ]
You may use these HTML tags and attributes:
Post Comment
6 thoughts on “Migrating from one Chef server to another”
-
[ea665620] Phil Nguyen November 8, 2014 at 2:07 am
Hi Ameir, The backup operation completed successfully (i.e. list of folders with json files etc..). However, the restore operation failed to process the backup folder as shown below. Do you know what am I missing? I will retry this using a Linux box to see if that will help. Thanks for the script. It will save a lot of pain if this works.
D:\P4\depot\vault\main\hpool\chef-repo>knife backup restore -D d:\chef-backup -c C:\Users
pnguyen.chef\knife.rb WARNING: This will overwrite existing data! Do you want to restore backup, possibly overwriting exisitng data? (Y/N)Y === Restoring clients === === Restoring users === === Restoring nodes === === Restoring roles === === Restoring data bags === === Restoring environments === === Restoring cookbooks === -
[d8fb36ec] Ameir Abdeldayem Post author November 8, 2014 at 2:37 am
Hi Phil,
Could you go into d:\chef-backup and run knife diff? That’ll compare the local folder with the remote server, and let you know if there are differences. It’s possible that the files are the same (are you using the correct config file?). You could also try with a trailing slash; I don’t have a Windows box to test with, but there may be nuances there. Also, you could use knife upload instead of knife backup. The former is essentially what the latter does behind the scenes. To try that, go into d:\chef-backup and do knife upload .. Hopefully that’ll work. Let me know if it doesn’t and I’ll try to help out.
-Ameir
-
[ea665620] Phil Nguyen November 8, 2014 at 3:40 am
Update: FYI, it worked when executing the backup/restore script via Ubuntu workstation. Thank you.
-
[d8fb36ec] Ameir Abdeldayem Post author November 9, 2014 at 2:16 am
Excellent, glad to hear it! There must be an issue on the Windows side of things. Good luck with your new Chef server!
-
[34890ea3] gdanko November 25, 2014 at 5:06 pm
I am seeing this: === Restoring cookbooks === Restoring cookbook [“publiccloud_lms_install_jdk”] Uploading publiccloud_lms_install_jdk [0.1.0] ERROR: Server returned error 500 for https://localhost/sandboxes/ 00000000000012b561684b15f8b1df3f, retrying 1/5 in 4s ERROR: Server returned error 500 for https://localhost/sandboxes/ 00000000000012b561684b15f8b1df3f, retrying 2/5 in 7s ERROR: Server returned error 500 for https://localhost/sandboxes/ 00000000000012b561684b15f8b1df3f, retrying 3/5 in 13s ERROR: Server returned error 500 for https://localhost/sandboxes/ 00000000000012b561684b15f8b1df3f, retrying 4/5 in 29s ERROR: Server returned error 500 for https://localhost/sandboxes/ 00000000000012b561684b15f8b1df3f, retrying 5/5 in 54s ERROR: internal server error Response: internal service error
Any idea what could be wrong?
-
[d8fb36ec] Ameir Abdeldayem Post author November 25, 2014 at 7:31 pm
A 500 error means that something server-side is having issues. Are you able to upload anything to your Chef server? Could you also add –verbose to your command to see if it gives any additional details?
Post navigation
- ← Change Chef Server settings after installation
- Enable XHProf for WordPress →
· © 2015 ameir dot net · Designed by Press Customizr ·
Back to top
#+end_example ** DONE [#A] setup and install chef 12 CLOSED: [2015-04-22 Wed 16:49] https://docs.chef.io/install_server.html
Ubuntu 14.04
http://downloads.chef.io/chef-server/ubuntu/#/ wget https://web-dl.packagecloud.io/chef/stable/packages/ubuntu/trusty/chef-server-core_12.0.8-1_amd64.deb
apt-get update dpkg -i chef-server-core_12.0.8-1_amd64.deb
chef-server-ctl reconfigure
chef-server-ctl user-create chef_adminsp denny zhang [email protected] filebatpwd1 --filename /tmp/chef_adminsp.pem chef-server-ctl org-create digitalocean "DigitalOcean, Inc." --association_user chef_adminsp -f /tmp/digitalocean-validator.pem
cat > ~/.ssh/knife.rb <<EOF log_level :info log_location STDOUT node_name 'admin' client_key '/Users/mac/.chef/admin.pem' validation_client_name 'digitalocean-validator' validation_key '/Users/mac/.chef/digitalocean-validator.pem' chef_server_url 'https://104.131.157.119/organizations/digitalocean' syntax_check_cache_path '/Users/mac/.chef/syntax_check_cache' ssl_verify_mode :verify_none EOF *** [#A] web page: How To Set Up a Chef 12 Configuration Management System on Ubuntu 14.04 Servers | DigitalOcean https://www.digitalocean.com/community/tutorials/how-to-set-up-a-chef-12-configuration-management-system-on-ubuntu-14-04-servers **** webcontent :noexport: #+begin_example Location: https://www.digitalocean.com/community/tutorials/how-to-set-up-a-chef-12-configuration-management-system-on-ubuntu-14-04-servers jellingwood By: Justin Ellingwood March 3, 2015 HeartedHeart 7 1 Share
Contents View All Results Sign Up Log In
[ ] submit
- Tutorials
- Questions
- Projects
- Main Site
Community Menu
- Tutorials
- Questions
- Projects
- Main Site
Sign Up Log In [ ] submit How To Set Up a Chef 12 Configuration Management System on Ubuntu 14.04 Servers
Tutorial Series
This tutorial is part 2 of 8 in the series: Getting Started Managing Your Infrastructure Using Chef
Getting Started Managing Your Infrastructure Using Chef
Chef is a powerful configuration management system that can be used to programmatically control your infrastructure environment. Leveraging the Chef system allows you to easily recreate your environments in a predictable manner by automating the entire system configuration. In this series, we will introduce you to Chef concepts and demonstrate how to install and utilize the its powerful features to manage your servers.
-
How To Understand the Chef Configuration Environment on a VPS
November 20, 2013 7 1 By Justin Ellingwood
-
How To Set Up a Chef 12 Configuration Management System on Ubuntu 14.04 Servers
March 2, 2015 7 1 By Justin Ellingwood
-
How to Install a Chef Server, Workstation, and Client on Ubuntu VPS Instances
January 30, 2014 5 33 By Justin Ellingwood
-
How To Create Simple Chef Cookbooks to Manage Infrastructure on Ubuntu
February 3, 2014 9 12 By Justin Ellingwood
-
How To Use Roles and Environments in Chef to Control Server Configurations
February 4, 2014 5 5 By Justin Ellingwood
-
How To Use the DigitalOcean Plugin for Knife to Manage Droplets in Chef
February 9, 2014 3 6 By Justin Ellingwood
-
How To Manage Your Cluster with Chef and Knife on Ubuntu
October 30, 2014 0 0 By Nik Wakelin
-
How To Automatically Add New Droplets to your Configuration Management System
February 25, 2015 3 0 By Justin Ellingwood
Previous Tutorial Next Tutorial
Introduction
As your infrastructure requirements expand, managing each server by hand becomes an increasingly difficult task. This difficulty is compounded by the requirement for reproducibility, which becomes necessary if a node fails or if horizontal scaling is needed.
Configuration management solutions are designed to address these issues by turning your infrastructure administration into a code base. Instead of performing individual tasks on a number of machines, these tools allow you to commit your requirements to a central location where each component can connect, pull down their configuration, and apply it.
In a previous guide, we talked, on a conceptual level, about the general structure of Chef components and the way in which they interact to achieve the administrator's objectives. We talked about relevant terminology and discussed the responsibility of each piece.
In this guide, we will install the actual software. We will set up a centralized Chef server which will store and serve configuration instructions and node profiling information. We will also set up a workstation where the administrator can work with the code base and alter the characteristics of the infrastructure. We will follow this up by bootstrapping a new node to bring it under the management of the Chef ecosystem.
Prerequisites and Goals
We will be setting up version 12 of Chef in this guide. Configuration can be significantly different between versions, so ensure that you are operating within the same major version number as this guide for best results.
The Chef documentation tells us that your Chef server should have at least 4 cores and 4 GB of RAM. It should also have a 64-bit operating system. For our guide, we will be using an 4 core / 8 GB DigitalOcean Droplet with 64-bit Ubuntu 14.04.
The workstation and nodes have very few requirements. We will use Ubuntu 14.04 on those as well for consistency.
When we are finished, we will have a centralized Chef server to store and serve our configuration data. Our workstation will be used to make changes, upload them to the server, and bootstrap and manage new nodes. The node represents a single server within our infrastructure.
Configure the Chef Server
We will begin by setting up the Chef server. Remember, Chef recommends at least 4 cores and 4 GB of RAM for this server, so plan accordingly.
Ensure that the Server is Accessible by Hostname
Once you are logged into the server you plan on installing the Chef server onto, the first task you need to perform is to ensure that the hostname of the server is a resolvable fully qualified domain name (FQDN) or IP address. You can check this by typing:
hostname -f
The result should be an address where the server can be reached. If this is not the case, you can set this to a domain name or IP address where the server can be reached by editing this file:
sudo nano /etc/hosts
The file will look similar to this:
127.0.1.1 current_hostname current_hostname_alias 127.0.0.1 localhost
. . .
Modify the top line to reflect the fully qualified domain name or the IP address, followed by a space and any alias you want to use for your host. Add a line beneath the two lines shown that has your server's public IP address in the first column, and the information that you modified at the end of the 127.0.1.1 line to the end. It should look something like this:
127.0.1.1 fqdn_or_IP_address host_alias 127.0.0.1 localhost IP_address fqdn_or_IP_address host_alias
So, if I do not have a domain name, my public IP address is 123.123.123.123, and if I also want my host reachable by the hostname "chef", I could have a file that looks like this:
127.0.1.1 123.123.123.123 chef 127.0.0.1 localhost 123.123.123.123 123.123.123.123 chef
If, on the other hand, this server has the fully qualified domain name of chef.example.com and an IP address of 234.234.234.234, my file might look something like this instead:
127.0.1.1 chef.example.com chef 127.0.0.1 localhost 234.234.234.234 chef.example.com chef
Save and close the file when you are finished. You can check that the value was set correctly by typing:
hostname -f
The result should be a value that you can use to reach your Chef server from anywhere in your infrastructure.
Download and Install the Chef 12 Server software
Next, we can go ahead and download the Chef 12 server software. You can find the package that must be installed by visiting the Chef site. Specifically, for an Ubuntu installation, you can follow this link.
Under the "Ubuntu Linux 14.04" header, right-click on the download link and copy the link location:
Chef server download
Back on your server, change to your home directory. Paste the link you copied and use the wget command to download the package. The link you copied may be different from the one below if there has been a minor version update since this writing:
cd ~ wget https://web-dl.packagecloud.io/chef/stable/packages/ubuntu/trusty/chef-server-core_12.0.5-1_amd64.deb
Once the download is complete, install the package by typing:
sudo dpkg -i chef-server-core_*.deb
This will install the base Chef 12 system onto the server. If you have selected a server with less powerful hardware than the recommended amount, this step may fail.
Once the installation is complete, you must call the reconfigure command, which configures the components that make up the server to work together in your specific environment:
sudo chef-server-ctl reconfigure
Create an Admin User and Organization
Next, we need to create an admin user. This will be the username that will have access to make changes to the infrastructure components in the organization we will be creating.
We can do this using the user-create subcommand of the chef-server-ctl command. The command requires a number of fields to be passed in during the creation process. The general syntax is:
chef-server-ctl user-create USERNAME FIRST_NAME LAST_NAME EMAIL PASSWORD
We will include this information, and will also add -f, an additional flag, onto the end in order to specify a filename in which to output our new user's private RSA key. We will need this in order to authenticate using the knife management command later.
For our example, we will create a user with the following information:
- Username: admin
- First Name: admin
- Last Name: admin
- Email: [email protected]
- Password: examplepass
- Filename: admin.pem
The command needed to create a user with this information is (you should change this to reflect your information, especially the password):
sudo chef-server-ctl user-create admin admin admin [email protected] examplepass -f admin.pem
You should now have a private key called admin.pem in your current directory.
Now that you have a user, you can create an organization with the org-create subcommand. An organization is simply a grouping of infrastructure and configuration within Chef. The command has the following general syntax:
chef-server-ctl org-create SHORTNAME LONGNAME --association_user USERNAME
The short name is the name that you will use to refer to the organization from within Chef. The long name is the actual name of the organization. The --association_user specifies the username that has access to administer the organization. Again, we will add the -f flag so that we can specify the name of the file to place the private key. The key that will be created is used to validate new clients as part of the organization until they can get their own unique client key.
We will create an organization with the following qualities:
- Short Name: digitalocean
- Long Name: DigitalOcean, Inc.
- Association User: admin
- Filename: digitalocean-validator.pem
To create an organization with the above qualities, we will use the following command:
sudo chef-server-ctl org-create digitalocean "DigitalOcean, Inc." --association_user admin -f digitalocean-validator.pem
Following this, you should have two .pem key files in your home directory. In our case, they will be called admin.pem and digitalocean-validator.pem. We will need to connect to this server and download these keys to our workstation momentarily. For now though, our Chef server installation is complete.
Configure a Chef Workstation
Now that our Chef server is up and running, our next course of action is to configure a workstation. The actual infrastructure coordination and configuration does not take place on the Chef server. This work is done on a workstation which then uploads the data to the server to influence the Chef environment.
Clone the Chef Repo
The Chef configuration for your infrastructure is maintained in a hierarchical file structure known collectively as a Chef repo. The general structure of this can be found in a GitHub repository provided by the Chef team. We will use git to clone this repo onto our workstation to work as a basis for our infrastructure's Chef repository.
First, we need to install git through the apt packaging tools. Update your packaging index and install the tool by typing:
sudo apt-get update sudo apt-get install git
Once you have git installed, you can clone the Chef repository onto your machine. For this guide, we will simply clone it to our home directory:
cd ~ git clone https://github.com/chef/chef-repo.git
This will pull down the basic Chef repo structure into a directory called chef-repo in your home directory.
Putting your Chef Repo Under Version Control
The configurations authored within the Chef repo itself are best managed within a version control system in the same way that you would manage code. Since we cloned the repo above, a git repo has already been initialized.
To set your workstation up for new commits, you should do a few things.
First, set the name and email that git will use to tag any commits you make. This is a requirement for git to accept commits. We set this globally so that any git repo we create will use these values:
git config --global user.name "Your Name" git config --global user.email "[email protected]"
Next, we will tell git to ignore any information contained within the ~/chef-repo/.chef directory. We will create this directory in a few minutes to store some sensitive information. For now, we can add this location to our .gitignore file so that git does not store data that should not be exposed to other people:
echo ".chef" >> ~/chef-repo/.gitignore
Since we have made a change to the .gitignore file, we can go ahead and make our first new commit to the version control system. First, add all of the modified files to the current staging area:
cd ~/chef-repo git add .
Now, commit the changes. We will use the -m flag to specify an in-line commit message describing the changes we are making:
git commit -m "Excluding the ./.chef directory from version control"
Our Chef repo is now under version control. As we author configurations for our infrastructure, we can use the above two commands to keep our git repo up-to-date.
Download and Install the Chef Development Kit
Next, we need to install the Chef Development Kit, a suite of software designed for Chef workstations. This includes many utilities that will be useful when designing configurations for your infrastructure. The tool we are interested in at this point is the bundled knife command, which can communicate with and control both the Chef server and any Chef clients.
We can find the Chef 12 Development Kit on the Chef website. Since we are using Ubuntu 14.04 as our workstation, the page here will contain the latest download link. Note that at the time of this writing, the download link only references Ubuntu 12.04 and Ubuntu 13.10, but it should still install without issue on Ubuntu 14.04.
Right-click on the download button under "Ubuntu Linux" and copy the link location:
Ubuntu Chef dev kit
Back on your workstation, change to your home directory. Paste the link you copied and use the wget command to download the package. The link you copied may be different from the one below if a newer development kit version has been released:
cd ~ wget https://opscode-omnibus-packages.s3.amazonaws.com/ubuntu/12.04/x86_64/chefdk_0.4.0-1_amd64.deb
Once the .deb package has been downloaded, you can install it by typing:
sudo dpkg -i chefdk_*.deb
After the installation, you can verify that all of the components are available in their expected location through the new chef command:
chef verify
If your workstation will primarily be used to manage Chef for your infrastructure, you will likely want to default to the version of Ruby installed with Chef. You can do this by modifying your .bash_profile so that Chef's Ruby takes precedence:
echo 'eval "$(chef shell-init bash)"' >> ~/.bash_profile
Afterwards, you can source your .bash_profile file to set the correct environmental variables for the current session:
source ~/.bash_profile
If you wish to manage your Ruby versions independently, you can skip the above steps.
Download the Authentication Keys to the Workstation
At this point, your workstation has all of the software needed to interact with a Chef server and compose infrastructure configurations. However, it is not yet configured to interact with your Chef server and your environment. In this section, we'll download the credentials we created on the Chef server.
We will use the scp utility to download the user key and the organization validator key that we created on the Chef server. Before doing so, we will create the hidden directory where we will store these files:
mkdir ~/chef-repo/.chef
The method that you use to connect to the Chef server will determine how exactly we go about downloading the keys. Follow the method below that matches your setup:
How To Download Keys when Connecting to a Chef Server with Passwords
If you connect to your Chef server through SSH using password-based authentication, the scp command will work without significant modification.
On your workstation, specify the username and domain name or IP address used to connect to the Chef server. Follow this immediately with a colon (:) and the path to the file you wish to download. After adding a space, indicate the directory on the local computer where you wish the download the files to be placed (~/chef-repo/.chef in our case).
If you log into the Chef server using the root user account, your commands will look something like this. Remember to change both the domain name or IP address and the name of the key files you are trying to download to match your environment:
scp root@server_domain_or_IP:/root/admin.pem ~/chef-repo/.chef scp root@server_domain_or_IP:/root/digitalocean-validator.pem ~/chef-repo/.chef
If you connect to your Chef server using a non-root user, the commands will look more like this:
scp username@server_domain_or_IP:/home/username/admin.pem ~/chef-repo/.chef scp username@server_domain_or_IP:/home/username/digitalocean-validator.pem ~/chef-repo/.chef
How To Download Keys when Connecting to a Chef Server Using SSH Keys
If, instead, you connect to your Chef server using SSH keys (recommended), you will need to perform some additional steps.
First, leave your SSH session with the workstation. We will need to reconnect momentarily with a new parameter:
exit
Once you are back on your local computer, you will need to add the SSH keys you use to connect to the Chef server to an SSH agent. OpenSSH, the standard SSH suite, includes an SSH agent that can be started by typing:
eval $(ssh-agent)
You should see output that looks like this (the number will likely be different):
Agent pid 13881
Once the agent is started, you can add your SSH key to it:
ssh-add
Identity added: /home/demo/.ssh/id_rsa (rsa w/o comment)
This will keep your SSH key stored in memory. Now, you can forward the stored key to your workstation as you connect by using the -A option with ssh. This will allow you to connect to any computer from your workstation as if you were connecting from your local computer:
ssh -A username@workstation_domain_or_IP
Now, you can connect to your Chef server without needing a password using the forwarded SSH credentials. If the keys on your Chef server were available through the root user, the commands you will need will look similar to this. Remember to change the Chef server domain name or IP address and the key names as needed:
scp root@server_domain_or_IP:/root/admin.pem ~/chef-repo/.chef scp root@server_domain_or_IP:/root/digitalocean-validator.pem ~/chef-repo/.chef
If the SSH key configured for the Chef server instead is used to authenticate you to a regular user account, your commands will look like this instead:
scp username@server_domain_or_IP:/home/username/admin.pem ~/chef-repo/.chef scp username@server_domain_or_IP:/home/username/digitalocean-validator.pem ~/chef-repo/.chef
Configuring Knife to Manage your Chef Environment
Now that you have your Chef credentials available on your workstation, we can configure the knife command with the information it needs to connect to and control your Chef infrastructure. This is done through a knife.rb file that we will place in the ~/chef-repo/.chef directory along with our keys.
Open up a file called knife.rb in that directory in your text editor:
nano ~/chef-repo/.chef/knife.rb
In this file, paste the following information:
current_dir = File.dirname(FILE) log_level :info log_location STDOUT node_name "name_for_workstation" client_key "#{current_dir}/name_of_user_key" validation_client_name "organization_validator_name" validation_key "#{current_dir}/organization_validator_key" chef_server_url "https://server_domain_or_IP/organizations/organization_name" syntax_check_cache_path "#{ENV['HOME']}/.chef/syntaxcache" cookbook_path ["#{current_dir}/../cookbooks"]
The following items should be adjusted to suit your infrastructure:
- node_name: This specifies the name that knife will use to connect to your Chef server. This should match your user name.
- client_key: This should be the name and path to the user key that you copied over from the Chef server. We can use the #{current_dir} snippet to fill in the path if the key is in the same directory as the knife.rb file.
- validation_client_name: This is the name of the validation client that knife will use to bootstrap new nodes. This will take the form of your organization short name, followed by -validator.
- validation_key: Like the client_key, this includes the name and path to the validation key you copied from the Chef server. Again, you can use the #{current_dir} Ruby snippet to specify the current directory if the validation key is in the same directory as the knife.rb file.
- chef_server_url: This is the URL where the Chef server can be reached. It should begin with https://, followed by your Chef server's domain name or IP address. Afterwards, the path to your organization should be specified by appending /organizations/your_organization_name.
For our guide, the knife.rb file will look similar to this. You still need to adjust the server's domain name or IP address if you are following along:
current_dir = File.dirname(FILE) log_level :info log_location STDOUT node_name "admin" client_key "#{current_dir}/admin.pem" validation_client_name "digitalocean-validator" validation_key "#{current_dir}/digitalocean-validator.pem" chef_server_url "https://server_domain_or_IP/organizations/digitalocean" syntax_check_cache_path "#{ENV['HOME']}/.chef/syntaxcache" cookbook_path ["#{current_dir}/../cookbooks"]
When you are finished, save and close the knife.rb file.
Now, we will test the configuration file by trying out a simple knife command. We need to be in our ~/chef-repo directory for our configuration file to be read correctly:
cd ~/chef-repo knife client list
This first attempt should fail with an error that looks like this:
ERROR: SSL Validation failure connecting to host: server_domain_or_IP - SSL_connect returned=1 errno=0 state=SSLv3 read server certificate B: certificate verify failed
ERROR: Could not establish a secure connection to the server.
Use knife ssl check to troubleshoot your SSL configuration.
If your Chef Server uses a self-signed certificate, you can use
knife ssl fetch to make knife trust the server's certificates.
Original Exception: OpenSSL::SSL::SSLError: SSL_connect returned=1 errno=0 state=SSLv3 read server certificate B: certificate verify failed
This occurs because we do not have our Chef server's SSL certificate on our workstation. We can acquire this by typing:
knife ssl fetch
This should add the Chef server's certificate file to a list in our ~/chef-repo/.chef directory:
WARNING: Certificates from server_domain_or_IP will be fetched and placed in your trusted_cert directory (/home/demo/chef-repo/.chef/trusted_certs).
Knife has no means to verify these are the correct certificates. You should verify the authenticity of these certificates after downloading.
Adding certificate for server_domain_or_IP in /home/demo/chef-repo/.chef/trusted_certs/server_domain_or_IP.crt
After the SSL certificate has been fetched, the previous command should now work:
knife client list
digitalocean-validator
If the above command correctly returns, your workstation is now set up to control your Chef environment.
Bootstrapping a New Node with Knife
With our Chef server and workstation configured, we can begin using Chef to configure new servers within our infrastructure.
This happens through a process called "bootstrapping" in which the Chef client executable is installed on the new computer and the organizational validator key is passed along as well. The new node then contacts the Chef server with the validator key and, in return, receives its own unique client key and any configuration that has been assigned to it. This process gets the new server into its initial state and sets it up for any future management.
To connect to the new server, we will need a few pieces of information about the new node:
- The domain name or IP address where it can be reached
- The username used to complete administrative actions. This can be either root, or a user configured with sudo privileges.
- A method of logging in as the above user. This can be either the password, or the ability to use an SSH key.
- A method of performing administrative tasks. For root users, this is unnecessary. For users relying on sudo privileges, a password is generally necessary.
The general syntax of the command will be:
knife bootstrap node_domain_or_IP [options]
Some common options you may end up using are:
- -x: Used to specify the username to authenticate with through SSH. This is usually required.
- -N: The new name for the node, as displayed within Chef. Leaving this out will usually result in the hostname being used for the Chef node name.
- -P: Used to specify the password for the username on the remote server. This is necessary if either the SSH session requires password authentication or if the username requires a password for sudo commands.
- --sudo: If the username on the remote server will need to use sudo to perform administrative actions, this flag is needed. By default, it will prompt for the sudo password.
- --use-sudo-password: If you are already providing the password for the user with the -P flag, using this flag in addition to the --sudo flag will use the -P password without prompting.
- -A: This option forwards SSH keys to the remote host to login rather than using password authentication.
When using the -A option, you must start an SSH agent on your local computer, add the SSH key that can be used to connect to the new node, and forward that information to your workstation by connecting with the -A flag initially. More information about how to do this can be found in the workstation configuration section regarding downloading the keys from the Chef server.
Using the above information, it is possible to construct the correct bootstrapping commands for a variety of situations.
For example, to bootstrap a node with the name "testing", using the username demo, which is configured with sudo privileges, and which needs a password for SSH and the sudo validation, we can type:
knife bootstrap node_domain_or_IP -N testing -x demo -P password --sudo --use-sudo-password
If we want to bootstrap using the root user, with SSH key authentication using keys available on the workstation, and wish to keep use the node's hostname as the Chef node name, we can type:
knife bootstrap node_domain_or_IP -x root -A
If we want to use SSH keys to authenticate to a sudo user, we will still need to provide a password using the -P flag, the --sudo flag, and the --use-sudo-password flag to avoid prompts:
knife bootstrap node_domain_or_IP -x demo -A -P password --sudo --use-sudo-password -N name
If you are in the above scenario, but do not mind being promted for the sudo password, you can instead just type this:
knife bootstrap node_domain_or_IP -x demo -A --sudo -N name
Once your new node is bootstrapped, you should have a new client:
knife client list
digitalocean-validator name
You should also have a new node of the same name:
knife node list
name
You can use the above procedure to easily set up new Chef clients on any number of new servers.
If you want to learn about how to automatically add your new DigitalOcean Droplets to your existing Chef infrastructure without having to bootstrap each one, check out this tutorial.
Conclusion
After following this guide, you should have a fully functional Chef server configured for your infrastructure. We have also set up a workstation that can be used to manage and maintain the configurations that Chef will apply to your infrastructure. We have demonstrated how to use the knife command to bootstrap the servers that will be configured by Chef.
In the next guide, we will demonstrate how to design configurations for your nodes using some Chef constructs. We will go over the fundamentals of Chef recipes and cookbooks as ways to control your infrastructure with declarative configs.
Tags: Configuration Management, Chef Distribution: Ubuntu jellingwood By: Justin Ellingwood HeartedHeart 7 Subscribe Subscribed
Share
Tutorial Series
Getting Started Managing Your Infrastructure Using Chef
Chef is a powerful configuration management system that can be used to programmatically control your infrastructure environment. Leveraging the Chef system allows you to easily recreate your environments in a predictable manner by automating the entire system configuration. In this series, we will introduce you to Chef concepts and demonstrate how to install and utilize the its powerful features to manage your servers.
-
How To Understand the Chef Configuration Environment on a VPS
November 20, 2013 7 1 By Justin Ellingwood
-
How To Set Up a Chef 12 Configuration Management System on Ubuntu 14.04 Servers
March 2, 2015 7 1 By Justin Ellingwood
-
How to Install a Chef Server, Workstation, and Client on Ubuntu VPS Instances
January 30, 2014 5 33 By Justin Ellingwood
-
How To Create Simple Chef Cookbooks to Manage Infrastructure on Ubuntu
February 3, 2014 9 12 By Justin Ellingwood
-
How To Use Roles and Environments in Chef to Control Server Configurations
February 4, 2014 5 5 By Justin Ellingwood
-
How To Use the DigitalOcean Plugin for Knife to Manage Droplets in Chef
February 9, 2014 3 6 By Justin Ellingwood
-
How To Manage Your Cluster with Chef and Knife on Ubuntu
October 30, 2014 0 0 By Nik Wakelin
-
How To Automatically Add New Droplets to your Configuration Management System
February 25, 2015 3 0 By Justin Ellingwood
Need a Server?
We offer cloud servers that are quick to set up and easy to manage. Spin one up now for as little as $5/mo.
Start Here
Related Tutorials
- How To Use Roles and Environments in Chef to Control Server Configurations
- How To Automatically Add New Droplets to your Configuration Management System
- 5 Ways to Improve your Production Web Application Server Setup
- How to Use Puppet to Manage WordPress Themes and Plugins on Ubuntu 14.04
- How To Create an Ansible Playbook To Automate Drupal Installation on Ubuntu 14.04
1 Comment
[ ] Log In to Comment Load
Creative Commons License This work is licensed under a Creative Commons Attribution-NonCommercial-ShareAlike 4.0 International License. Copyright © 2015 DigitalOcean™ Inc.
- Community
- Tutorials
- Questions
- Projects
- Tags
- Terms, Privacy, & Copyright
- Security
Sign Up
Not so fast, you must have an account before you can do that. Log In Create Account
#+end_example ** DONE Install chef server 11 CLOSED: [2015-04-22 Wed 18:15] *** web page: How to Install a Chef Server, Workstation, and Client on Ubuntu VPS Instances | DigitalOcean https://www.digitalocean.com/community/tutorials/how-to-install-a-chef-server-workstation-and-client-on-ubuntu-vps-instances **** webcontent :noexport: #+begin_example Location: https://www.digitalocean.com/community/tutorials/how-to-install-a-chef-server-workstation-and-client-on-ubuntu-vps-instances jellingwood By: Justin Ellingwood Jan 30, 2014 HeartedHeart 5 31 Share
Contents View All Results Sign Up Log In
[ ] submit
- Tutorials
- Questions
- Projects
- Main Site
Community Menu
- Tutorials
- Questions
- Projects
- Main Site
Sign Up Log In [ ] submit How to Install a Chef Server, Workstation, and Client on Ubuntu VPS Instances
Tutorial Series
This tutorial is part 3 of 8 in the series: Getting Started Managing Your Infrastructure Using Chef
Getting Started Managing Your Infrastructure Using Chef
Chef is a powerful configuration management system that can be used to programmatically control your infrastructure environment. Leveraging the Chef system allows you to easily recreate your environments in a predictable manner by automating the entire system configuration. In this series, we will introduce you to Chef concepts and demonstrate how to install and utilize the its powerful features to manage your servers.
-
How To Understand the Chef Configuration Environment on a VPS
November 20, 2013 7 1 By Justin Ellingwood
-
How To Set Up a Chef 12 Configuration Management System on Ubuntu 14.04 Servers
March 2, 2015 7 1 By Justin Ellingwood
-
How to Install a Chef Server, Workstation, and Client on Ubuntu VPS Instances
January 30, 2014 5 33 By Justin Ellingwood
-
How To Create Simple Chef Cookbooks to Manage Infrastructure on Ubuntu
February 3, 2014 9 12 By Justin Ellingwood
-
How To Use Roles and Environments in Chef to Control Server Configurations
February 4, 2014 5 5 By Justin Ellingwood
-
How To Use the DigitalOcean Plugin for Knife to Manage Droplets in Chef
February 9, 2014 3 6 By Justin Ellingwood
-
How To Manage Your Cluster with Chef and Knife on Ubuntu
October 30, 2014 0 0 By Nik Wakelin
-
How To Automatically Add New Droplets to your Configuration Management System
February 25, 2015 3 0 By Justin Ellingwood
Previous Tutorial Next Tutorial
Note: This guide is targeted at Chef 11. The Chef 12 platform introduces some significant configuration differences. You can find a guide on how to set up a Chef 12 server, workstation, and node here.
Introduction
As your organizational structure grows and the separate components necessary to manage your environment expand, administering each server and service can become unmanageable.
Configuration management solutions are designed to simplify the management of systems and infrastructure. The goal of configuration management tools are to allow you to manage your infrastructure as a code base. Chef is a configuration management solution that allows you to manage large numbers of servers easily.
In a previous guide, we discussed the general structure of the Chef components and the way the system operates on a conceptual level. We went over some key terminology and the relationship between many different components.
In this guide, we will work to install a small Chef 11 setup. This will be one Chef server used to store configuration data and administer access rights. This will serve as a hub for our other machines.
We will also install a workstation that will allow us to interact with our server and build our configuration policies. This is where we will do the work to manage our infrastructure environment.
Finally, we will bootstrap a node, which will represent one of the servers in our organization that will be managed through Chef. We will do this using the server and workstation that we configured.
All three of these machines will be using Ubuntu 12.04 x86_64 VPS instances for simplicity's sake. We will be targeting the Chef 11 release as it is stable and well tested.
Server Installation
The first component that we need to get online is the Chef server. Because this is central to the communication of our other components, it needs to be available for our other machines to complete their setup.
Before doing this, it is important to set up a domain name for your Chef server to resolve requests correctly. You can see our guide on getting a domain name set up with DigitalOcean here.
If you do not have a domain name, you will need to edit the /etc/hosts file on each of the VPS instances that you will be using, so that they can all resolve the Chef server by name. If you do have a domain name, this should only be necessary on the VPS you will be using as the Chef server. You can do this by typing this on the VPS you will use as the Chef server:
sudo nano /etc/hosts
Inside, add the IP address of this computer and then the name you would like to use to connect to the server. You can then add a short name after that. Something like this:
111.222.333.444 chef.domain.com chef
Change the 111.222.333.444 to your Chef server's IP address and change the other two values to whatever you'd like to use to refer to your server as. Add this line to point to your Chef server to this file on each of the machines you plan to use if you are not using a domain name.
You can check that this is setup correctly by typing:
hostname -f
This should give you the name that is used to reach this server.
You can get the chef server package by visiting this page in your web browser.
Click on the "Chef Server" tab and then select the menus that match your operating system:
Chef server select operating system
Select the most recent version of the Chef 11 server available to you on the right-hand side:
Chef server newest
You will be presented with a link to a deb file. Right-click on this and select the option that is similar to "copy link location".
In the VPS instance that you will be using as the server, change to your user's home directory and use the wget utility to download the deb. At the time of this writing, the most recent link is this:
cd ~ wget https://opscode-omnibus-packages.s3.amazonaws.com/ubuntu/12.04/x86_64/chef-server_11.0.10-1.ubuntu.12.04_amd64.deb
This will download the installation package that you can then install like this:
sudo dpkg -i chef-server*
This will install the server component on this machine.
It prints to the screen afterwards that you should run this next command to actually configure the service around your specific machine. This will configure everything automatically:
sudo chef-server-ctl reconfigure
Once this step is complete, the server should be up and running. You can access the web interface immediately by typing https:// followed by your server's domain name or IP address.
https://server_domain_or_IP
Because the SSL certificates were signed by an authority that your browser does not recognize by default, you will see a warning message appear:
Chef SSL warning
Click the "Proceed anyway" button to bypass this screen and access the login screen. It will look something like this:
Chef server login screen
The default login credentials are as follows:
Default Username: admin Default Password: p@ssw0rd1
When you log in for the first time, you will be immediately prompted to change your password. Select a new password and then click on the "Save User" button on the bottom:
Chef server change pw
You have now configured the server to a point where we can leave it and begin our workstation configuration.
Workstation Installation
Our workstation computer is the VPS that we will use to create and edit the actual policies that dictate our infrastructure environments. This machine has a copy of the Chef repo that describes our machines and services and it uploads those to the Chef server for implementation.
We will start by simply installing git for version control:
sudo apt-get update sudo apt-get install git
This actually has two purposes. The obvious use is that we will be keeping our configuration under version control to track changes. The second purpose is to temporarily cache our password with sudo so that the following command works.
We will now download and run the client installation script from the Chef website. Type this command to complete all of these steps:
curl -L https://www.opscode.com/chef/install.sh | sudo bash
Our Chef workstation component is now installed. However it is very far from being configured.
The next step is to acquire the "chef-repo" directory structure for a properly formatted Chef repository from GitHub. We can clone the structure into our home directory by typing:
cd ~ git clone https://github.com/opscode/chef-repo.git
This will create a directory called chef-repo in your home directory. This is where the entire configuration for your setup will be contained.
We will create a configuration directory for the Chef tools themselves within this directory:
mkdir -p ~/chef-repo/.chef
Within this directory, we will need to put some of the authentication files from our Chef server. Specifically, we need two private keys.
Generating and Copying Keys from the Server
Go back to your Chef server in your web browser:
https://server_domain_or_IP
Log in using the admin user's credentials that you changed before.
Click on the "Clients" tab in the top navigation bar. You will see two two clients called chef-validator and chef-webui:
Chef server clients
Click on the "Edit" button associated with the chef-validator client. Regenerate the private key by selecting that box and clicking "Save Client":
Chef regenerate key
You will be taken a screen with the newly generated values for the key file.
Chef val new key
Note: This key will only be available once, so don't click out of this page! If you do, you will need to regenerate the key again.
Copy the value of the private key field (the one at the bottom).
On your workstation machine, change to the Chef configuration directory we created in the repo:
cd ~/chef-repo/.chef
Open a new file for the validator key we just created:
nano chef-validator.pem
In this file, paste the contents of the key you copied from the server's web interface (some lines have been removed for brevity here):
-----BEGIN RSA PRIVATE KEY----- MIIEowIBAAKCAQEA6Np8f3J3M4NkA4J+r144P4z27B7O0htfXmPOjvQa2avkzWwx oP28SjUkU/pZD5jTWxsIlRjXgDNdtLwtHYABT+9Q5xiTQ37s+eeJgykQIifED23C aDi1cFXOp/ysBXaGwjvl5ZBCZkQGRG4NIuL7taPMsVTqM41MRgbAcLCdl5g7Vkri . . . . . . xGjoTVH1vBAJ7BG1RHJZlx+T9QnrK+fQu5R9mikkLHayxi13mD0C -----END RSA PRIVATE KEY-----
Ensure that there are not extra blank lines above or below the key. Save and close the file.
We will follow the same procedure to regenerate and save the admin user's key file. This time, the key is for a user, so click on the "Users" tab on the top.
Again, click on the "Edit" button associated with the admin user, check the "Regenerate Private Key" box and click the "Save User" button:
Chef admin user regen
Copy the Private key value on the next screen. Once again, this will not be shown again, so copy it correctly the first time.
Back on your workstation computer, you will need to create another file for the admin user in the same directory:
nano admin.pem
Paste the contents of the key you copied from the server's interface (again, this is shortened):
-----BEGIN RSA PRIVATE KEY----- MIIEpAIBAAKCAQEA/apu0+F5bkVtX6qGYcfoA6sIW/aLFUEc3Bw7ltb50GoZnUPj 0Ms1N1Rv/pdVZXeBa8KsqICAhAzvwSr0H9j+AoURidbkLv4urVC9VS4dZyIRfwvq PGvAKop9bbY2WJMs23SiEkurEDyfKaqXKW687taJ9AKbH2yVx0ArPI2RwS3Sze3g . . . . . . VTkNpg3lLRSGbQkvRUP6Kt20erS2bfETTtH6ok/zW4db8B/vnBlcZg== -----END RSA PRIVATE KEY-----
Verify that there are no extra lines above or below the pasted key lines. Save and close the file.
Configure the Knife Command
We now have to configure the knife command. This command is the central way of communicating with our server and the nodes that we will be configuring. We need to tell it how to authenticate and then generate a user to access the Chef server.
Luckily, we've been laying the groundwork for this step by acquiring the appropriate credential files. We can start the configuration by typing:
knife configure --initial
This will ask you a series of questions. We will go through them one by one:
WARNING: No knife configuration file found Where should I put the config file? [/home/your_user/.chef/knife.rb]
The values in the brackets ([]) are the default values that knife will use if we do not select a value.
We want to place our knife configuration file in the hidden directory we have been using:
/home/your_user/chef-repo/.chef/knife.rb
In the next question, type in the domain name or IP address you use to access the Chef server. This should begin with https:// and end with :443:
https://server_domain_or_IP:443
You will be asked for a name for the new user you will be creating. Choose something descriptive:
Please enter a name for the new user: [root] station1
It will then ask you for the admin name. This you can just press enter on to accept the default value (we didn't change the admin name).
It will then ask you for the location of the existing administrators key. This should be:
/home/your_user/chef-repo/.chef/admin.pem
It will ask a similar set of questions about the validator. We haven't changed the validator's name either, so we can keep that as chef-validator. Press enter to accept this value.
It will then ask you for the location of the validation key. It should be something like this:
/home/your_user/chef-repo/.chef/chef-validator.pem
Next, it will ask for the path to the repository. This is the chef-repo folder we have been operating in:
/home/your_user/chef-repo
Finally, it will ask you to select a password for your new user. Select anything you would like.
This should complete our knife configuration. If we look in our chef-repo/.chef directory, we should see a knife configuration file and the credentials of our new user:
ls ~/chef-repo/.chef
admin.pem chef-validator.pem knife.rb station1.pem
Cleaning up and Testing the Workstation
Our configuration for our workstation is almost complete. We need to do a few things to clean up and verify that our connections work.
First, we should get our Chef repository under version control. Because Chef configuration operates as source code, we can handle it in the same way as we would with the files for any program.
First, we need to initialize our git name and email. Type:
git config --global user.email "[email protected]" git config --global user.name "Your Name"
Since our "chef-repo" directory structure was pulled straight from GitHub, it is under git version control already.
However, we do not want to include the "chef-repo/.chef" directory in this version control. This contains our private keys and the knife configuration file. They do not have anything to do with our infrastructure we want to design.
Add this directory to the ignore list by opening the .gitignore file:
nano ~/chef-repo/.gitignore
At the bottom of the file, type .chef to include the entire directory:
.rake_test_cache
Ignore Chef key files and secrets
.chef/*.pem .chef/encrypted_data_bag_secret .chef
Save and close the file.
Now, we can commit our current state (which probably won't have any changes beside the .gitignore file we just modified) by typing:
git add . git commit -m 'Finish configuring station1'
We also want to make sure that our user uses the version of Ruby packaged with our Chef installation. Otherwise, calls made by Chef could be interpreted by the system's Ruby installation, which may be incompatible with the rest of our tools.
We can just modify our path by adding a line to the bottom of our .bash_profile file.
Type this in to add the line:
echo 'export PATH="/opt/chef/embedded/bin:$PATH"' >> ~/.bash_profile
Now, we can implement these changes into our current environment by typing:
source ~/.bash_profile
We can test whether we can connect successfully with the Chef server by requesting some information from the server using the knife command.
This will return a list of all of our users:
knife user list
admin station1
If this is successful, then our workstation can successfully communicate with our server.
Bootstrapping a Client Node
Now that we have the Chef server and a workstation online, we can try to bootstrap a Chef client on a sample node. We will use another Ubuntu instance.
The bootstrapping process involves setting up Chef client on a node. Chef client is a piece of software that communicates with the server in order to receive directions for its own configuration. The client then brings the node it is installed on in-line with the policy given to it by the server.
This process will simply configure our new VPS instance to be under the umbrella of our Chef management system. We can then configure it however we would like by creating policies on our workstation and uploading them to our server.
To complete this process, we only need to know three pieces of information about the VPS we want to install the client software on:
- IP address or domain name
- Username (accessible through SSH and with sudo privileges)
- Password
With these pieces of information, we can install the appropriate packages by using our knife tool on our workstation.
You want to type a command that looks like this:
knife bootstrap node_domain_or_IP -x username -P password -N name_for_node --sudo
Let's break this down a bit. The domain name/IP address tells knife which server to connect to. The username and password provide the login credentials.
If the user you are using is not root, then the --sudo option is necessary in order for the bootstrapping process to successfully install software on the remote computer. It will prompt you for the password once you log in to use the sudo command.
The name for the node is a name that you select that is used internally by Chef. This is how you will refer to this machine when crafting policies and using knife.
After the command is run, the client software will be installed on the remote node. It will be configured to communicate with the Chef server to receive instructions.
We can query our list of clients by typing:
knife client list
chef-validator chef-webui client1
We can see the two clients that are configured by default during the Chef server installation (chef-validator and chef-webui), as well as the client we just created.
You can just as easily set up other nodes to bring them under configuration control of your Chef system.
Conclusion
You should now have a Chef server, a separate workstation to create your configurations, and an example node.
We have not done any actual configuration of the node through Chef at this point, but we are set up to begin this process. In future tutorials, we will discuss how to implement policies and create recipes and cookbooks to manage your nodes.
By Justin Ellingwood Tags: Chef, Configuration Management, Git Distribution: Ubuntu jellingwood By: Justin Ellingwood HeartedHeart 5 Subscribe Subscribed
Share
Tutorial Series
Getting Started Managing Your Infrastructure Using Chef
Chef is a powerful configuration management system that can be used to programmatically control your infrastructure environment. Leveraging the Chef system allows you to easily recreate your environments in a predictable manner by automating the entire system configuration. In this series, we will introduce you to Chef concepts and demonstrate how to install and utilize the its powerful features to manage your servers.
-
How To Understand the Chef Configuration Environment on a VPS
November 20, 2013 7 1 By Justin Ellingwood
-
How To Set Up a Chef 12 Configuration Management System on Ubuntu 14.04 Servers
March 2, 2015 7 1 By Justin Ellingwood
-
How to Install a Chef Server, Workstation, and Client on Ubuntu VPS Instances
January 30, 2014 5 33 By Justin Ellingwood
-
How To Create Simple Chef Cookbooks to Manage Infrastructure on Ubuntu
February 3, 2014 9 12 By Justin Ellingwood
-
How To Use Roles and Environments in Chef to Control Server Configurations
February 4, 2014 5 5 By Justin Ellingwood
-
How To Use the DigitalOcean Plugin for Knife to Manage Droplets in Chef
February 9, 2014 3 6 By Justin Ellingwood
-
How To Manage Your Cluster with Chef and Knife on Ubuntu
October 30, 2014 0 0 By Nik Wakelin
-
How To Automatically Add New Droplets to your Configuration Management System
February 25, 2015 3 0 By Justin Ellingwood
Need a Server?
We offer cloud servers that are quick to set up and easy to manage. Spin one up now for as little as $5/mo.
Start Here
Related Tutorials
- How To Use Roles and Environments in Chef to Control Server Configurations
- How To Set Up a Chef 12 Configuration Management System on Ubuntu 14.04 Servers
- How To Automatically Add New Droplets to your Configuration Management System
- 5 Ways to Improve your Production Web Application Server Setup
- How to Use Puppet to Manage WordPress Themes and Plugins on Ubuntu 14.04
31 Comments
[ ] Log In to Comment Load
Creative Commons License This work is licensed under a Creative Commons Attribution-NonCommercial-ShareAlike 4.0 International License. Copyright © 2015 DigitalOcean™ Inc.
- Community
- Tutorials
- Questions
- Projects
- Tags
- Terms, Privacy, & Copyright
- Security
Sign Up
Not so fast, you must have an account before you can do that. Log In Create Account
#+end_example ** [#A] chef server | Name | Summary | |-------------------+----------------------------------------------------------------------------------------------------------------------------------------------| | Check postgres | tail -f /var/log/chef-server/postgresql/current | | fetch ssl | knife ssl fetch -c /etc/chef/client.rb | | knife bootstrap | knife bootstrap chef.dennyzhang.com --sudo -x root -P markDenny1 -p 4022 -N "jenkins" -c ~/.chef/knife_mdm.rb -V --node-ssl-verify-mode none | | chef certificates | /etc/chef/trusted_certs | | check log files | chef-server-ctl tail | | Test status | chef-server-ctl check | *** TODO [#B] configure chef server not listen on 443 http://opensysblog.directorioc.net/2014/03/chef-change-chef-server-port.html #+BEGIN_EXAMPLE We are migrating from Chef 10 to Chef 11. In Chef 10 the API is listening on port 4000 whereas the WebUI is on port 4040. Chef 11 uses nginx and listens by default on standard https port[1]. In order to change this do the following:
-
Edit /opt/chef-server/embedded/cookbooks/chef-server/attributes/default.rb and set the attribute default['chef_server']['nginx']['ssl_port'] to the desired value.
-
Apply the new configuration chef-server-ctl reconfigure chef-server-ctl test
Update (2014-08-14): You also have to change the attribute default['chef_server']['bookshelf']['url'] to something like https://#{node['fqdn']}:4000". Otherwise the webserver ui and the upload command won't work for chef will try to connect to port 443 for accessing the bookshelf. Update II (2014-08-14): The right way to do all this is by creating a new file called /etc/chef-server/chef-server.rb and setting the following parameters: bookshelf['url'] = "https://myhostname:4000" nginx['ssl_port'] = 4000 #+END_EXAMPLE *** ls -lth /etc/chef/trusted_certs #+BEGIN_EXAMPLE root@dbb3f08f2511:~# ls -lth /etc/chef/trusted_certs ls -lth /etc/chef/trusted_certs total 12K -rw-r--r-- 1 root root 1.3K Apr 24 05:36 4b4bc38b4449.crt -rw-r--r-- 1 root root 1.3K Apr 24 05:35 b869782a30f4.crt -rw-r--r-- 1 root root 1.3K Apr 24 05:35 kitchen-identity-sandbox.crt #+END_EXAMPLE *** DONE knife bootstrap fail: SSL issue CLOSED: [2015-04-24 Fri 10:32] http://stackoverflow.com/questions/27721000/using-chef-12-chef-client-unable-to-connect-to-chef-server https://docs.chef.io/knife_ssl_check.html
solution #1 disable ssl
knife bootstrap chef.dennyzhang.com --sudo -x root -P markDenny1 -p 4022 -N "jenkins" -c ~/.chef/knife_mdm.rb -V --node-ssl-verify-mode none
solution #2: fetch ssl certificate
#+BEGIN_EXAMPLE macs-MacBook-Air:cookbooks mac$ knife bootstrap chef.dennyzhang.com --sudo -x root -P markDenny1 -p 4022 -N "jenkins" -c ~/.chef/knife_mdm.rb -V knife bootstrap chef.dennyzhang.com --sudo -x root -P markDenny1 -p 4022 -N "jenkins" -c ~/.chef/knife_mdm.rb -V INFO: Using configuration from /Users/mac/.chef/knife_mdm.rb Doing old-style registration with the validation key at /Users/mac/.chef/dennyzhang-validator.pem... Delete your validation key in order to use your user credentials instead
Connecting to chef.dennyzhang.com chef.dennyzhang.com bash: warning: setlocale: LC_ALL: cannot change locale (en_US.UTF-8) chef.dennyzhang.com sudo: unable to resolve host jenkins.mdm.com chef.dennyzhang.com bash: warning: setlocale: LC_ALL: cannot change locale (en_US.UTF-8) chef.dennyzhang.com Starting first Chef Client run... chef.dennyzhang.com Starting Chef Client, version 12.2.1 chef.dennyzhang.com Creating a new client identity for jenkins using the validator key. chef.dennyzhang.com [2015-04-24T05:36:25+00:00] ERROR: SSL Validation failure connecting to host: 104.236.159.226 - hostname "104.236.159.226" does not match the server certificate chef.dennyzhang.com chef.dennyzhang.com ================================================================================ chef.dennyzhang.com Chef encountered an error attempting to create the client "jenkins" chef.dennyzhang.com ================================================================================ chef.dennyzhang.com chef.dennyzhang.com [2015-04-24T05:36:25+00:00] FATAL: Stacktrace dumped to /var/chef/cache/chef-stacktrace.out chef.dennyzhang.com Chef Client failed. 0 resources updated in 1.66183272 seconds chef.dennyzhang.com [2015-04-24T05:36:25+00:00] ERROR: hostname "104.236.159.226" does not match the server certificate chef.dennyzhang.com [2015-04-24T05:36:25+00:00] FATAL: Chef::Exceptions::ChildConvergeError: Chef run process exited unsuccessfully (exit code 1) #+END_EXAMPLE *** HALF knife bootstrap node: ssl issue #+BEGIN_EXAMPLE macs-MacBook-Air:cookbooks mac$ knife bootstrap chef.dennyzhang.com --sudo -x root -P markDenny1 -p 4022 -N "jenkins" -c ~/.chef/knife_mdm.rb -V knife bootstrap chef.dennyzhang.com --sudo -x root -P markDenny1 -p 4022 -N "jenkins" -c ~/.chef/knife_mdm.rb -V INFO: Using configuration from /Users/mac/.chef/knife_mdm.rb Doing old-style registration with the validation key at /Users/mac/.chef/dennyzhang-validator.pem... Delete your validation key in order to use your user credentials instead
Connecting to chef.dennyzhang.com chef.dennyzhang.com bash: warning: setlocale: LC_ALL: cannot change locale (en_US.UTF-8) chef.dennyzhang.com bash: warning: setlocale: LC_ALL: cannot change locale (en_US.UTF-8) chef.dennyzhang.com Installing Chef Client... chef.dennyzhang.com bash: warning: setlocale: LC_ALL: cannot change locale (en_US.UTF-8) chef.dennyzhang.com --2015-04-24 05:18:37-- https://www.chef.io/chef/install.sh chef.dennyzhang.com Resolving www.chef.io (www.chef.io)... 23.235.47.65 chef.dennyzhang.com Connecting to www.chef.io (www.chef.io)|23.235.47.65|:443... connected. chef.dennyzhang.com HTTP request sent, awaiting response... 200 OK chef.dennyzhang.com Length: 18990 (19K) [application/x-sh] chef.dennyzhang.com Saving to: 'STDOUT' chef.dennyzhang.com 100%[======================================>] 18,990 --.-K/s in 0.002s chef.dennyzhang.com chef.dennyzhang.com 2015-04-24 05:18:37 (11.8 MB/s) - written to stdout [18990/18990] chef.dennyzhang.com chef.dennyzhang.com Downloading Chef 12 for ubuntu... chef.dennyzhang.com downloading https://www.getchef.com/chef/metadata?v=12&prerelease=false&nightlies=false&p=ubuntu&pv=14.04&m=x86_64 chef.dennyzhang.com to file /tmp/install.sh.33/metadata.txt chef.dennyzhang.com trying wget... chef.dennyzhang.com url https://opscode-omnibus-packages.s3.amazonaws.com/ubuntu/13.04/x86_64/chef_12.2.1-1_amd64.deb chef.dennyzhang.com md5 84119f54115d754373c9891b8759497c chef.dennyzhang.com sha256 8e0a8a2477c11615f86ffe686a68fa6636112ba82ebe6bb22daa5dd416f3c13e chef.dennyzhang.com downloaded metadata file looks valid... chef.dennyzhang.com downloading https://opscode-omnibus-packages.s3.amazonaws.com/ubuntu/13.04/x86_64/chef_12.2.1-1_amd64.deb chef.dennyzhang.com to file /tmp/install.sh.33/chef_12.2.1-1_amd64.deb chef.dennyzhang.com trying wget... chef.dennyzhang.com Comparing checksum with sha256sum... chef.dennyzhang.com Installing Chef 12 chef.dennyzhang.com installing with dpkg... chef.dennyzhang.com Selecting previously unselected package chef. (Reading database ... 15859 files and directories currently installed.) chef.dennyzhang.com Preparing to unpack .../chef_12.2.1-1_amd64.deb ... chef.dennyzhang.com Unpacking chef (12.2.1-1) ... chef.dennyzhang.com Setting up chef (12.2.1-1) ... chef.dennyzhang.com Thank you for installing Chef! chef.dennyzhang.com Starting first Chef Client run... chef.dennyzhang.com Starting Chef Client, version 12.2.1 chef.dennyzhang.com Creating a new client identity for jenkins using the validator key. chef.dennyzhang.com [2015-04-24T05:18:53+00:00] ERROR: SSL Validation failure connecting to host: 104.236.159.226 - SSL_connect returned=1 errno=0 state=SSLv3 read server certificate B: certificate verify failed chef.dennyzhang.com chef.dennyzhang.com ================================================================================ chef.dennyzhang.com Chef encountered an error attempting to create the client "jenkins" chef.dennyzhang.com ================================================================================ chef.dennyzhang.com chef.dennyzhang.com [2015-04-24T05:18:53+00:00] FATAL: Stacktrace dumped to /var/chef/cache/chef-stacktrace.out chef.dennyzhang.com Chef Client failed. 0 resources updated in 1.643233538 seconds chef.dennyzhang.com [2015-04-24T05:18:53+00:00] ERROR: SSL_connect returned=1 errno=0 state=SSLv3 read server certificate B: certificate verify failed chef.dennyzhang.com [2015-04-24T05:18:53+00:00] FATAL: Chef::Exceptions::ChildConvergeError: Chef run process exited unsuccessfully (exit code 1) macs-MacBook-Air:cookbooks mac$ #+END_EXAMPLE *** [#A] web page: Chef 12: Fix Untrusted Self Signed Certificates | Chef Blog https://www.chef.io/blog/2014/12/12/chef-12-fix-untrusted-self-signed-certificates/ **** webcontent :noexport: #+begin_example Location: https://www.chef.io/blog/2014/12/12/chef-12-fix-untrusted-self-signed-certificates/ Community Blog Support Account Management Console Chef Toggle navigation
- Chef
- Delivery
- Learn Chef
- Resources
- Get Chef
-
- Community
- Blog
- Support
- Account
- Management Console
< Previous Post Next Post > Subscribe to RSS Feed
Chef 12: Fix Untrusted Self Signed Certificates
Posted on December 12, 2014 by Joshua Timberman — 6 Comments ↓
This post originally appeared on jtimberman’s Code Blog.
Scenario: You’ve started up a brand new Chef Server using version 12, and you have installed Chef 12 on your local system. You log into the Management Console to create a user and organization (or do this with the command-line chef-server-ctl commands), and you’re ready to rock with this knife.rb:
node_name 'jtimberman' client_key 'jtimberman.pem' validation_client_name 'tester-validator' validation_key 'tester-validator.pem' chef_server_url 'https://chef-server.example.com/organizations/tester'
However, when you try to check things out with knife:
% knife client list ERROR: SSL Validation failure connecting to host: chef-server.example.com - SSL_connect returned=1 errno=0 state=SSLv3 read server certificate B: certificate verify failed ERROR: OpenSSL::SSL::SSLError: SSL_connect returned=1 errno=0 state=SSLv3 read server certificate B: certificate verify failed
This is because Chef client 12 has SSL verification enabled by default for all requests. Since the certificate generated by the Chef Server 12 installation is self-signed, there isn’t a signing CA that can be verified, and this fails. Never fear intrepid user, for you can get the SSL certificate from the server and store it as a “trusted” certificate. To find out how, use knife ssl check.
Connecting to host chef-server.example.com:443 ERROR: The SSL certificate of chef-server.example.com could not be verified Certificate issuer data: /C=US/ST=WA/L=Seattle/O=YouCorp/OU=Operations/CN=chef-server.example.com/[email protected] Configuration Info: OpenSSL Configuration:
Version: OpenSSL 1.0.1j 15 Oct 2014
Certificate file: /opt/chefdk/embedded/ssl/cert.pem
Certificate directory: /opt/chefdk/embedded/ssl/certs
Chef SSL Configuration:
ssl_ca_path: nil
ssl_ca_file: nil
trusted_certs_dir: "/Users/jtimberman/Downloads/chef-repo/.chef/trusted_certs"
TO FIX THIS ERROR:
If the server you are connecting to uses a self-signed certificate, you must configure chef to trust that server's certificate.
By default, the certificate is stored in the following location on the host where your chef-server runs:
/var/opt/chef-server/nginx/ca/SERVER_HOSTNAME.crt
Copy that file to your trusted_certs_dir (currently: /Users/jtimberman/Downloads/chef-repo/.chef/trusted_certs) using SSH/SCP or some other secure method, then re-run this command to confirm that the server's certificate is now trusted.
(note, at the time of writing, this chef-server location is incorrect, it’s /var/opt/opscode)
There is a fetch plugin for knife too. Let’s download the certificate to the automatically preconfigured trusted certificate location mentioned in the output above.
% knife ssl fetch WARNING: Certificates from chef-server.example.com will be fetched and placed in your trusted_cert directory (/Users/jtimberman/Downloads/chef-repo/.chef/trusted_certs). Knife has no means to verify these are the correct certificates. You should verify the authenticity of these certificates after downloading. Adding certificate for chef-server.example.com in /Users/jtimberman/Downloads/chef-repo/.chef/trusted_certs/chef-server.example.com.crt
The certificate should be verified that what was downloaded is in fact the same as the certificate on the Chef Server. For example, I compared SHA256 checksums:
% ssh [email protected] sudo sha256sum /var/opt/opscode/nginx/ca/chef-server.example.com.crt 043728b55144861ed43a426c67addca357a5889158886aee50685cf1422b5ebf/var/opt/opscode/nginx/ca/chef-server.example.com.crt % gsha256sum .chef/trusted_certs/chef-server.example.com.crt 043728b55144861ed43a426c67addca357a5889158886aee50685cf1422b5ebf.chef/trusted_certs/chef-server.example.com.crt
Now check knife client list again.
% knife client list tester-validator
Victory!
Now, we need to get the ceritficate out to every node in the infrastructure in its trusted_certs_dir – by default this is /etc/chef/trusted_certs. The most simple way to do this is to use knife ssh to run knife on the target nodes.
% knife ssh 'name:*' 'sudo knife ssl fetch -c /etc/chef/client.rb' node-output.example.com WARNING: Certificates from chef-server-example.com will be fetched and placed in your trusted_cert node-output.example.com directory (/etc/chef/trusted_certs). node-output.example.com node-output.example.com Knife has no means to verify these are the correct certificates. You should node-output.example.com verify the authenticity of these certificates after downloading. node-output.example.com node-output.example.com Adding certificate for chef-server.example.com in /etc/chef/trusted_certs/chef-server.example.com.crt
The output will be interleaved for all the nodes returned by knife ssh. Of course, we should verify the SHA256 checksums like before, which can be done again with knife ssh.
[55851a28] About Joshua Timberman
Joshua Timberman is a Code Cleric at CHEF, where he Cures Technical Debt Wounds for 1d8+5 lines of code, casts Protection from Yaks, and otherwise helps continuously improve internal technical process.
‹ Upcoming releases for Chef Client and Chef Development Kit SysAdvent Day 14: Using Chef Provisioning to Build Chef Server ›
-
Jason
Thanks for making this officially available. Will this be added to the installation instructions? Also, it would be helpful to include the steps required to set up Chef using a CA signed cert in the installation instructions. They are there in piecemeal, but it takes a bit of digging to find it and get it set up.
-
Daniel Esponda
I agree with Jason, it has been a hard process setting up Chef Server 12 due to the scattered documentation
-
Jams
Hey Jason – looks like this might help https://docs.chef.io/server_security.html
-
James
Hi Jason,
I had to set up real certs on an AWS instance. There’s a little of these instructions that only apply to hosts that have more than one hostname, as AWS nodes do, but you should get a good started here.
-
-
Nick
This seems to be the case when attempting to bootstrap Windows hosts too causing it to fail without registration, which is… somewhat problematic…
-
http://odlevak.org/ Pavol
+1 Any instructions how to turn this off on the client I am bootstrapping? Using knife ec2 and and registering my Windows hosts with Chef server always fails. Setting –ca-trust-file did not work for me. Tried to use –bootstrap-version with knife ec2, but it somehow always installs the latest one.
-
Facebook Twitter YouTube LinkedIn
Solutions
-
AIX
-
Amazon Web Services
-
Auditing and Compliance
-
Cloud Management
-
Coded Business
-
Configuration Management
-
Containers
-
Continuous Delivery
-
Data Driven Automation
-
DevOps
-
Google Cloud Platform
-
Hardening Your OS
-
Microsoft Azure
-
OpenStack
-
Patch Management
-
Professional Services
-
VMware
-
Web-Scale IT
-
Windows
Products
- Chef
Legal
- Terms and Conditions of Use
- Privacy Policy
- Online Master License and Services Agreement
- Service Level Agreement
- Contributor License Agreements
- Trademark Policy
Support
- Documentation
- Support
- Security
- Learn Chef
- Training
- Webinars
- Community Resources
About Us
- Blog
- Media Room
- Events
- Company
- Careers
- Success with Chef
- Partners
© 2008 – 2015 Chef Software, Inc. All Rights Reserved.
*
#+end_example
*** DONE chef-server-ctl test: getaddrinfo: Name or service not known (SocketError)
CLOSED: [2015-04-24 Fri 07:23]
Define fqdn; and retry "chef-server-ctl reconfigure"
#+BEGIN_EXAMPLE
root@73fd787cb994:~# hostname -f
73fd787cb994.mdm.com
root@73fd787cb994:~# chef-server-ctl test
Configuring logging...
Creating platform...
Configured URL: https://4b4bc38b4449
Creating org pedant_testorg_4b4bc38b4449_7403
/opt/opscode/embedded/service/oc-chef-pedant/lib/pedant/core_ext/net_http.rb:22:in initialize': getaddrinfo: Name or service not known (SocketError) from /opt/opscode/embedded/service/oc-chef-pedant/lib/pedant/core_ext/net_http.rb:22:in open'
from /opt/opscode/embedded/service/oc-chef-pedant/lib/pedant/core_ext/net_http.rb:22:in block in connect' from /opt/opscode/embedded/lib/ruby/2.1.0/timeout.rb:76:in timeout'
from /opt/opscode/embedded/lib/ruby/2.1.0/timeout.rb:127:in timeout' from /opt/opscode/embedded/service/oc-chef-pedant/lib/pedant/core_ext/net_http.rb:22:in connect'
from /opt/opscode/embedded/lib/ruby/2.1.0/net/http.rb:863:in do_start' from /opt/opscode/embedded/lib/ruby/2.1.0/net/http.rb:852:in start'
from /opt/opscode/embedded/service/gem/ruby/2.1.0/bundler/gems/rest-client-ba0d12258b77/lib/restclient/request.rb:183:in transmit' from /opt/opscode/embedded/service/gem/ruby/2.1.0/bundler/gems/rest-client-ba0d12258b77/lib/restclient/request.rb:69:in execute'
from /opt/opscode/embedded/service/gem/ruby/2.1.0/bundler/gems/rest-client-ba0d12258b77/lib/restclient/request.rb:36:in execute' from /opt/opscode/embedded/service/gem/ruby/2.1.0/bundler/gems/rest-client-ba0d12258b77/lib/restclient.rb:73:in post'
from /opt/opscode/embedded/service/oc-chef-pedant/lib/pedant/request.rb:130:in authenticated_request' from /opt/opscode/embedded/service/oc-chef-pedant/lib/pedant/request.rb:152:in post'
from /opt/opscode/embedded/service/oc-chef-pedant/lib/pedant/platform.rb:306:in block in create_org' from /opt/opscode/embedded/service/oc-chef-pedant/lib/pedant/platform.rb:305:in times'
from /opt/opscode/embedded/service/oc-chef-pedant/lib/pedant/platform.rb:305:in create_org' from /opt/opscode/embedded/service/oc-chef-pedant/lib/pedant/platform.rb:113:in org_from_config'
from /opt/opscode/embedded/service/oc-chef-pedant/lib/pedant/platform.rb:42:in initialize' from /opt/opscode/embedded/service/oc-chef-pedant/lib/pedant.rb:79:in new'
from /opt/opscode/embedded/service/oc-chef-pedant/lib/pedant.rb:79:in create_platform' from /opt/opscode/embedded/service/oc-chef-pedant/lib/pedant.rb:58:in setup'
from ./bin/oc-chef-pedant:10:in `
hostname -f ** # --8<-------------------------- separator ------------------------>8-- ** CentOS install chef http://www.bonusbits.com/main/HowTo:Install_Chef_Server_on_CentOS *** DONE Chef WorkStation Installation CLOSED: [2014-06-02 Mon 22:26] http://sachinsharm.wordpress.com/2013/10/11/installsetup-and-configure-chef-serverworkstationnode-on-centosrhel-6-4/ curl -L https://www.opscode.com/chef/install.sh | bash ** [#A] ubuntu install chef https://ubuntu-vm.osc.com
default credential: admin/p@ssw0rd1 https://www.digitalocean.com/community/tutorials/how-to-install-a-chef-server-workstation-and-client-on-ubuntu-vps-instances
/etc/chef-server /etc/chef /var/opt/chef-server *** hostname sudo vim /etc/hosts 127.0.0.1 ubuntu-vm.osc.com ubuntu-vm
change hostname to add fqdn permanetly: sudo vim /etc/hostname *** Download related version cd ~ wget https://opscode-omnibus-packages.s3.amazonaws.com/ubuntu/12.04/x86_64/chef-server_11.0.10-1.ubuntu.12.04_amd64.deb sudo dpkg -i chef-server* *** configure chef server sudo chef-server-ctl reconfigure *** DONE [#A] test configuration :IMPORTANT: CLOSED: [2014-06-19 Thu 16:03] sudo chef-server-ctl test *** change iptables to allow port 443 go through telnet ubuntu-vm.osc.com 443 *** verify the configuration https://server_domain_or_IP
default credential: admin/p@ssw0rd1 *** Install workstation sudo apt-get install git curl -L https://www.opscode.com/chef/install.sh | sudo bash *** clone chef-repo cd ~ git clone https://github.com/opscode/chef-repo.git
mkdir ~/chef-repo/.chef *** Generating and Copying Keys from the Server https://server_domain_or_IP *** chef-validator client: chef-validator.pem #+begin_example -----BEGIN RSA PRIVATE KEY----- MIIEpQIBAAKCAQEAuUviZjhaUeHUVlJjcQv5GB1OoDEqtVQPia4WIVUTJCAEstIT gB8IEbiVVKhH0/RlYWGRC2lKOXKiYNLLGczs4SL6ZN36orVycPgsH/rXay5HVrl5 guM56nhdXiZarJsTkOp4Xx2VgmWoYjg+UpvT3m1ujaGpyKEE9D1F3Ih52RrvGi6E 0C66HySGszkN37J3egJLLcxf8CQqmUQNHXP7fhdQgA9YyuiPAqd2PZn+jDI6v8pU 2SiM8ZORs1cv6VJwVhUApG3fACx16CKjcESsAnxB15pHLsnLfYabbNYg+G+aJGYU 7BDhKlW6nnLBvtz5wXWO0cRYlv6L6MGhI/RjzQIDAQABAoIBAQCk1nHwV39Zylk3 9ZELFwigQCoa7cI9jytHYrvDKUie4XDsl1/LoU9vXFJT/mPvlUG+8Km0ihUCqAz1 r3AIYrnzykcQBj0aE+pbvxqZ1G9gpMnHx7XmDzgNcsg0olAVrtsoFr3Ad7PyTXcO 8VPX71H6VEV972v30+5xTDTi6/HhhMXexnN/Fqe9JcSj3aAybgNTVEIGkSoadOed AF0mlyBW0mXuNp90/R09baXrYfrMUt7ATvVfOLlocf7RYjMZU0dSS7sL9xN01yVe y8XxMhcxe3nPeXjXo+FKJaoK2F3yVmAT+3e6SW+rwgVdD7mjTGf1LAXhlw/HgdjE na43bcJtAoGBANr02vTQAVCPyYwhwZV6M+tov5wHSwQ9j3JzRPkGHCIAq7KB4XOf 6AwQQss+8DJzPD2QsfE/cGakH4CNmpYREPX6G+NN40HVa0pjww7enptb+Kcu/6Ek KXTs7ofs8ODTcHPkZUKmAelnOCd44Py0xH/0/c/htb5vMJKi1rbe33OvAoGBANil MOqRM+3qHqAWumbxJRp6ubkH685vq7b3uD37SI5WjWcTh8Iw4Qko8XSJkrsCwc0z 4ftE9rbbrAC6T4oYpxC/qXA02UbltS+eWHR0CR2Z9Q7By0cQRj1KQlYpXnO2unRn aPtQJfWVWFSOl9ShvSDp1trTomJcYlX3F70+dvNDAoGAP1TLcDwp5S9x0IKDB8VM 9y5ZHbxOSm+z6hrFPHIz+PHQt9UxbMw3xiV97GPL/guuxO/xSCJdVJLsOba7m+Rb z4oEPv7sWMJuQhoQ9WAW6ED17wV9ExLums9dPxudoKoHwL2zPE/gBa7BY0lnajCv FYO7VkGm2+o1VnSbPlHAuCkCgYEAtWZkNhSM8cpWCF/fhnCmS6y1M/ww8zLICjUT 3To5v40zazqMMwqwcvYIbzb+WH5vff3SW42cMvJu7FEUZqJLyRdiraRixh1y/8NL d37tXw7ZhZi5N/Clj45NS03qW2OGbg9kdQHgNujtBCg9c3pWHWgPUj1gu5F1eVuj Uf8qpHcCgYEAjP1sBk5NP5hpEdzZq2gTj7IwE6VXknVUJRFwVZGS2KlOolgyqz6/ RO9LMfPIrQQp4gR8sdqiV+CFp8NwACRmaOklsTdMALK6APWS3xTS39hqUd8bQaE0 xEdYnzQNxWX9jUa6ygYQ56k/pVv2QFfHRllFFkzmQt/gLzUV6/ZMyyk= -----END RSA PRIVATE KEY----- #+end_example *** admin.pem #+begin_example -----BEGIN RSA PRIVATE KEY----- MIIEpAIBAAKCAQEAn3lG7OZP33uBCknRkExHH0MiVbEi0YKLEtYf6d6RwJuKDL3S P6aUiPqfTlvX0j2f/ewM28aHvUYHyGVWAaIV9FGHftwKsqpg46Jhlk9D4AAOiDw6 1c9FGA2lQBLizPr3vLHaIw9pciqa9sgfB2vfMqqhWQTHTvZEoqOXMu2c9FSw7fRM gXiLKUd130IAcK5pBQRprUMxBlPUXXqv0zHiCQDvZo5j5XUh9fa1pA9WxFSt0oUv VYwwjNbkSyZjH//TU/Rg+KLOifGoh2NmHdrW+KgL0QTU88gZWCO6xgLqp8LDW8+i 6pv/dpHF4X+rMkr1CFNYmSthP7jSklm5P3H+oQIDAQABAoIBAQCU/ayK9h4XkH6d yxvUcb9c8M7qOoVqMkmWvqCwUjXgOjD++HWu7AYH+AbQIbSAgvywMlJNHq2A4yWw TyTMf899JJKvrgr8o3vEENiVotaqN8Nb+tGJIo3ODCmgtERa9/puu8cuTF7av/1p pMyAlYLBBnOaBIHlPuYfATHo7eBe0Cuvg+J3rAeP/WtIAsX2y4KUk1JguIgiR6xl yeGuvLhy02jcPCYj7a86ter3NPq0l02Mmm4+O+cdn4cYAvG6A62zLRFv3zyJqZ5I vTfEn0mvxO1mboHMcIU8yZljv5YXND5SQEAHaKKr7XNl/doOkJrrHjFknHWkrVeH qHwgpVE1AoGBAMwxPA45BxCDoBNbHrZ0VsfCTXWkOelWDgKSIQ8HYyQyEHV0ADxy izOBol8c0Pv9Iw/EvDkvIwboaPbjfFQqJWtRtKzETFo45K1hQLZO/DDkacsVX57M Lv19ZxpxcUqqZpLb6KdevH3tKCzjCzyYy0ldBO00n5WitVGA1OM1PQ6nAoGBAMfv d3M0Ph9hIH3EK4aWWTAYu7/Eo6TjeoKYbaDPbToLBNBt5lFb8ahHRz195jKzWcNV DxyFTX/h0iXRN+JT/c3Vhn+oVmLApmVIZZsqwpN4FnHSJvbquaas/R0abXfXFeqw 71kAiI+tx047L/WMf0RmJLHl8OmS8RCi8Gb4azl3AoGAVH5/GmeQu82rvLa0880a Z9jIUsjdSefZLkknst9csAqjcubIfjrrzSl0diUneU6bZpgDRypxNReQ77Dcrrst 9sW9nMwxyBfI0NHwhEAU7WpnOKkkg0J8o1p0AqY0ui/e+CBVmoSCPR2YxVJCQRX8 8OOz+TAQZUwJ+ar07PwHwvsCgYAZ4qofc0MbwvJ29gAAo9SWQo2ETYw2W/FPmTaQ XGqy2hxcc+4e2H2YIOpbTsKQC+JyRL/5HFUlWnJfzQ+kMOWqUZvhSUUt8e1ZLZ9i EI4yk5isUd4Tl95DcyAuNW641lMTGKdUaZpEp+Ym/ci+zNrpWyQjGDcxtoGZes8P NdiEDwKBgQCcKDnu9oY0qZQpeh/gnuFtM7UUBf2dOFjpOtwAyOdT77+RgMcyNgtb pPmyyi1ePm2KFwBg4UB4lr7i9p1fV6YXXddi/BHo+IWvWMMg6e2wzsbDPsSOQFkM I+au1TpRznHMn/AV4HiBG3ugqiGHPn61pFjedGb5FmWm7fQqdu/BbQ== -----END RSA PRIVATE KEY----- #+end_example *** configure knife /root/chef-repo/.chef admin.pem chef-validator.pem
knife configure --initial
#+begin_example root@ubuntu-vm:~/chef-repo/.chef# knife configure --initial knife configure --initial Overwrite /root/.chef/knife.rb? (Y/N)Y Y Please enter the chef server URL: [https://ubuntu-vm.osc.com:443]
Please enter a name for the new user: [root]
Please enter the existing admin name: [admin]
Please enter the location of the existing admin's private key: [/etc/chef-server/admin.pem] /root/chef-repo/.chef/admin.pem /root/chef-repo/.chef/admin.pem Please enter the validation clientname: [chef-validator]
Please enter the location of the validation key: [/etc/chef-server/chef-validator.pem] /root/chef-repo/.chef/chef-validator.pem /root/chef-repo/.chef/chef-validator.pem Please enter the path to a chef repository (or leave blank):
Creating initial API user... Please enter a password for the new user: password
Created user[root] Configuration file written to /root/.chef/knife.rb #+end_example *** [#A] knife.rb #+begin_example root@ubuntu-vm:~/chef-repo/.chef#cat /root/.chef/knife.rb cat /root/.chef/knife.rb log_level :info log_location STDOUT node_name 'root' client_key '/root/.chef/root.pem' validation_client_name 'chef-validator' validation_key '/root/chef-repo/.chef/chef-validator.pem' chef_server_url 'https://ubuntu-vm.osc.com:443' syntax_check_cache_path '/root/.chef/syntax_check_cache' #+end_example ** # --8<-------------------------- separator ------------------------>8-- ** service Port of chef | Service | Port | |-------------------+------| | Chef Server | 4000 | | Chef Server WebUI | 4040 | | CouchDB | 5984 | | RabbitMQ | 5672 | | Chef Solr | 8983 | ** [#A] Concept *** Cookbooks http://docs.opscode.com/chef_quick_overview.html #+begin_example A cookbook is the fundamental unit of configuration and policy distribution. Each cookbook defines a scenario, such as everything needed to install and configure MySQL, and then it contains all of the components that are required to support that scenario, including:
Attribute values that are set on nodes Definitions that allow the creation of reusable collections of resources File distributions Libraries that extend the chef-client and/or provide helpers to Ruby code Recipes that specify which resources to manage and the order in which those resources will be applied Custom resources and providers Templates Versions Metadata about recipes (including dependencies), version constraints, supported platforms, and so on The chef-client uses Ruby as its reference language for creating cookbooks and defining recipes, with an extended DSL for specific resources. The chef-client provides a reasonable set of resources, enough to support many of the most common infrastructure automation scenarios; however, this DSL can also be extended when additional resources and capabilities are required. #+end_example
#+begin_example Cookbooks 烹饪书 包含:
- Attributes 属性 是属于Node 节点 对默认值的设置。属性的作用域是整个cookbook 烹饪书。
- Definitions 定义 让您能够在数个Resources的基础上创建可重复使用的集合。
- File Distribution 文件 将定义好的文件通过Cookbook File 资源传送到chef管理的服务器中。
- Libraries 库 将让chef拥有Ruby代码的支持。
- Recipes 食谱 将Resources 材料 整合管理,已达成某一项任务。如,配置apache2的Recipe。
- Lightweight Resources and Providers (LWRP) 材料&原料 让您自定义resources_材料_和providers_原料_
- Templates 模板 在chef管理下的服务器中渲染,您可以将不同的变量带入模板其中,参见ERB templates。
- Metadata 概要 其中包含了如下概述:Cookbook_烹饪书_中的recipes 食谱,所依赖的libraries或其他cookbook,支持的操作系统,等等。 #+end_example *** Knife http://docs.opscode.com/chef_quick_overview.html #+begin_example Knife is a command-line tool that provides an interface between a local chef-repo and the Chef server. Knife helps users to manage:
Nodes Cookbooks and recipes Roles Stores of JSON data (data bags), including encrypted data Environments Cloud resources, including provisioning The installation of the chef-client on management workstations Searching of indexed data on the Chef server #+end_example *** DONE chef workstation CLOSED: [2014-06-09 Mon 16:30] https://learnchef.opscode.com/get-started/ A workstation is where you will spend most of your time working with Chef. It's the same place you do your development or sysadmin work. From your workstation, you'll author Chef cookbooks, upload them to your Chef server, and more. *** DONE [#A] What are cookbooks and recipes? CLOSED: [2014-06-03 Tue 09:57] https://learnchef.opscode.com/tutorials/create-your-first-cookbook/ A cookbook is the fundamental unit of configuration and policy distribution. A cookbook defines a scenario, such as everything needed to install and configure Apache or IIS web server and the resources that support it.
A recipe describes desired configuration state. A recipe is stored in a cookbook and declares everything that is required to configure part of a system. For example, a recipe can install and configure software components, manage files, deploy applications, run other recipes, and more.
Think of the literal analogy from cooking. You might have a cookbook on Italian cooking, one on Chinese cooking, and maybe one that contains your grandmother's best dishes. Each cookbook is made up of recipes around a common theme. A recipe defines the steps that, if followed precisely, produce the same dish every time. *** DONE Difference between Chef Server/Workstation/Node CLOSED: [2014-06-03 Tue 10:00]
- Workstation: Developing cookbooks, and upload to chef-repo
- Node: chef client *** DONE chef resource: Resources are gathered into recipes CLOSED: [2014-06-09 Mon 16:41] https://learnchef.opscode.com/concepts/resources/
Resources are declarative: that means we say what we want to have happen, rather than how
#+begin_example A resource is the fundamental building block of Chef configuration and represents one part of the system and its desired state. Examples include:
a package that should be installed a service that should be running a file that should be generated Resources are gathered into recipes. The Chef client applies resource requirements to nodes. For more information, see About Resources and Providers. #+end_example *** DONE chef ohai: detects data about your operating system CLOSED: [2014-06-10 Tue 10:01] Ohai is used to collect data about the system so that it is available to the chef-client
https://wiki.opscode.com/display/ChefCN/Ohai It's primary purpose is to provide node data to Chef. sudo gem install ohai
http://docs.opscode.com/ohai.html
https://wiki.opscode.com/display/ChefCN/Using+Ohai https://wiki.opscode.com/display/chef/Ohai+Installation+and+Use
#+begin_example
Detect node’s environment and provide them to the chef-client
The types of properties Ohai reports on include: Platform details Networking usage Memory usage Processor usage Kernel data Host names Fully qualified domain name Other configuration details …
#+end_example
The types of attributes Ohai collects include (but are not limited to): #+begin_example Platform details Network usage Memory usage Processor usage Kernel data Host names Fully qualified domain names Other configuration details #+end_example
Use ohai as a ruby Library #+begin_example
You can use Ohai as a library within a ruby program or script. The special Chef client configuration file used in the older Opscode-provided EC2 AMIs used this to retrieve EC2 userdata for configuring Chef itself.
Run this in IRB irb(main):001:0> require 'rubygems' => true irb(main):002:0> require 'ohai' => true irb(main):003:0> o = Ohai::System.new => #<Ohai::System:0x118dbb0 @seen_plugins={}, @data={}, @plugin_path="", @providers={}> irb(main):004:0> o.all_plugins => true irb(main):005:0> o[:fqdn] => "melomel.local" #+end_example *** DONE Recipe: a Chef configuration policy that describes resources and their desired state. CLOSED: [2014-06-09 Mon 16:45] https://learnchef.opscode.com/concepts/recipes/
Resources are the fundamental building blocks of Chef configuration Resources are gathered into Recipes Recipes ensure the system is in the d #+begin_example A recipe is a Chef configuration policy that describes resources and their desired state. A recipes is stored in a cookbook and describes everything that is required to configure part of a system. Recipes can:
install and configure software components manage files deploy applications execute other recipes and more... For more information, see About Recipes. #+end_example *** DONE Chef Definitions: allow you to create new Resources by stringing together existing resources. CLOSED: [2014-06-10 Tue 10:33] https://wiki.opscode.com/display/ChefCN/Definitions
When to use Definitions You want a definition if:
- You are repeating a pattern of resources
- You do not want to send actions directly to this resource - i.e., you never need to notify it
- You want to pass data from various recipes to one definition, to update your /etc/aliases, /etc/sudoers, or something similar, with entries from multiple recipes in a single chef run.
#+begin_example I think an example will explain best:
apache_site Definition define :apache_site, :enable => true do include_recipe "apache2"
if params[:enable] execute "a2ensite #{params[:name]}" do command "/usr/sbin/a2ensite #{params[:name]}" notifies :restart, resources(:service => "apache2") not_if do ::File.symlink?("#{node[:apache][:dir]}/sites-enabled/#{params[:name]}") or ::File.symlink?("#{node[:apache][:dir]}/sites-enabled/000-#{params[:name]}") end only_if do ::File.exists?("#{node[:apache][:dir]}/sites-available/#{params[:name]}") end end else execute "a2dissite #{params[:name]}" do command "/usr/sbin/a2dissite #{params[:name]}" notifies :restart, resources(:service => "apache2") only_if do ::File.symlink?("#{node[:apache][:dir]}/sites-enabled/#{params[:name]}") end end end end
Table of Contents Definitions How definitions work Where to place definitions Definitions aren't resources When to use Definitions This definition file creates a new resource apache_site. We utilize it by placing:
apache_site resource
Enable my_site.conf
apache_site "my_site.conf" do enable true end
Disable my_site.conf
apache_site "my_site.conf" do enable false end #+end_example ** useful webpage :noexport: *** web page: Chef集中管理工具实践之 (1) 环境部署 << Hey! Linux. http://heylinux.com/archives/2208.html **** webcontent :noexport: #+begin_example Location: http://heylinux.com/archives/2208.html 如果一件事情值得去做,那它就值得做好。 Whatever is worth doing is worth doing well.
Hey! Linux.
- Home
- About Me
- English Edition
- GitHub
- Site Map
« Chef集中管理工具实践之 (0) 什么是Chef 使用dnsmasq快速搭建内网DNS »
Chef集中管理工具实践之 (1) 环境部署
目录结构 Chef集中管理工具实践之 (0) 什么是Chef Chef集中管理工具实践之 (1) 环境部署 Chef集中管理工具实践之 (2) 服务器配置 Chef集中管理工具实践之 (3) 自定义配置
本文内容 Chef集中配置管理工具实践之 (1) 环境部署
参考资料 http://wiki.opscode.com/pages/viewpage.action?pageId=24773429 http://wiki.opscode.com/display/chef/Installing+Chef+Server+on+Debian+or+Ubuntu+using+Packages http://wiki.opscode.com/display/chef/Workstation+Setup+for+Debian+and+Ubuntu http://wiki.opscode.com/display/chef/Knife+Bootstrap
环境介绍 OS: Ubuntu 10.10 Server 64-bit //经过验证在12.04.1以及12.10上也成功实现部署。 Servers: chef-server:10.6.1.170 chef-workstation:10.6.1.171 chef-client-1:10.6.1.172 chef-client-2:10.6.1.173
- 安装配置Chef Server 编辑hosts ubuntu@chef-server:~$ sudo vim /etc/hosts
127.0.0.1 localhost
10.6.1.170 chef-server 10.6.1.171 chef-workstation 10.6.1.172 chef-client-1 10.6.1.173 chef-client-2
注意: 将本机的hostname在/etc/hosts中添加一条IP解析记录,这一点非常重要。 因为后面在安装chef-server的过程中,会首先安装rabbitmq-server,缺少该解析记录的话,会导致 rabbitma-server启动失败,进而影响到所有其它chef-server软件包的正常安装,如果不清楚这一点的话,会给 问题的排查带来很大的不便。
创建 /etc/apt/sources.list.d/opscode.list
ubuntu@chef-server:~$ sudo echo "deb http://apt.opscode.com/ lsb_release -cs-0.10 main" | sudo
tee /etc/apt/sources.list.d/opscode.list
添加GPG Key ubuntu@chef-server:~$ sudo mkdir -p /etc/apt/trusted.gpg.d ubuntu@chef-server:~$ sudo gpg --keyserver keys.gnupg.net --recv-keys 83EF826A ubuntu@chef-server:~$ sudo gpg --export [email protected] | sudo tee /etc/apt/trusted.gpg.d/ opscode-keyring.gpg > /dev/null
ubuntu@chef-server:~$ sudo apt-get update ubuntu@chef-server:~$ sudo apt-get install opscode-keyring
安装NTP时间服务器,Chef需要确保workstation与所有client与server的时钟一致 ubuntu@chef-server:~$ sudo apt-get install ntp
更新现有系统 ubuntu@chef-server:~$ sudo apt-get upgrade
安装chef-server软件包 ubuntu@chef-server:~$ sudo apt-get install chef chef-server
输入URL: http://chef-server:4000 [configuring-chef]
输入密码: chef-server [configuring-chef-solr]
该过程执行了如下过程: 安装Chef Server以及所依赖的软件包如Merb,CouchDB,RabbitMQ等共300多个软件包 启动CouchDB,RabbitMQ 启动chef-server-api并运行在4000端口 启动chef-server-webui并运行在4040端口 启动chef-solr-indexer并自动连接到rabbitmq-server 启动chef-solr,chef-client 在目录/etc/chef中创建相关的配置文件
安装完成后检查并确认以下端口: Chef Server - 4000 Chef Server WebUI - 4040 CouchDB - 5984 RabbitMQ - 5672 Chef Solr - 8983
ubuntu@chef-server:~$ sudo netstat -lntp
Active Internet connections (only servers) Proto Recv-Q Send-Q Local Address Foreign Address State PID/Program name tcp 0 0 0.0.0.0:22 0.0.0.0:* LISTEN 11402/sshd tcp 0 0 0.0.0.0:4000 0.0.0.0:* LISTEN 31998/merb : chef-s tcp 0 0 0.0.0.0:4040 0.0.0.0:* LISTEN 32168/merb : chef-s tcp 0 0 0.0.0.0:5672 0.0.0.0:* LISTEN 30470/beam tcp 0 0 127.0.0.1:5984 0.0.0.0:* LISTEN 30518/beam tcp 0 0 0.0.0.0:41891 0.0.0.0:* LISTEN 30128/beam tcp6 0 0 :::22 :::* LISTEN 11402/sshd tcp6 0 0 127.0.0.1:8983 :::* LISTEN 31760/java ...
登陆Web UI [chef-server-ui-login]
地址:http://chef-server:4040 (正常访问需要在本地电脑的hosts中添加“10.6.1.170 chef-server”) 账号:admin 密码:chef-server
安装配置knife命令行工具 ubuntu@chef-server:~$ mkdir -p ~/.chef ubuntu@chef-server:~$ sudo cp /etc/chef/validation.pem /etc/chef/webui.pem ~/.chef ubuntu@chef-server:~$ sudo chown -R $USER ~/.chef
ubuntu@chef-server:~$ knife configure -i
WARNING: No knife configuration file found Where should I put the config file? [/home/ubuntu/.chef/knife.rb] Please enter the chef server URL: [http://chef-server:4000] http://chef-server:4000 Please enter a clientname for the new client: [ubuntu] Please enter the existing admin clientname: [chef-webui] Please enter the location of the existing admin client's private key: [/etc/chef/webui.pem] .chef/webui.pem Please enter the validation clientname: [chef-validator] Please enter the location of the validation key: [/etc/chef/validation.pem] .chef/validation.pem Please enter the path to a chef repository (or leave blank): Creating initial API user... Created client[ubuntu] Configuration file written to /home/ubuntu/.chef/knife.rb
执行knife命令,检查是否能连接到指定的Chef Server ubuntu@chef-server:~$ knife client list
chef-validator chef-webui ubuntu
ubuntu@chef-server:~$ knife cookbook list
ubuntu@chef-server:~$ sudo apt-get install ntp
为工作站安装并配置Knife Client ubuntu@chef-server:~$ knife client create chef-workstation -d -a -f /home/ubuntu/.chef/chef-workstation.pem
Created client[chef-workstation]
ubuntu@chef-server:~$ knife client show chef-workstation
_rev: 1-2a52b9416bad08b697e9c644a0aea4cc admin: true chef_type: client json_class: Chef::ApiClient name: chef-workstation public_key: -----BEGIN RSA PUBLIC KEY----- MIIBCgKCAQEA1RAa+jf733FtoTv64msykO3/SEe8G/YhPgA2S3NfWdgh+LbuhCdT 9IjX3Hio3U/rj6VGeICJkCfWZy7NM9pTaPzH+gJdFbkLrLW1GSoEKMJ/f9IkxRcS 7vdySU05IrPOF9PqcMvrME4xYzsFzIXDz1CbWBs08SuMfjP9qHfeStfBQaoQ8rLp mOGI0VMOU/CrlfNsAPLbUgVVylKfcmop1dCO6My53xW/qogfg/8Af0qtk7tyjVFi K+umCjmHmtW09qg5467p7xf4WSUYh076pb3ofbTi0o3VJi8Dz+qGISjvAVf3Y1As mwkam0IBM5sK41r/Suki9UQanKWsiDm0CQIDAQAB -----END RSA PUBLIC KEY-----
- 安装配置chef-workstation 编辑hosts ubuntu@chef-workstation:~$ vim /etc/hosts
127.0.0.1 localhost
10.6.1.170 chef-server 10.6.1.171 chef-workstation 10.6.1.172 chef-client-1 10.6.1.173 chef-client-2
安装Ruby与其它依赖包 ubuntu@chef-workstation:~$ sudo apt-get install ruby ruby-dev libopenssl-ruby rdoc ri irb build-essential wget ssl-cert curl
安装RubyGems ubuntu@chef-workstation:~$ cd /tmp ubuntu@chef-workstation:~$ curl -O http://production.cf.rubygems.org/rubygems/rubygems-1.8.10.tgz ubuntu@chef-workstation:~$ tar zxf rubygems-1.8.10.tgz ubuntu@chef-workstation:~$ cd rubygems-1.8.10 ubuntu@chef-workstation:/tmp/rubygems-1.8.10$ sudo ruby setup.rb --no-format-executable
安装Chef Gem ubuntu@chef-workstation:/tmp/rubygems-1.8.10$ sudo gem install chef --no-ri --no-rdoc
Fetching: mixlib-config-1.1.2.gem (100%) Fetching: mixlib-cli-1.2.2.gem (100%) Fetching: mixlib-log-1.4.1.gem (100%) Fetching: mixlib-authentication-1.3.0.gem (100%) Fetching: mixlib-shellout-1.1.0.gem (100%) Fetching: systemu-2.5.2.gem (100%) Fetching: yajl-ruby-1.1.0.gem (100%) Building native extensions. This could take a while... Fetching: ipaddress-0.8.0.gem (100%) Fetching: ohai-6.14.0.gem (100%) Fetching: mime-types-1.19.gem (100%) Fetching: rest-client-1.6.7.gem (100%) Fetching: bunny-0.7.9.gem (100%) [Version 0.7.8] test suite cleanup (eliminated some race conditions related to queue.message_count) Fetching: json-1.6.1.gem (100%) Building native extensions. This could take a while... Fetching: polyglot-0.3.3.gem (100%) Fetching: treetop-1.4.12.gem (100%) Fetching: net-ssh-2.2.2.gem (100%) Fetching: net-ssh-gateway-1.1.0.gem (100%) Fetching: net-ssh-multi-1.1.gem (100%) Fetching: highline-1.6.15.gem (100%) Fetching: erubis-2.7.0.gem (100%) Fetching: moneta-0.6.0.gem (100%) Fetching: uuidtools-2.1.3.gem (100%) Fetching: chef-10.16.2.gem (100%) Successfully installed mixlib-config-1.1.2 Successfully installed mixlib-cli-1.2.2 Successfully installed mixlib-log-1.4.1 Successfully installed mixlib-authentication-1.3.0 Successfully installed mixlib-shellout-1.1.0 Successfully installed systemu-2.5.2 Successfully installed yajl-ruby-1.1.0 Successfully installed ipaddress-0.8.0 Successfully installed ohai-6.14.0 Successfully installed mime-types-1.19 Successfully installed rest-client-1.6.7 Successfully installed bunny-0.7.9 Successfully installed json-1.6.1 Successfully installed polyglot-0.3.3 Successfully installed treetop-1.4.12 Successfully installed net-ssh-2.2.2 Successfully installed net-ssh-gateway-1.1.0 Successfully installed net-ssh-multi-1.1 Successfully installed highline-1.6.15 Successfully installed erubis-2.7.0 Successfully installed moneta-0.6.0 Successfully installed uuidtools-2.1.3 Successfully installed chef-10.16.2 23 gems installed
安装Git ubuntu@chef-workstation:~$ sudo apt-get -y install git-core ubuntu@chef-workstation:~$ git --version git version 1.7.1
创建Chef Repository 备注:Chef的大部分配置工作都是在Workstaion中的Chef Repository中完成的,不同的Chef Repository可以管 理不同的Chef Server。 ubuntu@chef-workstation:~$ sudo git clone git://github.com/opscode/chef-repo.git /opt/chef-local
Initialized empty Git repository in /opt/chef-local/.git/ remote: Counting objects: 199, done. remote: Compressing objects: 100% (117/117), done. remote: Total 199 (delta 72), reused 162 (delta 49) Receiving objects: 100% (199/199), 30.34 KiB | 10 KiB/s, done. Resolving deltas: 100% (72/72), done.
ubuntu@chef-workstation:~$ cd /opt/chef-local/ ubuntu@chef-workstation:/opt/chef-local$ ls README.md Rakefile certificates chefignore config cookbooks data_bags environments roles
创建配置文件夹 ubuntu@chef-workstation:/opt/chef-local$ sudo mkdir -p .chef
传输pem认证文件到Workstation ubuntu@chef-workstation:/opt/chef-local$ sudo scp ubuntu@chef-server:/home/ubuntu/.chef/ chef-workstation.pem .chef/ ubuntu@chef-workstation:/opt/chef-local$ sudo scp ubuntu@chef-server:/home/ubuntu/.chef/ validation.pem .chef/
ubuntu@chef-workstation:/opt/chef-local$ ls .chef/ chef-workstation.pem validation.pem
ubuntu@chef-workstation:/opt/chef-local$ sudo knife configure
WARNING: No knife configuration file found Where should I put the config file? [/home/ubuntu/.chef/knife.rb] .chef/knife.rb Please enter the chef server URL: [http://chef-workstation:4000] http://chef-server:4000 Please enter an existing username or clientname for the API: [ubuntu] chef-workstation Please enter the validation clientname: [chef-validator] Please enter the location of the validation key: [/etc/chef/validation.pem] .chef/validation.pem Please enter the path to a chef repository (or leave blank): /opt/chef-local
You must place your client key in: /opt/chef-local/.chef/chef-workstation.pem Before running commands with Knife!
You must place your validation key in: /opt/chef-local/.chef/validation.pem Before generating instance data with Knife!
Configuration file written to /opt/chef-local/.chef/knife.rb
验证配置是否正确 ubuntu@chef-workstation:~$ sudo ntpdate chef-server
确认Knife工具能否连接到Chef Server ubuntu@chef-workstation:~$ knife client list
chef-server chef-validator chef-webui chef-workstation ubuntu
ubuntu@chef-workstation:~$ knife client show chef-validator
_rev: 1-96959e21dfdb3f232a3ce8bae835475b admin: false chef_type: client json_class: Chef::ApiClient name: chef-validator public_key: -----BEGIN RSA PUBLIC KEY----- MIIBCgKCAQEA00/AWJL5mThj+pSXEB2gMKdTdHFm0pGi2hXAoBwm4/ZlnO4p2iwI /skfZMepVm8SAkSMIhz7ZC+jN/+Kqas7es0E+iv9ei0BF4Q41Y5kKMFctuElYbPH ImRCVTcQJ6m7BPS0Tczhy87jk6QlhsDsrnhNyUEgM5XRVNO+NzqeqZ+UMOWd9k2q KTJhbtHdx7ILdjZ5SBsiIMBhBNni2D0Y34BDtddsXCn1eyTWwGZxZTRZuDDXnls+ aZaqogKoZ40d6h6ZVGh6nmmpdPDi9YdCIqFtWe5LF5bwIy7K6qBVgiOqU0x3Xek3 d1eZG/8C+4FWjAm1h856npvmMOpVip9w8QIDAQAB -----END RSA PUBLIC KEY-----
- 安装配置chef-client 编辑hosts ubuntu@chef-client-1:~$ vim /etc/hosts
127.0.0.1 localhost
10.6.1.170 chef-server 10.6.1.171 chef-workstation 10.6.1.172 chef-client-1 10.6.1.173 chef-client-2
与chef-server同步时间 ubuntu@chef-client-1:~$ sudo ntpdate chef-server
Boostrap可以用来将目标节点初始化为一个Client ubuntu@chef-workstation:~$ knife bootstrap --help
knife bootstrap FQDN (options) --bootstrap-proxy PROXY_URL The proxy server for the node being bootstrapped --bootstrap-version VERSION The version of Chef to install -N, --node-name NAME The Chef node name for your new node -s, --server-url URL Chef Server URL -k, --key KEY API Client Key --[no-]color Use colored output, defaults to enabled -c, --config CONFIG The configuration file to use --defaults Accept default values for all questions --disable-editing Do not open EDITOR, just accept the data as is -d, --distro DISTRO Bootstrap a distro using a template -e, --editor EDITOR Set the editor to use for interactive commands -E, --environment ENVIRONMENT Set the Chef environment -j JSON_ATTRIBS A JSON string to be added to the first run of chef-client --json-attributes -F, --format FORMAT Which format to use for output --hint HINT_NAME[=HINT_FILE] Specify Ohai Hint to be set on the bootstrap target. Use multiple --hint options to specify multiple hints. --[no-]host-key-verify Verify host key, enabled by default. -i IDENTITY_FILE The SSH identity file used for authentication --identity-file -u, --user USER API Client Username --prerelease Install the pre-release chef gems --print-after Show the data after a destructive operation -r, --run-list RUN_LIST Comma separated list of roles/recipes to apply -G, --ssh-gateway GATEWAY The ssh gateway -P, --ssh-password PASSWORD The ssh password -p, --ssh-port PORT The ssh port -x, --ssh-user USERNAME The ssh username --template-file TEMPLATE Full path to location of template to use --sudo Execute the bootstrap via sudo -V, --verbose More verbose output. Use twice for max verbosity -v, --version Show chef version -y, --yes Say yes to all prompts for confirmation -h, --help Show this message
下面我们对chef-client-1进行初始化 ubuntu@chef-workstation:~$ sudo knife bootstrap 10.6.1.172 -x ubuntu -P password --sudo
Bootstrapping Chef on 10.6.1.172 10.6.1.172 --2012-11-09 03:34:40-- http://opscode.com/chef/install.sh 10.6.1.172 Resolving opscode.com... 10.6.1.172 184.106.28.83 10.6.1.172 Connecting to opscode.com|184.106.28.83|:80... 10.6.1.172 connected. 10.6.1.172 HTTP request sent, awaiting response... 10.6.1.172 301 Moved Permanently 10.6.1.172 Location: http://www.opscode.com/chef/install.sh [following] 10.6.1.172 --2012-11-09 03:34:41-- http://www.opscode.com/chef/install.sh 10.6.1.172 Resolving www.opscode.com... 10.6.1.172 184.106.28.83 10.6.1.172 Reusing existing connection to opscode.com:80. 10.6.1.172 HTTP request sent, awaiting response... 10.6.1.172 200 OK 10.6.1.172 Length: 6396 (6.2K) [application/x-sh] 10.6.1.172 Saving to: `STDOUT' 10.6.1.172 0% [ ] 0 --.-K/s 10.6.1.172 Downloading Chef 10.16.2 for ubuntu... 100%![Couldn't insert /Users/mac/backup/essential/Dropbox/private_data/emacs_stuff/org_data/======================================>: (file-error Opening input file No such file or directory /Users/mac/backup/essential/Dropbox/private_data/emacs_stuff/org_data/======================================>)] 6,396 18.7K/s in 0.3s 10.6.1.172 10.6.1.172 2012-11-09 03:34:42 (18.7 KB/s) - written to stdout [6396/6396] 10.6.1.172 10.6.1.172 Installing Chef 10.16.2 10.6.1.172 Selecting previously deselected package chef. 10.6.1.172 (Reading database ... (Reading database ... 60% (Reading database ... 65% (Reading database ... 70% (Reading database ... 75% (Reading database ... 80% (Reading database ... 85% (Reading database ... 90% (Reading database ... 95% (Reading database ... 41378 files and directories currently installed.) 10.6.1.172 Unpacking chef (from .../chef_10.16.2_amd64.deb) ... 10.6.1.172 Setting up chef (10.16.2-1.ubuntu.10.04) ... 10.6.1.172 Thank you for installing Chef! 10.6.1.172 [2012-11-09T03:57:46+08:00] INFO: *** Chef 10.16.2 *** 10.6.1.172 [2012-11-09T03:57:47+08:00] INFO: Client key /etc/chef/client.pem is not present - registering 10.6.1.172 [2012-11-09T03:57:47+08:00] INFO: HTTP Request Returned 404 Not Found: Cannot load node chef-client-1 10.6.1.172 [2012-11-09T03:57:47+08:00] INFO: Setting the run_list to [] from JSON 10.6.1.172 [2012-11-09T03:57:47+08:00] INFO: Run List is [] 10.6.1.172 [2012-11-09T03:57:47+08:00] INFO: Run List expands to [] 10.6.1.172 [2012-11-09T03:57:47+08:00] INFO: HTTP Request Returned 404 Not Found: No routes match the request: /reports/nodes/chef-client-1/runs 10.6.1.172 [2012-11-09T03:57:47+08:00] INFO: Starting Chef Run for chef-client-1 10.6.1.172 [2012-11-09T03:57:47+08:00] INFO: Running start handlers 10.6.1.172 [2012-11-09T03:57:47+08:00] INFO: Start handlers complete. 10.6.1.172 [2012-11-09T03:57:48+08:00] INFO: Loading cookbooks [] 10.6.1.172 [2012-11-09T03:57:48+08:00] WARN: Node chef-client-1 has an empty run list. 10.6.1.172 [2012-11-09T03:57:48+08:00] INFO: Chef Run complete in 0.438462677 seconds 10.6.1.172 [2012-11-09T03:57:48+08:00] INFO: Running report handlers 10.6.1.172 [2012-11-09T03:57:48+08:00] INFO: Report handlers complete
验证chef-client-1是否已经注册 ubuntu@chef-workstation:~$ knife client list
chef-client-1 chef-server chef-validator chef-webui chef-workstation ubuntu
从上面可以看出chef-client-1已经成功注册到了chef-server中,整个环境 chef-workstation => chef-server => chef-client-1 已经搭建成功。
- 接着,我们可以开始以下过程 Chef集中管理工具实践之 (2) 服务器配置 Chef集中管理工具实践之 (3) 自定义配置
Chef, DevOps, 集中管理
版权所有© mcsrainbow,保留所有原创日志的权利。转载请注明出处:http://heyLinux.com 。
这篇文章发表于 2012/11/20 23:27,属于 Linux&Unix 分类。你可以通过 RSS 2.0 来跟踪这篇文章。你还可以 对它进行评论。
- Comments (6)
- Related Posts
-
[b1e625]
#1 by jerry on 2013/01/09 - 16:15
ops@debian:~/.chef$ knife configure -i Overwrite /home/ops/.chef/knife.rb? (Y/N) Y Please enter the chef server URL: [http://chef-server:4000] Please enter a clientname for the new client: [root] Please enter the existing admin clientname: [chef-webui] Please enter the location of the existing admin client's private key: [/etc/chef/webui.pem] Please enter the validation clientname: [chef-validator] Please enter the location of the validation key: [/etc/chef/validation.pem] Please enter the path to a chef repository (or leave blank): Creating initial API user... ERROR: Your private key could not be loaded from /etc/chef/webui.pem Check your configuration file and ensure that your private key is readable
博主,您好,我按照你的步骤去做,但是到这步总是有问题,无论我是用默认root账户,还是用我的ops账户 ,都不行
有什么解决方案吗?或者给我一个思路
++++++++++++++++++++++++++
********************** Resolved ERROR: Your private key could not be loaded from /home/brett/.chef/ This seems to have the wrong username for some reason
Here is the knife.rb that I am using, modify the passwords and usernames and it should work
current_dir = File.dirname(FILE) log_level :info log_location STDOUT node_name "username" client_key "#{current_dir}/username.pem" validation_client_name "organization-validator" validation_key "#{current_dir}/organization.pem" chef_server_url "https://api.opscode.com/organizations/organization" cache_type 'BasicFil cache_options( :path => "#{ENV['HOME']}/.chef/checksums" ) cookbook_path ["#{current_dir}/cookbooks"] ++++++++++++++++++++++++++++
以上是一个老外blog上的解决方法,但似乎不适用于我
回复引用
-
[b1e625]
#2 by jerry on 2013/01/09 - 16:21
我仔细看了下,我明明是ops用户,提示我的时候,默认却是root
Debian GNU/Linux 6.0 \n \l
回复引用
-
[c09990]
#3 by zhishui on 2013/07/08 - 15:24
你好,我想请教下三个装在同一台电脑上可以吗,我试了下,在chef-client-1注册的时候就有问题,还有就 是现在chef是11版的,据说跟10有挺多差别,这个适用于11版的吗,
回复引用
-
[c1dd2b]
#4 by mcsrainbow on 2013/07/10 - 11:43
基本的配置思路肯定是一致的,具体细节可能不同,有时间我测试一下11版的。目前更喜欢用的是一个 叫Saltstack的软件,和Chef类似但是更易用,用Python实现的。
回复引用
-
-
[9b9bd5]
#5 by eric on 2013/07/12 - 18:25
哥们你这教程写的有点忒..... 连一点说明都没有,很多地方随着版本和使用不同都应该或多或少有一点变化,所以看你这文档能做成功的 应该很少 希望你下次写文档时可以负责一点,要是给自己就自己收藏就好了 要是想分享,就应该写的详细和人性化一些 谢谢以上是小弟的一点建议
回复引用
-
[c1dd2b]
#6 by mcsrainbow on 2013/07/12 - 18:38
你是用的新版本么?我写文章的习惯是一遍操作一遍写,因此所有的步骤至少在我写文章的当时是没问 题的,我自己也经常拿来参考这些步骤,每次都能成功。我了解近期可能有新版的Chef,有时间我会再 测试一遍,看是不是有的步骤需要更新。
回复引用
-
取消回复 [ ] Name (required) [ ] E-Mail (required) (will not be published) [ ] Website [ ] [ ] [ ] [ ] [ ] [ ] [ ] [ ] 验证图片 刷新验证码 [ ] 验证码*
提交
发表评论
- Salt实战之自动安装部署MooseFS
- Chef集中管理工具实践之 (3) 自定义配置
- Chef集中管理工具实践之 (2) 服务器配置
- Chef集中管理工具实践之 (0) 什么是Chef
-
[Search ] Go
-
- Corporation (48)
- Database (21)
- English (7)
- Linux&Unix (168)
- Network (12)
- Programming (9)
- Thinking in Life (22)
- Uncategorized (31)
- Windows (21)
-
标签云(Tags)
Ansible Apache C CDH4 CDH5 CentOS Chef Cisco Cluster Crontab Debian DevOps DNS DOS eaccelerator Flume Hacker Hadoop HBase HDFS Hearbeat Hive Igenus iptables Java Jboss JDK Key KVM LFS LVM LVS MongoDB MooseFS Mysql NFS Nginx Oracle Percona Perl php Proxy Python Qmail RamDisk Redis RoseHA rsync Salt screen sendmail Shell Squid SSH Subversion SUSE swap Tomcat top Ubuntu VMware VNC VPN VPS Vsftp Windows XCP XEN XenServer XtraDB YouTube yum Zabbix Zend Zookeeper 东软内核分布式 监控反思回忆总结技术效率朋友架构梦爱情理想生活细节脆弱自动化虚拟化资料路由转载集中管理集群黑客 龙芯
WP Cumulus Flash tag cloud by blueandhack
-
近期评论(Recent Comments)
- Gravatar icon of jinyan2049 jinyan2049 您好,博主,你的技术blog 一直很有营养我想咨询一下,如果安装分布式hbase,我可以脱离hdfs吗 ?...
- Gravatar icon of leej leej 很荣幸和郭老师共事过!看到郭老师的问答很有感触,非常敬佩。依稀记得郭老师说过:我不仅仅是网 管!...
- Gravatar icon of 屠龙屠龙 不错啊。
- Gravatar icon of JP4017 JP4017 请问我导入证书总是出KT,但网上看到是要出KR,所以我是联不到线的,请问知不知道是什么原因?...
- Gravatar icon of shinaiqing123 shinaiqing123 SSH的连接数不是越少越安全吗,为什么要开放很多呀?我是linux菜鸟,请教一下,呵呵...
- Gravatar icon of 未完待续.. 未完待续.. 郭大师V5
- Gravatar icon of stxinu stxinu 很多都是这样的,没碰到并且没时间去了解的永远不知道,只有碰到了并解决了才知道为什么?该如何 处理,才学到了新东西。...
-
腾讯微博(Tencent Microblog)
[]郭冬微博主页
- 今天好好把Google的hosts整理了一下去除了很多用不到和过期的映射。 http://url.cn/SehW9G 各位可 以拿去用了,现在很简洁。 05月23日 17:01
- 太强大了: http://url.cn/MhMbrJ i耳目用户体验 05月09日 17:42
- Tenable Nessus 一个非常好用的商业漏洞扫描工具,可以申请HOME试用版:http://url.cn/11bDmg 04月16日 13:02
- 百度终于像Google一样提供主动推送Blog更新啦,预计我的Blog访问量会再增加哦! [160] 03月28日 11:36
-
友情链接(Blogroll)
- CrazyCen
- IT手记
- JasonZhao
- My GitHub
- TTLSA
- Wianm
- ㄨ销声匿迹
- 一阵风
- 中国SaltStack用户组
- 乡丅亻
- 南非机器猫
- 南非蚂蚁
- 周丕中
- 小蜗牛
- 张宴
- 張濤
- 昌德胜
- 杨振良
- 泡泡的博客
- 流浪の猫
- 海林
- 田逸
- 白开水
- 礼敬诸佛
- 稀饭的国度
- 绿肥
- 罗学
- 蓝色数据
- 蜗牛漫步
- 辛凯
- 运维者
- 酒剑心
- 陈沙克日志
- 静思学吧
-
文章归档(Archives)
- 2014 年五月 (3)
- 2014 年四月 (5)
- 2014 年三月 (4)
- 2014 年二月 (3)
- 2014 年一月 (5)
- 2013 年十二月 (6)
- 2013 年十一月 (6)
- 2013 年十月 (1)
- 2013 年九月 (3)
- 2013 年八月 (1)
- 2013 年七月 (1)
- 2013 年六月 (3)
- 2013 年五月 (4)
- 2013 年四月 (1)
- 2013 年三月 (2)
- 2013 年二月 (2)
- 2013 年一月 (7)
- 2012 年十二月 (3)
- 2012 年十一月 (5)
- 2012 年十月 (10)
- 2012 年九月 (10)
- 2012 年八月 (1)
- 2012 年七月 (1)
- 2012 年六月 (2)
- 2012 年五月 (1)
- 2012 年四月 (1)
- 2012 年三月 (8)
- 2012 年二月 (2)
- 2012 年一月 (2)
- 2011 年十二月 (4)
- 2011 年十一月 (4)
- 2011 年十月 (2)
- 2011 年九月 (1)
- 2011 年八月 (4)
- 2011 年七月 (5)
- 2011 年六月 (5)
- 2011 年五月 (4)
- 2011 年四月 (10)
- 2011 年三月 (1)
- 2011 年二月 (1)
- 2011 年一月 (1)
- 2010 年十二月 (1)
- 2010 年十一月 (1)
- 2010 年十月 (1)
- 2010 年九月 (2)
- 2010 年八月 (1)
- 2010 年七月 (1)
- 2010 年六月 (1)
- 2010 年五月 (2)
- 2010 年四月 (2)
- 2010 年三月 (1)
- 2010 年二月 (1)
- 2010 年一月 (2)
- 2009 年十二月 (1)
- 2009 年十一月 (1)
- 2009 年十月 (4)
- 2009 年九月 (2)
- 2009 年八月 (1)
- 2009 年七月 (1)
- 2009 年六月 (1)
- 2009 年五月 (1)
- 2009 年四月 (1)
- 2009 年三月 (1)
- 2009 年二月 (1)
- 2009 年一月 (1)
- 2008 年十二月 (1)
- 2008 年十一月 (2)
- 2008 年十月 (2)
- 2008 年九月 (2)
- 2008 年八月 (4)
- 2008 年七月 (3)
- 2008 年六月 (4)
- 2008 年五月 (2)
- 2008 年四月 (4)
- 2008 年三月 (5)
- 2008 年二月 (8)
- 2008 年一月 (9)
- 2007 年十二月 (17)
- 2007 年十一月 (5)
- 2007 年十月 (6)
- 2007 年九月 (1)
- 2007 年八月 (1)
- 2007 年七月 (1)
- 2007 年六月 (1)
- 2007 年五月 (2)
- 2007 年四月 (2)
- 2007 年三月 (9)
- 2007 年二月 (1)
- 2007 年一月 (9)
-
功能(Meta)
- 登录
- 文章 RSS
- 评论 RSS
- WordPress.org
-
垃圾评论过滤(Spam Blocked)
7,909,853 spam blocked by Akismet
-
网站安全监测(Webscan)
[0c0a0cf42f]
-
Google +1 (Plusone Button)
-
广告(Google Adsense)
本博客运行在 AWS EC2 日本机房的 VPS服务器上(型号t1.micro)。 域名提供商为GoDaddy,域名解析由DNSPod提供。 版权所有©mcsrainbow,保留所有原创日志的权利。转载请注明出处:http://heylinux.com 。
Fusion theme by digitalnature | powered by WordPress Entries (RSS) and Comments (RSS) ^
SetTextSize SetPageWidth
#+end_example *** web page: About Resources and Providers — Chef Docs http://docs.opscode.com/resource.html **** webcontent :noexport: #+begin_example Location: http://docs.opscode.com/resource.html Chef
Navigation
- next
- previous |
- Resources•
- Knife•
- Recipe DSL•
- Learn Chef•
- Search the Docs•
- Home »
Table Of Contents
- About Resources and Providers
- Resources Syntax
- Common Functionality
- Resources
About Resources and Providers¶
Note
If you want to see all of the information about resources in a single document, see: http:// docs.opscode.com/chef/resources.html. Keep reading this page for topics about individual resources.
A resource defines the desired state for a single configuration item present on a node that is under management by Chef. A resource collection—one (or more) individual resources—defines the desired state for the entire node. During every chef-client run, the current state of each resource is tested, after which the chef-client will take any steps that are necessary to repair the node and bring it back into the desired state.
For example, a resource can define a package to be installed, whether a service should be enabled, restarted, or both, which groups, users, or groups of users should be created, the location in which a file should be created, the template that is used to create that file, the name of a directory, and so on.
Where a resource represents a piece of the system (and its desired state), a provider defines the steps that are needed to bring that piece of the system from its current state into the desired state. These steps are de-coupled from the request itself. The request is made in a recipe and is defined by a lightweight resource. The steps are then defined by a lightweight provider.
The Chef::Platform class maps providers to platforms (and platform versions). Ohai, as part of every chef-client run, verifies the platform and platform_version attributes on each node. The chef-client then uses those values to identify the correct provider, build an instance of that provider, identify the current state of the resource, do the specified action, and then mark the resource as updated (if changes were made). For example, given the following resource:
directory "/tmp/folder" do owner "root" group "root" mode 0755 action :create end
The chef-client will look up the provider for the directory resource, which happens to be Chef::Provider::Directory, call load_current_resource to create a new resource called directory["/ tmp/folder"], and then, based on the current state of the directory, do the specified action, which in this case is to create a directory called /tmp/folder. If the directory already exists, nothing will happen. If the directory was changed in any way, the resource is marked as updated.
Resources Syntax¶
A resource is a Ruby block with four components: a type, a name, one (or more) attributes (with values), and one (or more) actions. The syntax for a resource is like this:
type "name" do attribute "value" action :type_of_action end
Every resource has its own set of actions and attributes. Most attributes have default values. Some attributes are available to all resources, for example those used to send notifications to other resources and guards that help ensure that some resources are idempotent.
For example, a resource that is used to install a tar.gz package for version 1.16.1 may look something like this:
package "tar" do version "1.16.1" action :install end
All actions have a default value. Only non-default behaviors of actions and attributes need to be specified. For example, the package resource’s default action is :install and the name of the package defaults to the "name" of the resource. Therefore, it is possible to write a resource block that installs the latest tar.gz package like this:
package "tar"
and a resource block that installs a tar.gz package for version 1.6.1 like this:
package "tar" do version "1.16.1" end
In both cases, the chef-client will use the default action (:install) to install the tar package.
Common Functionality¶
All resources share a set of common actions, attributes, conditional executions, notifications, and relative path options.
+-------------------------------------------------------------------------------------------------+ | Common Item | Description | |---------------------+---------------------------------------------------------------------------| |Actions |The :nothing action can be used with any resource or lightweight resource. | |---------------------+---------------------------------------------------------------------------| |Attributes |The ignore_failure, provider, retries, retry_delay, and supports attributes| | |can be used with any resource or lightweight resources. | |---------------------+---------------------------------------------------------------------------| | |The not_if and only_if conditional executions can be used to put additional| |Guards |guards around certain resources so that they are only run when the | | |condition is met. | |---------------------+---------------------------------------------------------------------------| |Guard Interpreters |Evaluate a string command using a script-based resource: bash, csh, perl, | | |powershell_script, python, or ruby. | |---------------------+---------------------------------------------------------------------------| |Notifications |The notifies and subscribes notifications can be used with any resource. | |---------------------+---------------------------------------------------------------------------| |Relative Paths |The #{ENV['HOME']} relative path can be used with any resource. | |---------------------+---------------------------------------------------------------------------| | |The template, file, remote_file, cookbook_file, directory, and | |Windows File Security|remote_directory resources support the use of inheritance and access | | |control lists (ACLs) within recipes. | |---------------------+---------------------------------------------------------------------------| |Run a Resource during|Sometimes a resource needs to be run before every other resource or after | |Resource Compilation |all resources have been added to the resource collection. | +-------------------------------------------------------------------------------------------------+
Resources¶
The following resources are “platform resources” (i.e. “resources that are built into the chef-client”):
+-------------------------------------------------------------------------------------------------+ | Resource | Description | |--------------------+----------------------------------------------------------------------------| |apt_package |Use the apt_package resource to manage packages for the Debian and Ubuntu | | |platforms. | |--------------------+----------------------------------------------------------------------------| | |The bash resource is used to execute scripts using the Bash interpreter. | | |This resource may also use any of the actions and attributes that are | | |available to the execute resource. Commands that are executed with this | | |resource are (by their nature) not idempotent, as they are typically unique | | |to the environment in which they are run. Use not_if and only_if to guard | | |this resource for idempotence. | |bash | | | |Note | | | | | |The bash script resource (which is based on the script resource) is | | |different from the ruby_block resource because Ruby code that is run with | | |this resource is created as a temporary file and executed like other script | | |resources, rather than run inline. | |--------------------+----------------------------------------------------------------------------| | |Use the batch resource to execute a batch script using the cmd.exe | | |interpreter. The batch resource creates and executes a temporary file | | |(similar to how the script resource behaves), rather than running the | | |command inline. This resource inherits actions (:run and :nothing) and | |batch |attributes (creates, cwd, environment, group, path, timeout, and user) from | | |the execute resource. Commands that are executed with this resource are (by | | |their nature) not idempotent, as they are typically unique to the | | |environment in which they are run. Use not_if and only_if to guard this | | |resource for idempotence. | |--------------------+----------------------------------------------------------------------------| | |Use the breakpoint resource to add breakpoints to recipes. Run the | | |chef-client in chef-shell mode, and then use those breakpoints to debug | | |recipes. Breakpoints are ignored by the chef-client during an actual | |breakpoint |chef-client run. That said, breakpoints are typically used to debug recipes | | |only when running them in a non-production environment, after which they are| | |removed from those recipes before the parent cookbook is uploaded to the | | |Chef server. | |--------------------+----------------------------------------------------------------------------| | |Use the chef_gem resource to install a gem only for the instance of Ruby | | |that is dedicated to the chef-client. When a package is installed from a | | |local file, it must be added to the node using the remote_file or | | |cookbook_file resources. | | | | | |The chef_gem resource works with all of the same attributes and options as | | |the gem_package resource, but does not accept the gem_binary attribute | |chef_gem |because it always uses the CurrentGemEnvironment under which the chef-client| | |is running. In addition to performing actions similar to the gem_package | | |resource, the chef_gem resource does the following: | | | | | | * Runs its actions immediately, before convergence, allowing a gem to be | | | used in a recipe immediately after it is installed | | | * Runs Gem.clear_paths after the action, ensuring that gem is aware of | | | changes so that it can be required immediately after it is installed | |--------------------+----------------------------------------------------------------------------| | |Use the cookbook_file resource to transfer files from a sub-directory of | | |COOKBOOK_NAME/files/ to a specified path located on a host that is running | | |the chef-client or chef-solo. The file is selected according to file | |cookbook_file |specificity, which allows different source files to be used based on the | | |hostname, host platform (operating system, distro, or as appropriate), or | | |platform version. Files that are located in the COOKBOOK_NAME/files/default | | |sub-directory may be used on any platform. | |--------------------+----------------------------------------------------------------------------| | |Use the cron resource to manage cron entries for time-based job scheduling. | | |Attributes for a schedule will default to * if not provided. The cron | | |resource requires access to a crontab program, typically cron. | | | | |cron |Warning | | | | | |The cron resource should only be used to modify an entry in a crontab file. | | |Use the cookbook_file or template resources to add a crontab file to the | | |cron.d directory. The cron_d lightweight resource (found in the cron | | |cookbook) is another option for managing crontab files. | |--------------------+----------------------------------------------------------------------------| | |The csh resource is used to execute scripts using the csh interpreter. This | | |resource may also use any of the actions and attributes that are available | | |to the execute resource. Commands that are executed with this resource are | | |(by their nature) not idempotent, as they are typically unique to the | | |environment in which they are run. Use not_if and only_if to guard this | | |resource for idempotence. | |csh | | | |Note | | | | | |The csh script resource (which is based on the script resource) is different| | |from the ruby_block resource because Ruby code that is run with this | | |resource is created as a temporary file and executed like other script | | |resources, rather than run inline. | |--------------------+----------------------------------------------------------------------------| | |Use the deploy resource to manage and control deployments. This is a popular| |deploy |resource, but is also complex, having the most attributes, multiple | | |providers, the added complexity of callbacks, plus four attributes that | | |support layout modifications from within a recipe. | |--------------------+----------------------------------------------------------------------------| | |Use the directory resource to manage a directory, which is a hierarchy of | | |folders that comprises all of the information stored on a computer. The root| |directory |directory is the top-level, under which the rest of the directory is | | |organized. The directory resource uses the name attribute to specify the | | |path to a location in a directory. Typically, permission to access that | | |location in the directory is required. | |--------------------+----------------------------------------------------------------------------| | |Use the dpkg_package resource to manage packages for the dpkg platform. When| |dpkg_package |a package is installed from a local file, it must be added to the node using| | |the remote_file or cookbook_file resources. | |--------------------+----------------------------------------------------------------------------| |easy_install_package|Use the easy_install_package resource to manage packages for the Python | | |platform. | |--------------------+----------------------------------------------------------------------------| | |Use the env resource to manage environment keys in Microsoft Windows. After | |env |an environment key is set, Microsoft Windows must be restarted before the | | |environment key will be available to the Task Scheduler. | |--------------------+----------------------------------------------------------------------------| | |Use the erl_call resource to connect to a node located within a distributed | | |Erlang system. Commands that are executed with this resource are (by their | |erl_call |nature) not idempotent, as they are typically unique to the environment in | | |which they are run. Use not_if and only_if to guard this resource for | | |idempotence. | |--------------------+----------------------------------------------------------------------------| | |Use the execute resource to execute a command. Commands that are executed | |execute |with this resource are (by their nature) not idempotent, as they are | | |typically unique to the environment in which they are run. Use not_if and | | |only_if to guard this resource for idempotence. | |--------------------+----------------------------------------------------------------------------| |file |Use the file resource to manage files that are present on a node, including | | |setting or updating the contents of those files. | |--------------------+----------------------------------------------------------------------------| |freebsd_package |Use the freebsd_package resource to manage packages for the FreeBSD | | |platform. | |--------------------+----------------------------------------------------------------------------| | |Use the gem_package resource to manage gem packages that are only included | |gem_package |in recipes. When a package is installed from a local file, it must be added | | |to the node using the remote_file or cookbook_file resources. | |--------------------+----------------------------------------------------------------------------| | |Use the git resource to manage source control resources that exist in a git | |git |repository. git version 1.6.5 (or higher) is required to use all of the | | |functionality in the git resource. | |--------------------+----------------------------------------------------------------------------| |group |Use the group resource to manage a local group. | |--------------------+----------------------------------------------------------------------------| | |Use the http_request resource to send an HTTP request (GET, PUT, POST, | |http_request |DELETE, HEAD, or OPTIONS) with an arbitrary message. This resource is often | | |useful when custom callbacks are necessary. | |--------------------+----------------------------------------------------------------------------| |ifconfig |Use the ifconfig resource to manage interfaces. | |--------------------+----------------------------------------------------------------------------| |ips_package |Use the ips_package resource to manage packages (using Image Packaging | | |System (IPS)) on the Solaris 11 platform. | |--------------------+----------------------------------------------------------------------------| |link |Use the link resource to create symbolic or hard links. | |--------------------+----------------------------------------------------------------------------| |log |Use the log resource to to create log entries from a recipe. | |--------------------+----------------------------------------------------------------------------| |macports_package |Use the macports_package resource to manage packages for the Mac OS X | | |platform. | |--------------------+----------------------------------------------------------------------------| | |Use the mdadm resource to manage RAID devices in a Linux environment using | | |the mdadm utility. The mdadm provider will create and assemble an array, but| |mdadm |it will not create the config file that is used to persist the array upon | | |reboot. If the config file is required, it must be done by specifying a | | |template with the correct array layout, and then by using the mount provider| | |to create a file systems table (fstab) entry. | |--------------------+----------------------------------------------------------------------------| |mount |Use the mount resource to manage a mounted file system. | |--------------------+----------------------------------------------------------------------------| | |Use the ohai resource to reload the Ohai configuration on a node. This | |ohai |allows recipes that change system attributes (like a recipe that adds a | | |user) to refer to those attributes later on during the chef-client run. | |--------------------+----------------------------------------------------------------------------| | |Use the package resource to manage packages. When the package is installed | |package |from a local file (such as with RubyGems, dpkg, or RPM Package Manager), the| | |file must be added to the node using the remote_file or cookbook_file | | |resources. | |--------------------+----------------------------------------------------------------------------| |pacman_package |Use the pacman_package resource to manage packages (using pacman) on the | | |Arch Linux platform. | |--------------------+----------------------------------------------------------------------------| | |The perl resource is used to execute scripts using the Perl interpreter. | | |This resource may also use any of the actions and attributes that are | | |available to the execute resource. Commands that are executed with this | | |resource are (by their nature) not idempotent, as they are typically unique | | |to the environment in which they are run. Use not_if and only_if to guard | | |this resource for idempotence. | |perl | | | |Note | | | | | |The perl script resource (which is based on the script resource) is | | |different from the ruby_block resource because Ruby code that is run with | | |this resource is created as a temporary file and executed like other script | | |resources, rather than run inline. | |--------------------+----------------------------------------------------------------------------| |portage_package |Use the portage_package resource to manage packages for the Gentoo platform.| |--------------------+----------------------------------------------------------------------------| | |Use the powershell_script resource to execute a script using the Windows | | |PowerShell interpreter, much like how the script and script-based resources—| | |bash, csh, perl, python, and ruby—are used. The powershell_script is | | |specific to the Microsoft Windows platform and the Windows PowerShell | | |interpreter. This resource creates and executes a temporary file (similar to| |powershell_script |how the script resource behaves), rather than running the command inline. | | |This resource includes actions (:run and :nothing; ) and attributes (creates| | |, cwd, environment, group, path, timeout, and user) that are inherited from | | |the execute resource. Commands that are executed with this resource are (by | | |their nature) not idempotent, as they are typically unique to the | | |environment in which they are run. Use not_if and only_if to guard this | | |resource for idempotence. | |--------------------+----------------------------------------------------------------------------| | |The python resource is used to execute scripts using the Python interpreter.| | |This resource may also use any of the actions and attributes that are | | |available to the execute resource. Commands that are executed with this | | |resource are (by their nature) not idempotent, as they are typically unique | | |to the environment in which they are run. Use not_if and only_if to guard | | |this resource for idempotence. | |python | | | |Note | | | | | |The python script resource (which is based on the script resource) is | | |different from the ruby_block resource because Ruby code that is run with | | |this resource is created as a temporary file and executed like other script | | |resources, rather than run inline. | |--------------------+----------------------------------------------------------------------------| | |Use the registry_key resource to create and delete registry keys in | | |Microsoft Windows. | | | | | |64-bit versions of Microsoft Windows have a 32-bit compatibility layer in | | |the registry that reflects and redirects certain keys (and their sub-keys) | |registry_key |into specific locations. By default, the registry functionality will default| | |to the machine architecture of the system that is being configured. The | | |chef-client can access any reflected or redirected registry key. The | | |chef-client can write to any 64-bit registry location. (This behavior is not| | |affected by the chef-client running as a 32-bit application.) For more | | |information, see: http://msdn.microsoft.com/en-us/library/windows/desktop/ | | |aa384235(v=vs.85).aspx. | |--------------------+----------------------------------------------------------------------------| | |Use the remote_directory resource to incrementally transfer a directory from| |remote_directory |a cookbook to a node. The directory that is copied from the cookbook should | | |be located under COOKBOOK_NAME/files/default/REMOTE_DIRECTORY. The | | |remote_directory resource will obey file specificity. | |--------------------+----------------------------------------------------------------------------| |remote_file |Use the remote_file resource to transfer a file from a remote location using| | |file specificity. This resource is similar to the file resource. | |--------------------+----------------------------------------------------------------------------| |route |Use the route resource to manage the system routing table in a Linux | | |environment. | |--------------------+----------------------------------------------------------------------------| |rpm_package |Use the rpm_package resource to manage packages for the RPM Package Manager | | |platform. | |--------------------+----------------------------------------------------------------------------| | |Use the ruby resource to execute scripts using the Ruby interpreter. This | | |resource may also use any of the actions and attributes that are available | | |to the execute resource. Commands that are executed with this resource are | | |(by their nature) not idempotent, as they are typically unique to the | | |environment in which they are run. Use not_if and only_if to guard this | | |resource for idempotence. | |ruby | | | |Note | | | | | |The ruby script resource (which is based on the script resource) is | | |different from the ruby_block resource because Ruby code that is run with | | |this resource is created as a temporary file and executed like other script | | |resources, rather than run inline. | |--------------------+----------------------------------------------------------------------------| | |Use the ruby_block resource to execute Ruby code during a chef-client run. | |ruby_block |Ruby code in the ruby_block resource is evaluated with other resources | | |during convergence, whereas Ruby code outside of a ruby_block resource is | | |evaluated before other resources, as the recipe is compiled. | |--------------------+----------------------------------------------------------------------------| | |Use the script resource to execute scripts using a specified interpreter | | |(Bash, csh, Perl, Python, or Ruby). This resource may also use any of the | | |actions and attributes that are available to the execute resource. Commands | | |that are executed with this resource are (by their nature) not idempotent, | | |as they are typically unique to the environment in which they are run. Use | |script |not_if and only_if to guard this resource for idempotence. | | | | | |Note | | | | | |The script resource is different from the ruby_block resource because Ruby | | |code that is run with this resource is created as a temporary file and | | |executed like other script resources, rather than run inline. | |--------------------+----------------------------------------------------------------------------| |service |Use the service resource to manage a service. | |--------------------+----------------------------------------------------------------------------| |smart_o_s_package |Use the smartos_package resource to manage packages for the SmartOS | | |platform. | |--------------------+----------------------------------------------------------------------------| |solaris_package |The solaris_package resource is used to manage packages for the Solaris | | |platform. | |--------------------+----------------------------------------------------------------------------| |subversion |Use the subversion resource to manage source control resources that exist in| | |a Subversion repository. | |--------------------+----------------------------------------------------------------------------| | |Use the template resource to manage the contents of a file using an Embedded| |template |Ruby (ERB) template. This resource includes actions and attributes from the | | |file resource. Template files managed by the template resource follow the | | |same file specificity rules as the remote_file and file resources. | |--------------------+----------------------------------------------------------------------------| | |Use the user resource to add users, update existing users, remove users, and| | |to lock/unlock user passwords. | | | | | |Note | | | | | |System attributes are collected by Ohai at the start of every chef-client | |user |run. By design, the actions available to the user resource are processed | | |after the start of the chef-client run. This means that attributes added or | | |modified by the user resource during the chef-client run must be reloaded | | |before they can be available to the chef-client. These attributes can be | | |reloaded in two ways: by picking up the values at the start of the (next) | | |chef-client run or by using the ohai resource to reload these attributes | | |during the current chef-client run. | |--------------------+----------------------------------------------------------------------------| | |Use the windows_package resource to manage Microsoft Installer Package (MSI)| | |packages for the Microsoft Windows platform. | | | | | |Note | |windows_package | | | |This resource effectively replaces the windows_package resource found in the| | |windows cookbook by moving that functionality into the chef-client. The | | |windows cookbook may still be used, but in that situation use the generic | | |package resource instead of the windows_package resource. | |--------------------+----------------------------------------------------------------------------| | |Use the yum_package resource to install, upgrade, and remove packages with | | |yum for the Red Hat and CentOS platforms. The yum_package resource is able | |yum_package |to resolve provides data for packages much like yum can do when it is run | | |from the command line. This allows a variety of options for installing | | |packages, like minimum versions, virtual provides, and library names. | +-------------------------------------------------------------------------------------------------+
In addition, the chef_handler resource is configured and run using the chef_handler cookbook, which is the location in which custom handlers are defined and maintained. Despite being defined in a cookbook (and as a “lightweight resource”), the chef_handler resource should otherwise be considered a “platform resource”.
Navigation
- next
- previous |
- Resources•
- Knife•
- Recipe DSL•
- Learn Chef•
- Search the Docs•
- Home »
Documentation for current versions of Enterprise Chef and Open Source Chef. Send feedback to [email protected]. This work is licensed under a Creative Commons Attribution 3.0 Unported License.
#+end_example *** web page: CentOS 6.3下CHEF环境部署 - 一路向北 - 51CTO技术博客 http://showerlee.blog.51cto.com/2047005/1408467 **** webcontent :noexport: #+begin_example Location: http://showerlee.blog.51cto.com/2047005/1408467 [head_blog_]51CTO首页#51CTO博客#我的博客# 搜索每日博报 #社区:学院论坛博客下载更多[nav_ico1]
- 家园
- 学院
- 博客
- 论坛
- 下载
- 自测
- 门诊
- 周刊
- 读书
- 技术圈
[blogLogo01]
一路向北
http://showerlee.blog.51cto.com 【复制】 【订阅】 原创:113翻译:0转载:64 博客|图库|写博文|帮助
- 首页|
- LINUX|
- WINDOWS|
- SHELL|
- PYTHON|
- PHP|
- RUBY|
- ORACLE|
- MYSQL|
- MAIL|
- APACHE|
- NGINX|
- RSYNC|
- ZABBIX|
- PUPPET|
- PANABIT|
- VPN|
- 虚拟化|
- 安全|
- 监控|
- 负载均衡高可用
showerlee 的BLOG
写留言去学院学习发消息加友情链接进家园加好友
2012年度IT博客大赛 十大杰出IT博客诞生
[blog_m]
博客统计信息
51CTO推荐博客 用户名:showerlee 文章数:179 评论数:126 访问量:134433 无忧币:5662 博客积分:2850 博客等级:7 注册日期:2010-08-23
热门专题
更多>> [wKiom1]
微软公有云学习系列 阅读量:1930
[wKiom1]
揭秘DB2的备份与恢复 阅读量:2967
[wKioL1]
Exchange Server 2013 服务器配置详解 阅读量:828
[wKioL1]
从零开始学高德地图JS API 阅读量:937
热门文章
- CENTOS6.3下zabbix安装部署
- LAMP 全功能编译安装 for..
- Centos6.3下利用rsyslog+..
- Centos6.3下利用openvpn..
- Centos6.3下apache+svn部..
- LINUX家族神器-Gentoo安..
- Centos6.3下rsync+sersyn..
- Centos6.3下利用changepa..
搜索BLOG文章
[ ] 搜 索
最近访客
-
[avatar]
dong5..
-
[avatar]
學飛的鳥
-
[avatar]
自由..
-
[avatar]
zf_tec
-
[avatar]
vbbb625
-
[avatar]
chenm..
-
[avatar]
双鱼..
-
[avatar]
北极火狐
-
[avatar]
johnn..
-
[avatar]
fish_..
-
[avatar]
zyp0209
-
[avatar]
米格29
最新评论
- lspgyy:你好,按照你的配置。 &nbs..
- stevenlee87:回复 stevenlee87: 我自己解决了..
- stevenlee87:博主你好!我在执行drbdadm crea..
- stevenlee87:楼主你好!请问 heartbeat drbd nfs..
- okhwyy:写的很不错,赞一个!
51CTO推荐博文
更多>>
- 内容类型(ContentType)与文件扩..
- SQL Server 在虚拟化中的授权
- 【高德地图API】从零开始学高德JS..
- AIX环境文件系统迁移到ASM存储
- jasypt命令行工具的使用说明
- c#中数组类型存放位置
- Drupal7主题初步设置篇-Ubuntu 14..
- Iptables实用脚本工具
- 从 apache duutils 所学到的
- 【Apache Shiro】Non-Spring web ..
- Nagios插件开发之监控服务器负载
友情链接
- 简单、简洁
- HWOTT
- 游造技术博客
- Chris—on the way
- IT辰逸
- 实践检验真理
- 雷纳科斯的博客
- ->
- 邓俊阳的Blog
- 上帝,咱们不见不散!本周内更新
- 老徐的私房菜
- 抚琴煮酒
- Ro の博客
- PHPer活到老学到老
- Ty_WangPanPan
- 一壶浊酒
- 奋斗的小鸟
- 老男孩linux运维本日内更新
- 韩立刚
- 马哥教育
- 烟雨楼台
- 运维工作奋斗
- 王乾De技术Blog[爱..
- 滴水穿石三日内更新
- 技术收藏
- 自强不息
- 生命不止,战斗不息!
- 刘园的博客
- 代光的博客
- linux
- 技术成就梦想
- 在晴朗的天空下
的视频课程
相关视频课程更多 [wKioJlMv5]
Shell运维自动化高级实战老男孩2014linux精品 34703人学习
[wKioL1NUh]
iOS开发视频教程-iOS网络编程【高级篇】(共39课时) 1293人学习
[wKioJlKO-]
Android开发从零到实战视频教程(共100课时) 12000人学习
博主的更多文章>>
[artType01] CentOS 6.3下CHEF环境部署
2014-05-08 16:26:11 标签:CHEF 原创作品,允许转载,转载时请务必以超链接形式标明文章原始出处、作者信息和本声明。否则将追究法律责任 。http://showerlee.blog.51cto.com/2047005/1408467
一.前言:
初识Chef,我们可以先了解一下DevOps运动 http://zh.wikipedia.org/wiki/DevOps,简单点说,就是传统的软 件组织将开发、IT运营和质量保障设为各自分离的部门,而DevOps运动的出现是由于软件行业日益清晰地认识到 :为了按时交付软件产品和服务,开发和运营工作必须紧密合作。 所以Chef简单点说,就是DevOps运动中的一项重要工具成员,是一个同时面向开发与运维的集中管理工具。
就服务器的集中管理工具而言,知名度与Chef平分天下的是叫“Puppet”的工具,它们是OSS知名度排名最前的2个
想像一下我们现在需要搭建一台MySQL Database Slave服务器,安装过程我们手动操作了没过多久,又需要第二 台,这时候我们会想,如果之后安装第一台的时候把操作过程执行的命令写成脚本,现在安装第二台,运行一下 脚本就行了,节约时间而且不容易出错。
Chef就相当于这样的一个脚本管理工具,但功能要强大得多,可定制性强,Chef将脚本命令代码化,定制时只需 要修改代码,安装的过程就是执行代码的过程。 打个比方,Chef就像一个制作玩具的工厂,它可以把一些原材料做成漂亮的玩具,它有一些模板,你把原材料放 进去,选择一个模板(比如怪物史莱克),它就会制造出这个玩具,服务器的配置也是这样,一台还没有配置的服 务器,你给它指定一个模板(role或recipe), Chef就会把它配置成你想要的线上服务器。
Chef使用服务器—客户端模式管理所有需要配置的机器,使用Chef涉及至少三台机器: 一台开发机器(Workstation),在上面编写大餐的做法; 一台Chef服务器(server),管理所有要配置的Chef客户端,给它们下发配置信息; 多台Chef客户端(Node),就是我将要烹调出的大餐。
操作系统:CentOS-6.3-x86-64 CHEF: chef-server-11.0.12-1.el6.x86_64
Server : 10.107.91.251 (chef.example.com) Workstation: 10.107.91.251 (chef.example.com) node: 10.107.91.252 (node1.example.com)
二.安装前的准备:(chef.example.com,node1.example.com) 1.关闭iptables
service iptables stop
2.关闭SELINUX
setenforce 0
vi /etc/sysconfig/selinux
SELINUX=disabled
3.同步时间(重要)
ntpdate asia.pool.ntp.org
hwclock -w
4.安装ruby环境: 详见: http://showerlee.blog.51cto.com/2047005/1393485
三.chef-server安装:(chef.example.com)
1.下载chef-server安装包 进入页面http://www.opscode.com/chef/install,点击Chef Server标签,选择要下载的版本 或在终端下用以下命令下载11.0.12版本:
wget -c --no-check-certificate https://opscode-omnibus-packages.s3.amazonaws.com/el/6/x86_64/
chef-server-11.0.12-1.el6.x86_64.rpm
2.安装chef-server 终端内进入chef-server软件包所在目录,执行以下命令:
rpm -ivh chef-server-11.0.12-1.el6.x86_64.rpm
注:请使用下载的软件包名称替换上面命令中的软件包名称.
3.修改本地FQDN名: 1).首先修改主机的hostname
vi /etc/sysconfig/network
———————-———————-———————-———————- HOSTNAME=chef.example.com ———————-———————-———————-———————-
2).修改本地host,添加server与node的FNDN
echo "10.107.91.251 chef.example.com" >> /etc/hosts
echo "10.107.91.252 node1.example.com" >> /etc/hosts
重启系统. 登录后验证:
hostname -f
———————-———————-———————-———————- chef.example.com ———————-———————-———————-———————-
3.配置chef-server 执行以下命令配置chef-server
chef-server-ctl reconfigure
注:chef-server 10.x版本默认监听4000端口,chef-server 11.x监听443端口 SO若线上开启防火墙,需执行以下命令防火墙开启443端口
iptables -I INPUT -p tcp --dport 443 -j ACCEPT
service iptables save
现在浏览器打开https://10.107.91.251 输入: username: admin password: p@ssw0rd1 即可访问chef-server web页面.
四.chef-workstation安装:(chef.example.com) 1.安装chef-Client 进入页面http://www.opscode.com/chef/install,点击Chef Client标签,选择要下载的版本. 本例使用11.12.4-1版本:
wget -c --no-check-certificate https://opscode-omnibus-packages.s3.amazonaws.com/el/6/x86_64/
chef-11.12.4-1.el6.x86_64.rpm
rpm -ivh chef-11.12.4-1.el6.x86_64.rpm
2.安装配置git 1).yum安装git:
yum -y install git
2).进入root主目录,git克隆chef repository
su -
cd ~
git clone git://github.com/opscode/chef-repo.git
———————————————————————————————————————————————————————————— Initialized empty Git repository in /root/chef-repo/.git/ remote: Reusing existing pack: 223, done. remote: Total 223 (delta 0), reused 0 (delta 0) Receiving objects: 100% (223/223), 45.77 KiB | 37 KiB/s, done. Resolving deltas: 100% (57/57), done. ————————————————————————————————————————————————————————————
2.配置chef-workstation 运行命令 knife configure -i ,配置过程如下所示(只需填写chef repository一项:/root/chef-repo,其他项使 用默认值):
knife configure --initial
———————————————————————————————————————————————————————————— WARNING: No knife configuration file found Where should I put the config file? [/root/.chef/knife.rb] Please enter the chef server URL: [https://chef.example.com:443] Please enter a name for the new user: [root] Please enter the existing admin name: [admin] Please enter the location of the existing admin's private key: [/etc/chef-server/admin.pem] Please enter the validation clientname: [chef-validator] Please enter the location of the validation key: [/etc/chef-server/chef-validator.pem] Please enter the path to a chef repository (or leave blank): /root/chef-repo Creating initial API user... Please enter a password for the new user: 123456
注:这里输入API user密码(后面要使用)
Created user[root] Configuration file written to /root/.chef/knife.rb ———————————————————————————————————————————————————————————— 注: 没有出现Please enter a name for the new user: [root] 检查chef-server的443端口是否可以访问.
五.chef-workstation与chef-server不在同一服务器上的配置方法
(本例server与workstation在同一服务器,如无特殊需可略过这部分)
1.将chef-server的域名解析添加至chef-workstation的hosts文件
echo "10.107.91.251 chef.example.com" >>/etc/hosts
2.在chef-workstation先创建/root/.chef目录,并将chef服务器上的/etc/chef-server/admin.pem和/etc/ chef-server/chef-validator.pem文件拷贝到此目录
mkdir ~/.chef
scp chef.example.com:/etc/chef-server/admin.pem ~/.chef
scp chef.example.com:/etc/chef-server/chef-validator.pem ~/.chef
3.执行knife configure -i命令进行初始化, 然后删除~/.chef/admin.pem
knife configure --initial
rm ~/.chef/admin.pem
4.knife configure配置过程: 1.server URL修改为chef服务器的地址https://chef.example.com:443, 2.admin's private key路径改为/root/.chef/admin.pem 3.validation key路径改为/root/.chef/chef-validation.pem 4.chef repository地址输入/root/chef-repo,其余项保持默认值.
knife configure --initial
———————————————————————————————————————————————————————————— Overwrite /root/.chef/knife.rb? (Y/N) Y Please enter the chef server URL: [https://workstation:443] https://chef.example.com:443 Please enter a name for the new user: [root] Please enter the existing admin name: [admin] Please enter the location of the existing admin's private key: [/etc/chef-server/admin.pem] /root /.chef/admin.pem Please enter the validation clientname: [chef-validator] Please enter the location of the validation key: [/etc/chef-server/chef-validator.pem] /root/.chef/ chef-validator.pem Please enter the path to a chef repository (or leave blank): /root/chef-repo Creating initial API user... Please enter a password for the new user: 123456 注:这里输入API user密码(后面要使用) Created user[root] Configuration file written to /root/.chef/knife.rb ————————————————————————————————————————————————————————————
5.配置ruby路径(之前已安装RUBY,这里可以略过) chef默认集成了一个ruby的稳定版本,需修改PATH变量,保证chef集成的ruby被优先使用.
echo 'export PATH="/opt/chef/embedded/bin:$PATH"' >> ~/.bash_profile && source ~/.bash_profile
六.验证chef-workstation 执行knife client list命令返回client列表则配置成功.
knife client list
—————————————————— chef-validator chef-webui ——————————————————
七.chef-node配置 (node1.example.com)
node即为被chef-server配置管理的服务器
1.安装chef-Client 进入页面http://www.opscode.com/chef/install,点击Chef Client标签,选择要下载的版本. 本例使用11.12.4-1版本:
wget -c --no-check-certificate https://opscode-omnibus-packages.s3.amazonaws.com/el/6/x86_64/
chef-11.12.4-1.el6.x86_64.rpm
rpm -ivh chef-11.12.4-1.el6.x86_64.rpm
2.修改本地FQDN名:
1).首先修改主机的hostname
vi /etc/sysconfig/network
———————-———————-———————-———————- HOSTNAME=node1.example.com ———————-———————-———————-———————-
2).修改本地host,添加本机和server的FNDN
echo "10.107.91.251 chef.example.com" >> /etc/hosts
echo "10.107.91.252 node1.example.com" >> /etc/hosts
重启系统. 登录后验证:
hostname -f
———————-———————-———————-———————- node1.example.com ———————-———————-———————-———————-
3.在chef-worksation执行下面命令添加并配置node
knife bootstrap node1.example.com -x root -P 123456
注: 这里的密码是node1系统root账号的密码 chef-workstation通过ssh连接到node1(10.107.91.252)上执行bootstrap脚本(chef-workstation /opt/chef/ embedded/lib/ruby/gems/1.9.1/gems/chef-11.6.0/lib/chef/knife/bootstrap/chef-full.erb)可以使用自定义 的bootstrap脚本对node进行初始化配置.
node1会下载https://www.opscode.com/chef/install.sh脚本. 脚本检查操作系统类型并在网络上下载符合此系
统的chef版本进行安装(下载安装较慢). 可以在node上预先安装chef(见workstation安装chef部分)跳过此脚本.
———————-———————-———————-———————-—-———————-—-———————-
Connecting to node1.example.com
node1.example.com Starting first Chef Client run...
node1.example.com [2014-05-08T15:53:22+08:00] WARN:
node1.example.com * * * * * * * * * * * * * * * * * * * * * * * * * * * * * * * * * * * * * * * *
node1.example.com SSL validation of HTTPS requests is disabled. HTTPS connections are still
node1.example.com encrypted, but chef is not able to detect forged replies or man in the middle
node1.example.com attacks.
node1.example.com
node1.example.com To fix this issue add an entry like this to your configuration file:
node1.example.com
node1.example.com node1.example.com # Verify all HTTPS connections (recommended) node1.example.com ssl_verify_mode :verify_peer node1.example.com node1.example.com # OR, Verify only connections to chef-server node1.example.com verify_api_cert true node1.example.com
node1.example.com
node1.example.com To check your SSL configuration, or troubleshoot errors, you can use the
node1.example.com knife ssl check command like so:
node1.example.com
node1.example.com node1.example.com knife ssl check -c /etc/chef/client.rb node1.example.com
node1.example.com
node1.example.com * * * * * * * * * * * * * * * * * * * * * * * * * * * * * * * * * * * * * * * *
node1.example.com
node1.example.com Starting Chef Client, version 11.12.4
node1.example.com Creating a new client identity for node1.example.com using the validator key.
node1.example.com resolving cookbooks for run list: []
node1.example.com Synchronizing Cookbooks:
node1.example.com Compiling Cookbooks...
node1.example.com [2014-05-08T15:53:25+08:00] WARN: Node node1.example.com has an empty run list.
node1.example.com Converging 0 resources
node1.example.com
node1.example.com Running handlers:
node1.example.com Running handlers complete
node1.example.com
node1.example.com Chef Client finished, 0/0 resources updated in 2.393659851 seconds
———————-———————-———————-———————-—-———————-—-———————-
查看是否连接node1成功:
knife node list
———————-———————-——————— node1 ———————-———————-———————
从上面可以看出node1已经成功注册到了chef-server中,整个环境 chef-workstation => chef-server => chef-client-1 已经搭建成功。
八.登陆server web后台 1.修改浏览器本机HOST,这里笔者使用的是MAC系统
vi /etc/hosts
———————-———————-——————— 10.107.91.251 chef.example.com 10.107.91.252 node1.example.com ———————-———————-———————
2.访问https://chef.example.com
如图:
wKioL1NrQVvRYxZyAAWYA7VjQ6w575.jpg
wKiom1NrQYaQ5-rfAARXsYvgAEw028.jpg
wKiom1NrQYeSu_9xAAa6V1ehHTc082.jpg
wKioL1NrQV3xP_NQAAUOuXSy2wI441.jpg
九.创建一个cookbook实例
1.git克隆chef repository (chef.example.com)
注: chef repository 是一个存储cookbooks和其他文件的目录结构,初次使用需要从github克隆
su -
cd ~
git clone git://github.com/opscode/chef-repo.git
———————————————————————————————————————————————————————————— Initialized empty Git repository in /root/chef-repo/.git/ remote: Reusing existing pack: 223, done. remote: Total 223 (delta 0), reused 0 (delta 0) Receiving objects: 100% (223/223), 45.77 KiB | 37 KiB/s, done. Resolving deltas: 100% (57/57), done. ————————————————————————————————————————————————————————————
获取到的目录如下:
ls
——————————————————————————————————
Desktop Downloads Pictures Templates anaconda-ks.cfg install.log src Documents Music Public Videos chef-repo install.log.syslog
——————————————————————————————————
cd chef-repo/
ls
——————————————————————————————————
LICENSE Rakefile chefignore cookbooks environments README.md certificates config data_bags roles
——————————————————————————————————
2.创建一个cookbook,取名quick_start (chef.example.com)
注:需要切换到之前clone获取到的目录的cookbooks目录下
cd ~/chef-repo/cookbooks
knife cookbook create quick_start -o ./
—————————————————————————————————— **** Creating cookbook quick_start **** Creating README for cookbook: quick_start **** Creating CHANGELOG for cookbook: quick_start **** Creating metadata for cookbook: quick_start
——————————————————————————————————
创建的cookbooks目录如下
# ls -1p quick_start
—————————————
CHANGELOG.md README.md attributes/ definitions/ files/ libraries/ metadata.rb providers/ recipes/ resources/ templates/
—————————————
注: cookbooks用来在chef中分布共享,大多数你创建基础实例都需要cookbooks.
此cookbook实例是创建一个简单的recipe,用来传递给node1一个简单的带有一些已经定义好的变量属性的文
本.
3.创建一个属性文件,取名"quick_start.rb" (chef.example.com)
vi ~/chef-repo/cookbooks/quick_start/attributes/quick_start.rb
——————————————————————————
normal[:deep_thought] = "If a tree falls in the forest ..."
——————————————————————————
注: 在cookbook中属性文件用来在node中创建一些配置,从而你可以从recipe中调用这些属性.
4.对default recipe创建一个source template源模板 (chef.example.com)
vi ~/chef-repo/cookbooks/quick_start/recipes/default.rb
——————————————————————————
template "/tmp/deep_thought.txt" do source "deep_thought.txt.erb" variables :deep_thought => node[:deep_thought] action :create end
——————————————————————————
注: recipes允许你对具体的源进行管理,这个例子中,你创建了一个叫quick_start的recipe,内容包括一个单独的 源模板名叫template "/tmp/deep_thought.txt"
5.创建一个template模板文件 (chef.example.com)
注:这个文件调用源模板的具体属性,而后被chef传送给具体的node客户端
vi ~/chef-repo/cookbooks/quick_start/templates/default/deep_thought.txt.erb
——————————————————————————
Today's deep thought: <%= @deep_thought %>
——————————————————————————
6.将cookbook上传到Server (chef.example.com)
cd ~/chef-repo/cookbooks/
ls
——————————————————————————
README.md quick_start
——————————————————————————
knife cookbook upload -a -o ./
——————————————————————————
Uploading quick_start [0.1.0] Uploaded all cookbooks.
——————————————————————————
确认你刚上传的cookbook
knife cookbook list
——————————————————————————
quick_start 0.1.0
——————————————————————————
6.将quick_start recipe添加到你的node中 (chef.example.com)
knife node run_list add node1.example.com 'recipe[quick_start]'
——————————————————————————
node1.example.com: run_list: recipe[quick_start]
——————————————————————————
查看添加好的recipe
knife node show node1.example.com -r
——————————————————————————
node1.example.com: run_list: recipe[quick_start]
——————————————————————————
6.在node客户端注册,从而获取server上recipe的具体实例 (node1.example.com)
注:保证/etc/chef下有client.pem与validation.pem证书文件,如果没有检查之前的配置.
chef-client
————————————————————————————————————
[2014-05-08T23:55:33+08:00] WARN:
* * * * * * * * * * * * * * * * * * * * * * * * * * * * * * * * * * * * * * *
SSL validation of HTTPS requests is disabled. HTTPS connections are still encrypted, but chef is not able to detect forged replies or man in the middle attacks.
To fix this issue add an entry like this to your configuration file:
 # Verify all HTTPS connections (recommended)
 ssl_verify_mode :verify_peer

 # OR, Verify only connections to chef-server
 verify_api_cert true
To check your SSL configuration, or troubleshoot errors, you can use the
knife ssl check command like so:
knife ssl check -c /etc/chef/client.rb
* * * * * * * * * * * * * * * * * * * * * * * * * * * * * * * * * * * * * * *
Starting Chef Client, version 11.12.4 resolving cookbooks for run list: ["quick_start"] Synchronizing Cookbooks:
- quick_start Compiling Cookbooks... Converging 1 resources Recipe: quick_start::default
- template[/tmp/deep_thought.txt] action create
- create new file /tmp/deep_thought.txt
- update content in file /tmp/deep_thought.txt from none to feb62f --- /tmp/deep_thought.txt 2014-05-08 23:55:43.098408727 +0800 +++ /tmp/chef-rendered-template20140508-8171-11cxwpb 2014-05-08 23:55:43.099454345 +0800 @@ -1 +1,2 @@ +Today's deep thought: If a tree falls in the forest ...
Running handlers: Running handlers complete
Chef Client finished, 1/1 resources updated in 9.915108372 seconds
————————————————————————————————————
最终执行后,创建 /tmp/deep_thought.txt文件,即实现了server向node的文件分发
vi /tmp/deep_thought.txt
————————————————————————————————————
Today's deep thought: If a tree falls in the forest ...
————————————————————————————————————
注: warning问题将在以后的文档中解决...
大功告成....
本文出自 “一路向北” 博客,请务必保留此出处http://showerlee.blog.51cto.com/2047005/1408467
更多 一键收藏,随
分享至 时查看,分享 好友!
                                                                    # 0人      了这篇
                                                                               文章
类别:RUBY┆阅读(0)┆评论(0) ┆ 返回博主首页┆返回博客首页 上一篇 CentOS 6.3下编译安装Ruby 2.0 下一篇 CentOS 6.3下CHEF批量部署APACHE
[wKiom1MxIy]
相关文章
- Chef是一个什么样的工具
- Chef在大数据集群部署中的应用
- ansible实现自动化运维
文章评论
发表评论
2014 WOT全球软件技术峰会【火热抢票中】
昵 称: [ ]登录 快速注册
验证码: [ ]
点击图片可刷新验证码请点击后输入验证码博客过2级,无需填写验证码
内 容: [ ]
[*]同时赞一个
                              Copyright By 51CTO.COM 版权所有

                                        [copyright]
#+end_example *** [#A] web page: Part 1: Install/Setup and configure Chef Server/Workstation/Node on CentOS/RHEL 6.4 | Sachin Sharma :IMPORTANT: http://sachinsharm.wordpress.com/2013/10/11/installsetup-and-configure-chef-serverworkstationnode-on-centosrhel-6-4/ **** webcontent :noexport: #+begin_example Location: http://sachinsharm.wordpress.com/2013/10/11/installsetup-and-configure-chef-serverworkstationnode-on-centosrhel-6-4/ Sachin Sharma
Menu
Skip to content
- Home
- About
Standard
Posted by
Sachin Sharma
Posted on
October 11, 2013
Posted under
Chef, Configuration Management
Comments
4 Comments
Part 1: Install/Setup and configure Chef Server/Workstation/Node on CentOS/RHEL 6.4
This article will guide you through the installation and configuration steps of Chef Server/ Workstation/Node on CentOS/RHEL 6.4. The procedure mentioned in this tutorial is tested on:
OS CentOS 6.4 Chef 11.0.8 Server Knife 11.6.0
What is Chef? Chef is a Ruby-based configuration management engine. It acts as a hub, ensuring that the right cookbooks are used, that the right policies are applied, that all of the node objects are up-to-date, and that all of the nodes that will be maintained are registered and known to the Chef Server. The Chef Server distributes configuration details (such as recipes, templates, and file distributions) to every node within the organization. Chef then does as much of the configuration work as possible on the nodes themselves (and not on the Chef Server). This scalable approach distributes the configuration effort throughout the organization.
Chef Server:
The server acts as a hub for configuration data. The server stores cookbooks, the policies that are applied to nodes, and metadata that describes each registered node that is being managed by the chef-client. Nodes use the chef-client to ask the server for configuration details, such as recipes, templates, and file distributions. Starting with the release of Chef 11.x, the front-end for the server is written using Erlang.
Workstations: A workstation is a computer that is configured to run Knife, to synchronize with the chef-repo, and interact with a single server. The workstation is the location from which most users will do most of their work, including:
- Developing cookbooks and recipes (and authoring them using Ruby).
- Keeping the chef-repo synchronized with version source control.
- Using Knife to upload items from the chef-repo to the server.
- Configuring organizational policy, including defining roles and environments and ensuring that critical data is stored in data bags.
- Interacting with nodes, as (or when) required, such as performing a bootstrap operation.
Node: A node is any server or virtual server that is configured to be maintained by a chef-client. A node can be any physical, virtual, or cloud machine that can run the chef-client. A chef-client is an agent that runs locally on every node that is registered with the server. When a chef-client is run, it will perform all of the steps that are required to bring the node into the expected state, including:
- Registering and authenticating the node with the server.
- Building the node object.
- Synchronizing cookbooks.
- Compiling the resource collection by loading each of the required cookbooks, including recipes, attributes, and all other dependencies.
- Taking the appropriate and required actions to configure the node.
- Looking for exceptions and notifications, handling each as required.
RSA public key-pairs are used to authenticate the chef-client with the server every time a chef-client needs access to data that is stored on the server. This prevents any node from accessing data that it shouldn’t and it ensures that only nodes that are properly registered with the server can be managed.
I) Prerequisite
-
Host should have fully configured hostname.
-
Should have DNS entry in place.
-
Following package are required.
yum install wget curl -y
II) Chef Server Installation
-
Go to http://www.opscode.com/chef/install.
-
Click the Chef Server tab.
-
Select the operating system, version, and architecture.
-
Select the version of Chef Server 11.x to download, and then click the link that appears to download the package.
-
Install the downloaded package using the correct method for the operating system on which Chef Server 11.x will be installed.
rpm -ivh https://opscode-omnibus-packages.s3.amazonaws.com/el/6/x86_64/chef-server-11.0.8-1.el6.x86_64.rpm
-
Configure Chef Server 11.x by running the following command:
chef-server-ctl reconfigure
The chef-server-ctl command will set up all of the required components, including Erchef, RabbitMQ, PostgreSQL, and all of the cookbooks that are used by chef to maintain Chef Server 11.x. 7) Verify the the hostname for the server by running the hostname command. The hostname for the server must be a FQDN.
hostname
-
Verify the installation of Chef Server 11.x by running the following command:
chef-server-ctl test
Note: Try to stop apache before running this test. 9) You can explore the Chef Server URL using your favorite browser:
https://FQDN-OR-IP-OF-CHEF-SERVER
Note: Default UserName/Password is admin/p@ssw0rd1
- The chef-server-ctl command is used on the Chef Server system for management. It has built-in help (-h) that will display the various sub-commands.
II) Chef WorkStation Installation
-
Run the following command that appears (for UNIX and Linux environments):
curl -L https://www.opscode.com/chef/install.sh | bash
% Total % Received % Xferd Average Speed Time Time Time Current Dload Upload Total Spent Left Speed 101 6790 101 6790 0 0 3826 0 0:00:01 0:00:01 --:--:-- 12190 Downloading Chef for el... Installing Chef warning: /tmp/tmp.KnyQTnqz/chef-.x86_64.rpm: Header V4 DSA/SHA1 Signature, key ID 83ef826a: NOKEY Preparing... ########################################### [100%] 1:chef ########################################### [100%] Thank you for installing Chef!
-
When the installation is finished enter the chef-client command to verify that the chef-client was installed:
chef-client -v
Chef: 11.6.0
-
Create the “.chef” directory The .chef directory is used to store three files:
- knife.rb
- ORGANIZATION-validator.pem
- USER.pem
a) Copy Cert Keys from Chef Server to your Workstation User Folder:
$ mkdir ~/.chef $ scp root@chef-server:/etc/chef-server/admin.pem ~/.chef $ scp root@chef-server:/etc/chef-server/chef-validator.pem ~/.chef
b) Now we will configure the Client setting using knife command.
$ knife configure -i Overwrite /root/.chef/knife.rb? (Y/N) y Please enter the chef server URL: [https://test.example.com:443] https://chef-server.example.com:443/ Please enter a name for the new user: [root] knife-user1 Please enter the existing admin name: [admin] Enter Please enter the location of the existing admin's private key: [/etc/chef-server/admin.pem] ~/.chef/admin.pem Please enter the validation clientname: [chef-validator] Please enter the location of the validation key: [/etc/chef-server/chef-validator.pem] ~/.chef/chef-validator.pem Please enter the path to a chef repository (or leave blank): Creating initial API user... Please enter a password for the new user: Created user[knife-user1] Configuration file written to /root/.chef/knife.rb
c) Your Knife config file (knife.rb) will look like:
$ cat ~/.chef/knife.rb log_level :info log_location STDOUT node_name 'knife-user1' client_key '/root/.chef/knife-user1.pem' validation_client_name 'chef-validator' validation_key '/root/.chef/admin.pem' chef_server_url 'https://chef-server.example.com:443/' syntax_check_cache_path '/root/.chef/syntax_check_cache'
d) Verify the install by running the following commands to ensure that every chef-client and user was registered correctly.
$ knife client list chef-validator chef-webui
$ knife user list admin knife-user1
III) Chef Node Installation
-
Run the following command that appears (for UNIX and Linux environments):
curl -L https://www.opscode.com/chef/install.sh | bash
% Total % Received % Xferd Average Speed Time Time Time Current Dload Upload Total Spent Left Speed 101 6790 101 6790 0 0 3826 0 0:00:01 0:00:01 --:--:-- 12190 Downloading Chef for el... Installing Chef warning: /tmp/tmp.KnyQTnqz/chef-.x86_64.rpm: Header V4 DSA/SHA1 Signature, key ID 83ef826a: NOKEY Preparing... ########################################### [100%] 1:chef ########################################### [100%] Thank you for installing Chef!
-
Create the Chef Directory.
mkdir /etc/chef
-
Copy Chef Server Validation Cert Keys from Chef Server to your Node at “/etc/chef”:
scp root@chef-server:/etc/chef-server/chef-validator.pem /etc/chef
-
Log in to Chef client and run the following command in order for a client to register itself with Chef Server:
chef-client -S https://FQDN-OR-IP-OF-CHEF-SERVER -K /etc/chef/chef-validator.pem
-
Once the client is verified, we need to create a “client.rb” file inside “/etc/chef”.
vi /etc/chef/client.rb
log_level :info log_location STDOUT chef_server_url 'https://FQDN-OR-IP-OF-CHEF-SERVER'
-
Verify the Node is successfully registered with Chef Server using: a) From Workstation Machine:
knife node list
b) From Chef Server Web UI (Node List):
https://FQDN-OR-IP-OF-CHEF-SERVER
-
Run the Chef Client to check if the respective cookbook (recipe’s) are pushed to that node:
chef-client
chef-client -l debug (In case if you want to debug)
-
Starts the chef-client which will poll the chef-server every 3600 seconds for changes.
chef-client -i 3600
Related Posts:
Part 2: Understanding Chef Cookbook/Recipe. Part 3: Understanding Chef Cookbook/Recipe.
About these ads
Share this:
Google+
Sachin Sharma Sachin Sharma
Like this:
Like Loading...
Related
- chef
- chef installation
- chef server
- knife
Post navigation
← Install/Setup and configure Git Server with Gitolite and Gitweb on CentOS/RHEL 6.4 Recover/Change/ Reset MySQL root password →
4 thoughts on “Part 1: Install/Setup and configure Chef Server/Workstation/Node on CentOS/RHEL 6.4”
-
[fc5] Aaron says: February 13, 2014 at 10:58 PM
Thank you for writing this series. You saved me hours of work. This is a well written, useful, and accurate tutorial and guide. I think it’s better than Chef’s own install guide. You may want to include a mention of opening TCP port 443 in iptables on the chef server machine. That was an obvious step to many of us but may be overlooked by some beginners.
Reply
-
Pingback: Installing Chef on CentOS « Runaway Sequence
-
[d69] venumurthy says: March 10, 2014 at 11:51 AM
Excellent tutorial Sachin. Thank you very much!
Reply
-
[9cd] sheetal says: March 11, 2014 at 5:09 PM
Can you also include steps of how to create cookbooks/recipes using CHEF server UI instead of from workstation ?
Reply
Leave a Reply Cancel reply
Enter your comment here... [ ]
Fill in your details below or click an icon to log in:
Gravatar Email (required) (Address never made public) Name (required) [ ] Website [ ] WordPress.com Logo
You are commenting using your WordPress.com account. ( Log Out / Change )
Twitter picture
You are commenting using your Twitter account. ( Log Out / Change )
Facebook photo
You are commenting using your Facebook account. ( Log Out / Change )
Google+ photo
You are commenting using your Google+ account. ( Log Out / Change )
Cancel
Connecting to % s
[ ] Notify me of follow-up comments via email.
Post Comment
Search Search Recent Posts
- Part 3: Understanding Chef Cookbook/Recipe.
- Part 2: Understanding Chef Cookbook/Recipe.
- Recover/Change/ Reset MySQL root password
- Part 1: Install/Setup and configure Chef Server/Workstation/Node on CentOS/RHEL 6.4
- Install/Setup and configure Git Server with Gitolite and Gitweb on CentOS/RHEL 6.4
Recent Comments
[300e] wasim on Setting up Dovecot on CentOS/R… [6b1c] sachinsharm on Install/Setup and configure Gi… [9cd0] sheetal on Part 1: Install/Setup and conf… [d693] venumurthy on Part 1: Install/Setup and conf… [c520] KWHW on Install/Setup and configure Gi…
Archives
- January 2014
- October 2013
- August 2013
- April 2012
Categories
- Chef
- Configuration Management
- Content Management
- Database
- Dovecot
- Ganglia
- Git
- Monitoring
- MTA
- MySQL
- Nagios
- OpenVPN
- Others
- Package Management
- Personal
- RPM
- Security
- SELinux
- Sendmail
- Trending
- Version Control
- VPN
- Wordpress
Meta
- Register
- Log in
- Entries RSS
- Comments RSS
- WordPress.com
Create a free website or blog at WordPress.com. | The Zoren Theme. Follow
Follow “Sachin Sharma”
Get every new post delivered to your Inbox.
Sign me up
Powered by WordPress.com % d bloggers like this:
[b]
#+end_example *** web page: Setup Knife - Bonus Bits Wiki http://www.bonusbits.com/main/HowTo:Setup_Knife **** webcontent :noexport: #+begin_example Location: http://www.bonusbits.com/main/HowTo:Setup_Knife Setup Knife
From Bonus Bits Wiki Jump to: navigation, search
Crystal Clear action configure.png This article is incomplete. You can help complete this article by adding content.
Contents
- 1 Purpose
- 2 Prerequisites
- 3 Create User Chef Client Config Folder
- 4 Option 1 (Use Configuration Tool)
- 5 Option 2 (Manual - Chef WebUI)
- 6 Bootstrap Option
- 7 User Knife Config File Path
- 8 Environment Variables
- 9 Other Options Examples
- 10 Sources
Purpose
This article gives the steps to setup Chef Client knife tool after it's installed.
Prerequisites
Install Chef Client from RPM on CentOS Install Chef Client from RubyGems
Create User Chef Client Config Folder
mkdir ~/.chef
Option 1 (Use Configuration Tool)
Copy Cert Keys from Chef Server to User Folder
scp root@chef-server:/etc/chef-server/admin.pem ~/.chef
scp root@chef-server:/etc/chef-server/chef-validator.pem ~/.chef
knife configure -i
Example
knife configure -i
WARNING: No knife configuration file found
Where should I put the config file? [/home/username/.chef/knife.rb]
Option 2 (Manual - Chef WebUI)
Logon to Chef WebUI
- Create user
- Set as admin
- Copy Private key that is generated
- Beware it will only show you the key once.
- Create a file to store the key in such as /home/username/.chef/username.pem
- Create a knife.rb file /home/username/.chef/knife.rb
- Add the following
log_level :info log_location STDOUT ssl_verify_mode :verify_none node_name 'username' chef_server_url 'http://chefserver.domain.com' client_key '/home/username/.chef/username.pem'
Bootstrap Option
To be able to send bootstrap (deploy) client command the chef-validator pem must be local and set in the knife.rb.
scp root@chef-server:/etc/chef-server/chef-validator.pem ~/.chef
validation_client_name 'chef-validator' validation_key '/home/username/.chef/chef-validator.pem'
User Knife Config File Path
~/.chef/knife.rb
Environment Variables
Set Knife Editor Append to .bashrc
echo '' >> ~/.bashrc && echo '# Knife Editor Path' >> ~/.bashrc && echo 'export EDITOR=/usr/bin/ sublime' >> ~/.bashrc
Other Options Examples
Cache Settings
cache_type 'Basicfile'
cache_options( :path => '~/.chef/checksums' )
Cookbook Path
cookbook_path [ '~/cookbooks' ]
Sources
http://docs.opscode.com/config_rb_knife.html
Retrieved from "http://www.bonusbits.com/index.php?title=HowTo:Setup_Knife&oldid=2405" Categories:
- How To
- Linux
- Chef
- Knife
Navigation menu
Personal tools
- Log in
Namespaces
- HowTo
- Discussion
Variants
Views
- Read
- View source
- View history
Actions
Search
Go Search
Navigation
- Main page
- Latest Articles
- Latest Updates
Top Namespaces
- Automation
- How To
- Knowledgebase
- Reference
Root Categories
- Apple
- Cisco
- Linux
- Network
- Microsoft
- Scripting
- SQL
- Vmware
Top Categories
- Bash Scripts
- Batch Scripts
- Cookbook
- CentOS
- Chef
- ESX
- Exchange
- Data Domain
- IOS
- Mac
- McAfee
- PowerShell
- PowerShell Scripts
- PowerShell Modules
- Windows
Tools
- What links here
- Related changes
- Upload file
- Special pages
- Printable version
- Permanent link
- Page information
Help
- User Help
- Wiki Manual
Favorites
- POSHCode.org
- Powershell.com
- Experts Exchange
- Levon's LinkedIn
Misc
-
Browse Categories
-
Top Categories
-
Recent Changes
-
This page was last modified on 8 July 2013, at 10:19.
-
This page has been accessed 2,029 times.
-
Privacy policy
-
About Bonus Bits Wiki
-
Disclaimers
-
Powered by MediaWiki
#+end_example *** web page: How to install chef on OSX Maverick - mariusv.com | Once a geek, forever a geek http://www.mariusv.com/install-chef-on-osx-maverick/ **** webcontent :noexport: #+begin_example Location: http://www.mariusv.com/install-chef-on-osx-maverick/ mariusv.com
Watch as I awkwardly stumble through life about • wishlist • rent me • subscribe
Home › Blog archive › How to install chef on OSX Maverick
How to install chef on OSX Maverick
Posted by Marius Voila on December 10, 2013 in London, U.K . — 0 comments This post contains 255 words
Few days ago I was tempted to update my work Mac to OSX Maverick (10.9) so I went ahead and upgraded even if I got lots of co-workers saying that my laptop will not boot up anymore because of the amount of Corporate Security software we have installed on it. Well the upgrade went pretty much fine (few glitches but nothing which I could not hack my way around) but for some reason the upgrade removed Chef from it so I had to re-install but for my surprise the curl -L https:// www.opscode.com/chef/install.sh | sudo bash command failed to install because of Unknown OS :-) and asking me to open a ticket with OpsCode which is not quite my view on fixing issues. After few minutes of Googling I found out that there is already a ticket open regarding this issue for OSX 10.8 Mountain Lion and one of the comments already has a small workaround for OSX 10.8 so I went ahead and applied the solution provided for 10.8 but changing to 10.9 and it worked.
Here are the steps needed to follow to install Chef on OSX 10.9 Maverick:
First, download the install script from https://www.opscode.com/chef/install.sh by invoking: curl https://www.opscode.com/chef/install.sh -o install.sh
Then edit the install.sh:
"10.6") platform_version="10.6" ;; "10.7") platform_version="10.7" ;; "10.8") platform_version="10.7" ;;
and change it to:
"10.6") platform_version="10.6" ;; "10.7") platform_version="10.7" ;; "10.8") platform_version="10.7" ;; "10.9") platform_version="10.7" ;;
next step will be to make the script executable and run it ;-)
Share this:
Liked this post? Subscribe to my RSS feed.
Categories: #personal
Gravatar image About the author: Marius Voila is a Linux Sysadmin, a photographer, a technologist, a specialist in deployments, cloud computing, load balancing, scaling and performance tuning, as well as developing disaster-recovery best practices such as backups and restorations, firewalls, and server security audits, OpenStack deployments. Read more → Follow @mariusvoila
Possibly Related Posts
- OpenVas6 OMP issues on CentOS ( May 23, 2014 )
- Install Apache Solr 4.7.1 on Ubuntu ( Apr 07, 2014 )
- Bash auto completion in iTerm2 OSX ( Feb 07, 2014 )
Please enable JavaScript to view comments. comments powered by Disqus
Copyright © 2010 - 2014 Marius Voila. Some rights reserved.
Except where otherwise noted, content on this site is licensed under a Creative Commons Attribution-NonCommercial-ShareAlike 3.0 Unported License.
#+end_example *** web page: Chef | IT automation for speed and awesomeness | Chef http://www.getchef.com/chef/ **** webcontent :noexport: #+begin_example Location: http://www.getchef.com/chef/ Chef Sign In Management Console
- Products
- Chef
- Enterprise Chef
- Solutions
- Amazon Web Services
- Cloud Management
- Coded Business
- Configuration Management
- Containers
- Continuous Delivery
- DevOps
- Google Cloud Platform
- Professional Services
- Windows
- Learn Chef
- Chef Docs
- Chef Tutorials
- Training
- About
- Blog
- Media Room
- Events
- Company
- Careers
- Success with Chef
- Partners
- Community
- Support
Get Chef [logo-chef]
Chef is built to address the hardest infrastructure challenges on the planet. By modeling IT infrastructure and application delivery as code, Chef provides the power and flexibility to compete in the digital economy.
Get Chef
Sign up for our Chef Fundamentals Series is now available!
Why Chef? Which Chef? Plans & Pricing How Chef Works Getting Started
Why Chef?
Chef gives your IT infrastructure the speed, flexibility and efficiency you need to compete in the digital economy
Chef is an automation platform that transforms infrastructure into code. Stop thinking in terms of physical and virtual servers. With Chef, your real asset is the code that brings those servers and the services they provide to life. An automated infrastructure can accelerate your time to market, help you manage scale and complexity, and safeguard your systems.
Whether your network is in the cloud, on-site, or a hybrid, Chef can automate how you configure, deploy and scale your servers and applications, whether you manage 5 servers, 5,000 servers or 500,000 servers. It's no wonder that Chef has been chosen by companies like Facebook and Amazon for mission-critical challenges.
Which Chef is Right for You?
Chef is available in two flavors: Enterprise Chef and Open Source Chef.
Enterprise Chef is a powerful solution to managing and automating large-scale infrastructure that includes premium features like multi-tenancy, role-based access control, reporting and support from automation experts at Chef.
Open source Chef is an open-source free version of Chef server that is the basis for both versions of Chef.
Features Open Source Chef Enterprise Chef
Flexible and Scalable Automation Platform ✔ ✔ Access to 800+ Reusable Cookbooks ✔ ✔ Integration with Leading Cloud Providers ✔ ✔ Enterprise Platform Support including Windows and Solaris ✔ ✔ Create, Bootstrap and Manage OpenStack Clouds ✔ ✔ Easy Installation with 'one-click' Omnibus Installer ✔ ✔ Automatic System Discovery with Ohai ✔ ✔ Text-Based Search Capabilities ✔ ✔ Multiple Environment Support ✔ ✔ "Knife" Command Line Interface ✔ ✔ "Dry Run" Mode for Testing Potential Changes ✔ ✔ Manage 10,000+ Nodes on a Single Chef Server ✔ ✔ Available as a Hosted Service — ✔ Enhanced Management Console — ✔ Centralized Activity and Resource Reporting — ✔ "Push" Command and Control Client Runs** — ✔ Multi-Tenancy — ✔ Role-Based Access Control [RBAC] — ✔ High Availability Installation Support and Verification — ✔ Centralized Authentication Using LDAP or Active Directory** — ✔ Standard Support Available ✔ Premium 24/7 Support Available Available Access to Chef Professional Services Available Priority **** Not available in Hosted Enterprise Chef
Plans & Pricing
The following plans are available for Enterprise Chef.
Free Launch Standard Premium
Price per Month Free $120 $300 $600 Nodes 5 20 50 100 Standard Support — ✔ ✔ ✔
Need more nodes? Contact us.
How Chef Works
Chef is based on a key insight: You can model your evolving IT infrastructure and applications as code. Chef makes no assumptions about your environment and the approach you use to configure and manage it. Instead, Chef gives you a way to describe and automate your infrastructure and processes. Your infrastructure becomes testable, versioned and repeatable. It becomes part of your Agile process.
Chef relies on reusable definitions known as cookbooks and recipes that are written using the the Ruby programming language. Cookbooks and recipes automate common infrastructure tasks. Their definitions describe what your infrastructure consists of and how each part of your infrastructure should be deployed, configured and managed. Chef applies those definitions to servers to produce an automated infrastructure.
Cookbooks and recipes are made from building blocks called resources. Many resources are included in Chef, but you can also create your own, in particular to deal with legacy systems. Also, you can interact with the community of Chef users, numbering in the tens of thousands, who are constantly sharing cookbooks, recipes and advice. There's a good chance you'll find someone who's worked on situations similar to yours. The community will support your success, and Chef's professional services are there to help you as well.
[chart-basi]
The Chef server stores your network's configuration data and recipes. The data describes all the “ingredients” that make up your infrastructure. Recipes are step-by-step instructions for assembling those ingredients together into a complete, running system. The Chef client is a program that runs the recipes on nodes of the network, which may be physical or virtual servers either on-premise or in the cloud. You use a workstation to update the state of the Chef server from time to time, as your infrastructure evolves. All changes are captured using revision control.
Getting started with Chef
Want to learn more? The best way is to start playing.
- Sign up for a free trial of Enterprise Chef.
- Get hands on with Chef quickstart guides on #learnchef.
- Take a look at some cookbooks.
- Take a look at the documentation.
If you want a little help getting up to speed with Chef, try our Chef Fundamentals training.
Intro to Chef
Code Can Accelerate Your Time to Market
Use Chef to quickly deliver products and services and adapt to shifts in the market. Automation means that you can set up your infrastructure and be ready to deploy new features in minutes rather than days.
"We were able to definitively accelerate our time-to-value and time-to-market, which results in
operational efficiency and cost savings. Chef's biggest advantage is the amount of time we save
in setting up virtual servers and other tasks."
Leandro Reox
Senior Infrastructure Engineer and Cloud Architect
MercadoLibre

                               Code Can Encourage Innovation
Let Chef handle repetitive manual tasks so you can focus on innovation. Increase agility and efficiency. Get new developers ready to go in just a few minutes.
Admeld automates configuration management with Chef to improve efficiency and agility.
"Four months ago we spent more time on maintenance. Now we are doing a lot more innovation.
Opscode [Chef] is exceeding our expectations and we are looking forward to leveraging Chef for
future projects."
Ian Meyer
Technical Operations Manager
Admeld

                                      Code Can Scale
Use Chef to manage complexity and rapidly scale to meet customer demand. Transforming your infrastructure into code means that you can build, rebuild, configure and scale in real time.
Prezi rapidly adds compute resources manages orchestration of complex infrastructure with Chef.
"Chef gives us agility. If we want to start developing a new system tomorrow, by Noon we can
put every infrastructure piece in place and be ready to go."
Gabor Veszi
Infrastructure Lead, Prezi
Prezi

                                    Code is Consistent
Use Chef to maintain a model of your infrastructure that is always consistent with its true state. A code-based blueprint gives you the flexibility to manage and understand your dynamic network, no matter how fast it changes, no matter its size.
Facebook's infrastructure team manages servers, configurations, and administrative access policies with Chef.
"There are three dimensions of scale we generally look at for infrastructure - the number of
servers, the volume of different configurations across those systems, and the number of people
required to maintain those configurations. Chef provided an automation solution flexible enough
to bend to our scale dynamics without requiring us to change our workflow."
Phil Dibowitz
Production Engineer, Facebook
Facebook

                             Code Can Safeguard Your Business
Code can make your infrastructure easier to maintain, reduce downtime, and give you increased visibility into operations. Use Chef to monitor for exceptions and unplanned events. If disaster strikes, use Chef to reconstruct your entire network. Chef can help transform your infrastructure into an auditable, automated and secure system.
Socrata builds secure, repeatable, fully automated infrastructure with Chef.
“Opscode [Chef] helped lower the stress of this job. Our team still carries the pager 24x7, but
it does not ring as often. We have dramatically increased the level of automation and
auditability when we deploy new capacity and that gives us peace of mind.”
Paul Paradise
Operations Engineer
Socrata
Products
- Chef
- Enterprise Chef
Solutions
- Amazon Web Services
- Cloud Management
- Coded Business
- Configuration Management
- Containers
- Continuous Delivery
- DevOps
- Google Cloud Platform
- Professional Services
- Windows
Support
- Documentation
- Support
- Security
- Learn Chef
- Training
- Community Resources
About Us
- Blog
- Media Room
- Events
- Company
- Careers
- Success with Chef
- Partners
Legal
- Terms and Conditions of Use
- Privacy Policy
- Online Master License and Services Agreement
- Service Level Agreement
- Contributor License Agreements
- Trademark Policy
© 2008-2014 Chef Software, Inc. All Rights Reserved. Facebook Twitter LinkedIn YouTube *
*
#+end_example *** web page: Create your first cookbook - Tutorials | Learn Chef https://learnchef.opscode.com/tutorials/create-your-first-cookbook/ **** webcontent :noexport: #+begin_example Location: https://learnchef.opscode.com/tutorials/create-your-first-cookbook/
- Chef Home
- Documentation
- @learnchef
Get started
Tutorials
- Create your first cookbook
- Write for multiple platforms
Concepts
- Resources
- Recipes
- Cookbooks
- Run-lists
- Nodes
- Roles
- Environments
- Organizations
Chef Fundamentals Webinar Series
Legacy content
- Starter Use Cases
Help I'm Stuck!
§Create your first cookbook
In this tutorial, you'll create your first cookbook that builds out a web server and serves up some basic content. Although you don't need prior knowledge about web servers, configuring one is a great way to learn how to:
- create a new cookbook and add a recipe to it
- upload your cookbook to the Chef server
- configure your node's run list
- run chef-client to trigger the configuration process on your target node
In the end, you'll see this basic web page in your browser:
Tutorial goal
In this tutorial, we break Windows and Linux into two separate tracks. In future tutorials, we'll look at how to combine everything into a single recipe.
§What are cookbooks and recipes?
A cookbook is the fundamental unit of configuration and policy distribution. A cookbook defines a scenario, such as everything needed to install and configure Apache or IIS web server and the resources that support it.
A recipe describes desired configuration state. A recipe is stored in a cookbook and declares everything that is required to configure part of a system. For example, a recipe can install and configure software components, manage files, deploy applications, run other recipes, and more.
Think of the literal analogy from cooking. You might have a cookbook on Italian cooking, one on Chinese cooking, and maybe one that contains your grandmother's best dishes. Each cookbook is made up of recipes around a common theme. A recipe defines the steps that, if followed precisely, produce the same dish every time.
§Let's get started
If you haven't yet set up your Chef environment, let's do it now. Then choose a track below.
Both tracks illustrate similar concepts, so you don't need to do both.
Jump to the Windows Server track ↓ Jump to the Linux track ↓
§Configure IIS on Windows Server
Here you'll set up and validate IIS on Windows Server in 7 steps.
§Step 1: Create the cookbook
The knife command provides an interface between your workstation and the Chef server. From your chef-repo directory, run the knife command to create a new cookbook.
knife cookbook create iis-tutorial-1
At this point, everything is set up locally, and nothing's sent to the Chef server. You'll upload the cookbook in a later step.
§Step 2: Write the recipe
When you create a cookbook, Chef creates a default recipe for you. From your text editor, open up the default recipe in the iis-tutorial-1 cookbook.
cookbooks/iis-tutorial-1/recipes/default.rb
Now let's write some Ruby code to perform these actions:
- install IIS
- start the World Wide Web Publishing Service
- configure the home page
Here's the code you need to add to default.rb:
powershell_script 'Install IIS' do action :run code 'add-windowsfeature Web-Server' end
service 'w3svc' do action [ :enable, :start ] end
cookbook_file 'c:\inetpub\wwwroot\Default.htm' do source 'Default.htm' rights :read, 'Everyone' end
§Step 3: Add a file resource
The final part of the recipe you just wrote uses the cookbook_file resource to copy the home page. Now you need to add that resource to your cookbook.
Open Default.htm in your text editor.
cookbooks/iis-tutorial-1/files/default/Default.htm
And write out the homepage like this:
Hello, world!
§Step 4: Upload the cookbook to the Chef server
From the chef-repo directory, run knife's cookbook upload command to upload your cookbook.
knife cookbook upload iis-tutorial-1
A copy of your cookbook is now on the Chef server.
§Step 5: Create the run list
The run list defines the order in which recipes are run. In this tutorial, you have just one recipe in your run list.
To configure the run list for your Windows Server node, first navigate to manage.opscode.com and log in to your Chef account. Then from the Nodes tab, select your node and open its run list.
Opening the run list
Now drag the recipe from the Available Recipes box to the Current Run List box. Then click Save Run List.
Setting and saving the run list
§Step 6: Run chef-client
Next you'll run chef-client to get the latest cookbooks from the Chef server and bring your target node to its expected state.
The easiest way to run chef-client is to run the knife command from your local workstation. (Recall that you ran the knife command when you bootstrapped your node and that knife serves as the interface between you and the Chef server.)
Here's the command.
knife winrm ec2-xx-xx-xx-xx.compute-1.amazonaws.com chef-client -m -x chef -P chef
Replace ec2-xx-xx-xx-xx.compute-1.amazonaws.com with your node's IP address or hostname. If you're not using a Chef EC2 image, replace the -x and -P arguments with the username and password for an account that has Administrator access.
Alternatively, you can log into your Windows Server node through Remote Desktop and run the chef-client command from PowerShell or the command prompt. Just be sure to open your prompt as Administrator.
As chef-client runs, you'll see Windows Server configure itself to run IIS and copy your basic web page to c:\inetpub\wwwroot.
§Step 7: Verify your home page
After the chef-client run completes, open a web browser from any computer and navigate to your test node. For example, if you're running on EC2, the URL might resemble:
http://ec2-xx-xx-xx-x.compute-1.amazonaws.com
You'll see "Hello, world!" in your browser.
You did it! Now try the Linux version of this tutorial, or jump to the bottom for next steps.
§Configure Apache on Linux
Here you'll set up and validate Apache on Linux in 7 steps.
§Step 1: Create the cookbook
The knife command provides an interface between your workstation and the Chef server. From your chef-repo directory, run the knife command to create a new cookbook.
knife cookbook create apache-tutorial-1
At this point, everything is set up locally, and nothing's sent to the Chef server. You'll upload the cookbook in a later step.
§Step 2: Write the recipe
When you create a cookbook, Chef creates a default recipe for you. From your text editor, open up the default recipe in the apache-tutorial-1 cookbook.
cookbooks/apache-tutorial-1/recipes/default.rb
Now let's write some Ruby code to perform these actions:
- install Apache
- start the service and make sure it will start when the machine boots
- configure the home page
Here's the code you need to add to default.rb. Apache is configured differently on various flavors of Linux. If your target node is running Ubuntu or Debian, follow the apache tab. If your target node is running RHEL, CentOS, or Fedora, follow the httpd tab. In future tutorials, you'll learn how to combine both options in the same code file.
apache
package 'apache2' do action :install end
service 'apache2' do action [ :enable, :start ] end
cookbook_file '/var/www/index.html' do source 'index.html' mode '0644' end
httpd
package 'httpd' do action :install end
service 'httpd' do action [ :enable, :start ] end
cookbook_file '/var/www/html/index.html' do source 'index.html' mode '0644' end
§Step 3: Add a file resource
The final part of the recipe you just wrote uses the cookbook_file resource to copy the home page. Now you need to add that resource to your cookbook.
Open index.html in your text editor.
cookbooks/apache-tutorial-1/files/default/index.html
And write out the homepage like this:
Hello, world!
§Step 4: Upload the cookbook to the Chef server
From the chef-repo directory, run knife's cookbook upload command to upload your cookbook.
knife cookbook upload apache-tutorial-1
A copy of your cookbook is now on the Chef server.
§Step 5: Create the run list
The run list defines the order in which recipes are run. In this tutorial, you have just one recipe in your run list.
To configure the run list for your Linux node, first navigate to manage.opscode.com and log in to your Chef account. Then from the Nodes tab, select your node and open its run list.
Opening the run list
Now drag the recipe from the Available Recipes box to the Current Run List box. Then click Save Run List.
Setting and saving the run list
§Step 6: Run chef-client
Next you'll run chef-client to get the latest cookbooks from the Chef server and bring your target node to its expected state.
The easiest way to run chef-client is to run the knife command from your local workstation. (Recall that you ran the knife command when you bootstrapped your node and that knife serves as the interface between you and the Chef server.)
Here's the command.
knife ssh ec2-xx-xx-xx-xx.compute-1.amazonaws.com 'sudo chef-client' -m -x chef -P chef
Replace ec2-xx-xx-xx-xx.compute-1.amazonaws.com with your node's IP address or hostname. If you're not using a Chef EC2 image, replace the -x and -P arguments with the username and password for an account that has root access.
Alternatively, you can log into your Linux node through SSH and then run chef-client.
sudo chef-client
If you're using Vagrant, here's the command to use.
knife ssh localhost 'sudo chef-client' -m -x vagrant -P vagrant --ssh-port 2222
--ssh-port 2222 might not be correct if you're running more than one Vagrant VM. You can get the port that Vagrant selects for SSH forwarding from the output of the vagrant up command.
As chef-client runs, you'll see Linux configure itself to run Apache and copy your basic web page to /var/www/index.html or /var/www/html/index.html.
§Step 7: Verify your home page
After the chef-client run completes, open a web browser from any computer and navigate to your test node. For example, if you're running on EC2, the URL might resemble:
http://ec2-xx-xx-xx-x.compute-1.amazonaws.com
You'll see "Hello, world!" in your browser.
You did it! Now try the Windows Server version of this tutorial, or jump to the bottom for next steps.
§What next?
Congratulations, you've successfully used Chef to configure your web server validated that it can serve up a basic web page. You now have a cookbook and a recipe that you can extend further or use as a template for something else. You also know how to run chef-client to update your configuration when things change. And you can do it all on Windows Server or Linux.
If you want to learn more about cookbooks, see the Chef documentation for cookbooks on docs.opscode.com.
In the next tutorial, you'll learn a bit more about what happens during a chef-client run and then revise your Linux cookbook to run on multiple distros.
Write for multiple platforms →
Did you find this content useful?YesNo
-
Feedback
Copyright © 2014 Chef All Rights Reserved.
#+end_example *** web page: Cookbooks烹饪书 - Chef-CN - Chef Open Source Wiki https://wiki.opscode.com/pages/viewpage.action?pageId=13173060 **** webcontent :noexport: #+begin_example Location: https://wiki.opscode.com/pages/viewpage.action?pageId=13173060 Quick Search [ ] Search this space
- Browse
- Pages
- Blog
- Templates
- Labels
- Attachments
- Forums
- Activity
- Advanced
- Space Directory
- Feed Builder
- Keyboard Shortcuts
- Confluence Gadgets
- Log In
- Sign Up
- Dashboard
- Chef-CN
- …
- 首页
- Chef核心
- Cookbooks烹饪书
[logo]
- Tools
- Attachments (0)
- Page History
- Restrictions
- Info
- Link to this Page…
- View in Hierarchy
- View Source
- Favourites
Cookbooks烹饪书
Skip to end of metadata
- Page restrictions apply
- Added by Adam Jacob, last edited by Ruoran Wang on Jul 21, 2012 (view change)
- show comment hide comment
Comment: Migration of unmigrated content due to installation of a new plugin Go to start of metadata
 Cookbooks 烹饪书是chef中的配置单元。它封装了用来自动配置您基础       * 什么是Cookbook 烹
 架构的各种资源,它还能让同学们方便的分享各自的构架配置。               饪书?
                                                                      * 如何使用cookbook
                                                                        烹饪书?
 什么是Cookbook 烹饪书?                                               * 如何写新的
                                                                        cookbook烹饪书?
 Cookbooks 烹饪书包含:                                                * 从哪里找到社区
                                                                        cookbook烹饪书?
   * Attributes 属性是属于Node 节点对默认值的设置。属性的作用域           + Github 中的烹
     是整个cookbook 烹饪书。                                                饪书
   * Definitions 定义让您能够在数个Resources的基础上创建可重复            + 烹饪书开发流
     使用的集合。                                                           程
   * File Distribution 文件将定义好的文件通过Cookbook File 资源       * 如何将烹饪书上传
     传送到chef管理的服务器中。                                         至chef服务器?
   * Libraries 库将让chef拥有Ruby代码的支持。                         * 我如何改动现有的
   * Recipes 食谱将Resources 材料整合管理,已达成某一项任务。如         烹饪书?
     ,配置apache2的Recipe。                                              + 上传不同路径
   * Lightweight Resources and Providers (LWRP) 材料&原料让您自             下的烹饪书
     定义resources_材料_和providers_原料_                                 + Site Specific
   * Templates 模板在chef管理下的服务器中渲染,您可以将不同的变             Cookbooks
     量带入模板其中,参见ERB templates。                                  + Customizing
   * Metadata 概要其中包含了如下概述:Cookbook_烹饪书_中的                  Templates and
     recipes 食谱,所依赖的libraries或其他cookbook,支持的操作              Files
     系统,等等。                                                         + Other
                                                                            Site-specific
 以上这些cookbook的组成元素均为文件夹或文件。您可已通过执行                 Cookbooks
 {{cookbook create}} knife command 来生成一个cookbook的示例。             + Cookbook
                                                                            Dependencies
 Cookbook Contents                                                    * Use Case Study

 您将要在本地系统的Chef Repository 大厨版本库中的 cookbooks/ 路
 径下开发cookbook。                                                       社区教程

 如何使用cookbook烹饪书?                                            ---------------------

 我们建议您在 *Chef Repository*中写您自己的cookbook烹饪书。当然     Nagios and Chef at
 ,您也可以下载使用社区分享的cookbook烹饪书。.                      Fotopedia

 cookbook烹饪书完成后,您将其上传至Chef Server以便使用(之后将提     Fotopedia uses Chef
 到使用方法)。同样的,您也可以通过 *Managing Cookbooks With         in the management of
 Knife*将其上传至Opscode Community Cookbooks site社区分享。         their infrastructure.
                                                                    Among many other
 如何写新的cookbook烹饪书?                                          things, Chef
                                                                    generates the Nagios
 您可以使用Knife在 Chef Repository cookbooks/ 创建新的cookbook      configuration for all
 烹饪书 .                                                           their services. Their
                                                                    Fotopedia Labs blog
 然后按照需求编辑不同的组成部分,比如说默认的recipe食谱。(更多      entry: Nagios and
 示例参见 Guide to Creating A Cookbook and Writing A Recipe从食     Chef at Fotopedia
 谱到烹饪书)                                                        includes extensive
                                                                    detail on the use of
                                                                    recipes, roles, ruby
                                                                    blocks, helpers and
                                                                    other Chef components
                                                                    - all within their
                                                                    Nagios Cookbook.

                                                                    Guide to Writing
                                                                    Cookbooks by Joshua
                                                                    Timberman

                                                                    Opscode team member
                                                                    Joshua Timberman
                                                                    posted a guide to
                                                                    writing cookbooks on
                                                                    his blog.

 从哪里找到社区cookbook烹饪书?

 Opscode 管理下的 Chef Community Cookbook Site 是cookbook烹饪书的来源之一. 这里专门提供
 了各种cookbook的清单,您可以使用RESTful API方便的浏览、获取所需资源。Opscode 公布了其内
 部使用的所有cookbook 并且也号召大家如此。Cookbook Site Help里包含了Chef Community
 Cookbook Site关于社区烹饪书的指南。

 您可以通过Kinfe API从网上下载烹饪书。您可解压下载的tar.gz 压缩文件至Chef Repository的
 cookbooks/ 路径下。

 如果您使用Git,您可以下载并自动解压文件至 cookbooks/ 路径,并且自动追踪上游改动。命令如
 下:

 更多信息参见 Chef Repository#cookbooks。

 Github 中的烹饪书

 Opscodef公布于社区网站上的cookbooks属于发行版,在github中的属于开发中 Opscode 建议从社
 区网站下载 the Community site 而不是从github中下载,因为这些开发中的cookbooks可能存在
 bug

 出了Opscode在github中的cookbooks,其他社区成员也在github中分享了他们各自的cookbooks:

                   仓库                             介绍                  维护者

 https://github.com/opscode-cookbooks     Cookbooks created by     Opscode
                                          Opscode

 https://github.com/37signals/            37 Signals Repository    37 Signals
 37s_cookbooks

 https://github.com/engineyard/           EY Cloud Recipes         Engine Yard
 ey-cloud-recipes

 https://github.com/cookbooks             Community Curated        "Cookbooks"
                                          Cookbooks                Organization

 烹饪书开发流程

 如果您使用Git Git 作为版本控制系统,详见 Working with Git and Cookbooks[如何使用烹饪书]
 如果您使用其他的版本控制系统,您也可以浏览一下内容,然后将相应的流程用于您选择的版本控
 制系统中。

 如何将烹饪书上传至chef服务器?

                        使用Knife~刀~来管理您的Cookbooks~烹饪书~

 [unknown-at]

 *Knife*刀是属于chef的功能强大的命令行工具.

 详情参见 *Managing Cookbooks With Knife*用刀管理您的烹饪书

 回到我们的问题,我们用 knife cookbook upload 命令来上传烹饪书至chef服务器。在这里,chef
 服务器包含托管chef服务器和私有chef服务器。

 如果您要上名为 COOKBOOK 的烹饪书:

 上传多个烹饪书 1..n :

 上传所有烹饪书:

 如果您使用Chef Solo[独奏], 您需要将您的cookbooks复制到运行chef-solo的服务器上。详情参见
 Chef Solo。

 我如何改动现有的烹饪书?

                                需要关于社区网站的帮助?

 [unknown-at]

 Cookbook Site Help 这里有您要的信息.

 如果您在使用 Opscode烹饪书, Cookbook Support 提供了如何创建和维护烹饪书的信息,您也可以
 在这里提出您的问题。

 当您从github上下载烹饪书,并且想自定义内容使用 "cookbook site install" 这个命令。

 然后您可以对烹饪书进行想要的改动。

 当需要更新至上游的新版本时,您可以执行同样的命令。之后您可以选择将上游的更新合并至您的
 改动中。

 如过上游的更新和您的改动有冲突,您可以用git解决问题。

 上传不同路径下的烹饪书

 一般来说,在knife.rb中您会定义您的烹饪书的路径,cookbook_path = /default/path/to/
 cookbook。如果想相传其他路径下的烹饪书,您可以使用 -o 选项:
 (knife.rb 是knife命令的配置文件)

 同样的,您也可以直接改变在knife.rb中的{{cookbook_path}}。

 Site Specific Cookbooks

 You can also make your own site specific copies of cookbooks.

 ~/.chef/knife.rb or ~/chef-repo/.chef/knife.rb

 Next, copy the entire contents of the cookbook, go forth and customize it, then upload
 the cookbook(s) to the server. When Chef runs, it will only use the cookbook from
 site-cookbooks, not the one in cookbooks.

 For example, say you have:

 When the cookbook is uploaded, Knife will use the cookbook in chef-repo/site-cookbooks/
 djbdns.

 Customizing Templates and Files

 WARNING!  This technique has been depreciated - see CHEF-2308

 If you would like to customize just the files or templates used by a cookbook, you can
 create just those as well, copying them over from the upstream version and making your
 local changes. For example, you're deploying OpenLDAP and want to customize the
 slapd.conf and add your own certificates.

 Assuming you've followed along with the Chef Repository and have created the ldap
 certificate:

 Make changes, update the repository and install the cookbooks, and when Chef runs, it
 will get the certificte and slapd.conf from the site-cookbooks, but otherwise use the
 rest of the openldap cookbook.

 Other Site-specific Cookbooks

 You can also use site-cookbooks for setting up other site-specific cookbooks

 chef-repo/site-cookbooks/web_server/recipes/default.rb

 Then add "web_server" to recipes for the node in the webui, and it will apply the
 configuration. Prior to Chef 0.7.0, you might have a cookbook that merely includes
 several other recipes/cookbooks. Now you'll use Roles to define that.

 Cookbook Dependencies

 The Chef Server tries to only distribute the cookbooks that are needed to configure
 each individual Node. In order to do that, we take the list of Roles and Recipes that
 are assigned directly to that system, expand the list of dependencies for them, and
 then ship that set to the Node.

 If there is a dependency on a particular cookbook being in place in order to complete a
 configuration, edit the template metadata.rb file to specify that dependency through
 the 'depends' field. Metadata has details on this field, and the other fields that are
 available to you in the metadata.rb file.

 Whenever you include a recipe in a cookbook via "include_recipe" you need to add the
 included cookbook to the depends list.

 Use Case Study

 In our environment we don’t have only Windows / Ubuntu/Debian / RH servers. So my
 problem is that we want to create a maintenance role for updating these servers, but
 the server name doesn’t describe the function or the OS running on it. Is there a way
 to create “server-groups” which include only windows servers or something like this
 because with these groups we can easily put a the correct “maintenance-role” (cookbooks
 for maintenance) to them if they are needed?

 Probably the best and most direct way to go about this is to have a single "Maintenance
 Cookbook" as part of every system, which will selectively include recipes based on
 platform. It'd look something like this:
Labels
- None
14 Child Pages
Page: Attributes Page: Definitions Page: File Distribution Page: Libraries Page: Metadata Page: Recipes Page: Templates Page: Version Constraints Page: Cookbook Site Help Page: Chef Repository Page: Working with Git and Cookbooks Page: Headless Branches for Cookbook Repositories Page: Just Enough Ruby for Chef Page: Creating New Cookbooks
4 Comments
Hide/Show Comments
-
User icon: [email protected]
Jul 31, 2009
Jin-young Heo
The git cloning doesn't allow clone repository to existed directory. Then, how can I get pre-made cookbooks into my cookbooks directory?
- Permalink
-
User icon: jtimberman
Aug 01, 2009
Joshua Timberman [Chef]
Sounds like you're using the Chef Repository, simply remove the cookbooks/ directory and then you can clone opscode/cookbooks from GitHub.
o Permalink
-
User icon: [email protected]
Aug 05, 2009
Jin-young Heo
I already organized chef-repo in our own git server. So I did like below:
cd ~/chef-repo git rm -r cookbooks git commit -m "Delete cookbooks directory to use Opscode pre-made cookbooks" git submodule add git://github.com/opscode/cookbooks.git ./cookbooks git add .gitmodules cookbooks/ git commit -m "Import Opscode pre-made cookbooks"
Is it reasonable(Sorry, I'm a newbie of chef and git)?
Permalink
-
User icon: jtimberman
Aug 06, 2009
Joshua Timberman [Chef]
Using Git submodules is perfectly ok. I know there's some others that use that method as well. It keeps your version consistent too, since its tied a commit.
@ Permalink
-
-
Powered by a free Atlassian Confluence Open Source Project License granted to Chef and Ohai. Evaluate Confluence today.
- Powered by Atlassian Confluence 4.3.7, the Enterprise Wiki
- Printed by Atlassian Confluence 4.3.7, the Enterprise Wiki.
- · Report a bug
- · Atlassian News
Portions Copyright © 2009-2013 Chef Software, Inc. All Rights Reserved. Other content licensed under a Creative Commons Attribution-ShareAlike 3.0 Unported License.
#+end_example *** web page: Set up your Chef environment | Learn Chef https://learnchef.opscode.com/get-started/ **** webcontent :noexport: #+begin_example Location: https://learnchef.opscode.com/get-started/
- Chef Home
- Documentation
- @learnchef
Get started
Tutorials
- Create your first cookbook
- Write for multiple platforms
Concepts
- Resources
- Recipes
- Cookbooks
- Run-lists
- Nodes
- Roles
- Environments
- Organizations
Chef Fundamentals Webinar Series
Legacy content
- Starter Use Cases
Help I'm Stuck!
§Set up your Chef environment
Before getting started using Chef, you'll need to set up your environment. Let's briefly touch on what the Chef environment looks like.
The typical Chef environment is made up of 3 parts: the Chef server, your workstation, and nodes.
The Chef server is the brains of the operation. It stores information about your infrastructure as well as reusable components called cookbooks. You can run Chef server on premises or let us host it for you. More on that later.
A workstation is where you will spend most of your time working with Chef. It's the same place you do your development or sysadmin work. From your workstation, you'll author Chef cookbooks, upload them to your Chef server, and more.
A node is a server in your infrastructure. Nodes are the computers that you manage using Chef. A node can be a physical computer, virtual machine, instance in your public or private cloud environment, or even a switch or router in your network.
Here's a visual representation to help you understand how the Chef server, workstation, and nodes fit together.
Chef server, workstation, and nodes
The next 3 sections walk you through the setup process. Each step has a few options. We recommend that as you evaluate and experiment with Chef that you choose the environment that you're most comfortable with. You can later adapt what you've learned to your business environment.
Expect to take about 20-30 minutes to work through the setup process.
§Step 1: Set up Chef server
Chef server comes in two flavors: Enterprise Chef and Open Source Chef.
You can run Enterprise Chef either on premises, or let us host it for you on Hosted Enterprise Chef. To help you experience Chef as quickly as possible, we recommend that you sign up for a free trial of Hosted Enterprise Chef. Just fill out the form on our sign up page.
Sign up for a free trial of Hosted Enterprise Chef
After you evaluate Chef, read Which Chef is Right for You? to understand which version of Chef works best for your organization. You can also check out Joshua Timberman's Chef 11 Server: Up and Running blog post to get a feel for what it's like to set up Chef server yourself.
§Step 2: Set up your workstation
Chef supports administration from many flavors of Windows, Mac OS, Linux, and Unix. You can find all supported options here. To keep things manageable, we recommend that you start with one of these:
- Windows 7 or 8.1
- Mac OS X 10.7.3+
- Ubuntu 10.04 or 12.04
§Install the Starter Kit
During the Hosted Enterprise Chef signup process, you created an organization. Now you need to install the Starter Kit to enable your workstation to communicate with the Chef server (authenication is done through .pem certificates.)
- Navigate to https://manage.opscode.com/starter-kit.
- If you have multiple organizations, choose the organization for which you would like to use the Starter Kit.
- Click the Download Starter Kit button that appears.
- Click Proceed. A folder named chef-repo will download to your computer.
- Move chef-repo to a convenient location. For example,
- C:\Users\you\chef-repo (Windows)
- /Users/you/chef-repo (Mac OS)
- /home/you/chef-repo (Linux)
§Run the Chef installer
Chef provides everything you need to get started in what's called the omnibus installer. The two important parts of the installation for a workstation are the Ruby programming language and knife, the command-line tool that provides the interface between the workstation and the Chef server. The installer includes other tools that we'll look at later.
Choose one of these options to install Chef on your workstation:
Windows
Get the MSI installer for Windows here. Choose the default options when you run it.
OS X
Run this command from your terminal:
curl -L https://www.opscode.com/chef/install.sh | sudo bash
Ubuntu
Run this command from your terminal:
curl -L https://www.opscode.com/chef/install.sh | sudo bash
§Set up your text editor
Because you'll be writing code, be sure to set up a good text editor on your workstation. We recommend one that shows line numbers, provides syntax highlighting for Ruby, auto-completes commands, and enables you to work with multiple files at the same time. If you don't have a favorite text editor, you can try Sublime Text for free. It works on all platforms.
§Step 3: Set up a node to manage
A node can be practically any computer with an operating system that is connected to a network and for which you have administrator, sudo, or root access. We recommend CentOS 6+, Windows Server 2008+, or Ubuntu 12.04+. You'll need access to the hostname or IP address of the server as well as the SSH username, password, and port.
§Deploy an image
Although you can use a physical machine, we recommend using a virtual machine so that you can easily spin up and tear down instances. We've provided a number of preconfigured images on Amazon EC2, and highly recommend that you start there.
If you're a Vagrant user, the Enterprise Chef Starter Kit includes a Vagrantfile which can be used to launch a Vagrant instance.
If you are not currently set up to use Vagrant or EC2, you can try our Chef Training Lab, (it's currently in beta - we'd love your feedback.)
Amazon EC2
For each AMI listed here, login with username chef and password chef.
- Choose an AMI.
- Public CentOS AMI (ami-ed100c84) in the US East (N. Virginia) Region
- Public Ubuntu AMI (ami-0521316c) in the US East (N. Virginia) Region
- Public Windows Server 2012 AMI (ami-97d0ccfe) in the US East (N. Virginia) Region
- From the EC2 Management Console, click Launch. Follow the prompts. You can accept the default
settings for all steps except the following:
- On Step 2, choose your instance type. A t1.micro instance is the most cost-effective and should be sufficient for Learn Chef tutorials.
- On Step 6, ensure these ports are open. Ensure that the Source column is Anywhere. Most of these ports are used by the bootstrap process, which you'll learn about next. The HTTP ports are later used by the Learn Chef tutorials, so we recommend you open them now. o Linux: # 22 (SSH) # 80-90 (HTTP) # 443 (SSL) o Windows: # 3389 (RDP) # 80-90 (HTTP) # 5985-6000 (WinRM)
- After you complete Step 7, choose Proceed without a key pair.
These images are simlilar to the base images, with these modifications:
-
A chef account with administrator access on all images.
-
A MOTD on Linux images.
-
Windows Remote Management (WinRM) configuration and access to port 5985 on Windows images. Specifically, we ran these commands with administrator priviledges:
winrm quickconfig -q winrm set winrm/config/winrs '@{MaxMemoryPerShellMB="300"}' winrm set winrm/config '@{MaxTimeoutms="1800000"}' winrm set winrm/config/service '@{AllowUnencrypted="true"}' winrm set winrm/config/service/auth '@{Basic="true"}' netsh advfirewall firewall set rule name="Windows Remote Management (HTTP-In)" profile=public protocol=tcp localport=5985 remoteip=localsubnet new remoteip=any
Vagrant
The Starter Kit provided by Enterprise Chef includes a Vagrantfile. All you need to run is:
vagrant up
Chef Training Lab (Beta)
Choose from one of the Training Labs below:
- Ubuntu Training Lab
- CentOS Training Lab
- Windows Training Lab
We have also published a detailed video tutorial on setting up this lab.
Here's what happens next:
- Sign Up Page: After clicking the link above you will be taken to a sign up page for CloudShare (the cloud hosting platform we are working with).
sign up page
- Once the sign up form is completed you will enter the environment. The status bar at the top will let you know that a VM is being provisioned for you.
- Once provisioned, the Start Using This Environment button will light up. Click it.
start using
- You will see a single Ubuntu 10.04 VM listed in the window. Click More details and write down
the following information:
- The external address
- SSH username and password
view-details view details more
§Bootstrap the image
At this point, you have an image with a public IP address or hostname, can establish an SSH or RDP connection, and an administrator or root account that you can access.
Now you need to bootstrap the image. The bootstrapping process installs the Chef client and checks in with the Chef server.
Bootstrapping can take a few moments to kick off. Please be patient after entering the command.
§Bootstrap a Windows node
If you're bootstrapping a Windows node, you'll first need to install the knife windows plugin on your workstation. The documentation explains in detail how to do so, but on Linux the command typically looks like this:
/opt/chef/embedded/bin/gem install knife-windows
Then to bootstrap the Windows node, you run the knife bootstrap command. Bootstrapping a Windows Server image on EC2 looks like this:
knife bootstrap windows winrm ec2-xx-xx-xx-xx.compute-1.amazonaws.com -x chef –P chef -N node1
Replace ec2-xx-xx-xx-xx.compute-1.amazonaws.com with your node's IP address or hostname. If you're not using an EC2 image, replace the -x and -P arguments with the username and password for an account that has Administrator access.
The -N argument specifies the node's name. It can be whatever you like.
§Bootstrap a Linux node
If you're bootstrapping a Linux node, navigate to the chef-repo directory and run the knife bootstrap command. Bootstrapping a Linux image on EC2 looks like this:
knife bootstrap ec2-xx-xx-xx-xx.compute-1.amazonaws.com --sudo -x chef -P chef -N node1
Replace ec2-xx-xx-xx-xx.compute-1.amazonaws.com with your node's IP address or hostname. If you're not using an EC2 image, replace the -x and -P arguments with the username and password for an account that has root access.
The -N argument specifies the node's name. It can be whatever you like.
You'll be prompted to re-enter the sudo password.
If you're using Vagrant, the bootstrap command looks like this.
knife bootstrap localhost --sudo -x vagrant -P vagrant --ssh-port 2222 -N node1
--ssh-port 2222 might not be correct if you're running more than one Vagrant VM. You can get the port that Vagrant selects for SSH forwarding from the output of the vagrant up command.
§Verify the node
To verify that the node is bootstrapped, navigate to manage.opscode.com/organizations. From the Nodes tab, you'll see an entry for the node you just bootstrapped.
When logged into your account and the organization used for this tutorial series, you should see a single node listed on the Nodes tab.
§All done!
Congratulations! You're now set up with your Chef environment and are ready to start the first tutorial where you'll write your first cookbook.
Create your first cookbook →
Did you find this content useful?YesNo
-
Feedback
Copyright © 2014 Chef All Rights Reserved.
#+end_example *** web page: sysadvent: Day 24 - Twelve things you may not know about Chef http://sysadvent.blogspot.com/2012/12/day-24-twelve-things-you-didnt-know.html **** webcontent :noexport: #+begin_example Location: http://sysadvent.blogspot.com/2012/12/day-24-twelve-things-you-didnt-know.html skip to main | skip to sidebar sysadvent
December 24, 2012
Day 24 - Twelve things you may not know about Chef
This was written by Joshua Timberman.
In this post, we will discuss a number of features that can be used in managing systems with Chef, but may be overlooked by some users. We'll also look at some features that are not so commonly used, and may prove helpful.
Here's a table of contents:
- Resources are first class citizens
- In-place file editing
- File Checksum comparisons
- Version matching
- Encrypting Data for Chef's Use
- Chef has a REPL
- Working with the Resource Collection
- Extending the Recipe DSL with helpers
- Load and execute a single recipe
- Integrating Chef with Your Tools
- Sending information to various places
- Tagging nodes
(1) Resources are first class citizens
This is probably something most readers who are familiar with Chef already do know. However, we do encounter some uses of Chef that indicate that the author didn't know this. For example, this is from an actual recipe I have seen:
execute "yum install foo" do not_if "rpm -qa | grep '^foo'" end
execute "/etc/init.d/food start" do not_if "ps awux | grep /usr/sbin/food" end
This totally works, assuming that the grep doesn't turn up a false positive (someone reading the 'food' man page?). However, there are resources for this pattern kind of thing, so it's best to use them instead:
package "foo" do action :install end
service "food" do action :start end
Core Chef Resources
Chef comes with a great many resources. These are for managing common components of operating systems, but also primitives that can be used to use on their own, or compose new resources.
Some common resources:
- package
- service
- user
- group
- file, template, remote_file, cookbook_file
- execute, script, ruby_block
These actually make up probably 80% or more of the resources people will use. However, Chef comes with a few other resources that are less commonly used but still highly useful.
- scm, git, subversion
- ohai
- http_request
- erlang_call
The scm resource has two providers, git and subversion, which can be used as the resource type. These are useful if a source repository must be checked out. For example, myproject is in subversion, and your project is in git.
subversion "myproject" do repository "svn://code.example.com/repos/myproject/trunk" destination "/opt/share/myproject" revision "HEAD" action :checkout end
git "yourproject" do repository "git://github.com/you/yourproject.git" destination "/usr/local/src/yourproject" reference "1.2.3" # some tag action :checkout end
This is used under the covers in the deploy resource.
The ohai resource can be used to reload attributes on the node that come from Ohai plugins.
For example, we can create a user, and then tell ohai to reload the plugin that has all user and group information.
ohai "reload_passwd" do action :nothing plugin "passwd" end
user "daemonuser" do home "/dev/null" shell "/sbin/nologin" system true notifies :reload, "ohai[reload_passwd]", :immediately end
Or, we can drop off a new plugin as a template, and then load that plugin.
ohai "reload_nginx" do action :nothing plugin "nginx" end
template "#{node['ohai']['plugin_path']}/nginx.rb" do source "plugins/nginx.rb.erb" owner "root" group "root" mode 00755 notifies :reload, 'ohai[reload_nginx]', :immediately end
If your recipe(s) manipulate system state that future resources need to be aware of, this can be quite helpful.
The http_request resource makes... an HTTP request. This can be used to send (or receive) data via an API.
For example, we can send a request to retrieve some information:
http_request "some_message" do url "http://api.example.com/check_in" end
But more usefully, we can send a POST request. For example, on a Chef Server with CouchDB (Chef 10 and earlier), we can compact the database:
http_request "compact chef couchDB" do url "http://localhost:5984/chef/_compact" action :post end
If you're building a custom lightweight resource/provider for an API service like a monitoring system, this could be a helpful primitive to build upon.
Opscode Cookbooks
Aside from the resources built into Chef, Opscode publishes a number of cookbooks that contain custom resources, or "LWRPs". See the README for these cookbooks for examples.
- apt_repository - manage APT repos (sources.list.d entries)
- cron_d - manage cron.d crontabs
- sudo - add sudoers.d entries
- yum_repository - manage YUM repos
There's many more, and documentation for them is on the Opscode Chef docs site.
(2) In-place file editing
For a number of reasons, people may need to manage the content of files by replacing or adding specific lines. The common use case is something like sysctl.conf, which may have different tuning requirements from different applications on a single server.
This is an anti-pattern
Many folks who practice configuration management see this as an anti-pattern, and recommend managing the whole file instead. While that is ideal, it may not make sense for everyone's environment.
But if you really must...
The Chef source has a handy utility library to provide this functionality, Chef::Util::FileEdit. This provides a number of methods that can be used to manipulate file contents. These are used inside a ruby_block resource so that the Ruby code is done during the "execution phase" of the Chef run.
ruby_block "edit etc hosts" do block do rc = Chef::Util::FileEdit.new("/etc/hosts") rc.search_file_replace_line( /^127.0.0.1 localhost$/, "127.0.0.1 #{new_fqdn} #{new_hostname} localhost" ) rc.write_file end end
For another example, Sean OMeara has written a line that includes a resource/provider to append a line in a file if it doesn't exist.
(3) File Checksum comparisons
In managing file content with the file, template, cookbook_file, and remote_file resources, Chef compares the content using a SHA256 checksum. This class can be used in your own Ruby programs or libraries too. Sure, you can use the "sha256sum" command, but this is native Ruby instead of shelling out.
The class to use is Chef::ChecksumCache and the method is #checksum_for_file.
require 'chef/checksum_cache' sha256 = Chef::ChecksumCache.checksum_for_file("/path/to/file")
(4) Version matching
It is quite common to need version string comparison checks in recipes. Perhaps we want to match the version of the platform this node is running on. Often we can simply use a numeric comparison between floating point numbers or strings:
if node['platform_version'].to_f == 10.04 if node['platform_version'] == "6.3"
However, sometimes we have versions that use three points, and matching on the third portion is relevant. This would get lost in #to_f, and greater/less than comparisons may not match with strings.
Chef::VersionConstraint
The Chef::VersionConstraint class can be used for version comparisons. It is modeled after the version constraints in Chef cookbooks themselves.
First we initialize the Chef::VersionConstraint with an argument containing the comparison operator and the version as a string. Then, we send the #include? method with the version to compare as an argument. For example, we might be checking that the version of OS X is 10.7 or higher (Lion).
require 'chef/version_constraint' Chef::VersionConstraint.new(">= 10.7.0").include?("10.6.0") #=> false Chef::VersionConstraint.new(">= 10.7.0").include?("10.7.3") #=> true Chef::VersionConstraint.new(">= 10.7.0").include?("10.8.2") #=> true
Or, in a Chef recipe we can use the node's platform version attribute. For example, on a CentOS 5.8 system:
Chef::VersionConstraint.new("~> 6.0").include?(node['platform_version']) # false
But on a CentOS 6.3 system:
Chef::VersionConstraint.new("~> 6.0").include?(node['platform_version']) # true
Chef's version number is stored as a node attribute (node['chef_packages']['chef']['version']) that can be used in recipes. Perhaps we want to check for a particular version because we're going to use a feature in the recipe only available in newer versions.
version_checker = Chef::VersionConstraint.new(">= 0.10.10") mac_service_supported = version_checker.include?(node['chef_packages']['chef']['version'])
if mac_service_supported
do mac service is supported so do these things
end
(5) Encrypting Data for Chef's Use
By default, the data stored on the Chef Server is not encrypted. Node attributes, while containing useful data, are plaintext for anyone that has a private key authorized to the Chef Server. However, sometimes it is desirable to store encrypted data, and Data Bags (stores of arbitrary JSON data) can be encrypted.
You'll need a secret key. This can be a phrase or a file. The key needs to be available on any system that will need to decrypt the data. A cryptographically strong secret key is best, and can be generated with OpenSSL:
openssl rand -base64 512 > ~/.chef/encrypted_data_bag_secret
Next, create the data bag that will contain encrypted items. For example, I'll use secrets.
knife data bag create secrets
Next, create the items in the bag that will be encrypted.
knife data bag create secrets credentials --secret-file ~/.chef/encrypted_data_bag_secret { "id": "credentials", "user": "joshua", "password": "dirty_secrets" }
Then, view the content of the data bag item:
knife data bag show secrets credentials id: credentials password: cKZgOISOE+lmRiqf9j5LlRegtcILqvVw6XRft11T7Pg=
user: mBf1UDwAGq0N0Ohqugabfg==
Naturally, this is encrypted using the secret file. Decrypt it:
knife data bag show secrets credentials --secret-file ~/.chef/encrypted_data_bag_secret id: credentials password: dirty_secrets user: joshua
To use this data in a recipe, the secret file must be copied and its location configured in Chef. The knife bootstrap command can do this automatically if your knife.rb contains the encrypted_data_bag_secret configuration. Presuming that the .chef directory contains the knife.rb and the above secret file:
encrypted_data_bag_secret "./encrypted_data_bag_secret"
In a Recipe, Chef::EncryptedDataBagItem
Nodes bootstrapped using the default bootstrap template will have the secret key file copied to / etc/chef/encrypted_data_bag_secret, and available for Chef. This is a constant in the Chef::EncryptedDataBagItem class, DEFAULT_SECRET_FILE. To use this in a recipe, use the # load_secret method, then pass that as an argument to the #load method for the data bag item. Finally, access various keys from the item like a Ruby Hash. Example below:
secret = Chef::EncryptedDataBagItem.load_secret(Chef::EncryptedDataBagItem::DEFAULT_SECRET_FILE)) user_creds = Chef::EncryptedDataBagItem.load("secrets","credentials", secret) user_creds['id'] # => "credentials" user_creds['user'] # => "joshua" user_creds['password'] # => "dirty_secrets"
(6) Chef has a REPL
Chef comes with a built-in "REPL" or shell, called shef. A REPL is "Read, Eval, Print, Loop" or "read what I typed in, evaluate it, print out the results, and do it again." Other examples of REPLs are Python's python w/ no arguments, a Unix shell, or Ruby's irb.
shef (chef-shell in Chef 11)
In Chef 10 and earlier, the Chef REPL is invoked as a binary named shef. In Chef 11 and later, it is renamed to chef-shell. Additional options can be passed to the command-line, including a config file to use, or an over all mode to use (solo or client/server). See shef --help for options.
Once invoked, shef has multiple run-time contexts that can be used:
- main
- recipe (recipe_mode in Chef 11)
- attributes (attributes_mode in Chef 11)
At any time, you can type "help" to get context specific help. The "main" context provides a number of API helper methods. The "attributes" context functions as a cookbook's attributes file. The "recipe" context is in the Chef recipe DSL context, where resources can be created and run. For example:
chef:recipe > package "zsh" do chef:recipe > action :install chef:recipe ?> end => <package[zsh] @name: "zsh" @package_name: "zsh" @resource_name: :package >
(the output is trimmed for brevity, try it on your own system)
This works similar to how Chef actually works when processing recipes. It has recognized the input as a Chef Resource and added it to the resource collection. This doesn't actually manage the resource until we enter the execution phase, similar to a Chef run. We can do that with the shef method run_chef:
chef:recipe > run_chef [2012-12-23T12:32:27-07:00] INFO: Processing package[zsh] action install ((irb#1) line 1) [2012-12-23T12:32:27-07:00] DEBUG: package[zsh] checking package status for zsh zsh: Installed: 4.3.17-1ubuntu1 Candidate: 4.3.17-1ubuntu1 Version table: *** 4.3.17-1ubuntu1 0 500 http://us.archive.ubuntu.com/ubuntu/ precise/main amd64 Packages 100 /var/lib/dpkg/status [2012-12-23T12:32:27-07:00] DEBUG: package[zsh] current version is 4.3.17-1ubuntu1 [2012-12-23T12:32:27-07:00] DEBUG: package[zsh] candidate version is 4.3.17-1ubuntu1 [2012-12-23T12:32:27-07:00] DEBUG: package[zsh] is already installed - nothing to do => true
There are many possibilities for debugging and exploring with this tool. For example, use it to test the examples that are presented in this post.
chef/shef/ext (renamed in Chef 11)
The methods available in the "main" context of Shef are also available to your own scripts and plugins by requiring Chef::Shef::Ext. In Chef 11, this will be Chef::Shell::Ext, though the old one is present for compatibility.
require 'chef/shef/ext' Shef::Extensions.extend_context_object(self) nodes.all # => [node[doppelbock], node[cask], node[ipa]]
(7) Working with the Resource Collection
One of the features of Chef is that Recipes are pure Ruby. As such, we can manipulate things that are in the Object Space, such as other Chef objects. One of these is the Resource Collection, the data structure that contains all the resources that have been seen as Chef processes recipes. Using shef, or any Chef recipe, we can work with the resource collection for a variety of reasons.
Look Up Another Resource
The #resources method will return an array of all the resources. From our shef session earlier, we have a single resource:
chef:recipe > resources ["package[zsh]"]
We can add others.
chef:recipe > service "food" chef:recipe > file "/tmp/food-zsh-completion"
Now when we look at the resource collection, we'll see the new resources:
chef:recipe > resources ["package[zsh]", "service[food]", "file[/tmp/food-zsh-completion]"]
We can use the resources method to open a specific resource.
"Re-Open" Resources to Modify/Override
If we look at the service[food] resource that was created (using all default parameters), we'll see:
chef:recipe > resources("service[food]") <service[food] @name: "food" @noop: nil @before: nil @params: {} @provider: nil @allowed_actions: [:nothing, :enable, :disable, :start, :stop, :restart, :reload] @action: "nothing" @updated: false @updated_by_last_action: false @supports: {:restart=>false, :reload=>false, :status=>false} @ignore_failure: false @retries: 0 @retry_delay: 2 @source_line: "(irb#1):2:in `irb_binding'" @elapsed_time: 0 @resource_name: :service @service_name: "food" @enabled: nil @running: nil @parameters: nil @pattern: "food" @start_command: nil @stop_command: nil @status_command: nil @restart_command: nil @reload_command: nil @priority: nil @startup_type: :automatic @cookbook_name: nil @recipe_name: nil>
To work with this, it is easier to assign to a local variable.
chef:recipe > f = resources("service[food]")
Then, we can call the various parameters as accessor methods.
chef:recipe > f.supports => {:restart=>false, :reload=>false, :status=>false}
We can modify this by sending the supports method to f with additional arguments. For example, maybe the food service supports restart and status commands, but not reload:
chef: recipe > f.supports({:restart => true, :status => true}) => {:restart=>true, :status=>true}
As a more practical example, perhaps you want to use a cookbook from the Chef Community Site that manages a couple services on Ubuntu. However, the author of the cookbook hasn't updated the cookbook in a while, and those services are managed by upstart instead of being init.d scripts. You could create a custom cookbook that "wraps" the upstream cookbook with a recipe like this to modify those service resources:
if platform?("ubuntu") ["service_one, "service_two].each do |s| srv = resource("service[#{s}]") srv.provider Chef::Provider::Service::Upstart srv.start_command "/usr/bin/service #{s} start" end end
Then in the node's run list, you'd have the upstream cookbook's recipe and your custom recipe:
{ "run_list": [ "their_upstream", "your_custom" ] }
This is a pattern that has become popular with the idea of "Library" vs. "Application" cookbooks, and Bryan Berry has a RubyGem to provider a helper for it.
(8) Extending the Recipe DSL with helpers
One of the features of a Chef cookbook is that it can contain a "libraries" directory with files containing helper libraries. These can be new Chef Resources/Providers, ways of interacting with third party services, or simply extending the Chef Recipe DSL.
Let's just have a simple method that shortcuts the Chef version attribute so we don't have to type the whole thing in our recipes.
First, create a cookbook named "my_helpers".
knife cookbook create my_helpers
Then create the library file. This can be anything you want, all library files are loaded by Chef.
touch cookbooks/my_helpers/libraries/default.rb
Then, since we are extending the Chef Recipe DSL, add this method to its class, Chef::Recipe.
class Chef class Recipe def chef_version node['chef_packages']['chef']['version'] end end end
To use this in a recipe, simply call that method. From the earlier example:
mac_service_supported = version_checker.include?(chef_version)
Next, I'll use a helper library for the Encrypted Data Bag example from earlier to demonstrate this. I created a separate library file.
touch cookbooks/my_helpers/libraries/encrypted_data_bag_item.rb
It contains:
class Chef class Recipe def encrypted_data_bag_item(bag, item, secret_file = Chef::EncryptedDataBagItem::DEFAULT_SECRET_FILE) DataBag.validate_name!(bag.to_s) DataBagItem.validate_id!(item) secret = EncryptedDataBagItem.load_secret(secret_file) EncryptedDataBagItem.load(bag, item, secret) rescue Exception Log.error("Failed to load data bag item: #{bag.inspect} #{item.inspect}") raise end end end
Now, when I want to use it in a recipe, I can:
user_creds = encrypted_data_bag_item("secrets", "credentials)
(9) Load and execute a single recipe
In default operation, Chef loads cookbooks and recipes from their directories on disk. It is actually possible to load a single recipe file by composing a new binary program from Chef's built-in classes. This is helpful for simple use cases or as a general example. Dan DeLeo of Opscode wrote this as a gist awhile back, which I've updated here:
https://gist.github.com//4366061
It's only 45 lines counting whitespace. Simply save that to a file, and then create a recipe file, and run it with the filename as an argument.
root@virt1test:~# wget https://gist.github.com/raw/4366061/68125dcf8767e1f5436e506c2d2a9697605d9802/chef-apply.rb --2012-12-23 13:56:32-- https://gist.github.com/raw/4366061/68125dcf8767e1f5436e506c2d2a9697605d9802/chef-apply.rb 2012-12-23 13:56:32 (137 MB/s) - `chef-apply.rb' saved [848]
root@virt1test:~# chmod +x chef-apply.rb root@virt1test:~# ./chef-apply.rb recipe.rb [2012-12-23T13:56:54-07:00] INFO: Run List is [] [2012-12-23T13:56:54-07:00] INFO: Run List expands to [] [2012-12-23T13:56:54-07:00] INFO: Processing package[zsh] action install ((chef-apply cookbook)::(chef-apply recipe) line 1) [2012-12-23T13:56:54-07:00] INFO: Processing package[vim] action install ((chef-apply cookbook)::(chef-apply recipe) line 2) [2012-12-23T13:56:54-07:00] INFO: Processing file[/tmp/stuff] action create ((chef-apply cookbook)::(chef-apply recipe) line 3)
This is the simple recipe:
package "zsh" package "vim"
file "/tmp/stuff" do content "I have some stuff I'm stashing in here." end
This functionality is quite useful for example purposes, and a ticket (CHEF-3571) was created to track its addition for core Chef.
(10) Integrating Chef with Your Tools
There's a rising ecosystem of tools surrounding chef. Many of them use the Chef REST API to expose cool functionality and let you build your own tooling on top.
spice and ridley (ruby)
spice and ridley provide ruby APIs that talk to Chef.
pychef (python)
pychef gives you a nice api for hitting the Chef API from python.
jclouds (java/clojure)
jclouds has a chef component to let you use the Chef REST api from Java and Clojure. Learn more here
(11) Sending information to various places
Chef has the ability to send output to a variety of places. By default, it will output to standard out. This is managed through the Chef logger, a class called Chef::Log.
The Chef::Log Configuration
The Chef::Log logger has three main configuration options:
- log_level: the amount of log output to display. Default is "info", but "debug" is common.
- log_location: where the log output should go. Default is standard out.
- verbose_logging: whether to display "Processing:" messages for each resource Chef processes. Default is true.
The first two are configurable with command-line options, or in the configuration file. The level is the -l (small ell) option, and the location is the -L (big ell) option.
chef-client -l debug -L debug-output.log
In the configuration file, the level should be specified as a symbol (preceding colon), and the location as a string or constant (if using standard out).
log_level :info log_location STDOUT
Or:
log_level :debug log_location "/var/log/chef/debug-output.log"
The verbose output option is in the configuration file. To suppress "Processing" lines, set it to false.
verbose_logging false
Output Formatters
A new feature for log output introduced in Chef 10.14 is "Output Formatters". These can be set with the -F option, or the formatter configuration option. There are some formatters included in Chef:
- base: the default
- doc: nicely presented "documentation" type output
- min: rspec style minimal output
For example, to use the doc style but only for one run:
chef-client -F doc -l fatal
Use the log level fatal so normal logger messages aren't displayed. To make this permenant for all runs, put it in the config file.
log_level :fatal formatter "doc"
You can create your own formatters, too. An example of this is Andrea Campi's nyan cat formatter. You can deploy this and use it with Sean OMeara's cookbook.
Report/Exception Handlers
Chef has an API for running report/exception handlers at the end of a Chef run. These can display information about the resources that were updated, any exception that occurred, or other data about the run itself. The handlers themselves are Ruby classes that inherit from Chef::Handler, and then override the report method to perform the actual reporting work. Chef handlers can be distributed as RubyGems, or single files.
client.rb
Chef becomes aware of the report or exception handlers through the configuration file. For example, if I wanted to use the updated_resources handler that I wrote as a RubyGem, I would install the gem on the system, and then put the following in my /etc/chef/client.rb.
require "chef/handler/updated_resources" report_handlers << SimpleReport::UpdatedResources.new exception_handlers << SimpleReport::UpdatedResources.new
Then at the end of the run, the report would print out the resources that were updated.
chef_handler Cookbook
For handlers that are simply a single file, use Opscode's chef_handler cookbook. It will automatically handle putting the handlers in place on the system, and adding them to the configuration.
Other Handlers
A number of Chef handlers are available from the community and many are listed on the Exception and Report Handlers page. Conventionally, authors often prepend chef-handler to their gem names to make them easier to find. Some common ones you may find useful:
- chef-irc-snitch: send exceptions to an IRC channel
- chef-handler-campfire: send exceptions and reports to campfire
- hipchat: the hipchat gem itself includes a Chef report handler!
- chef-handler-graphite: send Chef run report data to graphite.
(12) Tagging nodes
A feature that has existed in Chef since its initial release is "node tagging". This is simply a node attribute built in where entries can be added and removed, or queried easily.
Use cases
One can certainly use other node attributes for storing data. Since node attributes can be any JSON object type, arrays are easily available. Howeer, "tags" have some special helpers available, and semantic uses that may make more sense than plain attributes.
Part of the idea is that tags may be added or removed, flipping the node to various states as far as the Chef Server is concerned. For example, one might only want to monitor nodes that have a certain tag, or run data base migrations on a node tagged to do so.
Tags in Chef Recipes
In Chef recipes, we can search for nodes that have a particular tag. Perhaps nodes tagged "decommissioned" shouldn't be monitored.
decommissioned_nodes = search(:node, "tags:decommissioned")
The recipe DSL itself has some tag-specific helper methods, too.
Use tagged? to see if the node running Chef has a specific tag:
if tagged?("decommissioned") raise "Why am I running Chef if I'm decommissioned?" end
Perhaps more usefully:
if tagged?("run_migrations") execute "rake db:migrate" do cwd "/srv/myapp/current" end end
If the tags of the node need to be modified during a run, that can be done with the tag and untag methods.
tag("deployed") log "I'm printed if the tag deployed is set." do only_if { tagged?("deployed") } end
Or perhaps more usefully, untag the node after the migrations from earlier are run:
if tagged?("run_migrations") execute "rake db:migrate" do cwd "/srv/myapp/current" notifies :create, "ruby_block[untag-run-migrations]", :immediately end end
ruby_block "untag-run-migrations" do block do untag("run_migrations") end only_if { tagged?("run_migrations") } end
Knife Commands
There are knife commands for viewing and manipulating node tags.
View the tags of a node:
knife tag list web23.example.com decommissioned
Add a tag to a node:
knife tag create web23.example.com powered_off Created tags powered_off for node web23.example.com.
Remove a tag from a node:
knife tag delete web23.example.com powered_off Deleted tags powered_off for node web23.example.com.
Conclusion
Hopefully this post contains a number of things you didn't know were available to Chef, and will be useful in your Chef environment.
Posted by Jordan Sissel # #
3 comments:
Doug Ireton said...
Super helpful Chef tips. Thanks Joshua!

December 24, 2012 at 11:06 AM [icon_delet]
JB said...
You should work at Opscode...

December 24, 2012 at 3:45 PM [icon_delet]
jakshi said...
I'm chum that sometimes use ani-pattern "In-place file editing". Thank you a lot for your tips,
they are mega-helpful.

January 3, 2013 at 1:51 AM [icon_delet]
Post a Comment
Newer Post Older Post Home Subscribe to: Post Comments (Atom)
Sponsored by Puppet Labs
[PL_logo_ho]
Awesome Sponsors
[Sysadvent_]
What is sysadvent?
One article for each day of December, ending on the 25th article.
With the goals of of sharing, openness, and mentoring, we aim to provide great articles about systems administration topics written by fellow sysadmins.
Want to get involved? Join the mailing list!
Like SysAdvent? Donate!
Lots of love goes into this project every year. Show your love with a donation! Funds are spread out in the form of author appreciation :) PayPal - The safer, easier way to pay online! *
Subscribe
[arrow_drop] [icon_feed1] Posts [subscribe-] [subscribe-] [icon_feed1] Atom [arrow_drop] [icon_feed1] Posts [arrow_drop] [icon_feed1] Comments [subscribe-] [subscribe-] [icon_feed1] Atom [arrow_drop] [icon_feed1] Comments
Blog Archive
-
► 2013 (25)
- ► December (25)
-
▼ 2012 (25)
- ▼ December (25) o Day 25 - CFEngine Sketches o Day 24 - Twelve things you may not know about Chef... o Day 23 - Down and Dirty Log File Filtering with Pe... o Day 22 - Be a Fire Marshal, Not a Fire Fighter o Day 21 - The Double-Hop Nightmare o Day 20 - Data-Driven Firewalls o Day 19 - Modeling Deployments on Legos o Day 18 - Effective System Administration o Day 17 - Diving Into Alert Streams o Day 16 - SSH keys shared with FUSE o Day 15 - Remote Working the Right Way o Day 14 - Migrating Legacy (Physical) Servers into ... o Day 13 - Configuration Management as Legos o Day 12 - Devops is a Mindset; a Cultural Case Stud... o Day 11 - Data Center Ops Tips o Day 10 - Packages Doing Too Much? o Day 9 - Backups for Startups o Day 8 - Scheduling Projects with TaskJuggler o Day 7 - Bacon Preservation with ZFS o Day 6 - Watching out for Vendor Lock-In o Day 5 - Following the White Rabbit o Day 4 - ZooKeeper for Distributed Coordination o Day 3 - Zero-Downtime MySQL Schema Changes o Day 2 - Building Community for Fun and Profit o Day 1 - Easy Visualizations with Spreadsheets
-
► 2011 (25)
- ► December (25)
-
► 2010 (25)
- ► December (25)
-
► 2009 (26)
- ► December (26)
-
► 2008 (25)
- ► December (25)
#+end_example *** web page: About Data Bags — Chef Docs http://docs.opscode.com/essentials_data_bags.html **** webcontent :noexport: #+begin_example Location: http://docs.opscode.com/essentials_data_bags.html Chef
Navigation
- next
- previous |
- Resources•
- Knife•
- Recipe DSL•
- Learn Chef•
- Search the Docs•
- Home »
Table Of Contents
- About Data Bags
- Create a Data Bag o Using Knife o Manually
- Store Data in a Data Bag o Directory Structure o Data Bag Items
- Encrypt a Data Bag Item o Encryption Versions o Knife Options o Secret Keys o Encrypt o Verify Encryption o Decrypt o Store Keys on Nodes
- Use Data Bags o with Search o with Environments o with Recipes # Load with Recipe DSL # Create and edit # Access from recipe # Create users o with chef-solo
About Data Bags¶
A data bag is a global variable that is stored as JSON data and is accessible from a Chef server. A data bag is indexed for searching and can be loaded by a recipe or accessed during a search.
Create a Data Bag¶
A data bag can be created in two ways: using Knife or manually. In general, using Knife to create data bags is recommended, but as long as the data bag folders and data bag item JSON files are created correctly, either method is safe and effective.
Using Knife¶
Knife can be used to create data bags and data bag items when the knife data bag sub-command is run with the create argument and to update the Chef server with local changes to data bag items with the from_file argument. For example:
$ knife data bag create DATA_BAG_NAME (DATA_BAG_ITEM)
As long as a file is in the correct directory structure, Knife will be able to find the data bag and data bag item with only the name of the data bag and data bag item. For example:
$ knife data bag from file BAG_NAME ITEM_NAME.json
will load the following file:
data_bags/BAG_NAME/ITEM_NAME.json
Continuing the example above, if you are in the “admins” directory and make changes to the file charlie.json, then to upload that change to the Chef server use the following command:
$ knife data bag from file admins charlie.json
In some cases, such as when Knife is not being run from the root directory for the chef-repo, the full path to the data bag item may be required. For example:
$ knife data bag from file BAG_NAME /path/to/file/ITEM_NAME.json
Manually¶
One or more data bags and data bag items can be created manually under the data_bags directory in the chef-repo. Any method can be used to create the data bag folders and data bag item JSON files. For example:
$ mkdir data_bags/admins
would create a data bag folder named “admins”. The equivalent command for using Knife is:
$ knife data bag create admins
A data bag item can be created manually in the same way as the data bag, but by also specifying the file name for the data bag item (this example is using vi, a visual editor for UNIX):
$ vi data_bags/admins/charlie.json
would create a data bag item named “charlie.json” under the “admins” sub-directory in the data_bags directory of the chef-repo. The equivalent command for using Knife is:
$ knife data bag create admins charlie
Store Data in a Data Bag¶
When the chef-repo is cloned from github, the following occurs:
- A directory named data_bags is created.
- For each data bag, a sub-directory is created that has the same name as the data bag.
- For each data bag item, a JSON file is created and placed in the appropriate sub-directory.
The data_bags directory can be placed under version source control.
When deploying from a private repository using a data bag, use the deploy_key option to ensure the private key is present:
{ "id": "my_app", ... (truncated) ... "deploy_key": "ssh_private_key" }
where ssh_private_key is the same SSH private key as used with a private git repository and the new lines converted to \n.
Directory Structure¶
All data bags are stored in the data_bags directory of the chef-repo. This directory structure is understood by Knife so that the full path does not need to be entered when working with data bags from the command line. An example of the data_bags directory structure:
data_bags |_admins |_charlie.json |_bob.json |_tom.json |_db_users |_charlie.json |_bob.json |_sarah.json |_db_config |_small.json |_medium.json |_large.json
where admins, db_users, and db_config are the names of individual data bags and all of the files that end with .json are the individual data bag items.
Data Bag Items¶
A data bag is a container of related data bag items, where each individual data bag item is a JSON file. The only structural requirement of a data bag item is that it must have an id:
{ "id": "ITEM_NAME", "key": "value" }
where key and value are the key:value pair for each additional attribute within the data bag item. Knife can load a data bag item by specifying the name of the data bag to which the item belongs and then the filename of the data bag item.
Encrypt a Data Bag Item¶
A data bag item may be encrypted using shared secret encryption. This allows each data bag item to store confidential information (such as a database password) or to be managed in a source control system (without plain-text data appearing in revision history). Each data bag item may be encrypted individually; if a data bag contains multiple encrypted data bag items, these data bag items are not required to share the same encryption keys.
Encryption Versions¶
The manner by which a data bag item is encrypted depends on the version of the chef-client. See the following:
_images/essentials_data_bags_versions.png
where R is read, W is write, and D is disable. (Disabling support for older encryption version formats will be in the next version and, if desired, will require a configuration change.)
For version 0 (default, through Chef 10.18):
- An encrypted data bag item is written using YAML as the serialization format
- Base64 encoding is used to preserve special characters in encrypted contents
- Data is encrypted using AES-256-CBC (as defined by the OpenSSL package in the Ruby Standard Library)
- The chef-client uses shared secret encryption; an encrypted file can only be decrypted by a node or a user with the same shared secret
- A recipe can load encrypted data as long as the shared secret is present in a file on the node or is accessible from a URI path
- Only the values of a data bag item are decrypted; keys are still searchable. The values associated with the id key of a data bag item are not encrypted (because they are needed when tracking the data bag item)
For version 1 (default, starting with Chef 11.0):
- An encrypted data bag item is written using JSON as the serialization format
- Base64 encoding is used to preserve special characters in encrypted contents
- Data is encrypted using AES-256-CBC (as defined by the OpenSSL package in the Ruby Standard Library)
- A data bag item is encrypted using a random initialization vector each time a value is encrypted, which helps protect against some forms of cryptanalysis
- The chef-client uses shared secret encryption; an encrypted file can only be decrypted by a node or a user with the same shared secret
- A recipe can load encrypted data as long as the shared secret is present in a file on the node or is accessible from a URI path
- Only the values of a data bag item are decrypted; keys are still searchable. The values associated with the id key of a data bag item are not encrypted (because they are needed by the chef-client when tracking the data bag item)
For version 2 (available, starting with Chef 11.6):
- Same as version 1
- Can disable version 0 and version 1 data bag item encryption formats
- Adds Encrypt-then-MAC(EtM) protection
Knife Options¶
Knife can encrypt and decrypt data bag items when the knife data bag sub-command is run with the create, edit, from file, or show arguments and the following options:
+-----------------------------------------------------------------------------------------------+ | Option | Description | |------------------+----------------------------------------------------------------------------| |--secret SECRET |The encryption key that is used for values contained within a data bag item.| |------------------+----------------------------------------------------------------------------| |--secret-file FILE|The path to the file that contains the encryption key. | +-----------------------------------------------------------------------------------------------+
Secret Keys¶
Encrypting a data bag item requires a secret key. A secret key can be created in any number of ways. For example, OpenSSL can be used to generate a random number, which can then be used as the secret key:
$ openssl rand -base64 512 | tr -d '\r\n' > encrypted_data_bag_secret
where encrypted_data_bag_secret is the name of the file which will contain the secret key. For example, to create a secret key named “my_secret_key”:
$ openssl rand -base64 512 | tr -d '\r\n' > my_secret_key
The tr command eliminates any trailing line feeds. Doing so avoids key corruption when transferring the file between platforms with different line endings.
Encrypt¶
A data bag item is encrypted using a Knife command similar to:
$ knife data bag create passwords mysql --secret-file /tmp/my_data_bag_key
where “passwords” is the name of the data bag, “mysql” is the name of the data bag item, and “/tmp/ my_data_bag_key” is the path to the location in which the file that contains the secret-key is located. Knife will ask for user credentials before the encrypted data bag item is saved.
Verify Encryption¶
When the contents of a data bag item are encrypted, they will not be readable until they are decrypted. Encryption can be verified with a Knife command similar to:
$ knife data bag show passwords mysql
where “passwords” is the name of the data bag and “mysql” is the name of the data bag item. This will return something similar to:
id: mysql pass: cipher: aes-256-cbc encrypted_data: JZtwXpuq4Hf5ICcepJ1PGQohIyqjNX6JBc2DGpnL2WApzjAUG9SkSdv75TfKSjX4 iv: VYY2qx9b4r3j0qZ7+RkKHg== version: 1 user: cipher: aes-256-cbc encrypted_data: 10BVoNb/plkvkrzVdybPgFFII5GThZ3Op9LNkwVeKpA= iv: uIqKHZ9skJlN2gpJoml6rQ== version: 1
Decrypt¶
An encrypted data bag item is decrypted with a Knife command similar to:
$ knife data bag show --secret-file /tmp/my_data_bag_key passwords mysql
that will return JSON output similar to:
{ "id": "mysql", "pass": "thesecret123", "user": "fred" }
Store Keys on Nodes¶
An encryption key can also be stored in an alternate file on the nodes that need it and specify the path location to the file inside an attribute; however, EncryptedDataBagItem.load expects to see the actual secret as the third argument, rather than a path to the secret file. In this case, you can use EncryptedDataBagItem.load_secret to slurp the secret file contents and then pass them:
inside your attribute file:
default[:mysql][:secretpath] = "C:\chef\any_secret_filename"
inside your recipe:
look for secret in file pointed to by mysql attribute :secretpath
mysql_secret = Chef::EncryptedDataBagItem.load_secret("#{node[:mysql][:secretpath]}") mysql_creds = Chef::EncryptedDataBagItem.load("passwords", "mysql", mysql_secret) mysql_creds["pass"] # will be decrypted
Use Data Bags¶
Data bags can be accessed in the following ways:
with Search¶
A data bag is a global variable that is stored as JSON data and is accessible from a Chef server. A data bag is indexed for searching and can be loaded by a recipe or accessed during a search.
Any search for a data bag (or a data bag item) must specify the name of the data bag and then provide the search query string that will be used during the search. For example, to use Knife to search within a data bag named “admin_data” across all items, except for the “admin_users” item, enter the following:
$ knife search admin_data "(NOT id:admin_users)"
Or, to include the same search query in a recipe, use a code block similar to:
search(:admin_data, "NOT id:admin_users")
It may not be possible to know which data bag items will be needed. It may be necessary to load everything in a data bag (but not know what “everything” is). Using a search query is the ideal way to deal with that ambiguity, yet still ensure that all of the required data is returned. The following examples show how a recipe can use a series of search queries to search within a data bag named “admins”. For example, to find every administrator:
search(:admins, ":")
Or to search for an administrator named “charlie”:
search(:admins, "id:charlie")
Or to search for an administrator with a group identifier of “ops”:
search(:admins, "gid:ops")
Or to search for an administrator whose name begins with the letter “c”:
search(:admins, "id:c*")
Data bag items that are returned by a search query can be used as if they were a hash. For example:
charlie = search(:admins, "id:charlie").first
=> variable 'charlie' is set to the charlie data bag item
charlie["gid"]
=> "ops"
charlie["shell"]
=> "/bin/zsh"
The following recipe can be used to create a user for each administrator by loading all of the items from the “admins” data bag, looping through each admin in the data bag, and then creating a user resource so that each of those admins exist:
admins = data_bag('admins')
admins.each do |login| admin = data_bag_item('admins', login) home = "/home/#{login}"
user(login) do uid admin['uid'] gid admin['gid'] shell admin['shell'] comment admin['comment'] home home supports :manage_home => true end
end
And then the same recipe, modified to load administrators using a search query (and using an array to store the results of the search query):
admins = []
search(:admins, ":").each do |admin| login = admin["id"]
admins << login
home = "/home/#{login}"
user(login) do uid admin['uid'] gid admin['gid'] shell admin['shell'] comment admin['comment']
home      home
supports  :manage_home => true
end
end
with Environments¶
Values that are stored in a data bag are global to the organization and are available to any environment. There are two main strategies that can be used to store per-environment data within a data bag: by using a top-level key that corresponds to the environment or by using separate items for each environment.
A data bag that is storing a top-level key for an environment might look something like this:
{ "id": "some_data_bag_item", "production" : { # Hash with all your data here }, "testing" : { # Hash with all your data here } }
When using the data bag in a recipe, that data can be accessed from a recipe using code similar to:
bag_item[node.chef_environment]["some_other_key"]
The other approach is to use separate items for each environment. Depending on the amount of data, it may all fit nicely within a single item. If this is the case, then creating different items for each environment may be a simple approach to providing per-environment values within a data bag. However, this approach is more time-consuming and may not scale to very large environments or when the data must be stored in many data bag items.
with Recipes¶
Data bags can be accessed by a recipe in the following ways:
- Loaded by name when using the Recipe DSL. Use this approach when a only single, known data bag item is required.
- Accessed through the search indexes. Use this approach when more than one data bag item is required or when the contents of a data bag are looped through. The search indexes will bulk-load all of the data bag items, which will result in a lower overhead than if each data bag item were loaded by name.
Load with Recipe DSL¶
The Recipe DSL provides access to data bags and data bag items with the following methods:
- data_bag(bag), where bag is the name of the data bag.
- data_bag_item('bag', 'item'), where bag is the name of the data bag and item is the name of the data bag item.
The data_bag method returns an array with a key for each of the data bag items that are found in the data bag. For example, a data bag named “admins” with a single data bag item named “justin” could be loaded with:
data_bag("admins")
to return this:
=> ["justin"]
To load the contents of the data bag item named “justin”:
data_bag_item('admins', 'justin')
to return something like this:
=> {"comment"=>"Justin Currie", "gid"=>1005, "id"=>"justin", "uid"=>1005, "shell"=>"/bin/zsh"}
Create and edit¶
Creating and editing the contents of a data bag or a data bag item from a recipe is not recommended. The recommended method of updating a data bag or a data bag item is to use Knife and the knife data bag sub-command. If this action must be done from a recipe, please note the following:
- If two operations concurrently attempt to update the contents of a data bag, the last-written attempt will be the operation to update the contents of the data bag. This situation can lead to data loss, so organizations should take steps to ensure that only one chef-client is making updates to a data bag at a time.
- Altering data bags from the node when using the open source Chef server requires the node’s API client to be granted admin privileges. In most cases, this is not advisable.
and then take steps to ensure that any subsequent actions are done carefully. The following examples show how a recipe can be used to create and edit the contents of a data bag or a data bag item using the Chef::DataBag and Chef::DataBagItem objects.
To create a data bag from a recipe:
users = Chef::DataBag.new users.name("users") users.create
To create a data bag item from a recipe:
sam = { "id" => "sam", "Full Name" => "Sammy", "shell" => "/bin/zsh" } databag_item = Chef::DataBagItem.new databag_item.data_bag("users") databag_item.raw_data = sam databag_item.save
To edit the contents of a data bag item from a recipe:
sam = data_bag_item("users", "sam") sam["Full Name"] = "Samantha" sam.save
Access from recipe¶
A recipe can access encrypted data bag items as long as the recipe is running on a node that has access to the shared-key that is required to decrypt the data. A secret can be specified by using the Chef::EncryptedDataBagItem.load method. For example:
mysql_creds = Chef::EncryptedDataBagItem.load("passwords", "mysql", secret_key) mysql_creds["pass"] # will be decrypted
where “secret_key” is the argument that specifies the location of the file that contains the encryption key. An encryption key can be stored in a file on the nodes that need it and then configured so that the chef-client knows where to look using the Chef::Config [:encrypted_data_bag_secret] method, which defaults to /etc/chef/encrypted_data_bag_secret. When the default location is used, the argument that specifies the secret key file location is assumed to be the default and does not need to be explicitly specified in the recipe. For example:
mysql_creds = Chef::EncryptedDataBagItem.load("passwords", "mysql") # no secret_key mysql_creds["pass"] # will be decrypted
Create users¶
The chef-client can create users on systems based on the contents of a data bag. For example, a data bag named “admins” can contain a data bag item for each of the administrators that will manage the various systems that each chef-client is maintaining. A recipe can load the data bag items and then create user accounts on the target system with code similar to the following:
Load the keys of the items in the 'admins' data bag
admins = data_bag('admins')
admins.each do |login|
This causes a round-trip to the server for each admin in the data bag
admin = data_bag_item('admins', login) homedir = "/home/#{login}"
for each admin in the data bag, make a user resource
to ensure they exist
user(login) do uid admin['uid'] gid admin['gid'] shell admin['shell'] comment admin['comment'] home homedir supports :manage_home => true end
end
Create an "admins" group on the system
You might use this group in the /etc/sudoers file
to provide sudo access to the admins
group "admins" do gid 999 members admins end
with chef-solo¶
chef-solo can load data from a data bag as long as the contents of that data bag are accessible from a directory structure that exists on the same machine as chef-solo. The location of this directory is configurable using the data_bag_path option in the solo.rb file. The name of each sub-directory corresponds to a data bag and each JSON file within a sub-directory corresponds to a data bag item. Search is not available in recipes when they are run with chef-solo; use the data_bag() and data_bag_item() functions to access data bags and data bag items.
Note
Use the chef-solo-search cookbook library (developed by Chef community member “edelight” and available from github) to add data bag search capabilities to a chef-solo environment: https:// github.com/edelight/chef-solo-search.
Navigation
- next
- previous |
- Resources•
- Knife•
- Recipe DSL•
- Learn Chef•
- Search the Docs•
- Home »
Documentation for current versions of Enterprise Chef and Open Source Chef. Send feedback to [email protected]. This work is licensed under a Creative Commons Attribution 3.0 Unported License.
#+end_example *** web page: knife bootstrap — Chef Docs http://docs.opscode.com/knife_bootstrap.html **** webcontent :noexport: #+begin_example Location: http://docs.opscode.com/knife_bootstrap.html Chef
Navigation
- next
- previous |
- Resources•
- Knife•
- Recipe DSL•
- Learn Chef•
- Search the Docs•
- Home »
Table Of Contents
- knife bootstrap
- Syntax
- Options o knife.rb Settings
- Custom Templates o Template Locations o Ubuntu 12.04 o Debian and Apt o Microsoft Windows
- Examples
knife bootstrap¶
A bootstrap is a process that installs the chef-client on a target system so that it can run as a chef-client and communicate with a Chef server.
The knife bootstrap subcommand is used to run a bootstrap operation that installs the chef-client on the target system. The bootstrap operation must specify the IP address or FQDN of the target system.
Note
To bootstrap the chef-client on Microsoft Windows machines, the knife-windows plugins is required, which includes the necessary bootstrap scripts that are used to do the actual installation.
Syntax¶
This subcommand has the following syntax:
$ knife bootstrap FQDN_or_IP_ADDRESS (options)
Options¶
Note
Review the list of common options available to this (and all) Knife subcommands and plugins.
This subcommand has the following options:
-A, --forward-agent Use to enable SSH agent forwarding. --bootstrap-no-proxy NO_PROXY_URL_or_IP
A URL or IP address that specifies a location that should not be proxied.

Note

This option is used internally by Chef to help verify bootstrap operations during testing and
should never be used during an actual bootstrap operation.
--bootstrap-proxy PROXY_URL The proxy server for the node that is the target of a bootstrap operation. --bootstrap-version VERSION The version of the chef-client to install. -d DISTRO, --distro DISTRO
The template file to be used during a bootstrap operation. The following distributions are
supported: chef-full (the default bootstrap), centos5-gems, fedora13-gems, ubuntu10.04-gems,
ubuntu10.04-apt, ubuntu12.04-gems, and the name of a custom bootstrap template file. When this
option is used, Knife will search for the template file in the following order: the bootstrap/
folder in the current working directory, the bootstrap/ folder in the chef-repo, the bootstrap/
folder in the ~/.chef/ directory, or a default bootstrap file. Do not use the --template-file
option when --distro is specified.

Warning

The default bootstrap operation uses the omnibus installer, which means the default template
file (chef-full) should work on all supported platforms. It is recommended to use custom
bootstrap templates only when the omnibus installer cannot be used. The .erb file extension is
added automatically and should not be passed as part of the bootstrap command.
-E ENVIRONMENT, --environment ENVIRONMENT The name of the environment. When this option is added to a command, the command will run only against the named environment. -G GATEWAY, --ssh-gateway GATEWAY The SSH tunnel or gateway that is used to run a bootstrap action on a machine that is not accessible from the workstation. --hint HINT_NAME[=HINT_FILE] An Ohai hint to be set on the target of the bootstrap. The hint is contained in a file and is formatted as JSON: {"attribute":"value","attribute":"value"...}. HINT_NAME is the name of the hint and HINT_FILE is the name of the hint file located at /etc/chef/ohai/hints/HINT_FILE.json. Use multiple --hint options in the command to specify multiple hints. -i IDENTITY_FILE, --identity-file IDENTITY_FILE The SSH identity file used for authentication. Key-based authentication is recommended. -j JSON_ATTRIBS, --json-attributes JSON_ATTRIBS A JSON string that is added to the first run of a chef-client. -N NAME, --node-name NAME The name of the node. --[no-]host-key-verify Use --no-host-key-verify to disable host key verification. Default setting: --host-key-verify. -p PORT, --ssh-port PORT The SSH port. -P PASSWORD, --ssh-password PASSWORD The SSH password. This can be used to pass the password directly on the command line. If this option is not specified (and a password is required) Knife will prompt for the password. --prerelease Use to install pre-release gems. -r RUN_LIST, --run-list RUN_LIST A comma-separated list of roles and/or recipes to be applied. --secret SECRET The encryption key that is used for values contained within a data bag item. --secret-file FILE The path to the file that contains the encryption key. --sudo Use to execute a bootstrap operation with sudo. --template-file TEMPLATE The path to a template file that will be used during a bootstrap operation. Do not use the --distro option when --template-file is specified. --use-sudo-password Use to perform a bootstrap operation with sudo; specify the password with the -P (or --ssh-password) option. -V -V Use to run the initial chef-client run at the debug log-level (e.g. chef-client -l debug). -x USERNAME, --ssh-user USERNAME The SSH user name.
knife.rb Settings¶
Note
See knife.rb for more information about how to add optional settings to the knife.rb file.
The following knife bootstrap settings can be added to the knife.rb file:
knife[:bootstrap_proxy] Use to add the --bootstrap-proxy option. knife[:bootstrap_version] Use to add the --bootstrap-version option. knife[:distro] Use to add the --distro option. knife[:run_list] Use to add the --run-list option. knife[:template_file] Use to add the --template-file option. knife[:use_sudo] Use to add the --sudo option.
Note
The knife bootstrap subcommand relies on a number of SSH-related settings that are handled by the knife ssh subcommand.
Custom Templates¶
The chef-full distribution uses the omnibus installer. For most bootstrap operations, regardless of the platform on which the target node is running, using the chef-full distribution is the best approach for installing the chef-client on a target node. In some situations, using another supported distribution is necessary. And in some situations, a custom template may be required. For example, the default bootstrap operation relies on an Internet connection to get the distribution to the target node. If a target node cannot access the Internet, then a custom template can be used to define a specific location for the distribution so that the target node may access it during the bootstrap operation.
For example, a bootstrap template file named “british_sea_power”:
$ knife bootstrap 123.456.7.8 -x username -P password --sudo --distro "british_sea_power"
The following examples show how a bootstrap template file can be customized for various platforms.
Template Locations¶
A custom bootstrap template file (template_filename) must be located in a bootstrap/ directory, typically located within the ~/.chef/ directory.
Use the --distro option with the knife bootstrap subcommand to specify the bootstrap template file. This location is configurable when the following settings are added to the knife.rb file:
+-------------------------------------------------------------------------------------------------+ | Setting | Description | |----------------+--------------------------------------------------------------------------------| | |The template file to be used during a bootstrap operation. The following | | |distributions are supported: chef-full (the default bootstrap), centos5-gems, | | |fedora13-gems, ubuntu10.04-gems, ubuntu10.04-apt, ubuntu12.04-gems, and the name| |knife[:distro] |of a custom bootstrap template file. When this option is used, Knife will search| | |for the template file in the following order: the bootstrap/ folder in the | | |current working directory, the bootstrap/ folder in the chef-repo, the bootstrap| | |/ folder in the ~/.chef/ directory, or a default bootstrap file. Do not use the | | |--template-file option when --distro is specified. | |----------------+--------------------------------------------------------------------------------| |knife |The path to a template file that will be used during a bootstrap operation. Do | |[:template_file]|not use the --distro option when --template-file is specified. | +-------------------------------------------------------------------------------------------------+
Ubuntu 12.04¶
The following example shows how to modify the default script for Ubuntu 12.04. First, copy the bootstrap template from the default location. If the chef-client is installed from a RubyGems, the full path can be found in the gem contents:
% gem contents chef | grep ubuntu12.04-gems /Users/jtimberman/.rvm/gems/ruby-1.9.2-p180/gems/chef-0.10.2/lib/chef/knife/bootstrap/ubuntu12.04-gems.erb
Copy the template to the chef-repo in the .chef/bootstrap directory:
% cp /Users/jtimberman/.rvm/gems/ruby-1.9.2-p180/gems/chef-0.10.2/ lib/chef/knife/bootstrap/ubuntu12.04-gems.erb ~/chef-repo/.chef/ bootstrap/ubuntu12.04-gems-mine.erb
Modify the template with any editor, then use it with the -d or --distro option in the knife bootstrap operation, or use any of the Knife plug-ins that support cloud computing.
$ knife bootstrap 192.168.1.100 -r 'role[webserver]' -d ubuntu12.04-gems-mine
Alternatively, an example bootstrap template can be found in the git source for the chef-repo: https://github.com/opscode/chef/blob/master/lib/chef/knife/bootstrap/ubuntu12.04-gems.erb. Copy the template to ~/.chef-repo/.chef/bootstrap/ubuntu12.04-apt.erb and modify the template appropriately.
Debian and Apt¶
The following example shows how to use the knife bootstrap sub-command to create a client configuration file (/etc/chef/client.rb) that uses Hosted Chef as the Chef server. The configuration file will look something like:
log_level :info log_location STDOUT chef_server_url 'https://api.opscode.com/organizations/ORGNAME' validation_client_name 'ORGNAME-validator'
The knife bootstrap sub-command will look in three locations for the template that is used during the bootstrap operation. The locations are:
- A bootstrap directory in the installed Knife library; the actual location may vary, depending how the chef-client is installed
- A bootstrap directory in the $PWD/.chef, e.g. in ~/chef-repo/.chef
- A bootstrap directory in the users $HOME/.chef
If, in the example above, the second location was used, then create the .chef/bootstrap/ directory in the chef-repo, and then create the Embedded Ruby (ERB) template file by running commands similar to the following:
mkdir ~/.chef/bootstrap vi ~/.chef/bootstrap/debian5.0-apt.erb
When finished creating the directory and the Embedded Ruby (ERB) template file, edit the template to run the SSH commands. Then set up the validation certificate and the client configuration file.
Finally, run the chef-client on the node using a knife bootstrap command that specifies a run-list (the -r option). The bootstrap template can be called using a command similar to the following:
$ knife bootstrap mynode.example.com -r 'role[webserver]','role[production]' --distro debian5.0-apt
Microsoft Windows¶
The following example shows how to modify the default script for Microsoft Windows and Windows PowerShell:
@setlocal
<%= "SETX HTTP_PROXY "#{knife_config[:bootstrap_proxy]}"" if knife_config[:bootstrap_proxy] %> @mkdir <%= bootstrap_directory %>
<%= bootstrap_directory %>\wget.ps1 ( <%= win_wget_ps %> )
:install @rem Install Chef using chef-client MSI installer
<% url="http://reposerver.example.com/chef-client-11.6.0.rc.1-1.windows.msi" -%> @set "REMOTE_SOURCE_MSI_URL=<%= url %>" @set "LOCAL_DESTINATION_MSI_PATH=<%= local_download_path %>"
@powershell -ExecutionPolicy Unrestricted -NoProfile -NonInteractive "& '<%= bootstrap_directory %>\wget.ps1' '% REMOTE_SOURCE_MSI_URL%' '% LOCAL_DESTINATION_MSI_PATH%'"
@REM Replace install_chef from knife-windows Gem with one that has extra flags to turn on Chef service feature -- only available in Chef >= 11.6.x @REM <%= install_chef %> @echo Installing Chef Client 11.6.0.rc1 with msiexec @msiexec /q /i "% LOCAL_DESTINATION_MSI_PATH%" ADDLOCAL="ChefClientFeature,ChefServiceFeature" @endlocal
@echo Writing validation key...
<%= bootstrap_directory %>\validation.pem ( <%= validation_key %> )
@echo Validation key written.
<% if @config[:encrypted_data_bag_secret] -%>
<%= bootstrap_directory %>\encrypted_data_bag_secret ( <%= encrypted_data_bag_secret %> ) <% end -%>
<%= bootstrap_directory %>\client.rb ( <%= config_content %> )
<%= bootstrap_directory %>\first-boot.json ( <%= run_list %> )
<%= start_chef %>
Examples¶
The following examples show how to use this Knife subcommand:
Bootstrap a node
$ knife bootstrap 12.34.56.789 -P vanilla -x root -r 'recipe[apt],recipe[xfs],recipe[vim]'
which shows something similar to:
... 12.34.56.789 Chef Client finished, 12/12 resources updated in 78.942455583 seconds
Use knife node show to verify:
$ knife node show debian-wheezy.int.domain.org
which returns something similar to:
Node Name: debian-wheezy.int.domain.org Environment: _default FQDN: debian-wheezy.int.domain.org IP: 12.34.56.789 Run List: recipe[apt], recipe[xfs], recipe[vim] Roles: Recipes: apt, xfs, vim, apt::default, xfs::default, vim::default Platform: debian 7.4 Tags:
Use an SSH password
$ knife bootstrap 192.168.1.1 -x username -P PASSWORD --sudo
Use a file that contains a private key
$ knife bootstrap 192.168.1.1 -x username -i ~/.ssh/id_rsa --sudo
Navigation
- next
- previous |
- Resources•
- Knife•
- Recipe DSL•
- Learn Chef•
- Search the Docs•
- Home »
Documentation for current versions of Enterprise Chef and Open Source Chef. Send feedback to [email protected]. This work is licensed under a Creative Commons Attribution 3.0 Unported License.
#+end_example *** web page: How To Create Simple Chef Cookbooks to Manage Infrastructure on Ubuntu | DigitalOcean https://www.digitalocean.com/community/tutorials/how-to-create-simple-chef-cookbooks-to-manage-infrastructure-on-ubuntu **** webcontent :noexport: #+begin_example Location: https://www.digitalocean.com/community/tutorials/how-to-create-simple-chef-cookbooks-to-manage-infrastructure-on-ubuntu Contents
Sign Up Log In
[ ]
- Tutorials
- Questions
- Projects
- Tags
- Main Site
Menu Sign Up Log In
- Tutorials
- Questions
- Projects
- Tags
- Main Site
[ ] Justin Ellingwood
February 3, 2014
Beginner
How To Create Simple Chef Cookbooks to Manage Infrastructure on Ubuntu
Tagged In: NGINX, Ubuntu, Configuration Management Author: Justin Ellingwood • Date: February 3, 2014
Introduction
Chef is a configuration management system designed to allow you to automate and control vast numbers of computers in an automated, reliable, and scalable manner.
In previous tutorials, we have looked at some common Chef terminology and discussed how to install a Chef server, workstation, and nodes. In this guide, we will use these guides as a jumping off point to begin talking about how to automate your environment.
In this article, we will discuss the basics of creating a Chef cookbook. Cookbooks are the configuration units that allow us to configure and perform specific tasks within Chef on our remote nodes. We build cookbooks and then tell Chef which nodes we want to run the steps outlined in the cookbook.
In this guide, we will assume that you are starting with the three machines that we ended the last lesson with. You should have a server, a workstation, and at least one node to push configuration changes to.
Basic Cookbook Concepts
Cookbooks serve as the fundamental unit of configuration and policy details that Chef uses to bring a node into a specific state. This just means that Chef uses cookbooks to perform work and make sure things are as they should be on the node.
Cookbooks are usually used to handle one specific service, application, or functionality. For instance, a cookbook can be created to use NTP to set and sync the node's time with a specific server. It may install and configure a database application. Cookbooks are basically packages for infrastructure choices.
Cookbooks are created on the workstation and then uploaded to a Chef server. From there, recipes and policies described within the cookbook can be assigned to nodes as part of the node's "run-list". A run-list is a sequential list of recipes and roles that are run on a node by chef-client in order to bring the node into compliance with the policy you set for it.
In this way, the configuration details that you write in your cookbook are applied to the nodes you want to adhere to the scenario described in the cookbook.
Cookbooks are organized in a directory structure that is completely self-contained. There are many different directories and files that are used for different purposes. Let's go over some of the more important ones now.
Recipes
A recipe is the main workhorse of the cookbook. A cookbook can contain more than one recipe, or depend on outside recipes. Recipes are used to declare the state of different resources.
Chef resources describe a part of the system and its desired state. For instance, a resource could say "the package x should be installed". Another resource may say "the x service should be running".
A recipe is a list related resources that tell Chef how the system should look if it implements the recipe. When Chef runs the recipe, it checks each resource for compliance to the declared state. If the system matches, it moves on to the next resource, otherwise, it attempts to move the resource into the given state.
Resources can be of many different types. You can learn about the different resource types here. Some common ones are:
- package: Used to manage packages on a node
- service: Used to manage services on a node
- user: Manage users on the node
- group: Manage groups
- template: Manage files with embedded ruby templates
- cookbook_file: Transfer files from the files subdirectory in the cookbook to a location on the node
- file: Manage contents of a file on node
- directory: Manage directories on node
- execute: Execute a command on the node
- cron: Edit an existing cron file on the node
Attributes
Attributes in Chef are basically settings. Think of them as simple key-value pairs for anything you might want to use in your cookbook.
There are several different kinds of attributes that can be applied, each with a different level of precedence over the final settings that a node operates under. At the cookbook level, we generally define the default attributes of the service or system we are configuring. These can be overridden later by more specific values for a specific node.
When creating a cookbook, we can set attributes for our service in the attributes subdirectory of our cookbook. We can then reference these values in other parts of our cookbook.
Files
The files subdirectory within the cookbook contains any static files that we will be placing on the nodes that use the cookbook.
For instance, any simple configuration files that we are not likely to modify can be placed, in their entirety, in the files subdirectory. A recipe can then declare a resource that moves the files from that directory into their final location on the node.
Templates
Templates are similar to files, but they are not static. Template files end with the .erb extension, meaning that they contain embedded Ruby.
These are mainly used to substitute attribute values into the file to create the final file version that will be placed on the node.
For example, if we have an attribute that defines the default port for a service, the template file can call to insert the attribute at the point in the file where the port is declared. Using this technique, you can easily create configuration files, while keeping the actual variables that you wish to change elsewhere.
Metadata.rb
The metadata.rb file is used, not surprisingly, to manage the metadata about a package. This includes things like the name of the package, a description, etc.
It also includes things like dependency information, where you can specify which cookbooks this cookbook needs to operate. This will allow the Chef server to build the run-list for the nodes correctly and ensure that all of the pieces are transfered correctly.
Create a Simple Cookbook
To demonstrate some of the work flow involved in working with cookbooks, we will create a cookbook of our own. This will be a very simple cookbook that installs and configures the Nginx web server on our node.
To begin, we need to go to our ~/chef-repo directory on our workstation:
cd ~/chef-repo
Once there, we can create a cookbook by using knife. As we mentioned in previous guides, knife is a tool used to configure most interactions with the Chef system. We can use it to perform work on our workstation and also to connect with the Chef server or individual nodes.
The general syntax for creating a cookbook is:
knife cookbook create cookbook_name
Since our cookbook will deal with installing and configuring Nginx, we will name our cookbook appropriately:
knife cookbook create nginx
**** Creating cookbook nginx **** Creating README for cookbook: nginx **** Creating CHANGELOG for cookbook: nginx **** Creating metadata for cookbook: nginx
What knife does here is builds a simple structure within our cookbooks directory for our new cookbook. We can see our cookbook structure by navigating into the cookbooks directory, and into the directory with the cookbook name.
cd cookbooks/nginx ls
attributes CHANGELOG.md definitions files libraries metadata.rb providers README.md recipes resources templates
As you can see, this has created a folder and file structure that we can use to build our cookbook. Let's begin with the biggest chunk of the configuration, the recipe.
Create a Simple Recipe
If we go into the recipes subdirectory, we can see that there is already a file called default.rb inside:
cd recipes ls
default.rb
This is the recipe that will be run if you reference the "nginx" recipe. This is where we will be adding our code.
Open the file with your text editor:
nano default.rb
Cookbook Name:: nginx
Recipe:: default
Copyright 2014, YOUR_COMPANY_NAME
All rights reserved - Do Not Redistribute
The only thing that is in this file currently is a comment header.
We can begin by planning the things that need to happen for our Nginx web server to get up and running the way that we want it to. We do this by configuring "resources". Resources do not describe how to do something; they simply describe what a part of the system should look like when it is complete.
First of all, we obviously need to make sure the software is installed. We can do this by creating a "package" resource first.
package 'nginx' do action :install end
This little piece of code defines a package resource for Nginx. The first line begins with the type of resource (package) and the name of the resource ('nginx'). The rest is a group of actions and parameters that declare what we want to happen with the resource.
In this resource, we see action :install. This line tells Chef that the resource we are describing should be installed. The node that runs this recipe will check that Nginx is installed. If it is, it will check that off the list of things to do. If not, it will install the program using the methods available on the client system and then check it off.
After we install the service, we probably want to adjust its current state on the node. By default, Ubuntu does not start Nginx after installation, so we will want to change that:
service 'nginx' do action [ :enable, :start ] end
Here, we see a resource of the "service" type. This declares that for the Nginx service component (the part that allows us to manage the server with init or upstart), we want to start the service right now, and also enable it to start automatically when the machine is restarted.
The final resource we will be declaring is the actual file that we will be serving. Since this is just a simple file that we will not be modifying, we can simply declare the location where we want the file and tell it where in the cookbook to get the file:
cookbook_file "/usr/share/nginx/www/index.html" do source "index.html" mode "0644" end
We use the "cookbook_file" resource type to tell Chef that this file is available within the cookbook itself and can be transfered as-is to the location. In our example, we are transferring a file into Nginx's document root.
In our case, we specify the file name that we are trying to create in the first line. In the "source" line, we tell it the name of the file to look for within the cookbook. Chef looks for this file within the "files/default" subdirectory in the cookbook.
The "mode" line sets the permissions on the file we are creating. In this case, we are allowing the root user read and write permissions and everyone else read permissions.
Save and close this file when you are finished.
Creating the Index file
As you saw above, we defined a "cookbook_file" resource which should move a file called "index.html" into the document root on the node. We need to create this file.
We should put this file in the "files/default" subdirectory of our cookbook. Go there now by typing:
cd ~/chef-repo/cookbooks/nginx/files/default
Inside this directory, we will create the file we referenced:
nano index.html
This file will just be a really simple HTML document meant to demonstrate that our resources have operated the way we wanted them to.
Paste this into the file:
This is a test
Please work!
Save and close the file when you are finished.
Create a Helper Cookbook
Before we go any further, let's preemptively solve a small problem. When our node tries to run the cookbook that we've created as it is now, chances are, it will fail.
That is because it will attempt to install Nginx from the Ubuntu repositories, and the package database on our node is most likely out-of-date. Usually, we run "sudo apt-get update" prior to running package commands.
To address this issue, we can create a simple cookbook whose only purpose is to ensure that the package database is updated.
We can do this using the same knife syntax we used before. Let's call this cookbook "apt":
knife cookbook create apt
This will create the same kind of directory structure that we had when we first started with our Nginx cookbook.
Let's cut straight to the chase and edit the default recipe for our new cookbook.
nano ~/chef-repo/cookbooks/apt/recipes/default.rb
In this file, we will declare an "execute" resource. This is simply a way of defining a command that we want to run on the node.
Our resource looks like this:
execute "apt-get update" do command "apt-get update" end
The first line gives a name for our resource. In our case, we are calling the resource this for simplicity's sake. If the "command" attribute is defined (as we have done), then this is the actual command that is executed.
Since these are exactly the same, it does not matter in the slightest.
Save and close the file.
Now that we have our new cookbook, there are a number of ways that we can make sure that we execute this before our Nginx cookbook. We could add it to the node's run-list before the Nginx cookbook, but we can also tie it into the Nginx cookbook itself.
This is probably the better option because we will not have to remember to add the "apt" cookbook before the "nginx" cookbook on every node we want to configure for Nginx.
We need to adjust a few things in the Nginx cookbook to make this happen. First, let's open the Nginx recipe file again:
nano ~/chef-repo/cookbooks/nginx/recipes/default.rb
At the top of this cookbook, before the other resources that we have defined, we can read in the "apt" default recipe by typing:
include_recipe "apt"
package 'nginx' do action :install end
service 'nginx' do action [ :enable, :start ] end
cookbook_file "/usr/share/nginx/www/index.html" do source "index.html" mode "0644" end
Save and close the file.
The other file that we need to edit is the metadata.rb file. This file is checked when the Chef server sends the run-list to the node, to see which other recipes should be added to the run-list.
Open the file now:
nano ~/chef-repo/cookbooks/nginx/metadata.rb
At the bottom of the file, you can add this line:
name 'nginx' maintainer 'YOUR_COMPANY_NAME' maintainer_email 'YOUR_EMAIL' license 'All rights reserved' description 'Installs/Configures nginx' long_description IO.read(File.join(File.dirname(FILE), 'README.md')) version '0.1.0'
depends "apt"
With that finished, our Nginx cookbook now relies on our apt cookbook to take care of the package database update.
Add the Cookbook to your Node
Now that our basic cookbooks are complete, we can upload them to our chef server.
We can do that individually by typing:
knife cookbook upload apt knife cookbook upload nginx
Or, we can upload everything by typing:
knife cookbook upload -a
Either way, our recipes will be uploaded to the Chef server.
Now, we can modify the run-list of our nodes. We can do this easily by typing:
knife node edit name_of_node
If you need to find the name of your available nodes, you can type:
knife node list
client1
For our purposes, when we type this, we get a file that looks like this:
knife node edit client1
{ "name": "client1", "chef_environment": "_default", "normal": { "tags": [
]
}, "run_list": [
] }
You may need to set your EDITOR environmental variable before this works. You can do this by typing:
export EDITOR=name_of_editor
As you can see, this is a simple JSON document that describes some aspects of our node. We can see a "run_list" array, which is currently empty.
We can add our Nginx cookbook to that array using the format:
"recipe[name_of_recipe]"
When we are finished, our file should look like this:
{ "name": "client1", "chef_environment": "_default", "normal": { "tags": [
]
}, "run_list": [ "recipe[nginx]" ] }
Save and close the file to implement the new settings.
Now, we can SSH into our node and run the Chef client software. This will cause the client to check into the Chef server. Once it does this, it will see the new run-list that has been assigned it.
SSH into your node and then run this:
sudo chef-client
Starting Chef Client, version 11.8.2 resolving cookbooks for run list: ["nginx"] Synchronizing Cookbooks:
- apt
- nginx Compiling Cookbooks... Converging 4 resources Recipe: apt::default
- execute[apt-get update] action run
- execute apt-get update
Recipe: nginx::default
-
package[nginx] action install (up to date)
-
service[nginx] action enable
- enable service service[nginx]
-
service[nginx] action start (up to date)
-
cookbook_file[/usr/share/nginx/www/index.html] action create (up to date) Chef Client finished, 2 resources updated
As you can see, our apt cookbook was sent over and run as well, even though it wasn't in the run-list we created. That is because Chef intelligently resolved dependencies and modified the actual run-list before executing it on the node.
Note: There are various methods of ensuring that one cookbook or recipe is run before another. Adding a dependency is only one choice, and other methods may be preferred.
We can verify that this works by going to our node's IP address or domain name:
http://node_domain_or_IP
You should see something that looks like this:
Chef node Nginx
Congratulations, you have configured your first node using Chef cookbooks!
Conclusion
Although this was a very simple example that probably didn't save you much time over configuring your server manually, hopefully you can begin to see the possibilities of this method of building infrastructure.
Not only does it allow for rapid deployment and configuration of different kinds of servers, it ensures that you know the exact configuration of all of your machines. This lets you validate and test your infrastructure, and also gives you the framework you need to quickly redeploy your infrastructure on a whim.
By Justin Ellingwood Share Tutorial Improve Tutorial Write Tutorial
Related Tutorials
- How To Create Ansible Playbooks to Automate System Configuration on Ubuntu
- How To Install Tinc and Set Up a Basic VPN on Ubuntu 14.04
- How To Install and Use OTPW for Single-Use SSH Passwords on Ubuntu 14.04
- How To Install and Configure Syncthing to Synchronize Directories on Ubuntu 14.04
- How To Use Icinga To Monitor Your Servers and Services On Ubuntu 14.04
Share this Tutorial
Tweet Vote on Hacker News
4 Comments
Load Log In to comment [ ] Submit Comment Creative Commons License This work is licensed under a Creative Commons Attribution-NonCommercial-ShareAlike 4.0 International License.
Copyright © 2014 DigitalOcean ™ Inc. Proudly Made in NY Terms, Privacy, & Copyright Security
Product
- Pricing
- Features
- Customers
- One-Click Apps
- API
Company
- About Us
- Blog
- Jobs
- Press
- Logos & Badges
- Events
- Contact
Help
- Knowledgebase
- Getting Started
- Feedback
- Referral Program
- Network Status
Community
- Dashboard
- Overview
- Tutorials
- Questions
- Projects
- Tutorial Suggestions
- Get Paid to Write
Connect
- Google+
Droplets Launched *
*
#+end_example ** console shot *** console shot: sudo chef-server-ctl reconfigure #+begin_example [root@centos-vm1 ~]# sudo chef-server-ctl reconfigure sudo chef-server-ctl reconfigure Starting Chef Client, version 11.6.0 Compiling Cookbooks... Recipe: chef-server::default
- directory[/etc/chef-server] action create
- create new directory /etc/chef-server
- change mode from '' to '0775'
- change owner from '' to 'root'
- change group from '' to 'root'
[2014-06-02T21:59:57-04:00] WARN: Cloning resource attributes for directory[/var/opt/chef-server/chef-server-webui/etc] from prior resource (CHEF-3694)
[2014-06-02T21:59:57-04:00] WARN: Previous directory[/var/opt/chef-server/chef-server-webui/etc]: /opt/chef-server/embedded/cookbooks/chef-server/recipes/chef-server-webui.rb:31:in block in from_file' [2014-06-02T21:59:57-04:00] WARN: Current directory[/var/opt/chef-server/chef-server-webui/etc]: /opt/chef-server/embedded/cookbooks/chef-server/definitions/unicorn_config.rb:21:in block in from_file'
Generating RSA private key, 2048 bit long modulus
.................................................................+++
...................+++
e is 65537 (0x10001)
Converging 207 resources
-
directory[/etc/chef-server] action nothing (skipped due to action :nothing) Recipe: chef-server::users
-
user[chef_server] action create
- create user user[chef_server]
-
group[chef_server] action create
- alter group group[chef_server]
- replace group members with new list of members
Recipe: chef-server::default
-
directory[/etc/chef] action create
- create new directory /etc/chef
- change mode from '' to '0775'
- change owner from '' to 'root'
- change group from '' to 'chef_server'
-
directory[/var/opt/chef-server] action create
- create new directory /var/opt/chef-server
- change mode from '' to '0755'
- change owner from '' to 'root'
- change group from '' to 'root'
Recipe: runit::upstart
-
execute[initctl stop opscode-runsvdir] action run (skipped due to only_if)
-
file[/etc/init/opscode-runsvdir.conf] action delete (up to date)
-
cookbook_file[/etc/init/chef-server-runsvdir.conf] action create
- create new file /etc/init/chef-server-runsvdir.conf
- update content in file /etc/init/chef-server-runsvdir.conf from none to 1d64c1
--- /etc/init/chef-server-runsvdir.conf 2014-06-02 21:59:58.033000004 -0400
+++ /tmp/.chef-server-runsvdir.conf20140602-4853-16264rh 2014-06-02 21:59:58.052000001 -0400
@@ -0,0 +1,10 @@
+start on runlevel [2345]
+stop on shutdown
+respawn
+post-stop script
-
To avoid stomping on runsv's owned by a different runsvdir
-
process, kill any runsv process that has been orphaned, and is
-
now owned by init (process 1).
- pkill -HUP -P 1 runsv$ +end script +exec /opt/chef-server/embedded/bin/runsvdir-start
-
- change mode from '' to '0644'
- change owner from '' to 'root'
- change group from '' to 'root'
-
execute[initctl status chef-server-runsvdir] action run
- execute initctl status chef-server-runsvdir
-
execute[initctl start chef-server-runsvdir] action run
- execute initctl start chef-server-runsvdir
Recipe: chef-server::rabbitmq
-
directory[/var/opt/chef-server/rabbitmq] action create
- create new directory /var/opt/chef-server/rabbitmq
- change mode from '' to '0700'
- change owner from '' to 'chef_server'
-
directory[/var/opt/chef-server/rabbitmq/etc] action create
- create new directory /var/opt/chef-server/rabbitmq/etc
- change mode from '' to '0700'
- change owner from '' to 'chef_server'
-
directory[/var/opt/chef-server/rabbitmq/db] action create
- create new directory /var/opt/chef-server/rabbitmq/db
- change mode from '' to '0700'
- change owner from '' to 'chef_server'
-
directory[/var/log/chef-server/rabbitmq] action create
- create new directory /var/log/chef-server/rabbitmq
- change mode from '' to '0700'
- change owner from '' to 'chef_server'
-
link[/var/opt/chef-server/rabbitmq/db] action create (skipped due to not_if)
-
link[/opt/chef-server/embedded/bin/rabbitmqctl] action create (up to date)
-
link[/opt/chef-server/embedded/bin/rabbitmq-env] action create (up to date)
-
link[/opt/chef-server/embedded/bin/rabbitmq-multi] action create
- create symlink at /opt/chef-server/embedded/bin/rabbitmq-multi to /opt/chef-server/embedded/service/rabbitmq/sbin/rabbitmq-multi
-
link[/opt/chef-server/embedded/bin/rabbitmq-server] action create (up to date)
-
template[/opt/chef-server/embedded/service/rabbitmq/sbin/rabbitmq-env] action create ... ... Recipe: chef-server::erchef
-
service[erchef] action restart
- restart service service[erchef]
Chef Client finished, 268 resources updated chef-server Reconfigured! You have new mail in /var/spool/mail/root #+end_example *** console shot: chef-server-ctl test #+begin_example [root@centos-vm1 ~]# chef-server-ctl test chef-server-ctl test Configuring logging... Creating platform... Starting Pedant Run: 2014-06-03 13:57:25 UTC setting up rspec config for #Pedant::OpenSourcePlatform:0x00000002db89e8 Configuring RSpec for Open-Source Tests
| || || || || || | | | | _ || _ || || || _ || _ || | | | | || || || | | || | | || | | || |_ | || || ||__ || || || || || || | | || | _| || | | || || | |||| |||||||| |_______|
 _______  _______  ______   _______  __    _  _______
|       ||       ||      | |   _   ||  |  | ||       |
|    _  ||    ___||  _    ||  |_|  ||   |_| ||_     _|
|   |_| ||   |___ | | |   ||       ||       |  |   |
|    ___||    ___|| |_|   ||       ||  _    |  |   |
|   |    |   |___ |       ||   _   || | |   |  |   |
|___|    |_______||______| |__| |__||_|  |__|  |___|

                "Accuracy Over Tact"

              === Testing Environment ===
             Config File: /var/opt/chef-server/chef-pedant/etc/pedant_config.rb
   HTTP Traffic Log File: /var/log/chef-server/chef-pedant/http-traffic.log
Running tests from the following directories: /opt/chef-server/embedded/service/chef-pedant/spec/api Ruby? Erlang? true Run options: include {:focus=>true, :smoke=>true} exclude {:platform=>:multitenant, :cleanup=>true} Creating client pedant_admin_client... Populating dot_chef for knife user: pedant_admin_client Generating knife files: /tmp/d20140603-2304-1dxtqof/knife.rb Creating client pedant_client... Populating dot_chef for knife user: pedant_client Generating knife files: /tmp/d20140603-2304-x2s6aa/knife.rb Populating dot_chef for knife user: pedant_non_admin_user Generating knife files: /tmp/d20140603-2304-1qcbznq/knife.rb Populating dot_chef for knife user: knifey Generating knife files: /tmp/d20140603-2304-qgyrwb/knife.rb
Open source /authenticate_users endpoint POST /authenticate_user with existing user and correct password should respond with 200 OK verified => true and wrong password should respond with 200 OK verified => false
Environments API Endpoint
with non-default environments in the organization
PUT /environments/
/environments/ENVIRONMENT/recipes API endpoint with multiple versions of multiple cookbooks with no environment constraints when fetching recipes from a non-default environment should respond with 200 OK and recipes from the latest version of all cookbooks within the environment when fetching recipes from _default environment should respond with 200 OK and recipes from the latest version of all cookbooks within the environment
Environments API Endpoint
with non-default environments in the organization
DELETE /environments/
Environments API Endpoint POST /environments with no additional environments when creating a valid environment should respond with 201 Created and a correct path should persist the environment
Environments API Endpoint
GET /environments/
Environments API Endpoint
GET /environments
with an operational server
should respond with 200 OK
GET /environments/_default
with an operational server
should respond with 200 OK
GET /environments/
/environments/ENVIRONMENT/cookbooks API endpoint with multiple versions of multiple cookbooks with no environment constraints from a non-default environment when fetching cookbooks should respond with 200 OK and latest versions of ALL cookbooks
Open Source /principals endpoint
GET /principals/
Testing the Nodes API endpoint
GET /nodes/
Cookbooks API endpoint
PUT /cookbooks/
Cookbooks API endpoint
DELETE /cookbooks/
Cookbooks API endpoint
PUT /cookbooks/
Cookbook Versions API endpoint, GET with cookbooks on the server when requesting the 'latest' Cookbook version should respond with 200 OK and the latest cookbook version
Cookbooks API endpoint GET /cookbooks with an operational server should respond with 200 OK
Search API endpoint /search/environment GET when searching for a single environment by name should have more than just the target of our environment search on the system should return status code 200 and a single environment POST targeted toward many environments with body of {"possibly_nested"=>["default_attributes", "top", "middle", "bottom"], "the_name"=>["name"], "not_found"=>["foo", "bar", "baz", "totally_not_a_real_field"], "empty"=>[]} should succeed, and return multiple environments /search/node GET when searching for a single node by name should have more than just the target of our node search on the system should return status code 200 and a single node POST targeted toward many nodes with body of {"possibly_nested"=>["top", "middle", "bottom"], "the_name"=>["name"], "not_found"=>["foo", "bar", "baz", "totally_not_a_real_field"], "empty"=>[]} should succeed, and return multiple nodes /search/role GET when searching for a single role by name should have more than just the target of our role search on the system should return status code 200 and a single role POST targeted toward many roles with body of {"possibly_nested"=>["override_attributes", "top", "middle", "bottom"], "the_name"=>["name"], "not_found"=>["foo", "bar", "baz", "totally_not_a_real_field"], "empty"=>[]} should succeed, and return multiple roles /search/client GET searching by name returns the correct client POST targeted toward many clients with body of {"possibly_nested"=>["admin"], "the_name"=>["name"], "not_found"=>["foo", "bar", "baz", "totally_not_a_real_field"], "empty"=>[]} should succeed, and return multiple clients /search/<data_bag> using GET an existing data bag a query that should succeed should succeed using POST for an existing data bag a partial search should succeed
Testing the Roles API endpoint
making a request to /roles
using POST
for a role that does not exist
should respond with 201 and the correct path
should persist the role
making a request to /roles/
Open Source /users endpoint
GET /users
with an operational server
should respond with 200 OK
GET /users/
Data Bag API endpoint
with no data bags
a request to /data
POST
with a canonical payload
behaves like a successful data bag POST
returns success
creates the data bag
with data bags
that have no items
a request to /data/
Sandboxes API Endpoint Sandboxes Endpoint, POST when creating a new sandbox should respond with 201 Created Sandboxes Endpoint, PUT when committing a sandbox after uploading files should respond with 200 OK
Open Source Client API endpoint
GET /clients
as an admin client
with an operational server
should respond with 200 OK
POST /clients
valid requests of various types to create a client
with a "normal" admin client payload
creates a new admin client
GET /clients/
Depsolver API endpoint POST /environments/:env/cookbook_versions success cases returns 200 with a minimal good cookbook Deleting client pedant_admin_client ... Deleting client pedant_client ... Pedant did not create the user admin, and will not delete it Deleting user pedant_non_admin_user ... Deleting user knifey ...
Finished in 49.95 seconds 70 examples, 0 failures #+end_example *** [#B] chef-server-ctl chef-server-ctl reconfigure chef-server-ctl test #+begin_example chef-server-ctl cleanse Delete all private chef data, and start from scratch. graceful-kill Attempt a graceful stop, then SIGKILL the entire process group. help Print this help message. hup Send the services a HUP. int Send the services an INT. kill Send the services a KILL. once Start the services if they are down. Do not restart them if they stop. reconfigure Reconfigure the application. reindex Reindex all server data restart Stop the services if they are running, then start them again. service-list List all the services (enabled services appear with a *.) show-config Show the configuration that would be generated by reconfigure. start Start services if they are down, and restart them if they stop. status Show the status of all the services. stop Stop the services, and do not restart them. tail Watch the service logs of all enabled services. term Send the services a TERM. test Run the API test suite against localhost. uninstall Kill all processes and uninstall the process supervisor (data will be preserved). #+end_example *** [#A] chef validation_key #+begin_example root@ubuntu-vm:~/chef-repo/.chef#cat /root/.chef/knife.rb cat /root/.chef/knife.rb log_level :info log_location STDOUT node_name 'root' client_key '/root/.chef/root.pem' validation_client_name 'chef-validator' validation_key '/root/chef-repo/.chef/chef-validator.pem' chef_server_url 'https://ubuntu-vm.osc.com:443' syntax_check_cache_path '/root/.chef/syntax_check_cache' #+end_example ** DONE [#A] Sample: create a cookbook in a given directory :IMPORTANT: CLOSED: [2014-06-20 Fri 14:45] http://showerlee.blog.51cto.com/2047005/1408467
#+begin_example mkdir -p ~/chef-repo/cookbooks cd ~/chef-repo/cookbooks
knife cookbook create quick_start -o ./ ls -1p quick_start
vi ~/chef-repo/cookbooks/quick_start/attributes/quick_start.rb
normal[:deep_thought] = "If a tree falls in the forest ..."
vi ~/chef-repo/cookbooks/quick_start/recipes/default.rb
template "/tmp/deep_thought.txt" do source "deep_thought.txt.erb" variables :deep_thought => node[:deep_thought] action :create end
vi ~/chef-repo/cookbooks/quick_start/templates/default/deep_thought.txt.erb
Today's deep thought: <%= @deep_thought %>
cd ~/chef-repo/cookbooks/
ls
knife cookbook upload -a -o ./
knife cookbook list
将quick_start recipe添加到你的node中 (chef.example.com)
knife node run_list add node1.example.com 'recipe[quick_start]'
查看添加好的recipe
knife node show node1.example.com -r
chef-client #+end_example ** [#A] example :IMPORTANT: *** DONE example: Chef write for multiple platform CLOSED: [2014-06-09 Mon 16:20] https://learnchef.opscode.com/tutorials/write-for-multiple-platforms/ #+begin_example
These variables configure Ubuntu and Debian.
package_name = 'apache2' service_name = 'apache2' document_root = '/var/www'
if platform_family? 'rhel' package_name = 'httpd' service_name = 'httpd' document_root = '/var/www/html' end
package package_name do action :install end
service service_name do action [ :enable, :start ] end
cookbook_file "#{document_root}/index.html" do source 'index.html' mode '0644' end #+end_example *** [#B] Sample: Configure Apache on Linux https://learnchef.opscode.com/tutorials/create-your-first-cookbook/ #+begin_example Here you'll set up and validate Apache on Linux in 7 steps.
§Step 1: Create the cookbook The knife command provides an interface between your workstation and the Chef server. From your chef-repo directory, run the knife command to create a new cookbook.
knife cookbook create apache-tutorial-1 At this point, everything is set up locally, and nothing's sent to the Chef server. You'll upload the cookbook in a later step.
§Step 2: Write the recipe When you create a cookbook, Chef creates a default recipe for you. From your text editor, open up the default recipe in the apache-tutorial-1 cookbook.
cookbooks/apache-tutorial-1/recipes/default.rb Now let's write some Ruby code to perform these actions:
install Apache start the service and make sure it will start when the machine boots configure the home page Here's the code you need to add to default.rb. Apache is configured differently on various flavors of Linux. If your target node is running Ubuntu or Debian, follow the apache tab. If your target node is running RHEL, CentOS, or Fedora, follow the httpd tab. In future tutorials, you'll learn how to combine both options in the same code file.
apache package 'apache2' do action :install end
service 'apache2' do action [ :enable, :start ] end
cookbook_file '/var/www/index.html' do source 'index.html' mode '0644' end httpd §Step 3: Add a file resource The final part of the recipe you just wrote uses the cookbook_file resource to copy the home page. Now you need to add that resource to your cookbook.
Open index.html in your text editor.
cookbooks/apache-tutorial-1/files/default/index.html And write out the homepage like this:
Hello, world!
§Step 4: Upload the cookbook to the Chef server From the chef-repo directory, run knife's cookbook upload command to upload your cookbook.knife cookbook upload apache-tutorial-1 A copy of your cookbook is now on the Chef server.
§Step 5: Create the run list The run list defines the order in which recipes are run. In this tutorial, you have just one recipe in your run list.
To configure the run list for your Linux node, first navigate to manage.opscode.com and log in to your Chef account. Then from the Nodes tab, select your node and open its run list.
Opening the run list
Now drag the recipe from the Available Recipes box to the Current Run List box. Then click Save Run List.
Setting and saving the run list
§Step 6: Run chef-client Next you'll run chef-client to get the latest cookbooks from the Chef server and bring your target node to its expected state.
The easiest way to run chef-client is to run the knife command from your local workstation. (Recall that you ran the knife command when you bootstrapped your node and that knife serves as the interface between you and the Chef server.)
Here's the command.
knife ssh ec2-xx-xx-xx-xx.compute-1.amazonaws.com 'sudo chef-client' -m -x chef -P chef Replace ec2-xx-xx-xx-xx.compute-1.amazonaws.com with your node's IP address or hostname. If you're not using a Chef EC2 image, replace the -x and -P arguments with the username and password for an account that has root access.
Alternatively, you can log into your Linux node through SSH and then run chef-client.
ssh [email protected] sudo chef-client If you're using Vagrant, here's the command to use.
knife ssh localhost 'sudo chef-client' -m -x vagrant -P vagrant --ssh-port 2222 --ssh-port 2222 might not be correct if you're running more than one Vagrant VM. You can get the port that Vagrant selects for SSH forwarding from the output of the vagrant up command. As chef-client runs, you'll see Linux configure itself to run Apache and copy your basic web page to /var/www/index.html or /var/www/html/index.html.
§Step 7: Verify your home page After the chef-client run completes, open a web browser from any computer and navigate to your test node. For example, if you're running on EC2, the URL might resemble:
http://ec2-xx-xx-xx-x.compute-1.amazonaws.com You'll see "Hello, world!" in your browser. #+end_example *** [#A] Sample: https://github.com/opscode-cookbooks *** DONE [#A] chef cookbook example :IMPORTANT: CLOSED: [2014-06-09 Mon 15:37] http://docs.opscode.com/resource_cookbook_file.html#examples #+begin_example Examples The following examples demonstrate various approaches for using resources in recipes. If you want to see examples of how Chef uses resources in recipes, take a closer look at the cookbooks that Chef authors and maintains: https://github.com/opscode-cookbooks.
Transfer a file
cookbook_file "/tmp/testfile" do source "testfile" mode "0644" end Handle cookbook_file and yum_package resources in the same recipe
When a cookbook_file resource and a yum_package resource are both called from within the same recipe, dump the cache and use the new repository immediately to ensure that the correct package is installed:
cookbook_file "/etc/yum.repos.d/custom.repo" do source "custom" mode "0644" end
yum_package "only-in-custom-repo" do action :install flush_cache [:before] end Install repositories from a file, trigger a command, and force the internal cache to reload
The following example shows how to install new yum repositories from a file, where the installation of the repository triggers a creation of the yum cache that forces the internal cache for the chef-client to reload:
execute "create-yum-cache" do command "yum -q makecache" action :nothing end
ruby_block "reload-internal-yum-cache" do block do Chef::Provider::Package::Yum::YumCache.instance.reload end action :nothing end
cookbook_file "/etc/yum.repos.d/custom.repo" do source "custom" mode "0644" notifies :run, "execute[create-yum-cache]", :immediately notifies :create, "ruby_block[reload-internal-yum-cache]", :immediately end Use a case statement
The following example shows how a case statement can be used to handle a situation where an application needs to be installed on multiple platforms, but the where the install directories are different, depending on the platform:
cookbook_file "application.pm" do case node[:platform] when "centos","redhat" path "/usr/lib/version/1.2.3/dir/application.pm" when "arch" path "/usr/share/version/core_version/dir/application.pm" else path "/etc/version/dir/application.pm" end source "application-#{node[:languages][:perl][:version]}.pm" owner "root" group "root" mode "0644" end #+end_example ** DONE LoadError: cannot load such file -- chef/rest: gem install chef CLOSED: [2014-06-20 Fri 16:40] sudo apt-get install rubygems
gem install chef
#+begin_example
[root@centos-vm1 denny]# irb
irb
irb(main):001:0> require 'net/http'
require 'net/http'
=> true
irb(main):002:0> require 'chef/rest'
require 'chef/rest'
LoadError: cannot load such file -- chef/rest
from /usr/local/lib/ruby/site_ruby/2.1.0/rubygems/core_ext/kernel_require.rb:55:in require' from /usr/local/lib/ruby/site_ruby/2.1.0/rubygems/core_ext/kernel_require.rb:55:in require'
from (irb):2
from /usr/local/bin/irb:11:in `
- Chef support windows
- Chef have a nice GUI
- Chef have much more concept
[9/29/14, 18:53:13] denny: Chef is more modulized than Puppet, which result in it's more flexible and power. [9/29/14, 18:53:52] denny: Chef support multiple OS, say mac and windows. At least it claims to be so [9/29/14, 18:54:25] denny: Chef cookbook mechanism provides a good unit of code reuse. [9/29/14, 18:54:39] denny: Now, it's time for drawbacks. [9/29/14, 18:55:19] denny: 1. Chef is more difficult to learn, since too many concepts and too many ways to achieve the same goal. [9/29/14, 18:57:14] denny: 2. Chef is less popular to puppet, IMHO *** DONE Chef over Puppet: retries and retry_delay; ignore_failure CLOSED: [2014-06-09 Mon 16:09] http://docs.opscode.com/chef/resources.html *** DONE Chef over Puppet: support windows more CLOSED: [2014-06-09 Mon 16:10] ** # --8<-------------------------- separator ------------------------>8-- ** [#B] Chef Data Bags: arbitrary stores of globally available JSON data. https://wiki.opscode.com/display/ChefCN/Data+Bags Data Bags are stored on the server and indexed for searching.
export EDITOR=vim knife data bag create admins charlie
| Name | Summary | |----------------+---------------------------------------------------------| | create bag | export EDITOR=vim; knife data bag create admins charlie | | list bags | knife data bag list | | show bags | knife data bag show admins | | show bag items | knife data bag show admins charlie | | edit bags | knife data bag edit admins charlie | *** DONE Attributes or data bags: what should I use? CLOSED: [2014-06-23 Mon 12:46] http://www.getchef.com/blog/2014/01/23/attributes-or-data-bags-what-should-i-use/
guidelines for whether to a data bag, instead of attributes:
- If it is global across all of your infrastructure,
- If it needs to be encrypted
- If it needs to be written to by another system
- If an external team needs to update limited pieces of information ** DONE [#A] chef server api: Chef::REST :IMPORTANT: CLOSED: [2014-06-20 Fri 21:06] http://docs.opscode.com/api_chef_server.html http://ops.anthonygoddard.com/Chef/querying-chef-using-the-rest-api/ http://search.cpan.org/~bpatel/CHEF-REST-Client-1/lib/CHEF/REST/Client.pm
gem install bundler
Chef::REST library is the easiest one to perform the request.
Below is a ruby file, you modify the parameter, then launch it. Note: irb also works. *** sample1: get_rest http://ops.anthonygoddard.com/Chef/querying-chef-using-the-rest-api/ #+begin_src ruby require 'bundler/setup' require 'chef'
Chef::Config.from_file("/root/.chef/knife.rb") # /etc/chef/client.rb is also ok rest = Chef::REST.new("https://ubuntu-vm.osc.com")
nodes = rest.get_rest("/nodes") #+end_src *** sample2: post
- ruby code, which calls chef server to create a chef client #+begin_src ruby require 'bundler/setup' require 'chef'
require 'rubygems' require 'json'
Chef::Config.from_file("/root/.chef/knife.rb") rest = Chef::REST.new("https://ubuntu-vm.osc.com") # chef server uri
string="{"name": "client_name", "admin": false}" object=JSON.parse(string)
rest.post("/clients", object) # create a chef client, with name of client_name #+end_src
-
output of running above ruby code #+begin_example {"uri"=>"https://chef.fluigidentity.com/clients/client_name", "public_key"=>"-----BEGIN PUBLIC KEY-----\n MIIBIjANBgkqhkiG9w0BAQEFAAOCAQ8AMIIBCgKCAQEAnB0XiRF6K1UeGU5DDy5q\n NCFY1k12jgyRRoKcr5bzhRB0rbBarm7MxZgtgbn+dguMSj5mmIpReRD6pLe7zOjl\n xZ+3KFO+ptmzonwnG+3WvWNN+m3IjmzCcvT1RcISeBgWSg9yBNJdZIzk2tsnmwFr\n /2c2O8lUX8StCbUMyyM+L2KeLhUVt6r5oa/fExrRfKfXOQkZgajRScXum+JjVfkd\n 9YV2gqZSrriUMQnwlYAVznazpYUVKnC8lEc+7dO6zh/wHdnxMjDywgwgV4apxY6b\n iVdCLxxtQq0ks/aMu9VcEqOLAz1EtZh7QNL5WhNfzzNOoqp6NKQK0wvXGaA7kUHn\n mwIDAQAB\n-----END PUBLIC KEY-----\n", "private_key"=>"-----BEGIN RSA PRIVATE KEY-----\n MIIEpAIBAAKCAQEAnB0XiRF6K1UeGU5DDy5qNCFY1k12jgyRRoKcr5bzhRB0rbBa\n rm7MxZgtgbn+dguMSj5mmIpReRD6pLe7zOjlxZ+3KFO+ptmzonwnG+3WvWNN+m3I\n jmzCcvT1RcISeBgWSg9yBNJdZIzk2tsnmwFr/2c2O8lUX8StCbUMyyM+L2KeLhUV\n t6r5oa/fExrRfKfXOQkZgajRScXum+JjVfkd9YV2gqZSrriUMQnwlYAVznazpYUV\n KnC8lEc+7dO6zh/wHdnxMjDywgwgV4apxY6biVdCLxxtQq0ks/aMu9VcEqOLAz1E\n tZh7QNL5WhNfzzNOoqp6NKQK0wvXGaA7kUHnmwIDAQABAoIBACfZgT162Z2gD5vU\n D2gbp/6AmKWzhlTCPn8qLgbgWG8aAT6o6qzmGZ1CuDMKIDtPvVLiVNwRSrTFscVE\n JUssFCL7HwzLO7ppjeInIPCPKKaVZ71KMsywVH51qvpQjNhdBauH/8ndTPuyv2Ri\n VtzJYyEB3qUqQkBj+uukbIyaBXCgrL1hoMFHXe1Pbl6uUyXk4tN6fLZ+o/U600EJ\n Ln9Y/BN87CTk83BJ0C/OEkHMq/5i4DXUM8kHsUSr2PEYviJWozFd+tyCt29UDMw0\n vOzF6NlZ/VFKyyhZ7wA/VtU6NqBKpnQ5phfCeIGJG5aRyPy7Sz3h3JxOR1uQejco\n 27Iia2ECgYEAy9ruu2m1HBwLfSpK4qIEeTuO1AW3xtLm/Y2/H58QP9UI7XU5hCxV\n bxvJZOkav9V0axO8arQ64F61Wi621eu6XfyouSspLhzjnuK7Jtoxk0TqNa4OLwzO\n IyiFaqM3TKMWU86xryORKwpsOHhyJoIAlR1ytCvvl8WxJdoahjKYV8sCgYEAxAvk\n /hdrYy5tGTRKSAEvcAq1sGuP7C6hO8P1ZNoo6yhaI+8/G4ZFNJNEN6Hx9MTEa6nJ\n ntvUKaqStePrvPFhtNYVaQT4jtrwpg5483K4Cyu60pQusXvlKuutAv4FP8T7lUX1\n TmQYqaBhA1S3V9aFWEDX8Ko6L3pAVD5T2rF+lXECgYAxQ8F57TvlhSmJoBTk3D60\n hZ4owxD8ra9BC2Zq3+fvZS55JGE3/fbPmSl8h5D9VzqBPg3Ew7WOz5SILM3muMcb\n O5oS1cln6XdgyG5uH0Dn1Dm9q0imOjP+7yX+9V7B2I/mxQbPyoqkmio5I3KCt9wo\n LSuxOwT16sK64RCT6dpDLQKBgQC+fEgt0xeWsP90Y+hg+jXbiaxsFLcs50nmRkrj\n iU4E35pmHAqXdek8YnMAEyyDhcTMT5cF8da9/Wy7qw/c8DTdfr4i4p+YPodg8eL3\n uNm2kPDftvd/oEBVadUbeTIkegNxUR4+4udLufdJQ0E56ch6rdajkuMiSojC0iSr\n 85ZpIQKBgQCfxLSWBI7w1u0dsRhwjnKBWS+2pL6keZ6VbkhItTScvRtZzp+6wUfK\n KNYFTsXbLo5Fniu00qkkXFBFOLvW1P0UJ7Etw1aI3Oq+SVEkH2o7aKEVmsU7Rm50\n 2WkMXXLtHAn+UNl6irs+xNheFpOFuQjjCgFKY9JnNv6RiCzBakSwJA==\n -----END RSA PRIVATE KEY-----\n"} #+end_example
-
Content of knife.rb #+begin_example [root@centos190 ~]# cat /root/.chef/knife.rb cat /root/.chef/knife.rb log_level :info log_location STDOUT node_name 'dontest' client_key '/root/.chef/dontest.pem' <-- public admin key validation_client_name 'chef-validator-don' validation_key '/etc/chef-server/chef-validator-don.pem' <-- private admin key chef_server_url 'https://chef.fluigidentity.com' syntax_check_cache_path '/root/.chef/syntax_check_cache' #+end_example *** sample3: get_rest #+begin_src ruby #!/usr/bin/env ruby require 'rubygems' require 'chef/config' require 'chef/log' require 'chef/rest' require 'chef/node' require 'chef/application/client'
chef_server_url="https://chef.fluigidentity.com/" # TODO: change to the correct one client_name = "adminclient.dennyzhang.com" # TODO: change to the correct one signing_key_filename="/etc/chef/adminclient.pem" # TODO: change the correct one rest = Chef::REST.new(chef_server_url, client_name, signing_key_filename) puts rest.get_rest("/clients") # TODO: change to the correct one #+end_src ** DONE [#A] Fail connect 443: curl https://centos-vm1.novalocal:443: copy certificate from server to proper location of client CLOSED: [2014-06-20 Fri 14:43] cp /var/opt/chef-server/nginx/ca/ubuntu-vm.osc.com.crt /usr/share/centrifydc/apache/certs/ca-certs.crt #+begin_example [root@centos-vm1 ~]# curl https://centos-vm1.novalocal:443 curl https://centos-vm1.novalocal:443 curl: (60) error setting certificate verify locations: CAfile: /usr/share/centrifydc/apache/certs/ca-certs.crt CApath: none
More details here: http://curl.haxx.se/docs/sslcerts.html
curl performs SSL certificate verification by default, using a "bundle" of Certificate Authority (CA) public keys (CA certs). The default bundle is named curl-ca-bundle.crt; you can specify an alternate file using the --cacert option. If this HTTPS server uses a certificate signed by a CA represented in the bundle, the certificate verification probably failed due to a problem with the certificate (it might be expired, or the name might not match the domain name in the URL). If you'd like to turn off curl's verification of the certificate, use the -k (or --insecure) option. #+end_example ** DONE [#A] where chef's cookbook: /usr/local/src/chef/cookbooks/mycookbook :IMPORTANT: CLOSED: [2014-06-10 Tue 01:17]
knife cookbook create quick_start -o ./: specify where cookbooks are stored sudo knife cookbook create mycookbook http://heylinux.com/archives/2269.html ** DONE [#A] How to add a chef client node to chef server :IMPORTANT: CLOSED: [2014-06-20 Fri 14:39] knife configure --initial cat /root/.chef/knife.rb cp /root/.chef/dennyubuntu.pem /etc/chef/client.pem sudo knife bootstrap ubuntu-vm.osc.com --sudo -x root -P ChangeMe -N dennyubuntu *** DONE chef-server-ctl test: #<Errno::ECONNRESET: Connection reset by peer - SSL_connect>: stop Apache first CLOSED: [2014-06-03 Tue 10:03] https://groups.google.com/forum/#!msg/opscode-chef-openstack/AIZvB-P2Sl0/r4GAoO1ipRYJ http://lists.opscode.com/sympa/arc/chef/2013-06/msg00477.html #+begin_example [root@centos-vm1 ~]# chef-server-ctl test chef-server-ctl test Configuring logging... Creating platform... Starting Pedant Run: 2014-06-03 13:25:33 UTC setting up rspec config for #Pedant::OpenSourcePlatform:0x00000002931c58 Configuring RSpec for Open-Source Tests
| || || || || || | | | | _ || _ || || || _ || _ || | | | | || || || | | || | | || | | || |_ | || || ||__ || || || || || || | | || | _| || | | || || | |||| |||||||| |_______|
 _______  _______  ______   _______  __    _  _______
|       ||       ||      | |   _   ||  |  | ||       |
|    _  ||    ___||  _    ||  |_|  ||   |_| ||_     _|
|   |_| ||   |___ | | |   ||       ||       |  |   |
|    ___||    ___|| |_|   ||       ||  _    |  |   |
|   |    |   |___ |       ||   _   || | |   |  |   |
|___|    |_______||______| |__| |__||_|  |__|  |___|

                "Accuracy Over Tact"

              === Testing Environment ===
             Config File: /var/opt/chef-server/chef-pedant/etc/pedant_config.rb
   HTTP Traffic Log File: /var/log/chef-server/chef-pedant/http-traffic.log
Running tests from the following directories:
/opt/chef-server/embedded/service/chef-pedant/spec/api
Ruby? Erlang? true
Run options:
include {:focus=>true, :smoke=>true}
exclude {:platform=>:multitenant, :cleanup=>true}
Creating client pedant_admin_client...
Exception during Pedant credentials setup
#<Errno::ECONNRESET: Connection reset by peer - SSL_connect>
/opt/chef-server/embedded/lib/ruby/1.9.1/net/http.rb:800:in connect' /opt/chef-server/embedded/lib/ruby/1.9.1/net/http.rb:800:in block in connect'
/opt/chef-server/embedded/lib/ruby/1.9.1/timeout.rb:55:in timeout' /opt/chef-server/embedded/lib/ruby/1.9.1/timeout.rb:100:in timeout'
/opt/chef-server/embedded/lib/ruby/1.9.1/net/http.rb:800:in connect' /opt/chef-server/embedded/lib/ruby/1.9.1/net/http.rb:756:in do_start'
/opt/chef-server/embedded/lib/ruby/1.9.1/net/http.rb:745:in start' /opt/chef-server/embedded/service/gem/ruby/1.9.1/gems/rest-client-1.6.7/lib/restclient/request.rb:172:in transmit'
/opt/chef-server/embedded/service/gem/ruby/1.9.1/gems/rest-client-1.6.7/lib/restclient/request.rb:64:in execute' /opt/chef-server/embedded/service/gem/ruby/1.9.1/gems/rest-client-1.6.7/lib/restclient/request.rb:33:in execute'
/opt/chef-server/embedded/service/gem/ruby/1.9.1/gems/rest-client-1.6.7/lib/restclient.rb:72:in post' /opt/chef-server/embedded/service/chef-pedant/lib/pedant/request.rb:103:in authenticated_request'
/opt/chef-server/embedded/service/chef-pedant/lib/pedant/request.rb:125:in post' /opt/chef-server/embedded/service/chef-pedant/lib/pedant/opensource/platform.rb:81:in create_client'
/opt/chef-server/embedded/service/chef-pedant/lib/pedant/opensource/platform.rb:122:in client_from_config' /opt/chef-server/embedded/service/chef-pedant/lib/pedant/opensource/platform.rb:40:in block in setup'
/opt/chef-server/embedded/service/chef-pedant/lib/pedant/opensource/platform.rb:35:in each' /opt/chef-server/embedded/service/chef-pedant/lib/pedant/opensource/platform.rb:35:in setup'
/opt/chef-server/embedded/service/chef-pedant/lib/pedant.rb:102:in block (2 levels) in configure_rspec' /opt/chef-server/embedded/service/gem/ruby/1.9.1/gems/rspec-core-2.11.1/lib/rspec/core/hooks.rb:23:in instance_eval'
/opt/chef-server/embedded/service/gem/ruby/1.9.1/gems/rspec-core-2.11.1/lib/rspec/core/hooks.rb:23:in run' /opt/chef-server/embedded/service/gem/ruby/1.9.1/gems/rspec-core-2.11.1/lib/rspec/core/hooks.rb:72:in block in run'
/opt/chef-server/embedded/service/gem/ruby/1.9.1/gems/rspec-core-2.11.1/lib/rspec/core/hooks.rb:72:in each' /opt/chef-server/embedded/service/gem/ruby/1.9.1/gems/rspec-core-2.11.1/lib/rspec/core/hooks.rb:72:in run'
/opt/chef-server/embedded/service/gem/ruby/1.9.1/gems/rspec-core-2.11.1/lib/rspec/core/hooks.rb:424:in run_hook' /opt/chef-server/embedded/service/gem/ruby/1.9.1/gems/rspec-core-2.11.1/lib/rspec/core/command_line.rb:27:in block in run'
/opt/chef-server/embedded/service/gem/ruby/1.9.1/gems/rspec-core-2.11.1/lib/rspec/core/reporter.rb:34:in report' /opt/chef-server/embedded/service/gem/ruby/1.9.1/gems/rspec-core-2.11.1/lib/rspec/core/command_line.rb:25:in run'
/opt/chef-server/embedded/service/gem/ruby/1.9.1/gems/rspec-core-2.11.1/lib/rspec/core/runner.rb:69:in run' ./bin/chef-pedant:29:in
Finished in 0.50274 seconds 0 examples, 0 failures [root@centos-vm1 ~]# #+end_example *** useful link http://www.getchef.com/blog/2014/01/23/attributes-or-data-bags-what-should-i-use/ Attributes or data bags: what should I use? | Chef Blog *** DONE knife cli: search data bags CLOSED: [2014-06-20 Fri 16:50] http://docs.opscode.com/essentials_data_bags.html #+begin_example root@ubuntu-vm:~/.chef# knife search admins "(id:charlie)" knife search admins "(id:charlie)" 1 items found
chef_type: data_bag_item data_bag: admins gender: male id: charlie name: denny
root@ubuntu-vm:~/.chef# knife data bag show admins charlie knife data bag show admins charlie gender: male id: charlie name: denny #+end_example ** DONE [#A] nginx keeps restart, which fails 443 port listening: Apache listen in port 80 :IMPORTANT: CLOSED: [2014-06-19 Thu 16:30] ** DONE [#A] chef-solo: Managing a single server with Chef CLOSED: [2014-06-22 Sun 23:27] https://www.digitalocean.com/community/tutorials/how-to-install-chef-and-ruby-with-rvm-on-a-ubuntu-vps http://www.mechanicalrobotfish.com/blog/2013/01/01/configure-a-server-with-chef-solo-in-five-minutes/ http://www.opinionatedprogrammer.com/2011/06/chef-solo-tutorial-managing-a-single-server-with-chef/
sudo gem install knife-solo --no-ri --no-rdoc
chef-solo -v *** sample: sudo chef-solo -c ~/chef/solo.rb #+begin_example bash-3.2$ tree . ├── chef-client-running.pid ├── chef-stacktrace.out ├── cookbooks │ ├── crondemo │ │ └── recipes │ │ ├── default.rb │ │ └── goodbye.rb │ └── helloworld │ └── recipes │ └── default.rb ├── node.json └── solo.rb
5 directories, 7 files bash-3.2$ cat solo.rb file_cache_path "/Users/mac/chef" cookbook_path "Users/mac/chef/cookbooks" json_attribs "/Users/mac/chef/node.json"
bash-3.2$ cat node.json { "run_list": [ "recipe[helloworld]", "recipe[crondemo]", "recipe[crondemo::goodbye]" ] } bash-3.2$ cat cookbooks/helloworld/recipes/default.rb
file "/tmp/helloworld.txt" do owner "mac" group "staff" mode 00544 action :create content "Hello, Implementor!" end bash-3.2$ cat ~/chef/cookbooks/crondemo/recipes/default.rb
cron "log something" do action :create hour "" minute "" command "logger Hello!" end
bash-3.2$ cat ~/chef/cookbooks/crondemo/recipes/goodbye.rb
cron "log something else" do action :create hour "" minute "" command "logger Goodbye!" end
#+end_example ** DONE knife ssl check -c /etc/chef/client.rb: SSL certificate could not verfied CLOSED: [2014-06-20 Fri 12:09] mkdir /etc/chef/trusted_certs/ cp /var/opt/chef-server/nginx/ca/ubuntu-vm.osc.com.crt /etc/chef/trusted_certs/ knife ssl check -c /etc/chef/client.rb
#+begin_example root@ubuntu-vm:~# knife ssl check -c /etc/chef/client.rb knife ssl check -c /etc/chef/client.rb Connecting to host ubuntu-vm.osc.com:443 ERROR: The SSL certificate of ubuntu-vm.osc.com could not be verified Certificate issuer data: /C=US/ST=WA/L=Seattle/O=YouCorp/OU=Operations/CN=ubuntu-vm.osc.com/[email protected]
Configuration Info:
OpenSSL Configuration:
- Version: OpenSSL 1.0.1h 5 Jun 2014
- Certificate file: /opt/chef/embedded/ssl/cert.pem
- Certificate directory: /opt/chef/embedded/ssl/certs Chef SSL Configuration:
- ssl_ca_path: nil
- ssl_ca_file: nil
- trusted_certs_dir: "/etc/chef/trusted_certs"
TO FIX THIS ERROR:
If the server you are connecting to uses a self-signed certificate, you must configure chef to trust that server's certificate.
By default, the certificate is stored in the following location on the host where your chef-server runs:
/var/opt/chef-server/nginx/ca/SERVER_HOSTNAME.crt
Copy that file to you trusted_certs_dir (currently: /etc/chef/trusted_certs) using SSH/SCP or some other secure method, then re-run this command to confirm that the server's certificate is now trusted.
#+end_example ** DONE [#B] How to use attribute of chef CLOSED: [2014-06-20 Fri 17:43] #+begin_example quick_start attributes
quick_start.rb normal[:deep_thought] = "If a tree falls in the forest ..."
recipes
default.rb template "/tmp/deep_thought.txt" do source "deep_thought.txt.erb" variables :deep_thought => node[:deep_thought] action :create end
root_files
README.md CHANGELOG.md metadata.rb templates
deep_thought.txt.erb Today's deep thought: <%= @deep_thought %> #+end_example ** DONE [#A] remove ssl certificate verification problem CLOSED: [2014-06-20 Fri 12:13] mkdir -p /usr/share/centrifydc/apache/certs/ cp /var/opt/chef-server/nginx/ca/ubuntu-vm.osc.com.crt /usr/share/centrifydc/apache/certs/ca-certs.crt chmod 755 /usr/share/centrifydc/apache/certs/ca-certs.crt
#+begin_example root@ubuntu-vm:/var/log/chef-server/nginx# curl https://ubuntu-vm.osc.com/users/login <f-server/nginx# curl https://ubuntu-vm.osc.com/users/login curl: (60) error setting certificate verify locations: CAfile: /usr/share/centrifydc/apache/certs/ca-certs.crt CApath: none
More details here: http://curl.haxx.se/docs/sslcerts.html
curl performs SSL certificate verification by default, using a "bundle" of Certificate Authority (CA) public keys (CA certs). The default bundle is named curl-ca-bundle.crt; you can specify an alternate file using the --cacert option. If this HTTPS server uses a certificate signed by a CA represented in the bundle, the certificate verification probably failed due to a problem with the certificate (it might be expired, or the name might not match the domain name in the URL). If you'd like to turn off curl's verification of the certificate, use the -k (or --insecure) option. #+end_example ** DONE [#A] First option of chef bootstrap is not chef-server, but chef-node :IMPORTANT: CLOSED: [2014-06-20 Fri 14:17] http://docs.opscode.com/knife_bootstrap.html ** DONE [#A] knife configure --initial: need download perm for admin and chef-validator CLOSED: [2014-06-20 Fri 14:43] knife configuration: /root/.chef/knife.rb /root/chef-repo/.chef admin.pem chef-validator.pem
knife configure --initial
#+begin_example root@ubuntu-vm:~/chef-repo/.chef# knife configure --initial knife configure --initial Overwrite /root/.chef/knife.rb? (Y/N)Y Y Please enter the chef server URL: [https://ubuntu-vm.osc.com:443]
Please enter a name for the new user: [root]
Please enter the existing admin name: [admin]
Please enter the location of the existing admin's private key: [/etc/chef-server/admin.pem] /root/chef-repo/.chef/admin.pem /root/chef-repo/.chef/admin.pem Please enter the validation clientname: [chef-validator]
Please enter the location of the validation key: [/etc/chef-server/chef-validator.pem] /root/chef-repo/.chef/chef-validator.pem /root/chef-repo/.chef/chef-validator.pem Please enter the path to a chef repository (or leave blank):
Creating initial API user... Please enter a password for the new user: password
Created user[root] Configuration file written to /root/.chef/knife.rb #+end_example ** DONE chef add a user by cli CLOSED: [2014-06-20 Fri 14:58] export EDITOR=vim knife user create dennytemp --admin -p password ** DONE [#B] Writing to Data Bags from External Systems CLOSED: [2014-06-22 Sun 23:55] http://docs.opscode.com/essentials_data_bags.html http://www.getchef.com/blog/2014/01/23/attributes-or-data-bags-what-should-i-use/ *** source code #+begin_src ruby require 'net/http' require 'chef/rest' require 'chef/config' require 'chef/data_bag' require 'chef/data_bag_item'
users = Chef::DataBag.new users.name("users") users.create #+end_src ** DONE chef remote_file : current.org a file from a remote location using file specificity. CLOSED: [2014-06-23 Mon 14:09] http://docs.opscode.com/resource.html /Users/mac/chef/jenkins/recipes/_master_war.rb #+begin_example remote_file File.join(node['jenkins']['master']['home'], 'jenkins.war') do source node['jenkins']['master']['source'] checksum node['jenkins']['master']['checksum'] if node['jenkins']['master']['checksum'] owner node['jenkins']['master']['user'] group node['jenkins']['master']['group'] notifies :restart, 'service[jenkins]' end #+end_example ** Foodcritic helps you find problems in Chef Cookbooks https://www.digitalocean.com/community/tutorials/how-to-install-chef-and-ruby-with-rvm-on-a-ubuntu-vps sudo gem install foodcritic --no-ri --no-rdoc ** # --8<-------------------------- separator ------------------------>8-- ** TODO Why chef need postgresql ** TODO Chef Environments: manage different environments such as production, staging, development, and testing, etc https://wiki.opscode.com/display/ChefCN/Environments
#+begin_example /sshx:[email protected]: #$ knife environment help FATAL: Cannot find sub command for: 'environment help' Available environment subcommands: (for details, knife SUB-COMMAND --help)
** ENVIRONMENT COMMANDS ** knife environment compare [ENVIRONMENT..] (options) knife environment create ENVIRONMENT (options) knife environment delete ENVIRONMENT (options) knife environment edit ENVIRONMENT (options) knife environment from file FILE [FILE..] (options) knife environment list (options) knife environment show ENVIRONMENT (options) #+end_example ** TODO [#A] chef take pretty much time to understand how so many files are connected *** When Chef loads cookbook attribute files, it does so in alphabetical order for all the cookbooks. *** Any libraries you include in a Cookbook will automatically be required, and available within all your Recipes, Attribute Files and Definitions. *** How to find templates https://wiki.opscode.com/display/ChefCN/Templates the rule distilled: host-node[:fqdn] node[:platform]-node[:version] node[:platform] default ** TODO Install chef on mac ** TODO chef for windows ** # --8<-------------------------- separator ------------------------>8-- ** TODO What is validation client? ** TODO How to generate public and private certificate? ** chef-validator: The chef-validator uses the Chef Server API, but only during the first chef-client run on a node. http://docs.opscode.com/chef/auth.html
-
/etc/chef/client.pem When the chef-client makes a request to the Chef server, the chef-client authenticates each request using a private key located in /etc/chef/client.pem.
-
/etc/chef/validation.pem However, during the first chef-client run, this private key does not exist. Instead, the chef-client will attempt to use the private key assigned to the chef-validator, located in /etc/chef/validation.pem. (If, for any reason, the chef-validator is unable to make an authenticated request to the Chef server, the initial chef-client run will fail.)
During the initial chef-client run, the chef-client will register with the Chef server using the private key assigned to the chef-validator, after which the chef-client will obtain a client.pem private key for all future authentication requests to the Chef server.
After the initial chef-client run has completed successfully, the chef-validator is no longer required and may be deleted from the node. Use the delete_validation recipe found in the chef-client cookbook (https://github.com/opscode-cookbooks/chef-client) to remove the chef-validator. ** TODO How to generate /etc/chef/validation.pem? ** # --8<-------------------------- separator ------------------------>8-- ** environments http://docs.opscode.com/api_chef_server.html Typical environments: production, staging, testing, and development environments. ** chef runlist: a role can contain cookbooks and recipes | Name | Summary | |-----------------------------+--------------------------------------------------------------| | query runlist of a node | knife node show dennyubuntu -r | | remove run_list from a node | knife node run_list remove dennyubuntu "recipe[quick_start]" |
https://www.digitalocean.com/community/tutorials/how-to-use-roles-and-environments-in-chef-to-control-server-configurations The runlist of a role can contain cookbooks (which will run the default recipe), recipes from cookbooks (as specified using the cookbook::recipe syntax), and other roles. Remember, a run_list is always executed sequentially, so put the dependency items before the other items. ** TODO chef server list workstations: query the database ** TODO what's chef definitions https://www.digitalocean.com/community/tutorials/how-to-understand-the-chef-configuration-environment-on-a-vps ** TODO What's the difference for: cookbook, recipes, run_list; roles, policy; environments, definitions;
- Cookbooks are usually used to handle one specific service, application, or functionality. -A run-list is a sequential list of recipes and roles that are run on a node by chef-client in order to bring the node into compliance with the policy you set for it. ** TODO chef run-lists https://learnchef.opscode.com/concepts/run-lists/ A run-list is an ordered list of policies that the Chef client runs. ** TODO How to use databag in chef ** # --8<-------------------------- separator ------------------------>8-- ** TODO [#A] what does chef clients of chef-validator and chef-webui mean? ** TODO [#A] What's the backend flow for chef initializing client? ** TODO [#B] node tagging: group nodes by similar types of information http://sysadvent.blogspot.com/2012/12/day-24-twelve-things-you-didnt-know.html http://docs.opscode.com/knife_tag.html http://docs.opscode.com/dsl_recipe_method_tag.html #+begin_src ruby tag("machine")
if tagged?("machine") Chef::Log.info("Hey I'm #{node[:tags]}") end
untag("machine")
if not tagged?("machine") Chef::Log.info("I has no tagz") end #+end_src ** [#A] chef resource VS provider VS Lightweight Providers http://docs.opscode.com/lwrp_custom.html
http://docs.opscode.com/resource.html
-
The syntax for a resource is like this: #+begin_example type "name" do attribute "value" action :type_of_action end #+end_example
-
All actions have a default value.
-
A resource represents a piece of the system (and its desired state)
-
A provider defines the steps that are needed to bring that piece of the system from its current state into the desired state.
-
The Chef::Platform class maps providers to platforms (and platform versions).
-
Ohai, as part of every chef-client run, verifies the platform and platform_version attributes on each node.
#+begin_example For example, given the following resource:
directory "/tmp/folder" do owner "root" group "root" mode 0755 action :create end
The chef-client will look up the provider for the directory resource, which happens to be Chef::Provider::Directory, call load_current_resource to create a new resource called directory["/tmp/folder"], and then, based on the current state of the directory, do the specified action, which in this case is to create a directory called /tmp/folder. If the directory already exists, nothing will happen. If the directory was changed in any way, the resource is marked as updated. #+end_example ** TODO [#B] Why I need chef-validator pem file, since we already have a admin.perm: validation key and private key of admin knife configuration: /root/.chef/knife.rb /root/chef-repo/.chef admin.pem chef-validator.pem
knife configure --initial
#+begin_example root@ubuntu-vm:~/chef-repo/.chef# knife configure --initial knife configure --initial Overwrite /root/.chef/knife.rb? (Y/N)Y Y Please enter the chef server URL: [https://ubuntu-vm.osc.com:443]
Please enter a name for the new user: [root]
Please enter the existing admin name: [admin]
Please enter the location of the existing admin's private key: [/etc/chef-server/admin.pem] /root/chef-repo/.chef/admin.pem /root/chef-repo/.chef/admin.pem Please enter the validation clientname: [chef-validator]
Please enter the location of the validation key: [/etc/chef-server/chef-validator.pem] /root/chef-repo/.chef/chef-validator.pem /root/chef-repo/.chef/chef-validator.pem Please enter the path to a chef repository (or leave blank):
Creating initial API user... Please enter a password for the new user: password
Created user[root]
Configuration file written to /root/.chef/knife.rb
#+end_example
** TODO Questions: Chef environments and Chef tag
** # --8<-------------------------- separator ------------------------>8--
** TODO LWRP
** TODO Read some more cookbooks of chef
** loop: each for
#+BEGIN_EXAMPLE
node['nagios']['client_ip_list'].split(';').each do |nagios_client_ip|
service_check_list = []
########################### Common Check ##################################
service_check_list +=
[
'check_total_procs:check_nrpe2!check_total_procs',
'check_load:check_nrpe2!check_load',
'check_users:check_nrpe2!check_users',
'check_swap_usage:check_nrpe2!check_swap_usage',
'check_zombie_procs:check_nrpe2!check_zombie_procs',
]
end
#+END_EXAMPLE ** TODO [#A] Chef Roles: Each role consists of zero (or more) attributes and a run list. https://www.digitalocean.com/community/tutorials/how-to-use-roles-and-environments-in-chef-to-control-server-configurations http://docs.opscode.com/essentials_roles.html
#+begin_example name "webserver" description "The base role for systems that serve HTTP traffic" run_list "recipe[apache2]", "recipe[apache2::mod_ssl]", "role[monitor]" env_run_lists "prod" => ["recipe[apache2]"], "staging" => ["recipe[apache2::staging]"], "_default" => [] default_attributes "apache2" => { "listen_ports" => [ "80", "443" ] } override_attributes "apache2" => { "max_children" => "50" } #+end_example
#+begin_example { "name": "webserver", "chef_type": "role", "json_class": "Chef::Role", "default_attributes": { "apache2": { "listen_ports": [ "80", "443" ] } }, "description": "The base role for systems that serve HTTP traffic", "run_list": [ "recipe[apache2]", "recipe[apache2::mod_ssl]", "role[montior]" ], "env_run_lists" : { "production" : [], "preprod" : [], "dev": [ "role[base]", "recipe[apache]", "recipe[apache::copy_dev_configs]", ], "test": [ "role[base]", "recipe[apache]" ] }, "override_attributes": { "apache2": { "max_children": "50" } } } #+end_example ** # --8<-------------------------- separator ------------------------>8-- ** TODO [#A] setup a chef cient without help of knife: chef client Unattended Installs :IMPORTANT: http://docs.opscode.com/install_bootstrap.html public and private key
Unattended Installs: chef-client -j /etc/chef/file.json
The chef-client can be installed using an unattended bootstrap. This allows the chef-client to be installed from itself, without using SSH.
When the chef-client is installed using an unattended bootstrap, remember that the chef-client:
- Must be able to authenticate to the Chef server
- Must be able to configure a run-list
- May require custom attributes, depending on the cookbooks that are being used
- Must be able to access the chef-validator.pem so that it may create a new identity on the Chef server
- Must have a unique node name; the chef-client will use the FQDN for the host system by default
https://github.com/Metaswitch/clearwater-docs/wiki/Installing-a-Chef-client ** TODO [#A] Fail to connect chef server telnet www.baidu.com 80
curl -k -L http://docs.opscode.com/install_bootstrap.html curl -k -L https://chef.fluigidentity.com
telnet 54.230.38.25 80 ** DONE delete cookbook for a given version CLOSED: [2014-06-26 Thu 19:09] #+begin_example [root@centos190 cookbooks]# knife cookbook upload -a -o ./ knife cookbook upload -a -o ./ Uploading don_cookbook1 [0.1.0] Uploaded all cookbooks. [root@centos190 cookbooks]# knife cookbook delete don_cookbook1 0.1.0 knife cookbook delete don_cookbook1 0.1.0 Do you really want to delete don_cookbook1 version 0.1.0? (Y/N)Y Y Deleted cookbook[don_cookbook1 version 0.1.0] [root@centos190 cookbooks]# knife cookbook upload -a -o ./ knife cookbook upload -a -o ./ Uploading don_cookbook1 [0.1.0] Uploaded all cookbooks. #+end_example ** DONE [#A] centos install Chef client :IMPORTANT: CLOSED: [2014-06-29 Sun 19:18] http://www.oddtechnology.com/2011/06/30/simple-install-of-chef-client-on-linux/ http://www.bonusbits.com/main/HowTo:Install_Chef_Client_from_RPM_on_CentOS
wget https://opscode-omnibus-packages.s3.amazonaws.com/el/6/x86_64/chef-11.4.0-1.el6.x86_64.rpm
rpm -ivh chef-11.4.0-1.el6.x86_64.rpm *** [#B] web page: Simple Install of Chef Client on Linux (Red Hat, CentOS, Fedora, etc.) | Odd Technology http://www.oddtechnology.com/2011/06/30/simple-install-of-chef-client-on-linux/ **** webcontent :noexport: #+begin_example Location: http://www.oddtechnology.com/2011/06/30/simple-install-of-chef-client-on-linux/ Odd Technology Blog of a Tech Geek [cropped-drive-1] Skip to content
- Home
- About
← How to extract multi-part zip files on Linux How to Test UDP Connectivity →
Simple Install of Chef Client on Linux (Red Hat, CentOS, Fedora, etc.)
Posted on 2011/06/30 by kirk
- Install the rbel repo. As root, run the following command:
#> rpm -Uvh http://rbel.frameos.org/rbel5
- Install chef client and dependancies. Install root, run the following command:
#> yum install rubygem-chef -y
-
Create a “client” entry in Chef server management console or with knife on the management server. If you are not comfortable with the knife command, just use the web console.
-
Create and/or edit /etc/chef/validation.pem and paste the Public key to it.
-
Create and/or edit /etc/chef/client.pem and paste the Private key to it.
-
Create “node” in Chef server management console or with knife on the management server. If you are not comfortable with the knife command, just use the web console.
-
Create and edit /etc/chef/client.rb and add the following values:
log_level :info log_location STDOUT node_name '<your_new_client_name>' client_key '/etc/chef/client.pem' validation_client_name '<your_new_client_name>' validation_key '/etc/chef/validation.pem' chef_server_url 'http://<your_chef_server_name>:4000' cache_type 'BasicFile' cache_options( :path => '/etc/chef/checksums' )
Make sure you fill in the template values above with your information.
- Secure chef configuration directory and files.
#> chmod 750 /etc/chef #> chmod -R 640 /etc/chef/*
NOTE: If you want to get fancy later on, create a cookbook on your chef server that will secure the /etc/chef directory and its contents every time and assign that to every server you manage. So even if someone messes up the permission, they will be secured the next time the chef-client runs.
-
Configure new node in Chef server
-
Set chef-client service to start at boot
#> chkconfig chef-client on
- Start chef-client service
#> service chef-client start
- Check /var/log/chef/client.log to confirm that all has started well. If not, troubleshoot why. Most times it is something with the validation.pem, client.pem or connectivity.
You should now be able to log into the Chef managmeent console and see the node in the Nodes tab with OS and hardware data captured.
Now you can add cookbooks to your node and restart the client for them to be installed.
This entry was posted in CentOS, Chef, Fedora, Install, Linux, Recipe/Cookbooks, Red Hat. Bookmark the permalink. ← How to extract multi-part zip files on Linux How to Test UDP Connectivity →
Leave a Reply Cancel reply
You must be logged in to post a comment.
-
Search for: [ ] Search
-
Recent Posts
- Couchbase node reboots and rack crashes
- How to Create/Make Multiple Directories on Linux Using mkdir command
- How to Shrink Oracle Tables
- Fun of moving a wordpress blog to “self-hosted”
- How to Test UDP Connectivity
-
Recent Comments
-
Archives
- April 2014
- November 2013
- September 2013
- July 2011
- June 2011
- March 2011
-
Categories
- ASM
- CentOS
- Chef
- Couchbase
- Data Pump
- Fedora
- Install
- Linux
- Oracle Database
- Recipe/Cookbooks
- Red Hat
- Uncategorized
-
Meta
- Log in
- Entries RSS
- Comments RSS
- WordPress.org
Odd Technology Proudly powered by WordPress.
#+end_example ** DONE [#B] Chef ubuntu client :IMPORTANT: CLOSED: [2014-06-30 Mon 10:15] https://github.com/Metaswitch/clearwater-docs/wiki/Installing-a-Chef-client http://www.linuxfunda.com/2014/02/04/how-to-install-and-configure-chef-client/
#+begin_example Prepare APT
Connect to chef-client.
Install the add-apt-key tool.
sudo apt-get install add-apt-key -y Under sudo, create /etc/apt/sources.list.d/opscode.list with the following content:
deb http://apt.opscode.com/ precise-0.10 main Install the GPG key for this repository:
sudo add-apt-key 83EF826A Install the Chef keyring and update APT's indexes.
sudo apt-get update sudo apt-get install opscode-keyring -y sudo apt-get upgrade -y Once this is done, you can continue on to install the Chef client software.
Install the Chef client software
Install the Chef client tool.
sudo apt-get install chef -y
During the install you will be prompted for the Chef server URL, enter http://chef-server.
Then copy two pems files to /etc/chef
Change /etc/chef/client.rb #+end_example *** DONE /etc/chef/client.rb CLOSED: [2014-06-30 Mon 10:15] #+begin_example log_level :info log_location STDOUT node_name 'centos187.osc.com' client_key '/etc/chef/client.pem' validation_client_name 'centos187.osc.com' validation_key '/etc/chef/validation.pem' chef_server_url 'https://chef.fluigidentity.com' cache_type 'BasicFile' cache_options( :path => '/etc/chef/checksums' ) #+end_example *** web page: How to install and configure Chef Client | LinuxFunda http://www.linuxfunda.com/2014/02/04/how-to-install-and-configure-chef-client/ **** webcontent :noexport: #+begin_example Location: http://www.linuxfunda.com/2014/02/04/how-to-install-and-configure-chef-client/ Top Menu
- Submit Articles
- OpenSource Apps for Linux
[copy-l_f4]
LinuxFunda
Site for Linux Begineers!! Feel free to contribute your thoughts!!
Follow Us
[facebook][twitter][rss-feed][rss-commen]
Blogs
- Linux
- Ubuntu
- CentOS
- Fedora
- Database
- Oracle
- MySQL
- CouchBase
- Scripting
- Shell Script
- Webserver
- Apache
- Nginx
- Monitoring
- Cacti
- Nagios
- AWS
- S3
- Ec2
- AutoScaling
- Language
- PHP
- ROR
How to install and configure Chef Client
Posted on February 4, 2014 by Tapas Mishra 1 Comment
Chef-logoIn my previous post I have described about Chef and “How to install and configure Chef Server“. In this article I will show you how to install and configure Chef client. As per Opscode: The chef-client relies on abstract definitions (known as cookbooks and recipes) that are written in Ruby and are managed like source code. Each definition describes how a specific part of your infrastructure should be built and managed. The chef-client then applies those definitions to servers and applications, as specified, resulting in a fully automated infrastructure. When a new node is brought online, the only thing the chef-client needs to know is which cookbooks and recipes to apply.
Installing Chef Client:
To install Chef Client on a machine go to the URL http://www.getchef.com/chef/install/. Select your Operating System, Version and Environment. It will show you the link to download the relevant package.
On Linux you can also install through the installer script. The script will download and install the latest version of chef client on your machine.
[curl -L https://www.]
1 curl -L https://www.opscode.com/chef/install.sh | sudo bash
After finishing the installation verify that the chef-client was installed. If you have RVM installed on your machine then don’t forgot to change the ruby to system ruby issue the command rvm use system
[chef-client -v ]
1 chef-client -v
For me the result looks like this.
[Chef: 11.8.2 ]
1 Chef: 11.8.2
You can find a folder structure like below on your machine after chef-client installation.
[/opt ]
1 /opt 2 /chef 3 /bin 4 /embedded 5 /bin 6 /include 7 /lib 8 /share 9 /ssl
Now we will start working to communicate with our chef server. To communicate with chef server follow the below steps.
Create a directory named chef inside the /etc directory.
[mkdir /etc/chef ]
1 mkdir /etc/chef
We need to copy the chef-validator.pem file from our chef server. You can find this file in /etc /chef directory of the server. Issue the below command to copy it to our client machine.
[scp root@chefserver_]
1 scp root@chefserver_ip:/etc/chef/chef-validator.pem /etc/chef/
Now we need a client.rb file in the client machine in which we have to mention about our chef server.
[vi /etc/chef/client.]
1 vi /etc/chef/client.rb
Append the below code to the file
[log_level :in]
1 log_level :info 2 log_location STDOUT 3 chef_server_url 'https://chef_server_url/' 4 validation_key "/etc/chef/chef-validator.pem" 5 validation_client_name 'chef-validator'
Finally we need to register the client with the chef server. Issue the below command to register the client in chef server.
[/usr/bin/chef-client]
1 /usr/bin/chef-client
Login to the chef server URL and now you can able to see the newly installed client machine name in the client and node list of the chef server. Now you can run any role or recipes on the client. Below is an example to run a role on the client machine.
Create a joson file inside the /etc/chef directory named startup.json
[vi /etc/chef/startup]
1 vi /etc/chef/startup.json
Append the below code to run a role
[{"run_list": ["role[]
1 {"run_list": ["role[testrole]"]}
Issue the below command to execute the role on the client machine.
[/usr/bin/chef-client]
1 /usr/bin/chef-client -j /etc/chef/startup.json
That’s it. Enjoy with your newly installed Chef Server and client.
Share and Enjoy
- Delicious
- StumbleUpon
- Add to favorites
- RSS
The following two tabs change content below.
- Bio
- Latest Posts
[1bb44a08] My Twitter profileMy Facebook profileMy Google+ profileMy LinkedIn profile
Tapas Mishra
Software Engineer Loves to work on Opensource products. Basically having 4 yrs of experience on Linux environment. Knowledge on Public cloud services like AWS, Rackspace, DigitalOcean, Linode. Please don't hesitate to give a comment on the posts. Your comments are my strength. [1bb44a08] My Twitter profileMy Facebook profileMy Google+ profileMy LinkedIn profile
Latest posts by Tapas Mishra (see all)
- How to tag your AWS resources efficiently - March 24, 2014
- Understanding the Top command on Linux - March 18, 2014
- Working with SELinux - March 10, 2014
Categories: Chef, Linux
Tags: Chef, Chef Server
One thought on “How to install and configure Chef Client”
- Pingback: How to Install Chef Server on Ubuntu 12.04 | LinuxFunda
Leave a Reply Cancel reply
« How to Install Chef Server on Ubuntu 12.04 Working with SELinux » Search for: [ ] Search Subscribe to Blog via Email
Enter your email address to subscribe to this blog and receive notifications of new posts by email.
Join 25 other subscribers
[Email Address ]
Subscribe
Categories
[Select Category ]
Like Us On Facebook
Follow me on Twitter
My Tweets Translate » English English
- Chritmass
- OpenSource Apps for Linux
- Submit Articles
Powered by WordPress and HeatMap AdAptive Theme
EmailEmail PrintPrint
#+end_example ** Setup ubuntu environment: chef client and call rest api of chef server
-
Install related packages sudo apt-get install chef -y sudo apt-get install rubygems gem install chef
-
Create chef client in webUI of chef server, and copy pem files See this for example. Though it's for CentOS, it also make sense for ubuntu http://www.oddtechnology.com/2011/06/30/simple-install-of-chef-client-on-linux/
-
Run a small rest api test in ruby http://personal.dennyzhang.com/chef_skills/#sec-17-1
-
Run below command for chef client sync chef-client ** web page: Installing a Chef client · Metaswitch/clearwater-docs Wiki · GitHub https://github.com/Metaswitch/clearwater-docs/wiki/Installing-a-Chef-client *** webcontent :noexport: #+begin_example Location: https://github.com/Metaswitch/clearwater-docs/wiki/Installing-a-Chef-client Skip to content
Sign up Sign in
- Explore
- Features
- Enterprise
- Blog
[ ] This repository (*) This repository ( ) All repositories
- Star 14
- Fork 9
public Metaswitch/clearwater-docs #
-
Code #
-
Issues 3 #
-
Pull Requests 0 #
-
Wiki #
-
Pulse #
-
Graphs #
-
Network #
HTTPS clone URL
[https://github.com/M]
Subversion checkout URL
[https://github.com/M]
You can clone with HTTPS or Subversion.
Download ZIP
Installing a Chef client
graemerobertson edited this page May 01, 2014 · 13 revisions
Pages 51
[ ]
- All in one EC2 AMI Installation
- All in one Images
- All in one OVF Installation
- Application Server Guide
- Automated Install
- Backups
- Cacti
- CDF Integration
- Clearwater Architecture
- Clearwater Call Barring Support
- Clearwater Call Diversion Support
- Clearwater CPP Coding Guidelines
- Clearwater DNS Usage
- Clearwater Elastic Scaling
- Clearwater IP Port Usage
- Clearwater Privacy Feature
- Clearwater Ruby Coding Guidelines
- Clearwater SNMP Statistics
- Clearwater stress testing
- Clearwater Tour
- Configuring an Application Server
- Configuring M Monit
- Configuring the native Android SIP client
- Configuring Zoiper Android iOS Client
- Creating a deployment environment
- Creating a deployment with Chef
- Debugging Bono, Sprout and Homestead with GDB and Valgrind
- ENUM
- Exploring Clearwater
- External HSS Integration
- Geographic redundancy
- Home
- IBCF
- Installation Instructions
- Installing a Chef client
- Installing a Chef server
- IPv6
- IR.92 Supplementary Services
- Making your first call
- Manual Install
- Modifying Clearwater settings
- Multiple Domains
- OpenIMSCore HSS Integration
- Plivo
- Pull request process
- Running the live tests
- SIP Interface Specifications
- Support
- Troubleshooting and Recovery
- Voxbone
- WebRTC support in Clearwater
- Show 36 more pages…
Clone this wiki locally
[https://github.com/M]
Installing a Chef Client
These instructions cover commissioning a Chef client node on an EC2 server as part of the automated install process for Clearwater.
Prerequisites
- An Amazon EC2 account.
- A DNS root domain configured with Route53 (Amazon's built-in DNS service, accessible from the
EC2 console. This domain will be referred to as
in this document. - You must have installed a Chef server and thus know the <webUIPass> for your server.
- A web-browser with which you can visit the Chef server Web UI.
Create the instance
Create a m1.small AWS EC2 instance running Ubuntu Server 12.04.1 LTS using the AWS web interface. Configure its security group to allow access on port 22 (for SSH). The SSH keypair you provide here is referred to below as <amazon_ssh_key>. It is easiest if you use the same SSH keypair for all of your instances.
Configure a DNS entry for this machine, chef-client.
Once the instance is up and running and you can connect to it over SSH, you may continue to the next steps.
If you make a mistake, simply delete the instance permanently by selecting "Terminate" in the EC2 console, and start again. The terminated instance may take a few minutes to disappear from the console.
Prepare APT
Connect to chef-client.
Install the add-apt-key tool.
sudo apt-get install add-apt-key -y
Under sudo, create /etc/apt/sources.list.d/opscode.list with the following content:
deb http://apt.opscode.com/ precise-0.10 main
Install the GPG key for this repository:
sudo add-apt-key 83EF826A
Install the Chef keyring and update APT's indexes.
sudo apt-get update sudo apt-get install opscode-keyring -y sudo apt-get upgrade -y
Once this is done, you can continue on to install the Chef client software.
Install the Chef client software
Install the Chef client tool.
sudo apt-get install chef -y
During the install you will be prompted for the Chef server URL, enter http://chef-server.
Install Ruby 1.9.3
The Clearwater chef plugins use features from Ruby 1.9.3. Run the following to install it.
curl -L https://get.rvm.io | bash -s stable source ~/.rvm/scripts/rvm rvm autolibs enable rvm install 1.9.3 rvm use 1.9.3
At this point, ruby --version should indicate that 1.9.3 is in use.
Installing the Clearwater Chef extensions
On the chef-client machine, install git and dependent libraries.
sudo apt-get install git libxml2-dev libxslt1-dev
Clone the Clearwater Chef repository.
git clone -b stable git://github.com/Metaswitch/chef.git ~/chef
This will have created a chef folder in your home directory, navigate there now.
cd ~/chef
Fetch the submodules used by the Clearwater Chef extensions.
git submodule update --init
Finally install the Ruby libraries that are needed by our scripts.
bundle install
Create a Chef client for the chef-client machine
In a browser of your choice, navigate to http://chef-server.
Go to the Clients tab at the top of the screen and click Create, use chef-client for the name, tick the Admin box and click Create Client. On the next screen, you'll be presented with an RSA keypair, copy the private half before moving away from this screen. Once you've copied the key, you can close your browser tab.
If you forgot to tick the admin box or forgot to copy the private key before closing the browser tab, delete the newly created client with the delete link and create a new one.
Configure the chef-client machine
Back on the chef-client machine, create a .chef folder in your home directory.
mkdir ~/.chef
Create ~/.chef/chef-client.pem and paste the private key from the server into it.
Copy the validator key from the chef server to your client. You will need to either copy the Amazon SSH key to the client and use it, or copy the validator
scp -i <amazon_ssh_key>.pem ubuntu@chef-server.
or (on an intermediate box with the SSH key available)
scp -i <amazon_ssh_key>.pem ubuntu@chef-server.
Configure knife using the built in auto-configuration tool.
knife configure
- Use the default value for the config location.
- The Chef server URL should be http://chef-server.
:4000 - The Chef client name should be chef-client
- Use the default value for the validation client name.
- The validation key location should be ~/.chef/validation.pem.
- The chef repository path should be ~/chef/
Obtain AWS access keys
To allow the Clearwater extensions to create AWS instances or configure Route53 DNS entries, you will need to supply your AWS access key and secret access key. To find your AWS keys, you must be logged in as the main AWS user, not an IAM user. Go to http://aws.amazon.com and click on My Account/Console then Security Credentials. From there, under the Access Credentials section of the page, click on the Access Keys tab to view your access key. The access key is referred to as <accessKey> below. To see your secret access key, just click on the Show link under Secret Access Key. The secret access key will be referred to as <secretKey> below.
Add deployment-specific configuration
Now add the following lines to the bottom of your ~/.chef/knife.rb file.
AWS deployment keys.
knife[:aws_access_key_id] = "<accessKey>" knife[:aws_secret_access_key] = "<secretKey>"
Signup key. Anyone with this key can create accounts
on the deployment. Set to a secure value.
knife[:signup_key] = "secret"
TURN workaround password, used by faulty WebRTC clients.
Anyone with this password can use the deployment to send
arbitrary amounts of data. Set to a secure value.
knife[:turn_workaround] = "password"
Ellis API key. Used by internal scripts to
provision, update and delete user accounts without a password.
Set to a secure value.
knife[:ellis_api_key] = "secret"
Ellis cookie key. Used to prevent spoofing of Ellis cookies. Set
to a secure value.
knife[:ellis_cookie_key] = "secret"
SMTP credentials as supplied by your email provider.
knife[:smtp_server] = "localhost" knife[:smtp_username] = "" knife[:smtp_password] = ""
Sender to use for password recovery emails. For some
SMTP servers (e.g., Amazon SES) this email address
must be validated or email sending will fail.
knife[:email_sender] = "[email protected]"
MMonit server credentials, if any.
knife[:mmonit_server] = "" knife[:mmonit_username] = "" knife[:mmonit_password] = ""
Fill in the values appropriate to your deployment using a text editor as directed.
-
The AWS deployment keys are the ones you obtained above.
-
The keys and passwords marked "Set to a secure value" above should be set to secure random values, to protect your deployment from unauthorised access. An easy way to generate a secure random key on a Linux system is as follows:
head -c6 /dev/random | base64
The signup_key must be supplied by new users when they create an account on the system.
The turn_workaround must be supplied by certain WebRTC clients when using TURN. It controls access to media relay function.
The ellis_api_key and ellis_cookie_key are used internally.
-
The SMTP credentials are required only for password recovery. If you leave them unchanged, this function will not work.
-
The M/Monit credentials are only required if you have an M/Monit server. Otherwise you can leave them unchanged.
Test your settings
Test that knife is configured correctly
knife client list
This should return a list of clients and not raise any errors.
Upload Clearwater definitions to Chef server
The Chef server needs to be told the definitions for the various Clearwater node types. To do this, run
cd ~/chef knife cookbook upload apt knife cookbook upload chef-solo-search knife cookbook upload clearwater find roles/*.rb -exec knife role from file {} ;
You will need to re-do this step if make any changes to your knife.rb settings.
Next steps
At this point, the Chef server is up and running and ready to manage installs and the chef client is ready to create deployments. The next step is to create a deployment environment.
-
Status
-
API
-
Training
-
Shop
-
Blog
-
About
-
© 2014 GitHub, Inc.
-
Terms
-
Privacy
-
Security
-
Contact
[ ]
Something went wrong with that request. Please try again.
#+end_example ** [#A] web page: How To Understand the Chef Configuration Environment on a VPS | DigitalOcean https://www.digitalocean.com/community/tutorials/how-to-understand-the-chef-configuration-environment-on-a-vps *** webcontent :noexport: #+begin_example Location: https://www.digitalocean.com/community/tutorials/how-to-understand-the-chef-configuration-environment-on-a-vps Contents
Sign Up Log In
[ ]
- Tutorials
- Questions
- Projects
- Tags
- Main Site
Menu Sign Up Log In
- Tutorials
- Questions
- Projects
- Tags
- Main Site
[ ] Justin Ellingwood
November 20, 2013
Beginner
How To Understand the Chef Configuration Environment on a VPS
Tagged In: Miscellaneous, Scaling, Ruby, Configuration Management Author: Justin Ellingwood • Date: November 20, 2013
Introduction
Configuration management tools provide an avenue for deploying consistent, predictable code and configurations to a variety of client computers from a centralized management server. Chef is one of the most popular configuration management tools. It uses Ruby and handles configuration by packing details into what it calls recipes.
Chef provides a way to quickly deploy entire environments instead of only single applications. In any situation where you would install a piece of software and then modify its configuration files, Chef can be used to automate this process.
In this guide, we will provide a general overview of how Chef organizes its files and what tools and systems it uses to accomplish its objectives.
If you would like to follow along, there is a tutorial on how to install Chef on Ubuntu here.
Chef Terminology
It is important to understand the different components that make up Chef.
Chef Operating Infrastructure
We will start by discussing the different models that make up the high level deployment strategy.
The Chef system is defined by the roles that each machine or resource plays in the deployment process:
-
Chef Server: This is the central location that stores configuration recipes, cookbooks, and node and workstation definitions. It is the central machine that every other machine in the organization will use for deployment configuration.
-
Chef Nodes: Chef nodes are the deployment targets that are configured by Chef. Each node represents a separate, contained machine environment that can be on physical hardware or virtualized.
These operating system environments each contain a Chef client application that can communicate with the Chef Server.
- Chef Workstations: Chef workstations are where Chef configuration details are created or edited. The configuration files are then pushed to the Chef server, where they will be available to deploy to any nodes.
The configuration of these different components allows you to have multiple workstations and nodes. Nodes can be configured as soon as they are online and connected to the server.
While the above outline gives the impression that these are separate entities, it is possible for one machine to fulfill two or all of these roles. There is a project called chef-solo which allows you to forgo the use of a server and operate by configuring the computer which it is installed.
Server Details
The server is the central control point that is accessed by all of the other chef machines, whether as a client or a manager. It is basically a large repository or database of all of the configuration details.
It handles connections and permissions from nodes and workstations and organizes data so that it can easily be pulled by clients. The server can also include a web interface in order to manage or configure some details.
Node Details
As mentioned above, a node can be a physical or virtual machine. Its only requirements are that it has access to the network and can communicate with the chef server. The user running the chef software also needs to be able to install software and make system changes.
Each node communicates with the central server using an application called chef-client. This handles pulling data off of the server and executing the configuration steps necessary to get the node into its final state. The chef-client program and the chef server communicate through the use of RSA key-based authentication.
Chef-client uses a tool called ohai to get statistics about the node. These are used in order to set up certain configuration details and populate variables contained within the files.
Workstation Details
A workstation has the tools necessary to create and modify configuration details for any of the available nodes and can communicate with the chef server to make these available.
An important tool to manage chef on a workstation is called knife. Knife acts as a gateway in which you can configure anything that would be stored on the server. It can manage nodes and configurations and can generally be used to access the server in a "chef-specific" way. While it would be possible to log into the server with SSH and make changes to all of the data that it handles manually, this is not really adhering to the processes that chef implements.
Configurations and definitions that are created and modified on a workstation are committed to version control and then pushed to the server. The repository is called the chef-repo. It holds all of the data needed for the configuration of chef.
Chef Repo File Structure
Chef handles its configuration and dependency information on a workstation within a specified directory structure. It is important to understand this hierarchy in order to effectively create recipes and push changes.
As we mentioned above, the server configuration files should be kept in version control in repository referred to as the "chef-repo". This is just a normal directory that contains the chef files.
In this directory, we can find a structure that looks like this:
- certificates/: Contains the SSL certificates that can be associated with clients for authentication.
- chefignore: Lists the files and directories within the structure that should not be included in the push to the server.
- config/: Contains one of the two repository configuration files
- rake.rb: Defines some variable declarations for creating SSL certificates and some general options.
- cookbooks/: Contains the cookbooks that configure the infrastructure for your organization.
- data_bags/: Contains various data bags for your configuration.
Data bags are protected sub-directories that contain sensitive configuration details. They are only accessible to those nodes that have matching SSL certificates and contain JSON formated files with configuration details.
environments/: Contains a top-level location to contain details for deploying the environment.
Every environment that diverges from the default environment must be defined in this directory.
- Rakefile: This file defines the tasks that chef can perform in its configurations.
- roles/: Contains files that define the roles that can be assigned to nodes.
Chef Cookbook File Structure
Within the cookbooks directory in the chef-repo, sub-directories define specific cookbooks for applications. Within each separate application configuration directory is a structure that defines how this service should be installed and what changes must be made to make it work correctly.
Within the application, you will find files and definitions that define how an application must be installed and configured.
The metadata.rb or metadata.json files contains metadata information about the service. This includes basic information like the name of the cookbook and the version, but it also is the place where the dependency information is stored. If this cookbook depends on other cookbooks to be installed, it can list them in this file and chef will install and configure them prior to the current cookbook.
The attributes directory contains attribute definitions that can be used to override or define settings for the nodes that will have this service.
The definitions directory contains files that declare resources. This means that you can group functionality together under one heading.
The files directory describes how chef should distribute files throughout the node on which this cookbook is deployed.
The recipes directory contains the "recipes" that define how the service should be configured. Recipes are generally small files that configure specific aspects of the larger system. If a cookbook used to install and configure a web server, a recipe may enable a module or set up a sane firewall default.
The templates directory is used to provide more complex configuration management. You can provide entire configuration files that contain embedded Ruby commands. The variables that are printed can be defined in other files.
Conclusion
While this guide may not help you get started writing your own Chef configurations, it should give you a good overview as to what the individual components are in a complex deployment environment. Once you begin to understand how the node, server, workstation interaction works, and can find your way around the chef-repo, you can begin to start understanding how some of the cookbooks available operate.
In a future article, we will discuss how to create some of your own cookbooks and configure an environment that can be deployed to other machines within your network.
By Justin Ellingwood Share Tutorial Improve Tutorial Write Tutorial
Related Tutorials
- How To Install and Use OTPW for Single-Use SSH Passwords on Ubuntu 14.04
- 5 Common Server Setups For Your Web Application
- How To Use HAProxy As A Layer 7 Load Balancer For WordPress and Nginx On Ubuntu 14.04
- How To Migrate a MySQL Database To A New Server On Ubuntu 14.04
- How To Optimize WordPress Performance With MySQL Replication On Ubuntu 14.04
Share this Tutorial
Tweet Vote on Hacker News
1 Comment
Load Log In to comment [ ] Submit Comment Creative Commons License This work is licensed under a Creative Commons Attribution-NonCommercial-ShareAlike 4.0 International License.
Copyright © 2014 DigitalOcean ™ Inc. Proudly Made in NY Terms, Privacy, & Copyright Security
Product
- Pricing
- Features
- Customers
- One-Click Apps
- API
Company
- About Us
- Blog
- Jobs
- Press
- Logos & Badges
- Events
- Contact
Help
- Knowledgebase
- Getting Started
- Feedback
- Referral Program
- Network Status
Community
- Dashboard
- Overview
- Tutorials
- Questions
- Projects
- Tutorial Suggestions
- Get Paid to Write
Connect
- Google+
Droplets Launched *
*
#+end_example ** web page: Errors — Chef Docs http://docs.opscode.com/errors.html *** webcontent :noexport: #+begin_example Location: http://docs.opscode.com/errors.html Chef
Navigation
- next
- previous |
- Resources•
- Knife•
- Recipe DSL•
- Learn Chef•
- Search the Docs•
- Home »
Table Of Contents
- Errors
- 401 Unauthorized o Failed to authenticate as ORGANIZATION-validator o Failed to authenticate to https://api.opscode.com o Organization not found o Synchronize the clock on your host o All other 401 errors
- 403 Forbidden
- Workflow Problems o No such file or directory o Commit or stash your changes o Cannot find config file
Errors¶
The following sections describe troubleshooting some common errors and problems.
401 Unauthorized¶
There are multiple causes of the Chef 401 “Unauthorized” error, so please use the sections below to find the error message that most closely matches your output. If you are unable to find a matching error, or if the provided steps are unhelpful, please file a help ticket.
Failed to authenticate as ORGANIZATION-validator¶
If you’re receiving an error like the following it most likely means you’ll need to regenerate the ORGANIZATION-validator.pem file:
INFO: Client key /etc/chef/client.pem is not present - registering INFO: HTTP Request Returned 401 Unauthorized: Failed to authenticate as ORGANIZATION-validator. Ensure that your node_name and client key are correct. FATAL: Stacktrace dumped to c:/chef/cache/chef-stacktrace.out FATAL: Net::HTTPServerException: 401 "Unauthorized"
Troubleshooting Steps
-
Check if the ORGANIZATION-validator.pem file exists in one of the following locations:
~/.chef ~/projects/current_project/.chef /etc/chef
If one is present, verify that it has the correct read permissions.
-
If there’s no ORGANIZATION-validator.pem file, regenerate it.
Recreate this file by going to the Chef Manager web user interface and selecting Organizations in
Metadata
Owner
Metadata
:book: Challenges Your Chef Skills By Solving Real Questions.