builderbook
 builderbook copied to clipboard
Open source web application to learn JS stack: React, Material-UI, Next.js, Node.js, Express.js, Mongoose, MongoDB database.

Support Ukraine: link
Builder Book
Open source web app to self-publish and sell books or other online content.
If you want to learn how to build this project from scratch, check out our book: https://builderbook.org.
The open source project is located in the builderbook folder. If you purchased our book, codebases for each of the book's chapters are located in the book folder.
We've used this builderbook project to build:
- Builder Book - learn how to build full-stack web apps from scratch
- SaaS Boilerplate - open source web app to build your own SaaS product
- Async - Urgent vs non-urgent team communication tool for small teams
- Async Labs - many custom dev projects
Live app:
https://builderbook.org/books/builder-book/introduction.
Sponsors


Showcase
Check out projects built with the help of this open source app. Feel free to add your own project by creating a pull request.
- workinbiotech.com: Work in biotech, job board for small and young biotech companies
- Async: urgent and non-urgent communication for remote teams
- Retaino by Earl Lee: Save, annotate, review, and share great web content. Receive smart email digests to retain key information.
- michaelstromer.nyc by Michael Stromer: Books and articles by Michael Stromer.
- SaaS Boilerplate
- Async Labs
Contents
- What can I learn from this project?
- Run locally
- Add a new book
- Add your own styles
- Deploy to Heroku
- Scaling
- Docker
- Screenshots
- Built with
- Core stack
- Third party APIs
- Contributing
- Team
- License
- Project structure
What can I learn from this project?
You will learn how to structure your project and build many internal and external API infrastructures.
On the browser, the main technologies you will learn are: Next.js, React.js, Material-UI. On the server, the main technologies you will learn are: Next.js, Node.js, Express.js, Mongoose.js, MongoDB database.
In addition to the above technologies, you can learn how to integrate your web application with the following external API services:
Plus, you can learn many concepts such as session and cookie, headers, HTTP request-response, Express middleware, Promise, async/await, and more. You have to know these concepts to be a confident web developer, no matter what language you use.
The main use cases for this project, besides learning, are:
- To write and host free documentation with Github being a source of truth for content.
- To sell online content, such as books.
- To extend it (see our second book, SaaS Boilerplate Book) to start software business.
Run locally
-
Clone the project and run
yarnto add packages. -
Before you start the app, create a
.envfile at the app's root. This file must have values for some env variables specified below.-
To get
MONGO_URL_TEST, we recommend a free MongoDB at MongoDB Atlas (to be updated soon with MongoDB Atlas, see issue). -
Get
GOOGLE_CLIENTIDandGOOGLE_CLIENTSECRETby following official OAuth tutorial.Important: For Google OAuth app, callback URL is: http://localhost:8000/oauth2callback
Important: You have to enable Google+ API in your Google Cloud Platform account. -
Specify your own secret key for Express session
SESSION_SECRET: https://github.com/expressjs/session#secret
-
-
To use all features and third-party integrations (such as Stripe, Google OAuth, Mailchimp), create a
.envfile and add values for all variables as shown below. These variables are also listed in.env.example, which you can use as a template to create your own.envfile.
.env :
# Used in server/server.js
MONGO_URL=
MONGO_URL_TEST=
SESSION_SECRET=

# Used in lib/getRootUrl.js
NEXT_PUBLIC_URL_APP=
NEXT_PUBLIC_PRODUCTION_URL_APP="https://heroku.builderbook.org"

# Used in server/google.js
GOOGLE_CLIENTID=
GOOGLE_CLIENTSECRET=

# Used in server/aws.js
AWS_ACCESSKEYID=
AWS_SECRETACCESSKEY=
AWS_REGION=

# Used in server/models/User.js
EMAIL_ADDRESS_FROM=

----------
# All environmental variables above this line are required for successful sign up

# Used in server/github.js
GITHUB_TEST_CLIENTID=
GITHUB_LIVE_CLIENTID=
GITHUB_TEST_SECRETKEY=
GITHUB_LIVE_SECRETKEY=

# Used in server/stripe.js
NEXT_PUBLIC_STRIPE_TEST_PUBLISHABLEKEY=
NEXT_PUBLIC_STRIPE_LIVE_PUBLISHABLEKEY=
STRIPE_TEST_SECRETKEY=
STRIPE_LIVE_SECRETKEY=
STRIPE_TEST_DEMO_BOOK_PRICE_ID=
STRIPE_LIVE_DEMO_BOOK_PRICE_ID=
STRIPE_TEST_SECOND_BOOK_PRICE_ID=
STRIPE_LIVE_SECOND_BOOK_PRICE_ID=

# Used in server/mailchimp.js
MAILCHIMP_API_KEY=
MAILCHIMP_REGION=
MAILCHIMP_PURCHASED_LIST_ID=
MAILCHIMP_SIGNEDUP_LIST_ID=

# Used in pages/_document.js and pages/_app.js
NEXT_PUBLIC_GA_MEASUREMENT_ID=
COOKIE_DOMAIN=".builderbook.org"
-
IMPORTANT: do not publish your actual values for environmentable variables in
.env.example; this file is public and only meant to show you how your.envfile should look. -
Add your value (domain that you own) for
COOKIE_DOMAINandNEXT_PUBLIC_PRODUCTION_URL_APP. -
Start the app with
yarn dev.- To get
NEXT_PUBLIC_GA_MEASUREMENT_ID, set up Google Analytics and follow these instructions to find your tracking ID. - To get Stripe-related API keys, set up or log into your Stripe account and find your key here.
- To get
-
Env keys
NEXT_PUBLIC_GA_MEASUREMENT_IDandNEXT_PUBLIC_STRIPE_TEST_PUBLISHABLEKEY/NEXT_PUBLIC_STRIPE_LIVE_PUBLISHABLEKEYare universally available (client and server). Env keys inside.envfile are used in server code only unless they haveNEXT_PUBLIC_prepended to their name. In that case, they are universally available. -
To make user a book's owner, set
"isAdmin": trueon corresponding MongoDB document in your database (default value isfalsefor any new user).
Important: if you don't add values for environmental variables to .env file, corresponding functionality will not work. For example, login with Google account, purchasing book, getting repo information via GitHub API and other third-party API infrastructures.
Add a new book
-
Create a new Github repo (public or private).
-
In that repo, create an
introduction.mdfile and write some content. -
At the top of your
introduction.mdfile, add metadata in the format shown below. See this file as an example.--- title: Introduction seoTitle: title for search engines seoDescription: description for search engines isFree: true --- -
Go to the app, click "Connect Github".
-
Click "Add Book". Enter details and select the Github repo you created.
-
Click "Save".
When you add new .md files or update content, go to the BookDetail page of your app and click Sync with Github.
Important: All .md files in your Github repo must have metadata in the format shown above.
Important: All .md files in your Github repo must have name introduction.md or chapter-N.md.
To make the content of a .md file private (meaning a person must purchase the content to see it), remove isFree:true and add excerpt:"". Add some excerpt content - this content is public and serves as a free preview.
Add your own styles
To change the color scheme of this app, modify the primary and secondary theme colors inside lib/context.js. Select any colors from Material UI's official color palette.
Recommended ways to add your own styles to this app:
- Inline style for a single element
- Reusable style for multiple elements within single page or component
- Reusable/importable style for multiple pages or components
- Global style for all pages in application
Inline style for a single element
USE CASE: apply a style to one element on a single page/component
For example, in our book page, we wrote this single inline style:
<p style={{ textAlign: 'center' }}>
  ...
</p>
Reusable style for multiple elements within single page or component
USE CASE: apply the same style to multiple elements on a single page/component.
For example, in our tutorials page, we created styleExcerpt and applied it to a <p> element within the page:
const styleExcerpt = {
  margin: '0px 20px',
  opacity: '0.75',
  fontSize: '13px',
};

<p style={styleExcerpt}>
  ...
</p>
Reusable/importable style for multiple pages or components
USE CASE: apply the same style to elements on multiple pages/components.
For example, we created styleH1 inside components/SharedStyles.js and exported the style at the bottom of the file:
const styleH1 = {
  textAlign: 'center',
  fontWeight: '400',
  lineHeight: '45px',
};

module.exports = {
  styleH1,
};
We then imported styleH1 into our book page, as well as our index page, and applied the style to a <h1> element:
import {
  styleH1,
} from '../components/SharedStyles';

<h1 style={styleH1}>
  ...
</h1>
Global style for all pages in application
USE CASE: apply the same style to elements on all pages of your app.
Create your style in pages/_document.js. For example, we specified a style for all hyperlinks that use the <a> element:
<style>
  {`
    a, a:focus {
      font-weight: 400;
      color: #1565C0;
      text-decoration: none;
      outline: none
    }
  `}
</style>
Deploy to Heroku
In this section, we will learn how to deploy our app to Heroku cloud. We will deploy our React-Next-Express app to lightweight Heroku container called dyno.
Instructions are for app located at /book/8-end.
Adjust route if you are deploying app from the root of this public repo.
We will discuss the following topics in this section:
- installing Heroku on Linux-based OS
- creating app on Heroku dashboard
- preparing app for deployment
- configuring env variables
- deploying app
- checking logs
- adding custom domain
Let's go step by step.
- Install Heroku CLI (command-line interface) on your OS. Follow the official guide. In this book we provide instructions for Linux-based systems, in particular, a Ubuntu OS. For Ubuntu OS, run in your terminal:
sudo snap install --classic heroku
To confirm a successful installation, run:
heroku --version
As example, my output that confirms successful installation, looks like:
heroku/7.22.7 linux-x64 node-v11.10.1
-
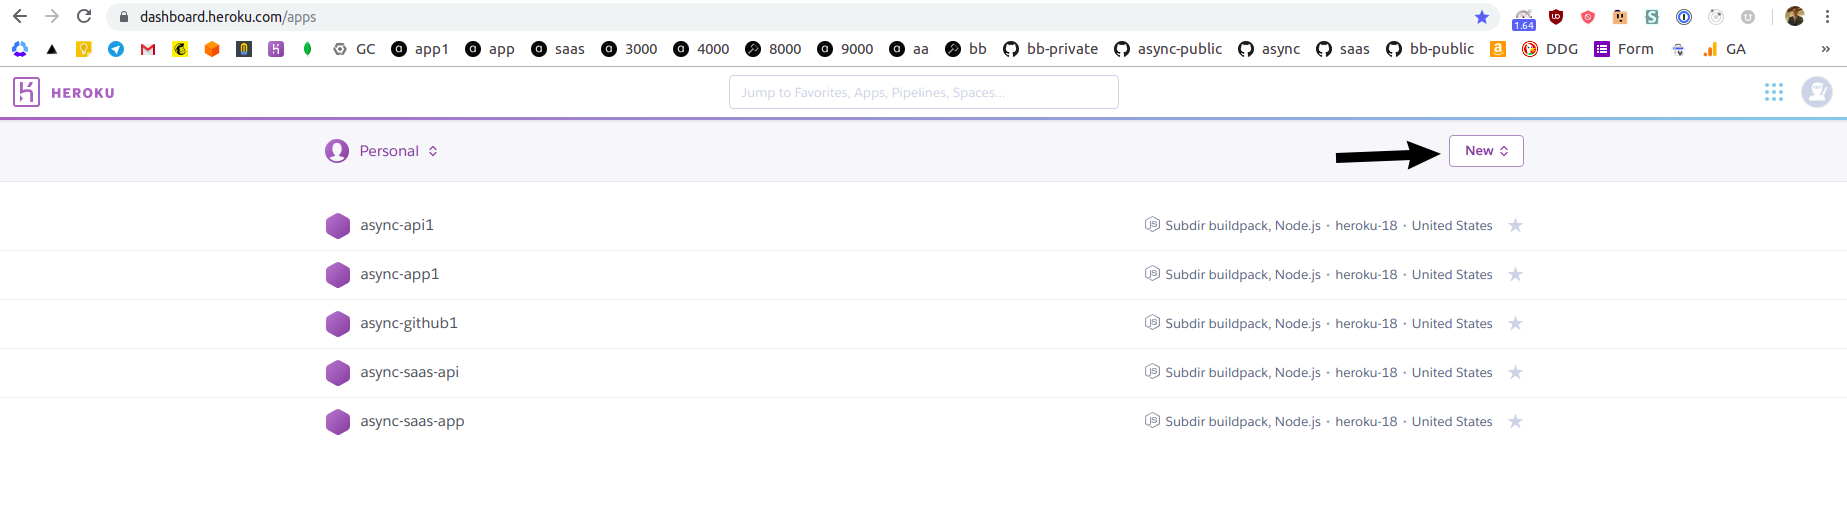
Sign up for Heroku, go to your Heroku dashboard and click purple New button on the right:
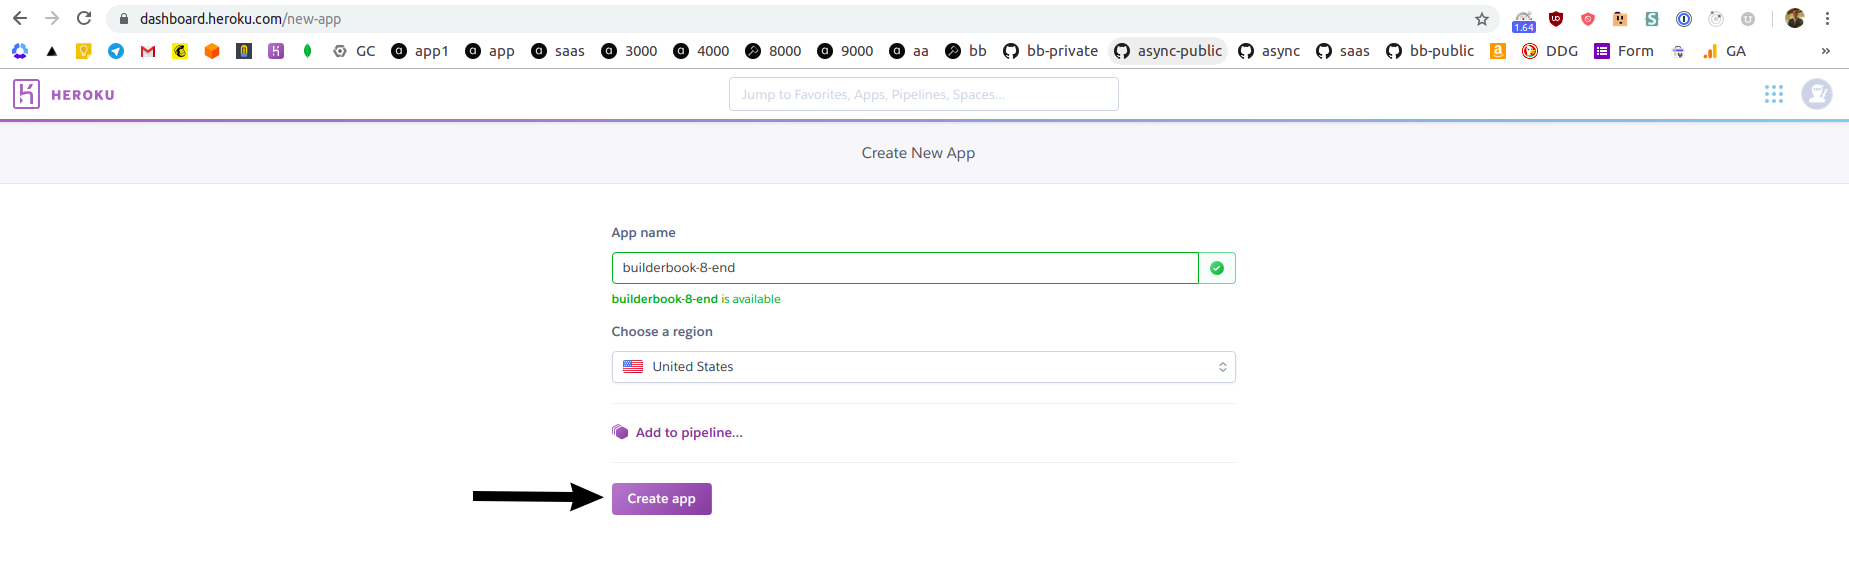
On the next screen, give a name to your app and select a region. Click purple Create app button at the bottom:
You will be redirected to
Deploytab of your newly created Heroku app:
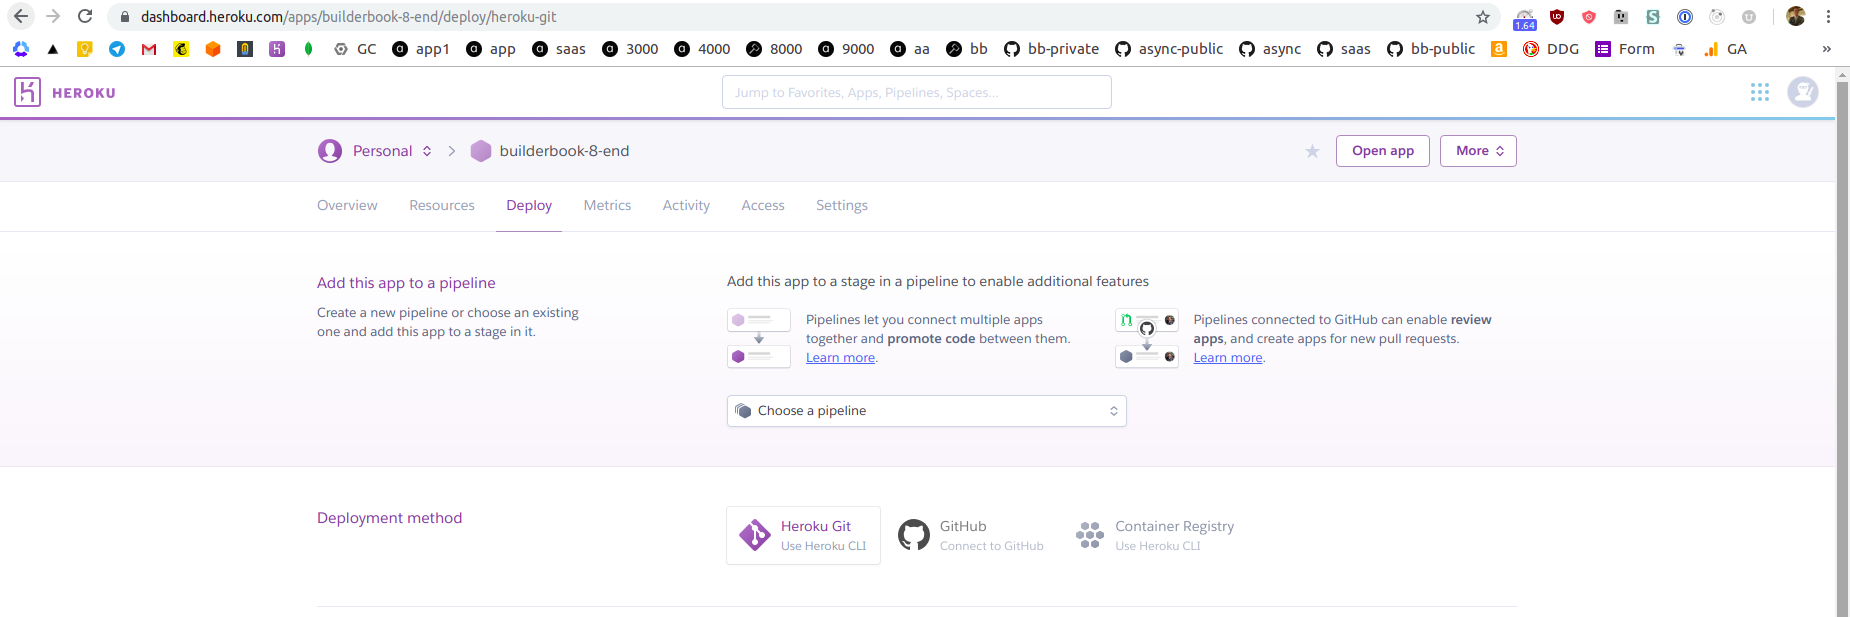
-
As you can see from the above screenshot, you have two options. You can deploy the app directly from your local machine using Heroku CLI or directly from GitHub. In this tutorial, we will deploy a
async-labs/builderbook/book/8-endapp from our public async-labs/builderbook repo hosted on GitHub. Deploying from a private repo will be a similar process.Deploying from GitHub has a few advantages. Heroku uses git to track changes in a codebase. It's possible to deploy app from the local machine using Heroku CLI, however you have to create a Git repo for
async-labs/builderbook/book/8-endwithpackage.jsonfile at the root level. A first advantage is that we can deploy from a non-root folder using GitHub instead of Heroku CLI.A second advantage is automation, later on you can create a branch that automatically deploy every new commit to Heroku. For example, we have a deploy branch for our demo for SaaS boilerplate. When we commit to
masterbranch - there is no new deployment, when we commit todeploybranch - new change is automatically deployed to Heroku app.Let's set up deploying from GitHub. On
Deploytab of your Heroku app at Heroku dashboard, click Connect to GitHub, then search for your repo, then click Connect next to the name of the proper repo:
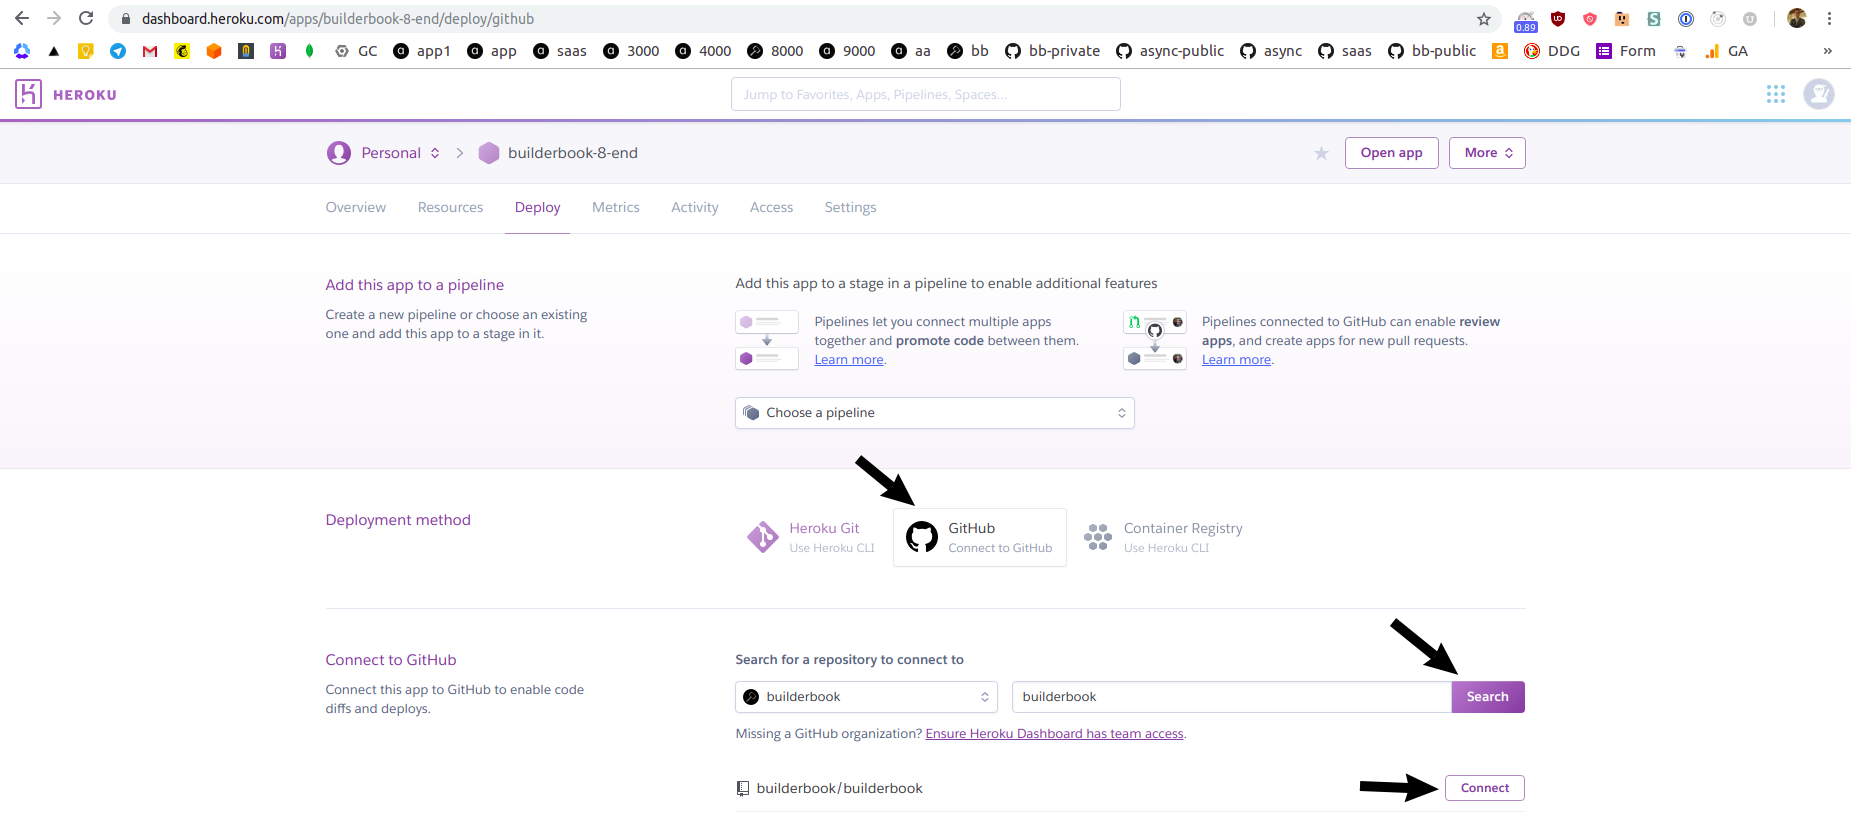
If successful, you will see green text
Connectedand be offered to select a branch and deploy app automatically or manually. Automatic deployment will deploy every new commit, manual deployment requires you to manually click on Deploy Branch button. For simplicity, we will deploy manually frommasterbranch of ourasync-labs/builderbookrepo.Before we perform a manual deployment via GitHub, we need Heroku to run some additional code while app is being deploying. Firstly, we need to tell Heroku that
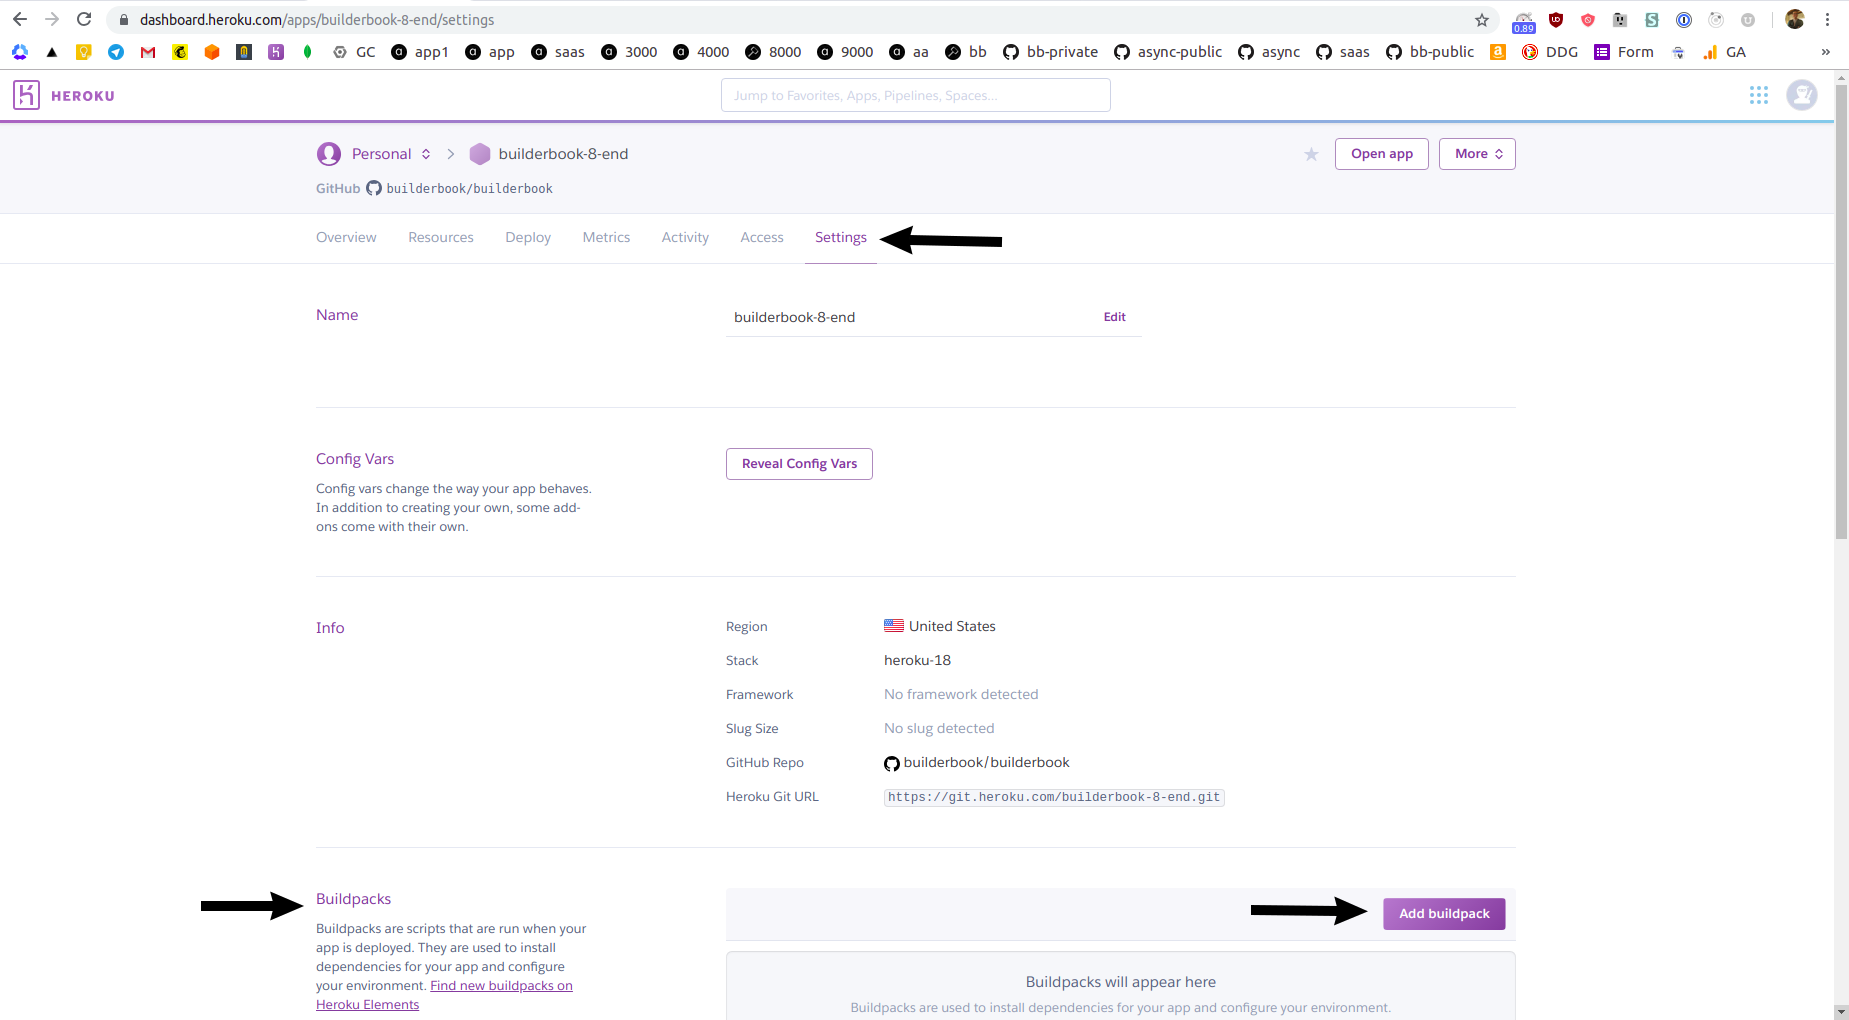
8-endapp in theasync-labs/builderbookrepo is not at the root level, it's actually nested at/book/8-end. Secondly, Heroku needs to know that our app is Node.js app so Heroku findspackage.jsonfile, properly installs dependencies and runs proper scripts (such asbuildandstartscripts frompackage.json). To achieve this, we need to add so calledbuildpacksto our Heroku app. ClickSettingstab, scroll toBuildpackssection and click purple Add buildpack button:
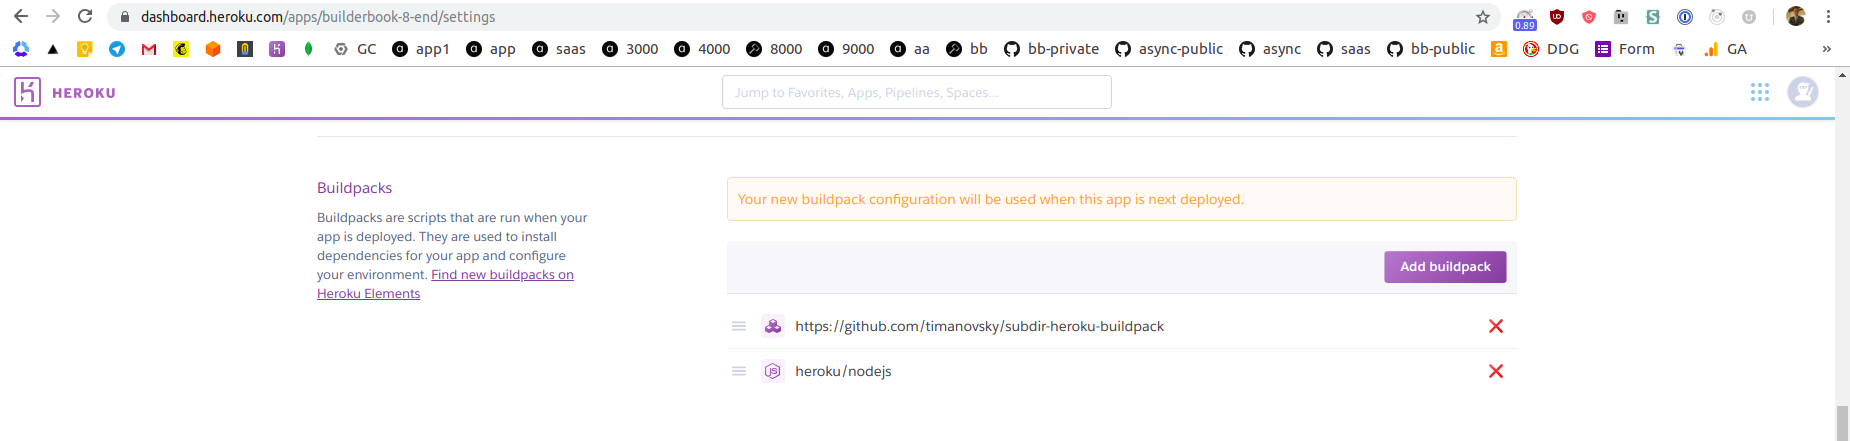
Add two buildpacks, first is
https://github.com/timanovsky/subdir-heroku-buildpackand second isheroku/nodejs:
Next, scroll up while on
Settingstab and click purple Reveal Config Vars button, create a new environmental variablePROJECT_PATHwith valuebook/8-end:
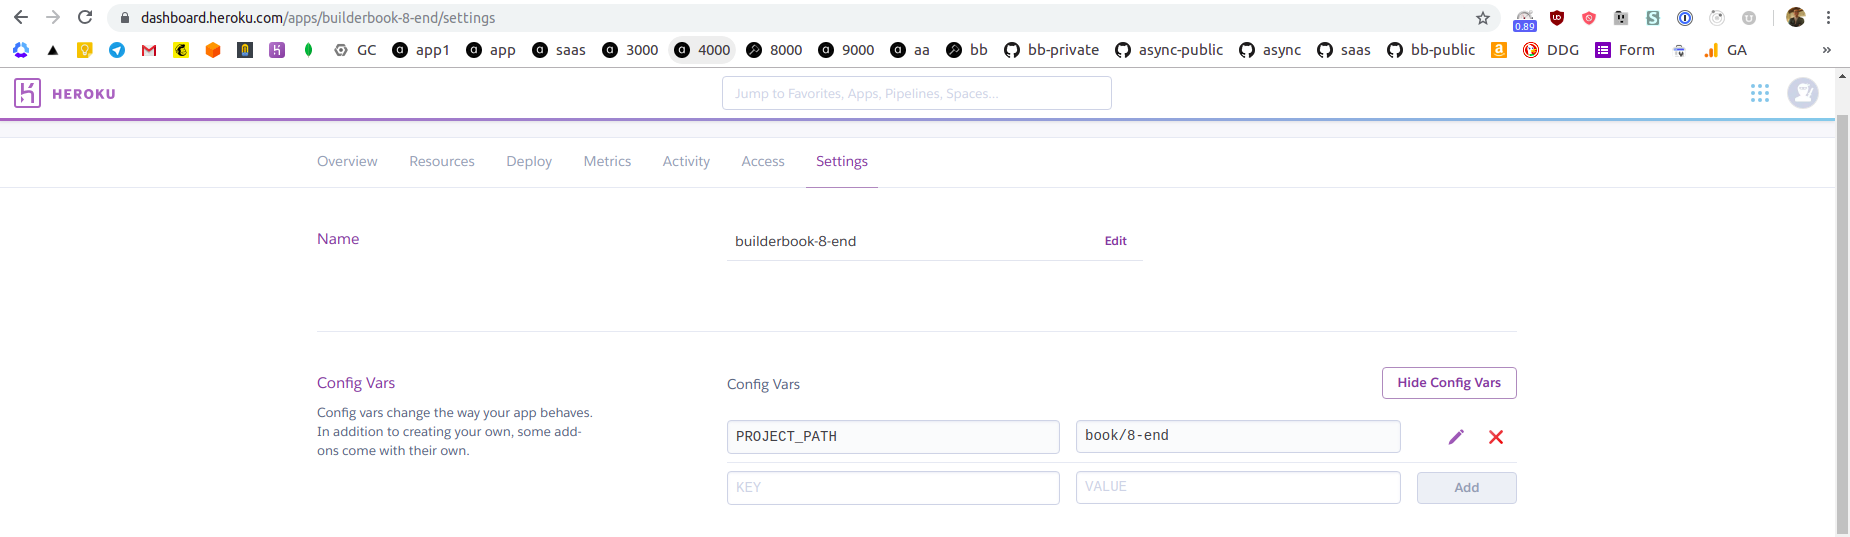
The above variable will be used by the first buildpack
subdir-heroku-buildpackto deploy app from repo's subdirectory. -
If we deploy app at this point, our app will deploy with errors since we did not add environmental variables. Similar to how you added
PROJECT_PATHvariable, add all environmental variables frombook/8-end/.envfile to your Heroku app. Remember to add the rest of env variables for all features to work, including signup event. -
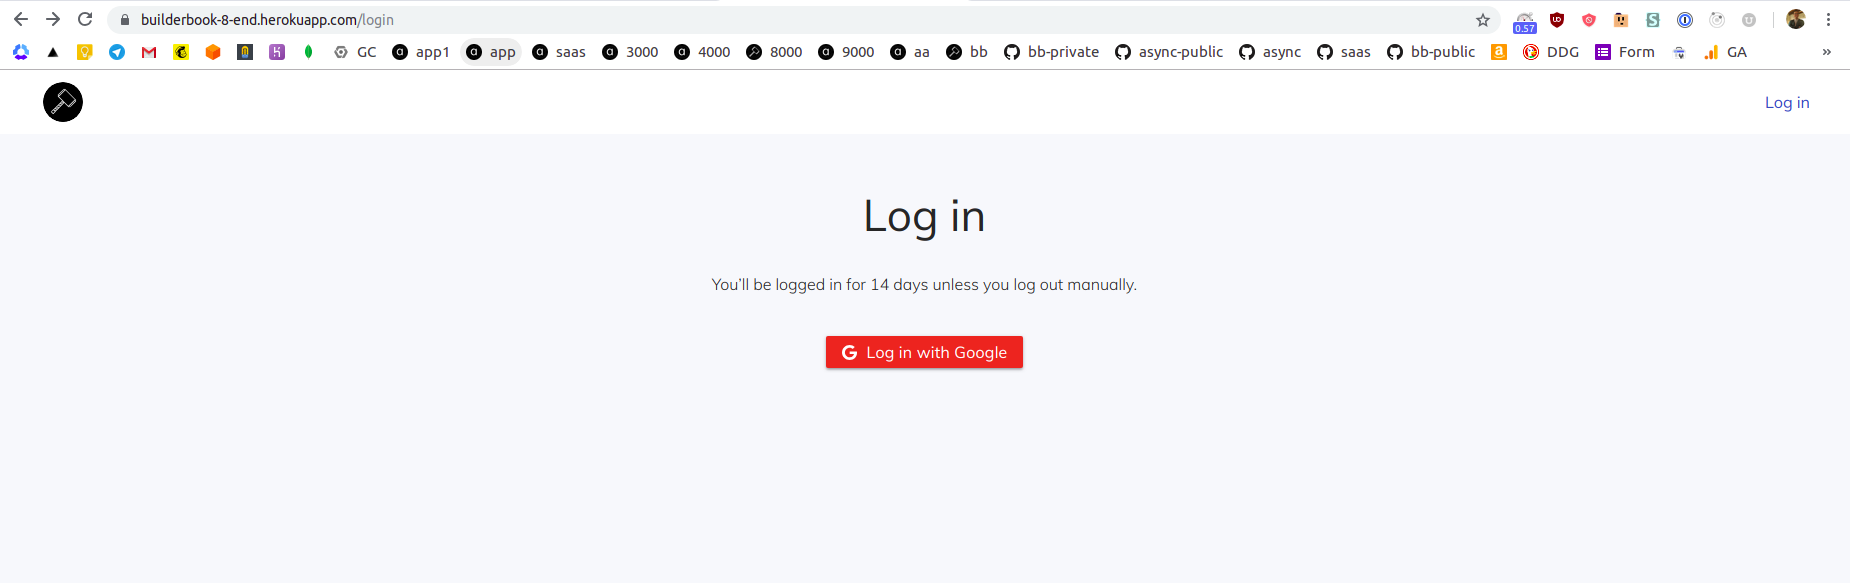
While on
Settingstab, scroll toDomains and certificatessection and note your app's URL. My app's URL is: https://builderbook-8-end.herokuapp.com Let's deploy, go toDeploytab, scroll toManual deploysection and click Deploy branch button. After deployment process is complete , navigate to your app's URL:
-
Server logs are not available on Heroku dashboard. To see logs, you have to use Heroku CLI. In your terminal, run:
heroku login
Follow instructions to log in to Heroku CLI.
After successful login, terminal will print:
Logged in as [email protected]
Where
[email protected]is an email address that you used to create your Heroku account.To see logs, in your terminal run:
heroku logs --app builderbook-8-end --tail
In your terminal, you will see your most recent logs and be able to see a real-time logs.
You can output certain number of lines (N) for retrieved logs by adding
--num Nto theheroku logscommand. You can print only app's logs by adding--source appor system's logs by adding--source heroku. -
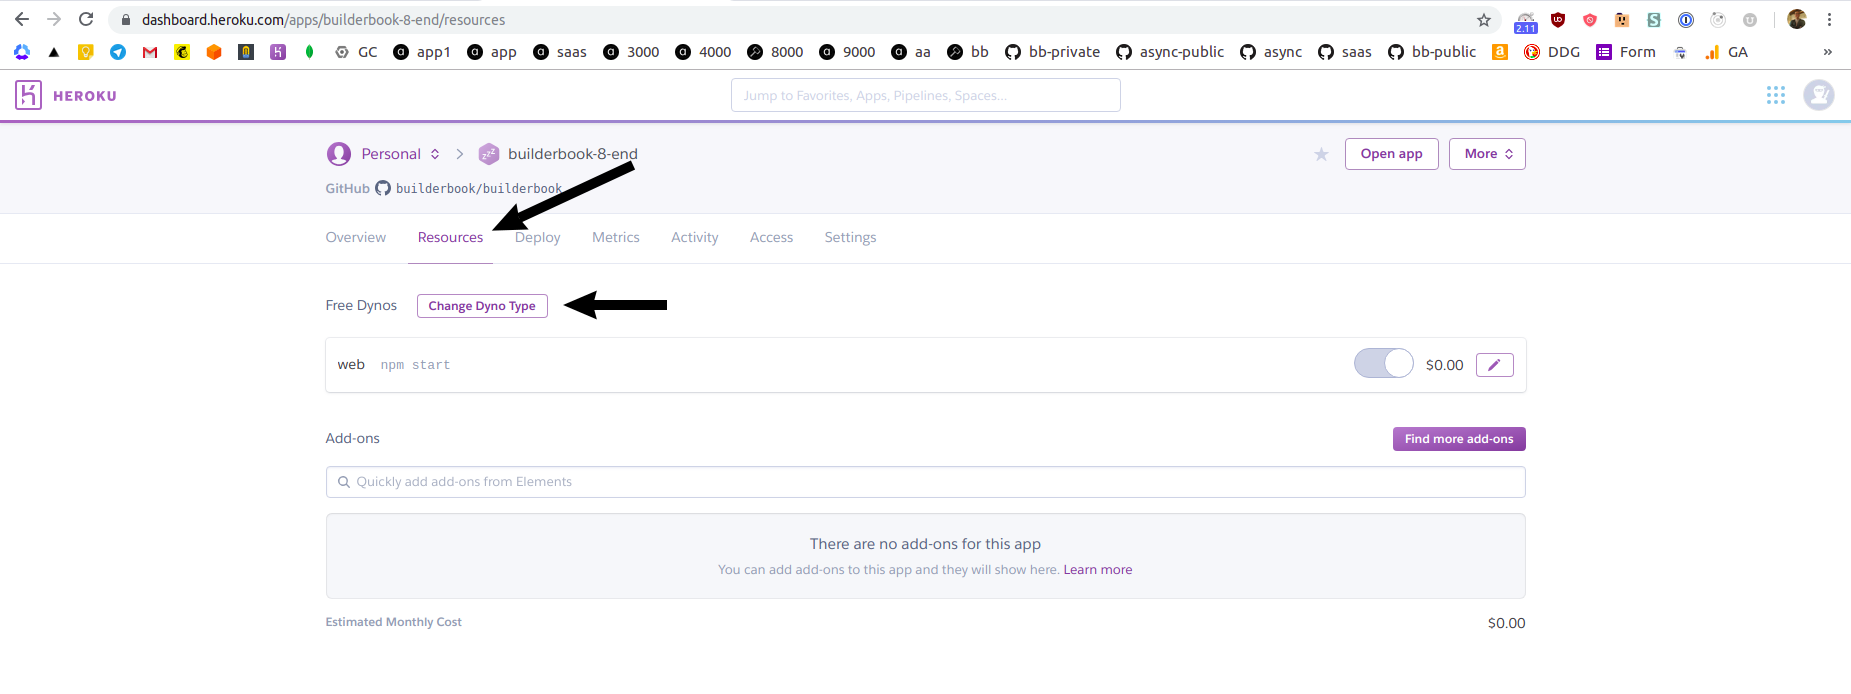
Time to add a custom domain. The Heroku app that we created is deployed on
free dyno. Free dyno plan does not let you to add a custom domain to your app. To add custom domain, go toResourcestab and click purple Change Dyno Type button:
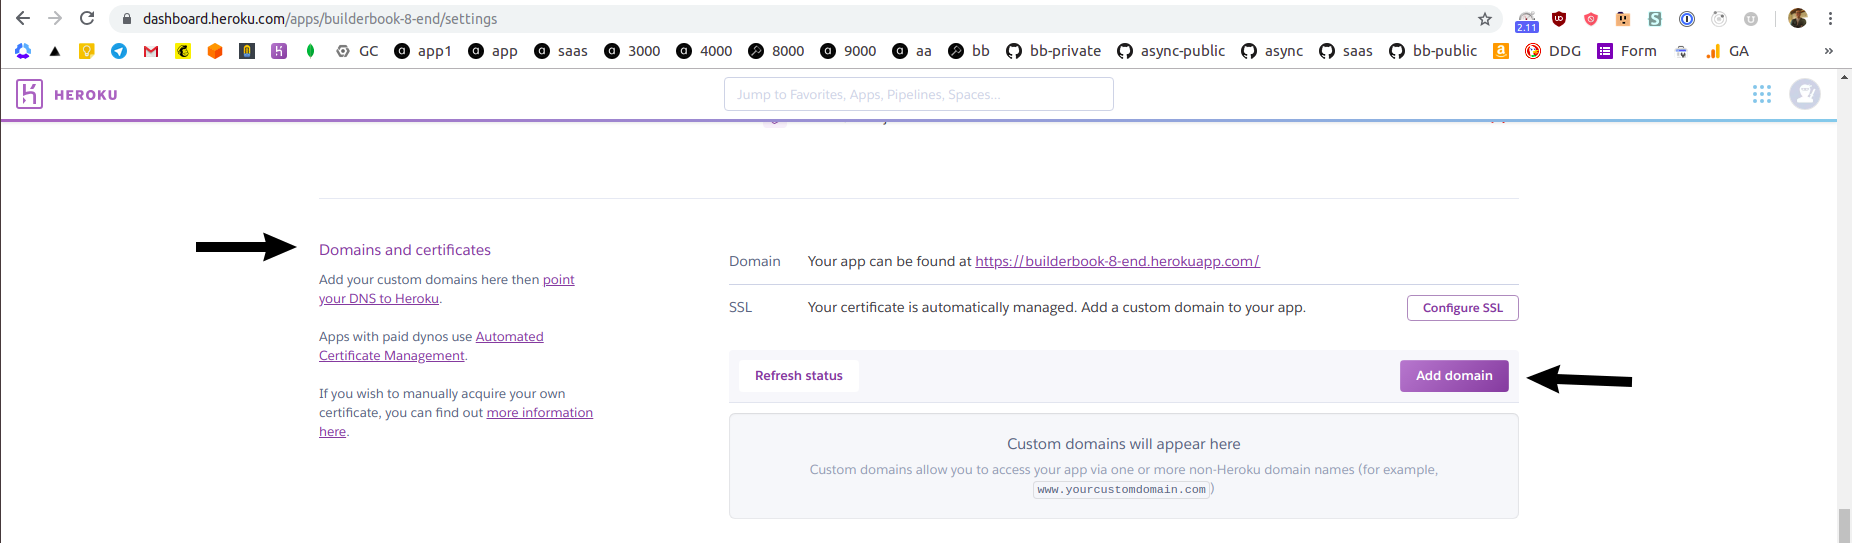
Select a
Hobbyplan and click Save button.Navigate to
Settingstab and scroll to theDomains and certificatesand click purple Add domain button:
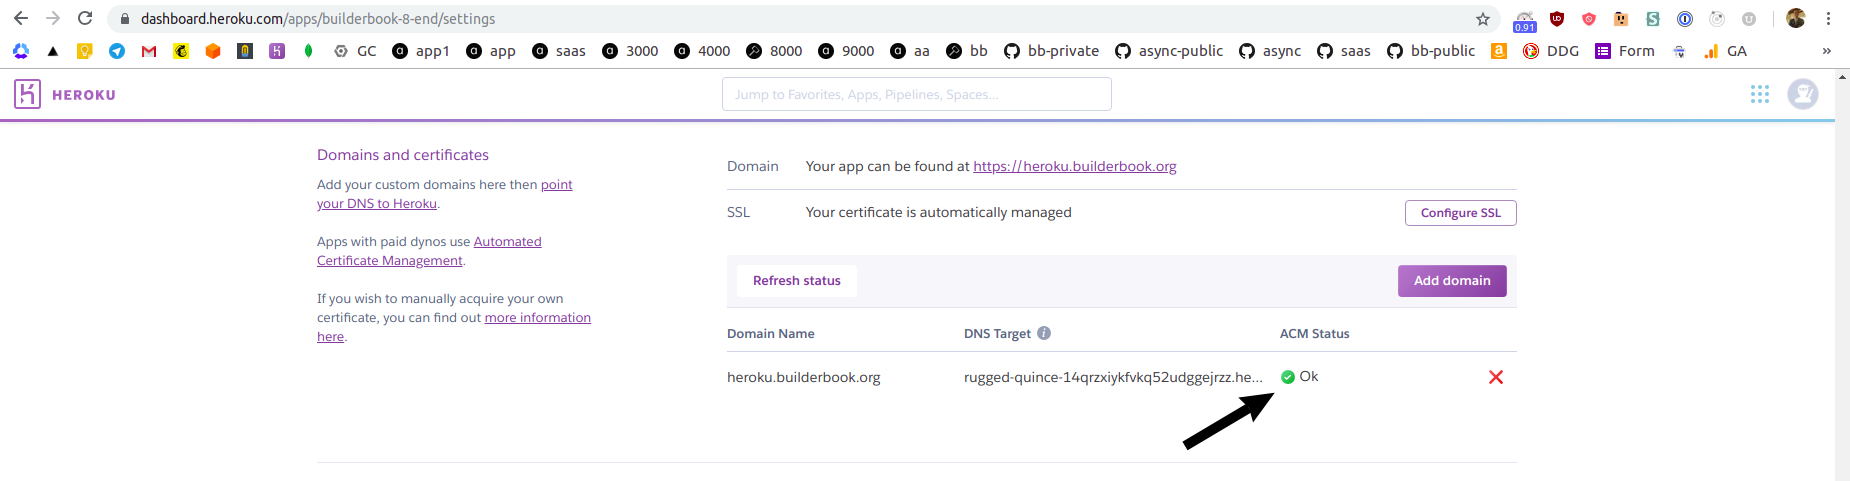
Type your custom domain name, I added
heroku.builderbook.orgas a custom domain, click Save changes button.Heroku will display you a value for CNAME record that you have to create for your custom domain. For me, custom domain is
heroku.builderbook.organd I manage DNS records at Now by Zeit.After you create a CNAME, ACM status on Heroku's dashboard will change to
Ok:
It's important that you remember to manually add your custom domain to the settings of your Google OAuth app (Chapter 3) and GitHub OAuth app (Chapter 6). If you forget to do it, you will see errors when you try to log in to your app or when you try to connect GitHub to your app.
Scaling
You may want to consider splitting single Next/Express server into two servers:
- Next server for serving pages, server-side caching, sitemap and robots
- Express server for internal and external APIs
Here is an example of web application with split servers: https://github.com/async-labs/saas
Splitting servers will get you:
- faster page loads since Next rendering does not block internal and external APIs,
- faster code reload times during development,
- faster deployment and more flexible scaling of individual apps.
Docker
- Install Docker and Docker Compose
- Modify
docker-compose-dev.ymlfile - If using Ubuntu, follow these steps: https://stackoverflow.com/questions/38775954/sudo-docker-compose-command-not-found
- Start app with
docker-compose -f docker-compose-dev.yml up
Screenshots
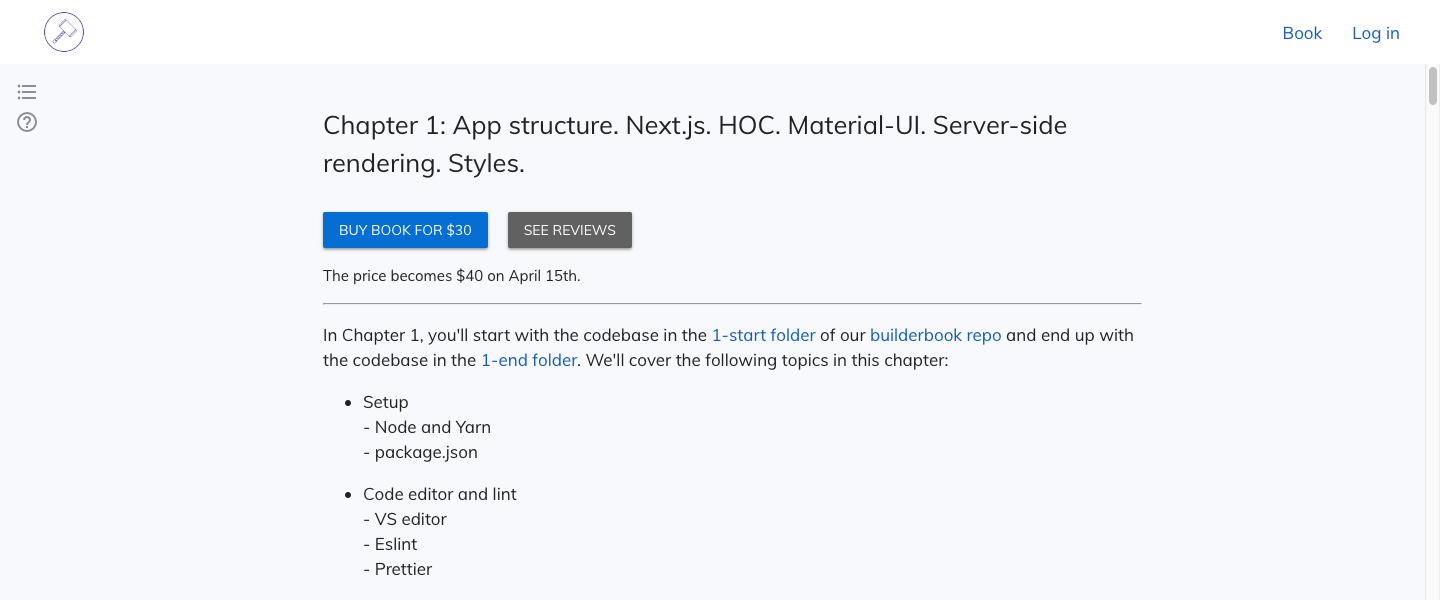
Chapter excerpt with Buy Button for Public/Guest visitor:
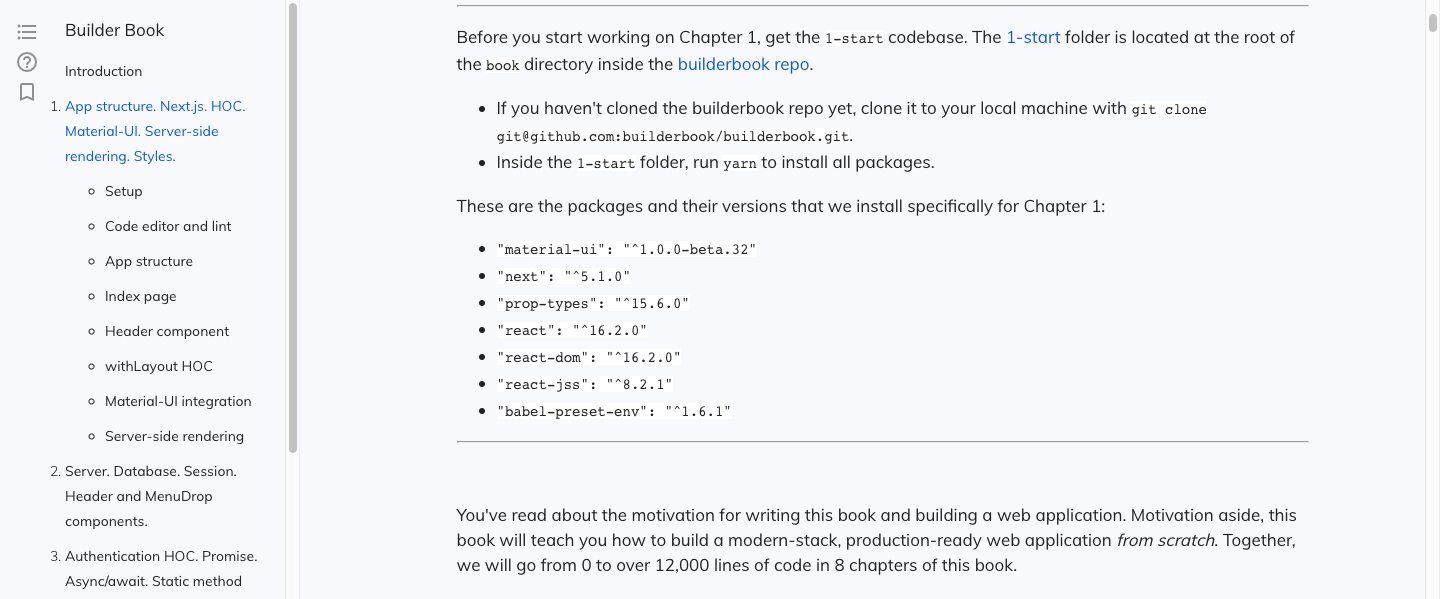
Chapter content and Table of Contents for book Customer:
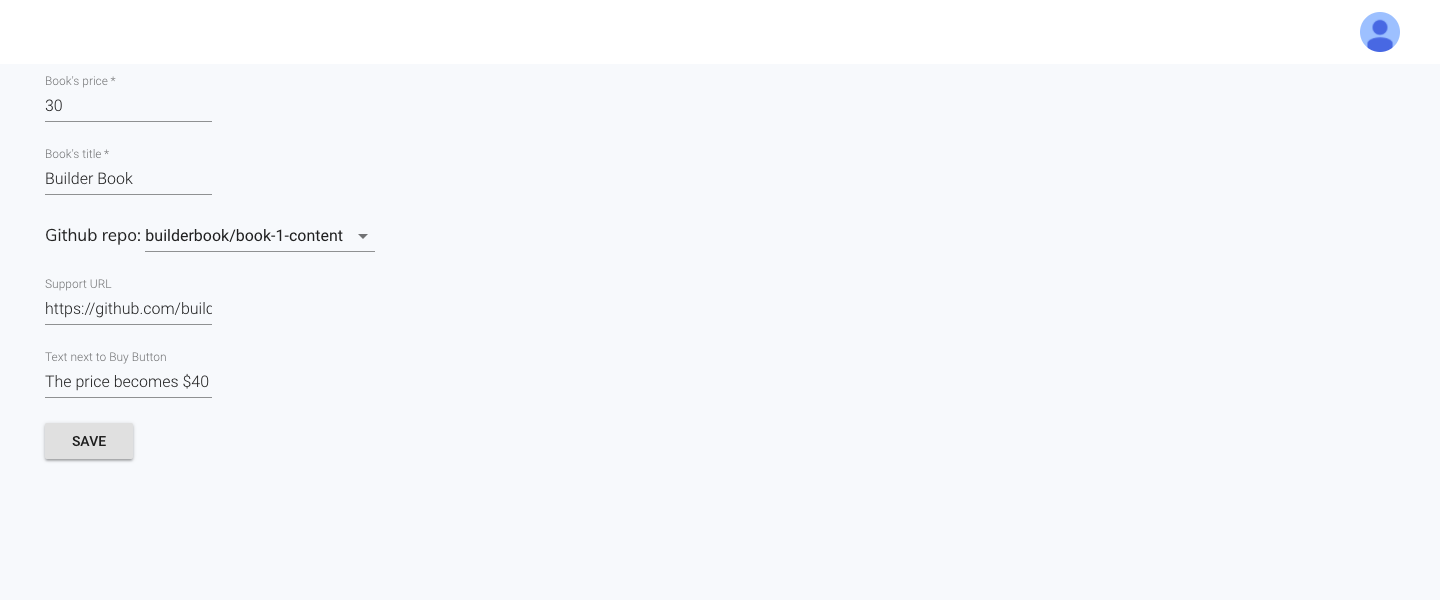
Add-book/Edit-book page for Admin user:
Book-detail page for Admin user:

Built with
Core stack
Third party APIs
- Google OAuth
- Github
- AWS SES
- Stripe
- MailChimp
Check out package.json.
Contributing
We welcome suggestions and bug reports via issues and and pull requests.
By participating in this project, you are expected to uphold Builder Book's Code of Conduct.
Want to support this project? Sign up at async and/or buy our books, which teach you how to build web apps from scratch. Also check out our open source SaaS boilerplate.
Team
You can contact us at [email protected]
If you are interested in working with us, check out Async Labs.
License
All code in this repository is provided under the MIT License.
Project structure
.
├── .vscode
│   ├── extensions.json
│   ├── settings.json
├── book
├── builderbook
│   ├── .elasticbeanstalk
│   │   ├── config.yml
│   ├── components
│   │   ├── admin
│   │   │   ├── EditBook.jsx
│   │   ├── customer
│   │   │   ├── BuyButton.jsx
│   │   ├── Header.jsx
│   │   ├── MenuWithAvatar.jsx
│   │   ├── Notifier.jsx
│   │   ├── SharedStyles.js
├── lib
│   ├── api
│   │   ├── admin.js
│   │   ├── customer.js
│   │   ├── getRootURL.js
│   │   ├── public.js
│   │   ├── sendRequest.js
│   ├── notify.js
│   ├── theme.js
│   ├── withAuth.jsx
├── pages
│   ├── admin
│   │   ├── add-book.jsx
│   │   ├── book-detail.jsx
│   │   ├── edit-book.jsx
│   │   ├── index.jsx
│   ├── customer
│   │   ├── my-books.jsx
│   ├── public
│   │   ├── login.jsx
│   │   ├── read-chapter.jsx
│   ├── _app.jsx
│   ├── _document.jsx
│   ├── index.jsx
├── public
│   ├── robots.txt
├── server
│   ├── api
│   │   ├── admin.js
│   │   ├── customer.js
│   │   ├── index.js
│   │   ├── public.js
│   ├── models
│   │   ├── Book.js
│   │   ├── Chapter.js
│   │   ├── EmailTemplate.js
│   │   ├── Purchase.js
│   │   ├── User.js
│   ├── utils
│   │   ├──slugify.js
│   ├── app.js
│   ├── aws.js
│   ├── github.js
│   ├── google.js
│   ├── logger.js
│   ├── mailchimp.js
│   ├── routesWithSlug.js
│   ├── sitemapAndRobots.js
│   ├── stripe.js
├── test/server/utils
│   ├── slugify.test.js
├── .eslintrc.js
├── .gitignore
├── package.json
├── yarn.lock
Metadata
Owner
Metadata
Open source web application to learn JS stack: React, Material-UI, Next.js, Node.js, Express.js, Mongoose, MongoDB database.