FastAPI-boilerplate
 FastAPI-boilerplate copied to clipboard
An extendable async API using FastAPI, Pydantic V2, SQLAlchemy 2.0, PostgreSQL and Redis.
Fast FastAPI boilerplate
Yet another template to speed your FastAPI development up.

0. About
FastAPI boilerplate creates an extendable async API using FastAPI, Pydantic V2, SQLAlchemy 2.0 and PostgreSQL:
FastAPI: modern Python web framework for building APIsPydantic V2: the most widely used data Python validation library, rewritten in Rust(5x-50x faster)SQLAlchemy 2.0: Python SQL toolkit and Object Relational MapperPostgreSQL: The World's Most Advanced Open Source Relational DatabaseRedis: Open source, in-memory data store used by millions as a cache, message broker and more.ARQJob queues and RPC in python with asyncio and redis.Docker ComposeWith a single command, create and start all the services from your configuration.NGINXHigh-performance low resource consumption web server used for Reverse Proxy and Load Balancing.
1. Features
- ⚡️ Fully async
- 🚀 Pydantic V2 and SQLAlchemy 2.0
- 🔐 User authentication with JWT
- 🍪 Cookie based refresh token
- 🏬 Easy redis caching
- 👜 Easy client-side caching
- 🚦 ARQ integration for task queue
- ⚙️ Efficient and robust queries with fastcrud
- ⎘ Out of the box offset and cursor pagination support with fastcrud
- 🛑 Rate Limiter dependency
- 👮 FastAPI docs behind authentication and hidden based on the environment
- 🦾 Easily extendable
- 🤸♂️ Flexible
- 🚚 Easy running with docker compose
- ⚖️ NGINX Reverse Proxy and Load Balancing
2. Contents
- About
- Features
- Contents
- Prerequisites
- Environment Variables (.env)
- Docker Compose
- From Scratch
- Usage
- Docker Compose
- From Scratch
- Packages
- Running PostgreSQL With Docker
- Running Redis with Docker
- Running the API
- Creating the first superuser
- Database Migrations
- Extending
- Project Structure
- Database Model
- SQLAlchemy Models
- Pydantic Schemas
- Alembic Migrations
- CRUD
- Routes
- Paginated Responses
- HTTP Exceptions
- Caching
- More Advanced Caching
- ARQ Job Queues
- Rate Limiting
- JWT Authentication
- Running
- Create Application
- Running in Production
- Uvicorn Workers with Gunicorn
- Running With NGINX
- One Server
- Multiple Servers
- Testing
- Contributing
- References
- License
- Contact
3. Prerequisites
3.0 Start
Start by using the template, and naming the repository to what you want.

Then clone your created repository (I'm using the base for the example)
git clone https://github.com/igormagalhaesr/FastAPI-boilerplate
[!TIP] If you are in a hurry, you may use one of the following templates (containing a
.env,docker-compose.ymlandDockerfile):
- Running locally with uvicorn
- Runing in staging with gunicorn managing uvicorn workers
- Running in production with NGINX
[!WARNING] Do not forget to place
docker-compose.ymlandDockerfilein therootfolder, while.envshould be in thesrcfolder.
3.1 Environment Variables (.env)
Then create a .env file inside src directory:
touch .env
Inside of .env, create the following app settings variables:
# ------------- app settings -------------
APP_NAME="Your app name here"
APP_DESCRIPTION="Your app description here"
APP_VERSION="0.1"
CONTACT_NAME="Your name"
CONTACT_EMAIL="Your email"
LICENSE_NAME="The license you picked"
For the database (if you don't have a database yet, click here), create:
# ------------- database -------------
POSTGRES_USER="your_postgres_user"
POSTGRES_PASSWORD="your_password"
POSTGRES_SERVER="your_server" # default "localhost", if using docker compose you should use "db"
POSTGRES_PORT=5432 # default "5432", if using docker compose you should use "5432"
POSTGRES_DB="your_db"
For database administration using PGAdmin create the following variables in the .env file
# ------------- pgadmin -------------
PGADMIN_DEFAULT_EMAIL="your_email_address"
PGADMIN_DEFAULT_PASSWORD="your_password"
PGADMIN_LISTEN_PORT=80
To connect to the database, log into the PGAdmin console with the values specified in PGADMIN_DEFAULT_EMAIL and PGADMIN_DEFAULT_PASSWORD.
Once in the main PGAdmin screen, click Add Server:
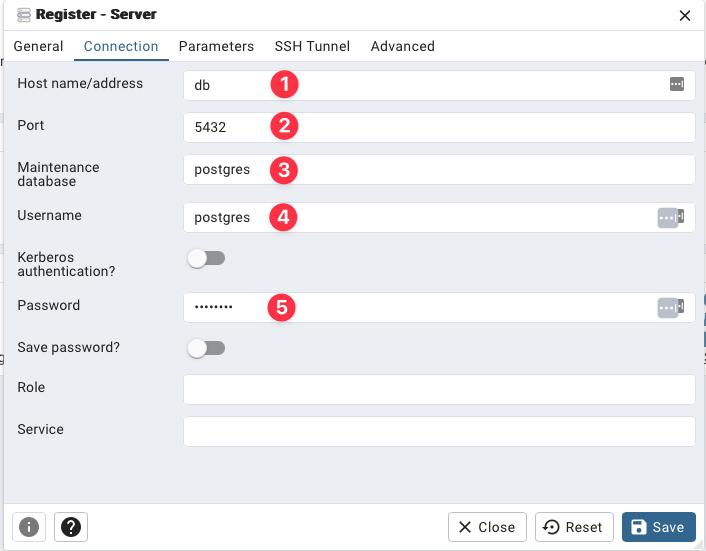
- Hostname/address is
db(if using containers) - Is the value you specified in
POSTGRES_PORT - Leave this value as
postgres - is the value you specified in
POSTGRES_USER - Is the value you specified in
POSTGRES_PASSWORD
For crypt: Start by running
openssl rand -hex 32
And then create in .env:
# ------------- crypt -------------
SECRET_KEY= # result of openssl rand -hex 32
ALGORITHM= # pick an algorithm, default HS256
ACCESS_TOKEN_EXPIRE_MINUTES= # minutes until token expires, default 30
REFRESH_TOKEN_EXPIRE_DAYS= # days until token expires, default 7
Then for the first admin user:
# ------------- admin -------------
ADMIN_NAME="your_name"
ADMIN_EMAIL="your_email"
ADMIN_USERNAME="your_username"
ADMIN_PASSWORD="your_password"
For redis caching:
# ------------- redis cache-------------
REDIS_CACHE_HOST="your_host" # default "localhost", if using docker compose you should use "redis"
REDIS_CACHE_PORT=6379 # default "6379", if using docker compose you should use "6379"
And for client-side caching:
# ------------- redis client-side cache -------------
CLIENT_CACHE_MAX_AGE=30 # default "30"
For ARQ Job Queues:
# ------------- redis queue -------------
REDIS_QUEUE_HOST="your_host" # default "localhost", if using docker compose you should use "redis"
REDIS_QUEUE_PORT=6379 # default "6379", if using docker compose you should use "6379"
[!WARNING] You may use the same redis for both caching and queue while developing, but the recommendation is using two separate containers for production.
To create the first tier:
# ------------- first tier -------------
TIER_NAME="free"
For the rate limiter:
# ------------- redis rate limit -------------
REDIS_RATE_LIMIT_HOST="localhost"   # default="localhost", if using docker compose you should use "redis"
REDIS_RATE_LIMIT_PORT=6379          # default=6379, if using docker compose you should use "6379"


# ------------- default rate limit settings -------------
DEFAULT_RATE_LIMIT_LIMIT=10         # default=10
DEFAULT_RATE_LIMIT_PERIOD=3600      # default=3600
For tests (optional to run):
# ------------- test -------------
TEST_NAME="Tester User"
TEST_EMAIL="[email protected]"
TEST_USERNAME="testeruser"
TEST_PASSWORD="Str1ng$t"
And Finally the environment:
# ------------- environment -------------
ENVIRONMENT="local"
ENVIRONMENT can be one of local, staging and production, defaults to local, and changes the behavior of api docs endpoints:
- local:
/docs,/redocand/openapi.jsonavailable - staging:
/docs,/redocand/openapi.jsonavailable for superusers - production:
/docs,/redocand/openapi.jsonnot available
3.2 Docker Compose (preferred)
To do it using docker compose, ensure you have docker and docker compose installed, then: While in the base project directory (FastAPI-boilerplate here), run:
docker compose up
You should have a web container, postgres container, a worker container and a redis container running.
Then head to http://127.0.0.1:8000/docs.
3.3 From Scratch
Install poetry:
pip install poetry
4. Usage
4.1 Docker Compose
If you used docker compose, your setup is done. You just need to ensure that when you run (while in the base folder):
docker compose up
You get the following outputs (in addition to many other outputs):
fastapi-boilerplate-worker-1  | ... redis_version=x.x.x mem_usage=999K clients_connected=1 db_keys=0
...
fastapi-boilerplate-db-1      | ... [1] LOG:  database system is ready to accept connections
...
fastapi-boilerplate-web-1     | INFO:     Application startup complete.
So you may skip to 5. Extending.
4.2 From Scratch
4.2.1. Packages
In the root directory (FastAPI-boilerplate if you didn't change anything), run to install required packages:
poetry install
Ensuring it ran without any problem.
4.2.2. Running PostgreSQL With Docker
[!NOTE] If you already have a PostgreSQL running, you may skip this step.
Install docker if you don't have it yet, then run:
docker pull postgres
And pick the port, name, user and password, replacing the fields:
docker run -d \
    -p {PORT}:{PORT} \
    --name {NAME} \
    -e POSTGRES_PASSWORD={PASSWORD} \
    -e POSTGRES_USER={USER} \
    postgres
Such as:
docker run -d \
    -p 5432:5432 \
    --name postgres \
    -e POSTGRES_PASSWORD=1234 \
    -e POSTGRES_USER=postgres \
    postgres
4.2.3. Running redis With Docker
[!NOTE] If you already have a redis running, you may skip this step.
Install docker if you don't have it yet, then run:
docker pull redis:alpine
And pick the name and port, replacing the fields:
docker run -d \
  --name {NAME}  \
  -p {PORT}:{PORT} \
redis:alpine
Such as
docker run -d \
  --name redis  \
  -p 6379:6379 \
redis:alpine
4.2.4. Running the API
While in the root folder, run to start the application with uvicorn server:
poetry run uvicorn src.app.main:app --reload
[!TIP] The --reload flag enables auto-reload once you change (and save) something in the project
4.3 Creating the first superuser
4.3.1 Docker Compose
[!WARNING] Make sure DB and tables are created before running create_superuser (db should be running and the api should run at least once before)
If you are using docker compose, you should uncomment this part of the docker-compose.yml:
  #-------- uncomment to create first superuser --------
  # create_superuser:
  #   build:
  #     context: .
  #     dockerfile: Dockerfile
  #   env_file:
  #     - ./src/.env
  #   depends_on:
  #     - db
  #   command: python -m src.scripts.create_first_superuser
  #   volumes:
  #     - ./src:/code/src
Getting:
  #-------- uncomment to create first superuser --------
  create_superuser:
    build:
      context: .
      dockerfile: Dockerfile
    env_file:
      - ./src/.env
    depends_on:
      - db
    command: python -m src.scripts.create_first_superuser
    volumes:
      - ./src:/code/src
While in the base project folder run to start the services:
docker-compose up -d
It will automatically run the create_superuser script as well, but if you want to rerun eventually:
docker-compose run --rm create_superuser
to stop the create_superuser service:
docker-compose stop create_superuser
4.3.2 From Scratch
While in the root folder, run (after you started the application at least once to create the tables):
poetry run python -m src.scripts.create_first_superuser
4.3.3 Creating the first tier
[!WARNING] Make sure DB and tables are created before running create_tier (db should be running and the api should run at least once before)
To create the first tier it's similar, you just replace create_superuser for create_tier service or create_first_superuser to create_first_tier for scripts. If using docker compose, do not forget to uncomment the create_tier service in docker-compose.yml.
4.4 Database Migrations
If you are using the db in docker, you need to change this in docker-compose.yml to run migrations:
  db:
    image: postgres:13
    env_file:
      - ./src/.env
    volumes:
      - postgres-data:/var/lib/postgresql/data
    # -------- replace with comment to run migrations with docker --------
    expose:
      - "5432"
    # ports:
    #  - 5432:5432
Getting:
  db:
    ...
    # expose:
    #  - "5432"
    ports:
      - 5432:5432
While in the src folder, run Alembic migrations:
poetry run alembic revision --autogenerate
And to apply the migration
poetry run alembic upgrade head
[!NOTE]
If you do not have poetry, you may run it without poetry after running
pip install alembic
5. Extending
5.1 Project Structure
First, you may want to take a look at the project structure and understand what each file is doing.
.
├── Dockerfile                        # Dockerfile for building the application container.
├── docker-compose.yml                # Docker Compose file for defining multi-container applications.
├── pyproject.toml                    # Poetry configuration file with project metadata and dependencies.
├── README.md                         # Project README providing information and instructions.
├── LICENSE.md                        # License file for the project.
│
├── tests                             # Unit and integration tests for the application.
│   ├── __init__.py
│   ├── conftest.py                   # Configuration and fixtures for pytest.
│   ├── helper.py                     # Helper functions for tests.
│   └── test_user.py                  # Test cases for user-related functionality.
│
└── src                               # Source code directory.
    ├── __init__.py                   # Initialization file for the src package.
    ├── alembic.ini                   # Configuration file for Alembic (database migration tool).
    ├── poetry.lock                   # Poetry lock file specifying exact versions of dependencies.
    │
    ├── app                           # Main application directory.
    │   ├── __init__.py               # Initialization file for the app package.
    │   ├── main.py                   # Main entry point of the FastAPI application.
    │   │
    │   │
    │   ├── api                       # Folder containing API-related logic.
    │   │   ├── __init__.py
    │   │   ├── dependencies.py       # Defines dependencies for use across API endpoints.
    │   │   │
    │   │   └── v1                    # Version 1 of the API.
    │   │       ├── __init__.py
    │   │       ├── login.py          # API route for user login.
    │   │       ├── logout.py         # API route for user logout.
    │   │       ├── posts.py          # API routes for post operations.
    │   │       ├── rate_limits.py    # API routes for rate limiting functionalities.
    │   │       ├── tasks.py          # API routes for task management.
    │   │       ├── tiers.py          # API routes for user tier functionalities.
    │   │       └── users.py          # API routes for user management.
    │   │
    │   ├── core                      # Core utilities and configurations for the application.
    │   │   ├── __init__.py
    │   │   ├── config.py             # Configuration settings for the application.
    │   │   ├── logger.py             # Configuration for application logging.
    │   │   ├── schemas.py            # Pydantic schemas for data validation.
    │   │   ├── security.py           # Security utilities, such as password hashing.
    │   │   ├── setup.py              # Setup file for the FastAPI app instance.
    │   │   │
    │   │   ├── db                    # Core Database related modules.
    │   │   │   ├── __init__.py
    │   │   │   ├── crud_token_blacklist.py  # CRUD operations for token blacklist.
    │   │   │   ├── database.py       # Database connectivity and session management.
    │   │   │   ├── models.py         # Core Database models.
    │   │   │   └── token_blacklist.py  # Model for token blacklist functionality.
    │   │   │
    │   │   ├── exceptions            # Custom exception classes.
    │   │   │   ├── __init__.py
    │   │   │   ├── cache_exceptions.py   # Exceptions related to cache operations.
    │   │   │   └── http_exceptions.py    # HTTP-related exceptions.
    │   │   │
    │   │   ├── utils                 # Utility functions and helpers.
    │   │   │   ├── __init__.py
    │   │   │   ├── cache.py          # Cache-related utilities.
    │   │   │   ├── queue.py          # Utilities for task queue management.
    │   │   │   └── rate_limit.py     # Rate limiting utilities.
    │   │   │
    │   │   └── worker                # Worker script for background tasks.
    │   │       ├── __init__.py
    │   │       ├── settings.py       # Worker configuration and settings.
    │   │       └── functions.py      # Async task definitions and management.
    │   │
    │   ├── crud                      # CRUD operations for the application.
    │   │   ├── __init__.py
    │   │   ├── crud_base.py          # Base class for CRUD operations.
    │   │   ├── crud_posts.py         # CRUD operations for posts.
    │   │   ├── crud_rate_limit.py    # CRUD operations for rate limiting.
    │   │   ├── crud_tier.py          # CRUD operations for user tiers.
    │   │   ├── crud_users.py         # CRUD operations for users.
    │   │   └── helper.py             # Helper functions for CRUD operations.
    │   │
    │   ├── logs                      # Directory for log files.
    │   │   └── app.log               # Log file for the application.
    │   │
    │   ├── middleware                # Middleware components for the application.
    │   │   └── client_cache_middleware.py  # Middleware for client-side caching.
    │   │
    │   ├── models                    # ORM models for the application (Deprecated/Unused).
    │   │   ├── __init__.py
    │   │   ├── post.py               # ORM model for posts.
    │   │   ├── rate_limit.py         # ORM model for rate limiting.
    │   │   ├── tier.py               # ORM model for user tiers.
    │   │   └── user.py               # ORM model for users.
    │   │
    │   └── schemas                   # Pydantic schemas for data validation.
    │       ├── __init__.py
    │       ├── job.py                # Schema for background jobs.
    │       ├── post.py               # Schema for post data.
    │       ├── rate_limit.py         # Schema for rate limiting data.
    │       ├── tier.py               # Schema for user tier data.
    │       └── user.py               # Schema for user data.
    │
    ├── migrations                    # Alembic migration scripts for database changes.
    │   ├── README
    │   ├── env.py                    # Environment configuration for Alembic.
    │   ├── script.py.mako            # Template script for Alembic migrations.
    │   │
    │   └── versions                  # Individual migration scripts.
    │       └── README.MD
    │
    └── scripts                       # Utility scripts for the application.
        ├── __init__.py
        ├── create_first_superuser.py # Script to create the first superuser.
        └── create_first_tier.py      # Script to create the first user tier.
5.2 Database Model
Create the new entities and relationships and add them to the model

5.2.1 Token Blacklist
Note that this table is used to blacklist the JWT tokens (it's how you log a user out)

5.3 SQLAlchemy Models
Inside app/models, create a new entity.py for each new entity (replacing entity with the name) and define the attributes according to SQLAlchemy 2.0 standards:
[!WARNING] Note that since it inherits from
Base, the new model is mapped as a pythondataclass, so optional attributes (arguments with a default value) should be defined after required attributes.
from sqlalchemy import String, DateTime
from sqlalchemy.orm import Mapped, mapped_column, relationship

from app.core.db.database import Base


class Entity(Base):
    __tablename__ = "entity"

    id: Mapped[int] = mapped_column("id", autoincrement=True, nullable=False, unique=True, primary_key=True, init=False)
    name: Mapped[str] = mapped_column(String(30))
    ...
5.4 Pydantic Schemas
Inside app/schemas, create a new entity.py for for each new entity (replacing entity with the name) and create the schemas according to Pydantic V2 standards:
from typing import Annotated

from pydantic import BaseModel, EmailStr, Field, HttpUrl, ConfigDict


class EntityBase(BaseModel):
    name: Annotated[
        str,
        Field(min_length=2, max_length=30, examples=["Entity Name"]),
    ]


class Entity(EntityBase):
    ...


class EntityRead(EntityBase):
    ...


class EntityCreate(EntityBase):
    ...


class EntityCreateInternal(EntityCreate):
    ...


class EntityUpdate(BaseModel):
    ...


class EntityUpdateInternal(BaseModel):
    ...


class EntityDelete(BaseModel):
    model_config = ConfigDict(extra="forbid")

    is_deleted: bool
    deleted_at: datetime
5.5 Alembic Migrations
Then, while in the src folder, run Alembic migrations:
poetry run alembic revision --autogenerate
And to apply the migration
poetry run alembic upgrade head
5.6 CRUD
Inside app/crud, create a new crud_entities.py inheriting from FastCRUD for each new entity:
from fastcrud import FastCRUD

from app.models.entity import Entity
from app.schemas.entity import EntityCreateInternal, EntityUpdate, EntityUpdateInternal, EntityDelete

CRUDEntity = FastCRUD[Entity, EntityCreateInternal, EntityUpdate, EntityUpdateInternal, EntityDelete]
crud_entity = CRUDEntity(Entity)
So, for users:
# crud_users.py
from app.model.user import User
from app.schemas.user import UserCreateInternal, UserUpdate, UserUpdateInternal, UserDelete

CRUDUser = FastCRUD[User, UserCreateInternal, UserUpdate, UserUpdateInternal, UserDelete]
crud_users = CRUDUser(User)
5.6.1 Get
When actually using the crud in an endpoint, to get data you just pass the database connection and the attributes as kwargs:
# Here I'm getting the first user with email == user.email (email is unique in this case)
user = await crud_users.get(db=db, email=user.email)
5.6.2 Get Multi
To get a list of objects with the attributes, you should use the get_multi:
# Here I'm getting at most 10 users with the name 'User Userson' except for the first 3
user = await crud_users.get_multi(db=db, offset=3, limit=100, name="User Userson")
[!WARNING] Note that get_multi returns a python
dict.
Which will return a python dict with the following structure:
{
  "data": [
    {
      "id": 4,
      "name": "User Userson",
      "username": "userson4",
      "email": "[email protected]",
      "profile_image_url": "https://profileimageurl.com"
    },
    {
      "id": 5,
      "name": "User Userson",
      "username": "userson5",
      "email": "[email protected]",
      "profile_image_url": "https://profileimageurl.com"
    }
  ],
  "total_count": 2,
  "has_more": false,
  "page": 1,
  "items_per_page": 10
}
5.6.3 Create
To create, you pass a CreateSchemaType object with the attributes, such as a UserCreate pydantic schema:
from app.schemas.user import UserCreate

# Creating the object
user_internal = UserCreate(name="user", username="myusername", email="[email protected]")

# Passing the object to be created
crud_users.create(db=db, object=user_internal)
5.6.4 Exists
To just check if there is at least one row that matches a certain set of attributes, you should use exists
# This queries only the email variable
# It returns True if there's at least one or False if there is none
crud_users.exists(db=db, email=user @ example.com)
5.6.5 Count
You can also get the count of a certain object with the specified filter:
# Here I'm getting the count of users with the name 'User Userson'
user = await crud_users.count(db=db, name="User Userson")
5.6.6 Update
To update you pass an object which may be a pydantic schema or just a regular dict, and the kwargs.
You will update with objects the rows that match your kwargs.
# Here I'm updating the user with username == "myusername".
# #I'll change his name to "Updated Name"
crud_users.update(db=db, object={"name": "Updated Name"}, username="myusername")
5.6.7 Delete
To delete we have two options:
- db_delete: actually deletes the row from the database
- delete:
- adds
"is_deleted": Trueanddeleted_at: datetime.now(UTC)if the model inherits fromPersistentDeletion(performs a soft delete), but keeps the object in the database. - actually deletes the row from the database if the model does not inherit from
PersistentDeletion
- adds
# Here I'll just change is_deleted to True
crud_users.delete(db=db, username="myusername")

# Here I actually delete it from the database
crud_users.db_delete(db=db, username="myusername")
5.6.8 Get Joined
To retrieve data with a join operation, you can use the get_joined method from your CRUD module. Here's how to do it:
# Fetch a single record with a join on another model (e.g., User and Tier).
result = await crud_users.get_joined(
    db=db,  # The SQLAlchemy async session.
    join_model=Tier,  # The model to join with (e.g., Tier).
    schema_to_select=UserSchema,  # Pydantic schema for selecting User model columns (optional).
    join_schema_to_select=TierSchema,  # Pydantic schema for selecting Tier model columns (optional).
)
Relevant Parameters:
join_model: The model you want to join with (e.g., Tier).join_prefix: Optional prefix to be added to all columns of the joined model. If None, no prefix is added.join_on: SQLAlchemy Join object for specifying the ON clause of the join. If None, the join condition is auto-detected based on foreign keys.schema_to_select: A Pydantic schema to select specific columns from the primary model (e.g., UserSchema).join_schema_to_select: A Pydantic schema to select specific columns from the joined model (e.g., TierSchema).join_type: pecifies the type of join operation to perform. Can be "left" for a left outer join or "inner" for an inner join. Default "left".kwargs: Filters to apply to the primary query.
This method allows you to perform a join operation, selecting columns from both models, and retrieve a single record.
5.6.9 Get Multi Joined
Similarly, to retrieve multiple records with a join operation, you can use the get_multi_joined method. Here's how:
# Retrieve a list of objects with a join on another model (e.g., User and Tier).
result = await crud_users.get_multi_joined(
    db=db,  # The SQLAlchemy async session.
    join_model=Tier,  # The model to join with (e.g., Tier).
    join_prefix="tier_",  # Optional prefix for joined model columns.
    join_on=and_(User.tier_id == Tier.id, User.is_superuser == True),  # Custom join condition.
    schema_to_select=UserSchema,  # Pydantic schema for selecting User model columns.
    join_schema_to_select=TierSchema,  # Pydantic schema for selecting Tier model columns.
    username="john_doe",  # Additional filter parameters.
)
Relevant Parameters:
join_model: The model you want to join with (e.g., Tier).join_prefix: Optional prefix to be added to all columns of the joined model. If None, no prefix is added.join_on: SQLAlchemy Join object for specifying the ON clause of the join. If None, the join condition is auto-detected based on foreign keys.schema_to_select: A Pydantic schema to select specific columns from the primary model (e.g., UserSchema).join_schema_to_select: A Pydantic schema to select specific columns from the joined model (e.g., TierSchema).join_type: pecifies the type of join operation to perform. Can be "left" for a left outer join or "inner" for an inner join. Default "left".kwargs: Filters to apply to the primary query.offset: The offset (number of records to skip) for pagination. Default 0.limit: The limit (maximum number of records to return) for pagination. Default 100.kwargs: Filters to apply to the primary query.
More Efficient Selecting
For the get and get_multi methods we have the option to define a schema_to_select attribute, which is what actually makes the queries more efficient. When you pass a pydantic schema (preferred) or a list of the names of the attributes in schema_to_select to the get or get_multi methods, only the attributes in the schema will be selected.
from app.schemas.user import UserRead

# Here it's selecting all of the user's data
crud_user.get(db=db, username="myusername")

# Now it's only selecting the data that is in UserRead.
# Since that's my response_model, it's all I need
crud_user.get(db=db, username="myusername", schema_to_select=UserRead)
5.7 Routes
Inside app/api/v1, create a new entities.py file and create the desired routes
from typing import Annotated

from fastapi import Depends

from app.schemas.entity import EntityRead
from app.core.db.database import async_get_db

...

router = fastapi.APIRouter(tags=["entities"])


@router.get("/entities/{id}", response_model=List[EntityRead])
async def read_entities(request: Request, id: int, db: Annotated[AsyncSession, Depends(async_get_db)]):
    entity = await crud_entities.get(db=db, id=id)

    return entity


...
Then in app/api/v1/__init__.py add the router such as:
from fastapi import APIRouter
from app.api.v1.entity import router as entity_router

...

router = APIRouter(prefix="/v1")  # this should be there already
...
router.include_router(entity_router)
5.7.1 Paginated Responses
With the get_multi method we get a python dict with full suport for pagination:
{
  "data": [
    {
      "id": 4,
      "name": "User Userson",
      "username": "userson4",
      "email": "[email protected]",
      "profile_image_url": "https://profileimageurl.com"
    },
    {
      "id": 5,
      "name": "User Userson",
      "username": "userson5",
      "email": "[email protected]",
      "profile_image_url": "https://profileimageurl.com"
    }
  ],
  "total_count": 2,
  "has_more": false,
  "page": 1,
  "items_per_page": 10
}
And in the endpoint, we can import from fastcrud.paginated the following functions and Pydantic Schema:
from fastcrud.paginated import (
    PaginatedListResponse,  # What you'll use as a response_model to validate
    paginated_response,  # Creates a paginated response based on the parameters
    compute_offset,  # Calculate the offset for pagination ((page - 1) * items_per_page)
)
Then let's create the endpoint:
import fastapi

from app.schemas.entity import EntityRead

...


@router.get("/entities", response_model=PaginatedListResponse[EntityRead])
async def read_entities(
    request: Request, db: Annotated[AsyncSession, Depends(async_get_db)], page: int = 1, items_per_page: int = 10
):
    entities_data = await crud_entity.get_multi(
        db=db,
        offset=compute_offset(page, items_per_page),
        limit=items_per_page,
        schema_to_select=UserRead,
        is_deleted=False,
    )

    return paginated_response(crud_data=entities_data, page=page, items_per_page=items_per_page)
5.7.2 HTTP Exceptions
To add exceptions you may just import from app/core/exceptions/http_exceptions and optionally add a detail:
from app.core.exceptions.http_exceptions import NotFoundException

# If you want to specify the detail, just add the message
if not user:
    raise NotFoundException("User not found")

# Or you may just use the default message
if not post:
    raise NotFoundException()
The predefined possibilities in http_exceptions are the following:
CustomException: 500 internal errorBadRequestException: 400 bad requestNotFoundException: 404 not foundForbiddenException: 403 forbiddenUnauthorizedException: 401 unauthorizedUnprocessableEntityException: 422 unprocessable entityDuplicateValueException: 422 unprocessable entityRateLimitException: 429 too many requests
5.8 Caching
The cache decorator allows you to cache the results of FastAPI endpoint functions, enhancing response times and reducing the load on your application by storing and retrieving data in a cache.
Caching the response of an endpoint is really simple, just apply the cache decorator to the endpoint function.
[!WARNING] Note that you should always pass request as a variable to your endpoint function if you plan to use the cache decorator.
...
from app.core.utils.cache import cache


@app.get("/sample/{my_id}")
@cache(key_prefix="sample_data", expiration=3600, resource_id_name="my_id")
async def sample_endpoint(request: Request, my_id: int):
    # Endpoint logic here
    return {"data": "my_data"}
The way it works is:
- the data is saved in redis with the following cache key:
sample_data:{my_id} - then the time to expire is set as 3600 seconds (that's the default)
Another option is not passing the resource_id_name, but passing the resource_id_type (default int):
...
from app.core.utils.cache import cache


@app.get("/sample/{my_id}")
@cache(key_prefix="sample_data", resource_id_type=int)
async def sample_endpoint(request: Request, my_id: int):
    # Endpoint logic here
    return {"data": "my_data"}
In this case, what will happen is:
- the
resource_idwill be inferred from the keyword arguments (my_idin this case) - the data is saved in redis with the following cache key:
sample_data:{my_id} - then the the time to expire is set as 3600 seconds (that's the default)
Passing resource_id_name is usually preferred.
5.9 More Advanced Caching
The behaviour of the cache decorator changes based on the request method of your endpoint.
It caches the result if you are passing it to a GET endpoint, and it invalidates the cache with this key_prefix and id if passed to other endpoints (PATCH, DELETE).
Invalidating Extra Keys
If you also want to invalidate cache with a different key, you can use the decorator with the to_invalidate_extra variable.
In the following example, I want to invalidate the cache for a certain user_id, since I'm deleting it, but I also want to invalidate the cache for the list of users, so it will not be out of sync.
# The cache here will be saved as "{username}_posts:{username}":
@router.get("/{username}/posts", response_model=List[PostRead])
@cache(key_prefix="{username}_posts", resource_id_name="username")
async def read_posts(request: Request, username: str, db: Annotated[AsyncSession, Depends(async_get_db)]):
    ...


...

# Invalidating cache for the former endpoint by just passing the key_prefix and id as a dictionary:
@router.delete("/{username}/post/{id}")
@cache(
    "{username}_post_cache",
    resource_id_name="id",
    to_invalidate_extra={"{username}_posts": "{username}"},  # also invalidate "{username}_posts:{username}" cache
)
async def erase_post(
    request: Request,
    username: str,
    id: int,
    current_user: Annotated[UserRead, Depends(get_current_user)],
    db: Annotated[AsyncSession, Depends(async_get_db)],
):
    ...


# And now I'll also invalidate when I update the user:
@router.patch("/{username}/post/{id}", response_model=PostRead)
@cache("{username}_post_cache", resource_id_name="id", to_invalidate_extra={"{username}_posts": "{username}"})
async def patch_post(
    request: Request,
    username: str,
    id: int,
    values: PostUpdate,
    current_user: Annotated[UserRead, Depends(get_current_user)],
    db: Annotated[AsyncSession, Depends(async_get_db)],
):
    ...
[!WARNING] Note that adding
to_invalidate_extrawill not work for GET requests.
Invalidate Extra By Pattern
Let's assume we have an endpoint with a paginated response, such as:
@router.get("/{username}/posts", response_model=PaginatedListResponse[PostRead])
@cache(
    key_prefix="{username}_posts:page_{page}:items_per_page:{items_per_page}",
    resource_id_name="username",
    expiration=60,
)
async def read_posts(
    request: Request,
    username: str,
    db: Annotated[AsyncSession, Depends(async_get_db)],
    page: int = 1,
    items_per_page: int = 10,
):
    db_user = await crud_users.get(db=db, schema_to_select=UserRead, username=username, is_deleted=False)
    if not db_user:
        raise HTTPException(status_code=404, detail="User not found")

    posts_data = await crud_posts.get_multi(
        db=db,
        offset=compute_offset(page, items_per_page),
        limit=items_per_page,
        schema_to_select=PostRead,
        created_by_user_id=db_user["id"],
        is_deleted=False,
    )

    return paginated_response(crud_data=posts_data, page=page, items_per_page=items_per_page)
Just passing to_invalidate_extra will not work to invalidate this cache, since the key will change based on the page and items_per_page values.
To overcome this we may use the pattern_to_invalidate_extra parameter:
@router.patch("/{username}/post/{id}")
@cache("{username}_post_cache", resource_id_name="id", pattern_to_invalidate_extra=["{username}_posts:*"])
async def patch_post(
    request: Request,
    username: str,
    id: int,
    values: PostUpdate,
    current_user: Annotated[UserRead, Depends(get_current_user)],
    db: Annotated[AsyncSession, Depends(async_get_db)],
):
    ...
Now it will invalidate all caches with a key that matches the pattern "{username}_posts:*, which will work for the paginated responses.
[!CAUTION] Using
pattern_to_invalidate_extracan be resource-intensive on large datasets. Use it judiciously and consider the potential impact on Redis performance. Be cautious with patterns that could match a large number of keys, as deleting many keys simultaneously may impact the performance of the Redis server.
Client-side Caching
For client-side caching, all you have to do is let the Settings class defined in app/core/config.py inherit from the ClientSideCacheSettings class. You can set the CLIENT_CACHE_MAX_AGE value in .env, it defaults to 60 (seconds).
5.10 ARQ Job Queues
Create the background task in app/core/worker/functions.py:
...
# -------- background tasks --------
async def sample_background_task(ctx, name: str) -> str:
    await asyncio.sleep(5)
    return f"Task {name} is complete!"
Then add the function to the WorkerSettings class functions variable in app/core/worker/settings.py:
# -------- class --------
...


class WorkerSettings:
    functions = [sample_background_task]
    ...
Add the task to be enqueued in a POST endpoint and get the info in a GET:
...


@router.post("/task", response_model=Job, status_code=201)
async def create_task(message: str):
    job = await queue.pool.enqueue_job("sample_background_task", message)
    return {"id": job.job_id}


@router.get("/task/{task_id}")
async def get_task(task_id: str):
    job = ArqJob(task_id, queue.pool)
    return await job.info()
And finally run the worker in parallel to your fastapi application.
If you are using docker compose, the worker is already running.
If you are doing it from scratch, run while in the root folder:
poetry run arq src.app.core.worker.settings.WorkerSettings
5.11 Rate Limiting
To limit how many times a user can make a request in a certain interval of time (very useful to create subscription plans or just to protect your API against DDOS), you may just use the rate_limiter dependency:
from fastapi import Depends

from app.api.dependencies import rate_limiter
from app.core.utils import queue
from app.schemas.job import Job


@router.post("/task", response_model=Job, status_code=201, dependencies=[Depends(rate_limiter)])
async def create_task(message: str):
    job = await queue.pool.enqueue_job("sample_background_task", message)
    return {"id": job.job_id}
By default, if no token is passed in the header (that is - the user is not authenticated), the user will be limited by his IP address with the default limit (how many times the user can make this request every period) and period (time in seconds) defined in .env.
Even though this is useful, real power comes from creating tiers (categories of users) and standard rate_limits (limits and periods defined for specific paths - that is - endpoints) for these tiers.
All of the tier and rate_limit models, schemas, and endpoints are already created in the respective folders (and usable only by superusers). You may use the create_tier script to create the first tier (it uses the .env variable TIER_NAME, which is all you need to create a tier) or just use the api:
Here I'll create a free tier:

And a pro tier:

Then I'll associate a rate_limit for the path api/v1/tasks/task for each of them, I'll associate a rate limit for the path api/v1/tasks/task.
[!WARNING] Do not forget to add
api/v1/...or any other prefix to the beggining of your path. For the structure of the boilerplate,api/v1/<rest_of_the_path>
1 request every hour (3600 seconds) for the free tier:

10 requests every hour for the pro tier:

Now let's read all the tiers available (GET api/v1/tiers):
{
  "data": [
    {
      "name": "free",
      "id": 1,
      "created_at": "2023-11-11T05:57:25.420360"
    },
    {
      "name": "pro",
      "id": 2,
      "created_at": "2023-11-12T00:40:00.759847"
    }
  ],
  "total_count": 2,
  "has_more": false,
  "page": 1,
  "items_per_page": 10
}
And read the rate_limits for the pro tier to ensure it's working (GET api/v1/tier/pro/rate_limits):
{
  "data": [
    {
      "path": "api_v1_tasks_task",
      "limit": 10,
      "period": 3600,
      "id": 1,
      "tier_id": 2,
      "name": "api_v1_tasks:10:3600"
    }
  ],
  "total_count": 1,
  "has_more": false,
  "page": 1,
  "items_per_page": 10
}
Now, whenever an authenticated user makes a POST request to the api/v1/tasks/task, they'll use the quota that is defined by their tier.
You may check this getting the token from the api/v1/login endpoint, then passing it in the request header:
curl -X POST 'http://127.0.0.1:8000/api/v1/tasks/task?message=test' \
-H 'Authorization: Bearer <your-token-here>'
[!TIP] Since the
rate_limiterdependency uses theget_optional_userdependency instead ofget_current_user, it will not require authentication to be used, but will behave accordingly if the user is authenticated (and token is passed in header). If you want to ensure authentication, also useget_current_userif you need.
To change a user's tier, you may just use the PATCH api/v1/user/{username}/tier endpoint.
Note that for flexibility (since this is a boilerplate), it's not necessary to previously inform a tier_id to create a user, but you probably should set every user to a certain tier (let's say free) once they are created.
[!WARNING] If a user does not have a
tieror the tier does not have a definedrate limitfor the path and the token is still passed to the request, the defaultlimitandperiodwill be used, this will be saved inapp/logs.
5.12 JWT Authentication
5.12.1 Details
The JWT in this boilerplate is created in the following way:
- JWT Access Tokens: how you actually access protected resources is passing this token in the request header.
- Refresh Tokens: you use this type of token to get an
access token, which you'll use to access protected resources.
The access token is short lived (default 30 minutes) to reduce the damage of a potential leak. The refresh token, on the other hand, is long lived (default 7 days), and you use it to renew your access token without the need to provide username and password every time it expires.
Since the refresh token lasts for a longer time, it's stored as a cookie in a secure way:
# app/api/v1/login

...
response.set_cookie(
    key="refresh_token",
    value=refresh_token,
    httponly=True,  # Prevent access through JavaScript
    secure=True,  # Ensure cookie is sent over HTTPS only
    samesite="Lax",  # Default to Lax for reasonable balance between security and usability
    max_age=number_of_seconds,  # Set a max age for the cookie
)
...
You may change it to suit your needs. The possible options for samesite are:
Lax: Cookies will be sent in top-level navigations (like clicking on a link to go to another site), but not in API requests or images loaded from other sites.Strict: Cookies will be sent in top-level navigations (like clicking on a link to go to another site), but not in API requests or images loaded from other sites.None: Cookies will be sent with both same-site and cross-site requests.
5.12.2 Usage
What you should do with the client is:
Login: Send credentials to/api/v1/login. Store the returned access token in memory for subsequent requests.Accessing Protected Routes: Include the access token in the Authorization header.Token Renewal: On access token expiry, the front end should automatically call/api/v1/refreshfor a new token.Login Again: If refresh token is expired, credentials should be sent to/api/v1/loginagain, storing the new access token in memory.Logout: Call /api/v1/logout to end the session securely.
This authentication setup in the provides a robust, secure, and user-friendly way to handle user sessions in your API applications.
5.13 Running
If you are using docker compose, just running the following command should ensure everything is working:
docker compose up
If you are doing it from scratch, ensure your postgres and your redis are running, then
while in the root folder, run to start the application with uvicorn server:
poetry run uvicorn src.app.main:app --reload
And for the worker:
poetry run arq src.app.core.worker.settings.WorkerSettings
6. Running in Production
6.1 Uvicorn Workers with Gunicorn
In production you may want to run using gunicorn to manage uvicorn workers:
command: gunicorn app.main:app -w 4 -k uvicorn.workers.UvicornWorker -b 0.0.0.0:8000
Here it's running with 4 workers, but you should test it depending on how many cores your machine has.
To do this if you are using docker compose, just replace the comment:
This part in docker-compose.yml:
# docker-compose.yml

# -------- replace with comment to run with gunicorn --------
command: uvicorn app.main:app --host 0.0.0.0 --port 8000 --reload
# command: gunicorn app.main:app -w 4 -k uvicorn.workers.UvicornWorker -b 0.0.0.0:8000
Should be changed to:
# docker-compose.yml

# -------- replace with comment to run with uvicorn --------
# command: uvicorn app.main:app --host 0.0.0.0 --port 8000 --reload
command: gunicorn app.main:app -w 4 -k uvicorn.workers.UvicornWorker -b 0.0.0.0:8000
And the same in Dockerfile:
This part:
# Dockerfile

CMD ["uvicorn", "app.main:app", "--host", "0.0.0.0", "--port", "8000", "--reload"]
# CMD ["gunicorn", "app.main:app", "-w", "4", "-k", "uvicorn.workers.UvicornWorker". "-b", "0.0.0.0:8000"]
Should be changed to:
# Dockerfile

# CMD ["uvicorn", "app.main:app", "--host", "0.0.0.0", "--port", "8000", "--reload"]
CMD ["gunicorn", "app.main:app", "-w", "4", "-k", "uvicorn.workers.UvicornWorker". "-b", "0.0.0.0:8000"]
[!CAUTION] Do not forget to set the
ENVIRONMENTin.envtoproductionunless you want the API docs to be public.
5.14 Create Application
If you want to stop tables from being created every time you run the api, you should disable this here:
# app/main.py

from .api import router
from .core.config import settings
from .core.setup import create_application

# create_tables_on_start defaults to True
app = create_application(router=router, settings=settings, create_tables_on_start=False)
This create_application function is defined in app/core/setup.py, and it's a flexible way to configure the behavior of your application.
A few examples:
- Deactivate or password protect /docs
- Add client-side cache middleware
- Add Startup and Shutdown event handlers for cache, queue and rate limit
6.2 Running with NGINX
NGINX is a high-performance web server, known for its stability, rich feature set, simple configuration, and low resource consumption. NGINX acts as a reverse proxy, that is, it receives client requests, forwards them to the FastAPI server (running via Uvicorn or Gunicorn), and then passes the responses back to the clients.
To run with NGINX, you start by uncommenting the following part in your docker-compose.yml:
# docker-compose.yml

...
# -------- uncomment to run with nginx --------
# nginx:
#   image: nginx:latest
#   ports:
#     - "80:80"
#   volumes:
#     - ./default.conf:/etc/nginx/conf.d/default.conf
#   depends_on:
#     - web
...
Which should be changed to:
# docker-compose.yml

...
  #-------- uncomment to run with nginx --------
  nginx:
    image: nginx:latest
    ports:
      - "80:80"
    volumes:
      - ./default.conf:/etc/nginx/conf.d/default.conf
    depends_on:
      - web
...
Then comment the following part:
# docker-compose.yml

services:
  web:
    ...
    # -------- Both of the following should be commented to run with nginx --------
    command: uvicorn app.main:app --host 0.0.0.0 --port 8000 --reload
    # command: gunicorn app.main:app -w 4 -k uvicorn.workers.UvicornWorker -b 0.0.0.0:8000
Which becomes:
# docker-compose.yml

services:
  web:
    ...
    # -------- Both of the following should be commented to run with nginx --------
    # command: uvicorn app.main:app --host 0.0.0.0 --port 8000 --reload
    # command: gunicorn app.main:app -w 4 -k uvicorn.workers.UvicornWorker -b 0.0.0.0:8000
Then pick the way you want to run (uvicorn or gunicorn managing uvicorn workers) in Dockerfile.
The one you want should be uncommented, comment the other one.
# Dockerfile

CMD ["uvicorn", "app.main:app", "--host", "0.0.0.0", "--port", "8000", "--reload"]
# CMD ["gunicorn", "app.main:app", "-w", "4", "-k", "uvicorn.workers.UvicornWorker". "-b", "0.0.0.0:8000"]
And finally head to http://localhost/docs.
6.2.1 One Server
If you want to run with one server only, your setup should be ready. Just make sure the only part that is not a comment in default.conf is:
# default.conf

# ---------------- Running With One Server ----------------
server {
    listen 80;

    location / {
        proxy_pass http://web:8000;
        proxy_set_header Host $host;
        proxy_set_header X-Real-IP $remote_addr;
        proxy_set_header X-Forwarded-For $proxy_add_x_forwarded_for;
        proxy_set_header X-Forwarded-Proto $scheme;
    }
}
So just type on your browser: http://localhost/docs.
6.2.2 Multiple Servers
NGINX can distribute incoming network traffic across multiple servers, improving the efficiency and capacity utilization of your application.
To run with multiple servers, just comment the Running With One Server part in default.conf and Uncomment the other one:
# default.conf

# ---------------- Running With One Server ----------------
...

# ---------------- To Run with Multiple Servers, Uncomment below ----------------
upstream fastapi_app {
    server fastapi1:8000;  # Replace with actual server names or IP addresses
    server fastapi2:8000;
    # Add more servers as needed
}

server {
    listen 80;

    location / {
        proxy_pass http://fastapi_app;
        proxy_set_header Host $host;
        proxy_set_header X-Real-IP $remote_addr;
        proxy_set_header X-Forwarded-For $proxy_add_x_forwarded_for;
        proxy_set_header X-Forwarded-Proto $scheme;
    }
}
And finally, on your browser: http://localhost/docs.
[!WARNING] Note that we are using
fastapi1:8000andfastapi2:8000as examples, you should replace it with the actual name of your service and the port it's running on.
7. Testing
For tests, ensure you have in .env:
# ------------- test -------------
TEST_NAME="Tester User"
TEST_EMAIL="[email protected]"
TEST_USERNAME="testeruser"
TEST_PASSWORD="Str1ng$t"
While in the tests folder, create your test file with the name "test_{entity}.py", replacing entity with what you're testing
touch test_items.py
Finally create your tests (you may want to copy the structure in test_user.py)
Now, to run:
7.1 Docker Compose
First you need to uncomment the following part in the docker-compose.yml file:
  #-------- uncomment to run tests --------
  # pytest:
  #   build:
  #     context: .
  #     dockerfile: Dockerfile
  #   env_file:
  #     - ./src/.env
  #   depends_on:
  #     - db
  #     - create_superuser
  #     - redis
  #   command: python -m pytest ./tests
  #   volumes:
  #     - .:/code
You'll get:
  #-------- uncomment to run tests --------
  pytest:
    build:
      context: .
      dockerfile: Dockerfile
    env_file:
      - ./src/.env
    depends_on:
      - db
      - create_superuser
      - redis
    command: python -m pytest ./tests
    volumes:
      - .:/code
Start the Docker Compose services:
docker-compose up -d
It will automatically run the tests, but if you want to run again later:
docker-compose run --rm pytest
7.2 From Scratch
While in the root folder, run:
poetry run python -m pytest
8. Contributing
Read contributing.
9. References
This project was inspired by a few projects, it's based on them with things changed to the way I like (and pydantic, sqlalchemy updated)
Full Stack FastAPI and PostgreSQLby @tiangolo himselfFastAPI Microservicesby @kludex which heavily inspired this boilerplateAsync Web API with FastAPI + SQLAlchemy 2.0for sqlalchemy 2.0 ORM examplesFastaAPI Rocket Boilerplatefor docker compose
10. License
MIT
11. Contact
Igor Magalhaes – @igormagalhaesr – [email protected] github.com/igorbenav