blog
 blog copied to clipboard
动手实现简单版的 React(一)
这一年陆陆续续、跌跌撞撞看过一些实现 react 的文章,但是还没有自己亲自动手过,也就谈不上深入理解过,希望能够通过代码和文字帮助鞭策自己。
jsx 语法
在 React 中一个 Node 节点会被描述为一个如下的 js 对象:
{
   type: 'div',
   props: {
      className: 'content'
   },
   children: []
}
这个对象在 React 中会被 React.createElement 方法返回,而 jsx 语法经过 babel 编译后对应的 node 节点就会编译为 React.createElement 返回,如下的 jsx 经过 babel 编译后如下:
const name = 'huruji'
const content = <ul className="list">
        <li>{name}</li>
        huruji
      </ul>
const name = 'huruji';
const content = React.createElement("ul", {
  className: "list"
}, React.createElement("li", null, name), "huruji");
从编译过后的代码大致可以得到以下信息:
-
子节点是通过剩余参数传递给
createElement函数的 -
子节点包括了文本节点
-
当节点的 attribute 为空时,对应的 props 参数为 null
为了加深对于这些的理解,我使用了 typescript 来编写,vdom 的 interface 可以大致描述如下,props 的 value 为函数的时候就是处理相应的事件:
interface VdomInterface {
	type: string
	props: Record<string, string | Function>
	children: VdomInterface[]
}
其中因为子节点其实还可以是文本节点,因此需要兼容一下,
export interface VdomInterface {
	type: string
	props: Record<string, string | Function>
	children: VdomType[]
}

type VdomType = VdomInterface | string
实际上,React 的声明文件对于每个不同的 HTML 标签的 props 都做了不同的不同的适配,对应的标签只能编写该标签下所有的 attributes,所以经常会看到以下这种写法:
type InputProps = React.InputHTMLAttributes<{}> & BasicProps;

export default class Input extends React.Component<InputProps, any> {
    // your comonent's code
}
这里一切从简,createElement 函数的内容就会是下面这个样子:
interface VdomInterface {
	type: string
	props: Record<string, string | Function>
	children: VdomInterface[]
}

export default function createElement(
	type: string,
	props: Record<string, string | Function>,
	...children: VdomType[]
): VdomType {
	if (props === null) props = {}
	console.log(type)
	debugger
	return {
		type,
		props,
		children
	}
}
测试
编写我们的测试,为了不需要再编写繁琐的 webpack 配置,我使用了 saso 作为这次打包的工具,创建目录目录结构:
--lib2
--src
   --index.html
   --index.tsx
   --App.tsx
--saso.config.js
因为 saso 推崇以 .html 文件为打包入口,所以在 .html 中需要指定 .index.ts 作为 script 属性 src 的值:
<script src="./index.tsx" async defer></script>
在 saso 配置文件 saso.config.js 配置一下 jsx 编译后的指定函数,内容如下:
module.exports = {
  jsx: {
    pragma: 'createElement'
  },
}
App.tsx 内容如下:
import { createElement } from '../lib2/index'

const name = 'huruji'
const content = (
	<ul className="list">
		<li>{name}</li>
		huruji
	</ul>
)

export default content
index.ts 内容如下:
import App from './App'
console.log(App)
在根目录中运行 saso dev,可以在控制台中看到打包编译完成,在浏览器中访问 http://localhost:10000 并打开控制台,可以看到组件 App 编译过后被转化为了一个 js 对象:
渲染真实 DOM
接下来就需要考虑如何将这些对象渲染到真实的 DOM 中,在 React 中,我们是通过 react-dom 中的 render 方法渲染上去的:
ReactDOM.render(<App/>, document.querySelector('#app'))
react 是在版本 0.14 划分为 react 和 react-dom,react 之所以将 渲染到真实 DOM 单独分为一个包,一方面是因为 react 的思想本质上与浏览器或者DOM是没有关系的,因此分为两个包更为合适,另外一个方面,这也有利于将 react 应用在其他平台上,如移动端应用(react native)。
这里为了简单,就不划分了, 先写下最简单的渲染函数,如下:
export default function render(vdom:VdomType, parent: HTMLElement) {
  if(typeof vdom === 'string') {
    const node = document.createTextNode(vdom)
    parent.appendChild(node)
  } else if(typeof vdom === 'object') {
    const node = document.createElement(vdom.type)
    vdom.children.forEach((child:VdomType) => render(child, node))
    parent.appendChild(node)
  }
}
vdom 是字符串时对应于文本节点,其实这从 VdomType 类型中就可以看出来有 string 和 object 的情况(这也正是我喜欢 ts 的原因)。
在 index.tsx 中编写相应的测试内容:
import { render, createElement } from '../lib2'

render(
	<div>
		<p>name</p>
		huruji
	</div>,
	document.querySelector('#app')
)
这个时候可以看到,对应的内容已经渲染到 dom 中了
设置DOM属性
对于每个 dom 来说,除了普通的属性外,jsx 使用 className 来替代为 class,on 开头的属性作为事件处理,style是一个对象,key 属性作为标识符来辅助 dom diff,因此这些需要单独处理,key属性我们存储为 __key, 如下:
export default function setAttribute(node: HTMLElement & { __key?: any }, key: string, value: string | {} | Function) {
	if (key === 'className') {
		node['className'] = value as string
	} else if (key.startsWith('on') && typeof value === 'function') {
		node.addEventListener(key.slice(2).toLowerCase(), value as () => {})
	} else if (key === 'style') {
		if (typeof value === 'object') {
			for (const [key, val] of Object.entries(value)) {
				node.style[key] = val
			}
		}
	} else if (key === 'key') {
		node.__key = value
	} else {
		node.setAttribute(key, value as string)
	}
}
修改对应的测试,如下:
import { render, createElement } from '../lib2'

render(
	<div className="list" style={{ color: 'red' }} onClick={() => console.log('click')}>
		<p key="123" style={{ color: 'black' }}>
			name
		</p>
		huruji
	</div>,
	document.querySelector('#app')
)
打开浏览器可以看到已经生效:
组件 Component
首先先修改测试内容,将 dom 移到 App.tsx 中,index.tsx 内容修改为:
import { render, createElement } from '../lib2'
import App from './App'

render(<App />, document.querySelector('#app'))
打开浏览器可以看到这个时候报错了:
其实这个错误很明显,就是这个时候 Content 组件编译后传给 createElement 函数的第一个参数是一个 vdom 对象,但是我们并没有对 type 是对象的时候做处理,因此需要修改一下 createElement :
export default function createElement(
	type: string | VdomType,
	props: Record<string, string | Function>,
	...children: VdomType[]
): VdomType {
	if (props === null) props = {}
	if (typeof type === 'object' && type.type) {
		return type
	}
	return {
		type: type as string,
		props,
		children
	}
}
这个时候就正常了。
先新建一个 Component 对象:
export default class Component {
  public props

  constructor(props) {
    this.props = props || {}
  }

}
对于 class Component 的写法,转化过后的传递给 createElement 的第一个参数就是一个以 React.Component 为原型的函数:
class Content extends React.Component {

  render(){
    return <div>content</div>
  }
}

const content = <div><Content name="huruji"/></div>
class Content extends React.Component {
  render() {
    return React.createElement("div", null, "content");
  }

}

const content = React.createElement("div", null, React.createElement(Content, {
  name: "huruji"
}));
也就是说这个时候 type 是一个函数,目前在 createElement 中和 render 中并没有做处理。所以肯定会报错。
在编写 class 组件的时候,我们必须要包含 render 方法,并且如果编写过 ts 的话,就知道这个 render 方法是 public 的,因此肯定需要实例化之后再调用 render 方法,我们放在 render 方法处理。Component 的 interface 可以表示为:
export interface ComponentType {
  props?: Record<string, any>
  render():VdomType
}
render 方法中单独处理一下 type 为 function 的情况:
const props = Object.assign({}, vdom.props, {
      children: vdom.children
    })
    const instance = new (vdom.type)(props)
    const childVdom = instance.render()
    render(childVdom, parent)
}
这里做的事情就是实例化后调用 render 方法。
这个时候,整个 render 方法的内容如下:
export default function render(vdom:VdomType, parent: HTMLElement) {
  if(typeof vdom === 'string') {
    const node = document.createTextNode(vdom)
    parent.appendChild(node)
  } else if(typeof vdom === 'object' && typeof vdom.type === 'string') {
    const node = document.createElement(vdom.type)
    vdom.children.forEach((child:VdomType) => render(child, node))
    for(const prop in vdom.props) {
      setAttribute(node, prop, vdom.props[prop])
    }
    parent.appendChild(node)
  } else if (typeof vdom === 'object' && typeof vdom.type === 'function') {
    const props = Object.assign({}, vdom.props, {
      children: vdom.children
    })
    const instance = new (vdom.type)(props)
    const childVdom = instance.render()
    render(childVdom, parent)
  }
}
修改我们的测试内容:
import { render, createElement, Component } from '../lib2'

class App extends Component {
	constructor(props) {
		super(props)
	}

	render() {
		const { name } = this.props
		debugger
		return <div style={{ color: 'red', fontSize: '100px' }}>{name}</div>
	}
}

render(<App name={'app'} />, document.querySelector('#app'))
打开浏览器,可以看到内容已经被正常渲染出来了:
处理 Functional Component
我们将测试内容修改为函数式组件:
function App({ name }) {
	return <div style={{ color: 'red', fontSize: '100px' }}>{name}</div>
}
这个时候可以看到报错:
这个错误是显而易见的,render 里将 Functional Component 也当成了 Class Component 来处理,但是 Functional Component 里并没有 render 属性,因此我们仍然需要修改,Class Component 的原型是我们定义的 Component ,我们可以通过这个来区分。
先增加一下 interface ,这能帮助我们更好地理解:
export interface ClassComponentType {
  props?: Record<string, any>
  render():VdomType
}

export type FunctionComponent = (props:any) => VdomType

export interface VdomInterface {
	type: FunctionComponent | string  | {
		new(props:any): ClassComponentType
	}
	props: Record<string, string | Function>
	children: VdomType[]
}
将 type 为 function 的逻辑修改为:
    const props = Object.assign({}, vdom.props, {
      children: vdom.children
    })

    let childVdom = null

    if(Component.isPrototypeOf(vdom.type)) {
      const vnode = vdom.type as {new(props:any): ClassComponentType}
      const instance = new (vnode)(props)
      childVdom = instance.render()

    } else {
      const vnode = vdom.type as FunctionComponent
      childVdom = vnode(props)
    }
    render(childVdom, parent)
这个时候整个 render 的内容如下:
import { VdomType, FunctionComponent } from './createElement'
import setAttribute from './setAttribute'
import Component, { ComponentType, ClassComponentType }  from './component'

export default function render(vdom:VdomType, parent: HTMLElement) {
  if(typeof vdom === 'string') {
    const node = document.createTextNode(vdom)
    parent.appendChild(node)
  } else if(typeof vdom === 'object' && typeof vdom.type === 'string') {
    const node = document.createElement(vdom.type)
    vdom.children.forEach((child:VdomType) => render(child, node))
    for(const prop in vdom.props) {
      setAttribute(node, prop, vdom.props[prop])
    }
    parent.appendChild(node)
  } else if (typeof vdom === 'object' && typeof vdom.type === 'function') {
    const props = Object.assign({}, vdom.props, {
      children: vdom.children
    })

    let childVdom = null

    if(Component.isPrototypeOf(vdom.type)) {
      const vnode = vdom.type as {new(props:any): ClassComponentType}
      const instance = new (vnode)(props)
      childVdom = instance.render()

    } else {
      const vnode = vdom.type as FunctionComponent
      childVdom = vnode(props)
    }
    render(childVdom, parent)
  }
}
这个时候重新打开一下浏览器,可以发现能够正常渲染了:
优化 render
目前 render 方法里渲染的节点包括:普通的文本节点、普通的标签节点、functional component、class component,但是个人感觉好像有点乱,在 render 方法中并没有反映我们的意图。
仔细回想一下 createElement 函数,除了文本节点外,其他类型的节点都会经过这个函数处理,我们其实可以在这里动动手脚,标记下节点的类型。
export default function createElement(
	type: VdomType | Vdom,
	props: Record<string, string | Function>,
	...children: Vdom[]
): Vdom {
	let nodeType:nodeType = 'node'
	if (props === null) props = {}

	if (typeof type === 'object' && type.type) {
		return type
	}

	if (typeof type === 'function') {
		if (Component.isPrototypeOf(type)) {
			nodeType = 'classComponent'
		} else {
			nodeType = 'functionalComponent'
		}
	}


	return {
		type: type as VdomType,
		props,
		children,
		nodeType
	}
}
这个时候重写下 render 方法会更加清晰:
import { Vdom } from './types/vdom'

import setAttribute from './setAttribute'
import { ClassComponent, FunctionComponent } from './types/component';

export default function render(vdom:Vdom, parent: HTMLElement) {

  if(typeof vdom === 'string') {
    const node = document.createTextNode(vdom)
    parent.appendChild(node)
    return
  }


  switch(vdom.nodeType) {
    case 'node':
      const node = document.createElement(vdom.type as string)
      vdom.children.forEach((child:Vdom) => render(child, node))
      for(const prop in vdom.props) {
        setAttribute(node, prop, vdom.props[prop])
      }
      parent.appendChild(node)
      break;
    case 'classComponent':
      const classProps = Object.assign({}, vdom.props, {
        children: vdom.children
      })
      const classVnode = vdom.type as {new(props:any): ClassComponent}
      const instance = new (classVnode)(classProps)
      const classChildVdom = instance.render()
      render(classChildVdom, parent)
      break
    case 'functionalComponent':
      const props = Object.assign({}, vdom.props, {
        children: vdom.children
      })
      const vnode = vdom.type as FunctionComponent
      const childVdom = vnode(props)
      render(childVdom, parent)
      break
    default:
  }

}
更新视图
接下来就是需要完成更新了,首先我们知道 setState 是异步的,那么怎么实现异步?前端最常见的就是使用定时器,这当然可以,不过参考 Preact 的源码,可以发现使用的是通过 Promise.resolve 微任务将 setState 的操作放在当次事件循环的最后,这样就可以做到异步了。
Promise.resolve().then(update)
先完善下 Component 的类型,方便后续动手:
export default class Component<P,S> {
  static defaultProps
  public props:P
  public _pendingStates
  public base
  public state: Readonly<S>

  constructor(props) {
    this.props = props || Component.defaultProps ||  {}
  }

  setState(nextState) {
  }
}
这里使用了两个泛型来标记 props 和 state 的类型,并通过 Readonly 标记了 state 为只读。为了方便,我们可以在 setState 里将传进来的参数使用 _pendingState 保存一下,将相应的更新函数单独抽出来:
setState(nextState) {
    this._pendingStates = nextState
    enqueueRender(this)
}
更新函数如下:
function defer(fn) {
	return Promise.resolve().then(fn)
}


function flush(component) {
  component.prevState = Object.assign({}, component.state)
  Object.assign(component.state, component._pendingStates)
}

export default function queueRender(component) {
	defer(flush(component))
}
更新完 state 最重要的还是要重新渲染视图,既然要重新渲染视图,就需要对新旧 DOM 树进行对比,然后找到更新方式(删除节点、增加节点、移动节点、替换节点)应用到视图中。
我们一直被告诉传统的 tree diff 算法的时间复杂度为 O(n^3) ,但似乎很少文章提及为啥是 O(n^3) ,知乎上有一个回答可以参考下 react的diff 从O(n^3)到 O(n) ,请问 O(n^3) 和O(n) 是怎么算出来,大致的就是 tree diff 算法是一个递归算法,在递归过程拆分成可能的子树对比,然后还需要计算最小的转换方式,导致了最终的时间复杂度为 O(n^3) ,上张 tree diff 算法演变过程冷静冷静:
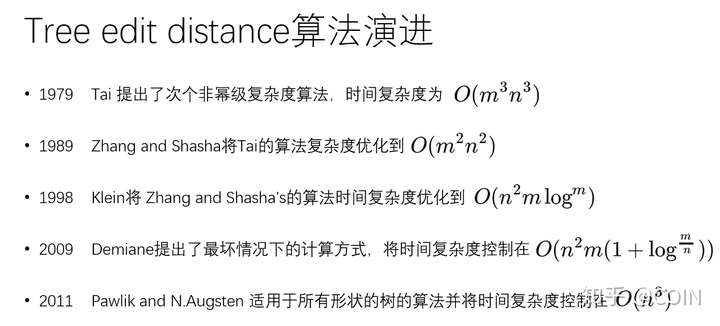
我终于知道为啥这方面的文章少的原因了,有兴趣的同学可以看看 tree diff 的论文:A Survey on Tree Edit Distance and Related Problems(27页)
这个算法在前端来说太大了,1000 个节点就需要1亿次操作,这会让应用卡成翔的,React 基于DOM操作的实践提出了两点假设:
- 不同类型的元素产生不同的树,
- 开发人员可以通过辅助来表示子元素在两次渲染中保持了稳定(也就是key属性)
可以在 React 的文档 Advanced guides - Reconciliation 中找到 React 自己的说明,假设原文如下:
Two elements of different types will produce different trees.
The developer can hint at which child elements may be stable across different renders with a key prop.
DOM 操作的事实就是:
-
局部小改动多,大片的改动少(性能考虑,用显示隐藏来规避)
-
跨层级的移动少,同层节点移动多(比如表格排序)
分别对应着上面的两点假设,非常合理。
那么 diff 策略就是只对比同层级的节点,如果节点一致则继续对比子节点,如果节点不一致,则先 tear down 老节点,然后再创建新节点,这也就意味着即使是跨层级的移动也是先删除相应的节点,再创建节点。
如下,这个时候执行的操作是: create A -> create B -> create C -> delete A
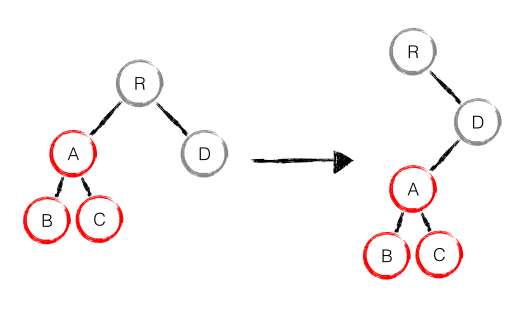
记住这个规则。
回到代码,要想能够对比首先就应该能够获取到对应的真实DOM,对于 component 组件同时需要可以获取到对应的 constructor 来对比是否是相同的组件,为了获取到这些,我们可以在渲染的时候通过属性保存下:
const base = render(classChildVdom, parent)
instance.base = base
base._component = instance
获得新树的方法很简单,通过重新调用组件的 render 方法就获得了新树,更新下 queueRender 方法里面的代码:
import diff from './diff'

function defer(fn) {
	return Promise.resolve().then(fn)
}


function flush(component) {
  component.prevState = Object.assign({}, component.state)
  Object.assign(component.state, component._pendingStates)
  diff(component.base, component.render())
}

export default function queueRender(component) {
	defer(() => flush(component))
}
diff 方法就是对新旧树进行对比。
- 新树没有的节点,则删除旧树节点
- 新树有旧树没有的节点,则创建对应节点
- 新树和旧树是相同节点,则继续 diff 子节点
- 新树和旧树是不同节点,则进行替换
- 对于
props则进行对比,进行删改,这个相对来说比较简单
判断是否同类型 node 的代码如下:
function isSameNodeType(dom: Dom, vdom:Vdom) {
  if(typeof vdom === 'string' || typeof vdom === 'number') {
    return dom.nodeType === 3
  }

  if(typeof vdom.type === 'string') {
    return dom.nodeName.toLowerCase() === vdom.type.toLowerCase()
  }

  return dom && dom._component && dom._component.constructor === vdom.type
}
对于 属性的对比 首先遍历旧结点,处理修改和删除的操作,之后遍历新节点属性,完成增加操作
function diffAttribute(dom, oldProps, newProps) {
  Object.keys(oldProps).forEach(key => {
    if(newProps[key] && newProps[key] !== oldProps[key]) {
      dom.removeAttribute(key)
      setAttribute(dom, key, newProps[key])
    }
  })

  Object.keys(newProps).forEach(key => {
    if(!oldProps[key]) {
      setAttribute(dom, key, newProps[key])
    }
  })
}
对于 Component diff,先处理 Component 相同的情况,Component 相同则继续 diff dom 和 调用 comonent render 得到树
对于 node diff,不同类型 render 后直接替换,相同类型则递归diff 子节点。
export default function diff(dom: Dom, vdom, parent: Dom = dom.parentNode) {
  if(!dom) {
    render(vdom, parent)
  } else if (!vdom) {
    dom.parentNode.removeChild(dom)
  } else if ((typeof vdom === 'string' || typeof vdom === 'number') && dom.nodeType === 3) {
    if(vdom !== dom.textContent) dom.textContent = vdom + ''
	} else if (vdom.nodeType === 'classComponent' || vdom.nodeType === 'functionalComponent') {
		const _component = dom._component
		if (_component.constructor === vdom.type) {
      _component.props = vdom.props
      diff(dom, _component.render())
		} else {
      const newDom = render(vdom, dom.parentNode)
      dom.parentNode.replaceChild(newDom, dom)
    }
	} else if (vdom.nodeType === 'node') {
    if(!isSameNodeType(dom, vdom)) {
      const newDom = render(vdom, parent)
      dom.parentNode.replaceChild(newDom, dom)
    } else {
      const max = Math.max(dom.childNodes.length, vdom.children.length)
      diffAttribute(dom, dom._component.props, vdom.props)
      for(let i = 0; i < max; i++) {
        diff(dom.childNodes[i] || null, vdom.children[i] || null, dom)
      }
    }
	}
}
编写测试,这次的测试我们需要覆盖当前的场景
- 新旧树类型相同,只是更改属性
- 新旧树类型不同,tear down 旧树后创建新树
- 只是更新 textNode 内容
- 新树有节点,旧树没有节点(增加)
- 旧树有节点,新树没有节点(删除)
class App extends Component<any, any> {
	public state = { name: 'app', list: [], nodeType: 'div', className: 'name' }

	constructor(props) {
		super(props)
	}

	update() {
		debugger
		this.setState({
			name: this.state.name + '1'
		})
	}

	add() {
		const { list } = this.state
		debugger
		for (let i = 0; i < 1000; i++) {
			list.push((Math.random() + '').slice(2, 8))
		}
		this.setState({
			list: [].concat(list)
		})
	}

	sort() {
		const { list } = this.state
		list.sort((a, b) => a - b)
		this.setState({
			list: [].concat(list)
		})
	}
	delete() {
		const { list } = this.state
		list.pop()
		this.setState({
			list: [].concat(list)
		})
	}
	changeType() {
		const { nodeType } = this.state
		this.setState({
			nodeType: nodeType === 'div' ? 'p' : 'div'
		})
	}
	changeProps() {
		const { className } = this.state
		this.setState({
			className: className + 'a'
		})
	}

	render() {
		const { name, list, nodeType, className } = this.state
		return (
			<div className="container">
				<div className="optcontainer">
					<div className="opt" onClick={this.update.bind(this)}>
						update text
					</div>
					<div className="opt" onClick={this.add.bind(this)}>
						add
					</div>
					<div className="opt" onClick={this.delete.bind(this)}>
						delete
					</div>
					<div className="opt" onClick={this.sort.bind(this)}>
						sort
					</div>
				</div>
				<div className="optcontainer">
					<div className="opt" onClick={this.changeType.bind(this)}>
						changeNodeType
					</div>
					<div className="opt" onClick={this.changeProps.bind(this)}>
						changeNodeProps
					</div>
				</div>
				{nodeType === 'div' ? (
					<div className={className}>{name + 'div'}</div>
				) : (
					<p className={className}>{name + 'p'}</p>
				)}
				<ul>{list.map(l => <li>{l}</li>)}</ul>
			</div>
		)
	}
}

render(<App />, document.querySelector('#app'))
打开浏览器,可以看到如下界面:
这个时候通过按钮进行操作(增删改移),可以很方便的发现已经能够更新我们的视图,也就是说目前基本上已经简单完成了
component diff 、tree diff、element diff,但是对于最重要的优化手段 key 目前没有排上用场,也就是目前还没有完成 list diff。