embeddingsviz
 embeddingsviz copied to clipboard
Visualize word embeddings of a vocabulary in TensorBoard, including the neighbors
Embeddings Visualizer in TensorBoard
Problem
Suppose you have a large word embeddings file at hand (e.g. GloVe) and that you want to visualize these embeddings in TensorBoard. The problem is that TensorBoard becomes very slow at doing this task as the number of total words exceeds tens of thousands, especially that it does computations in the browser. Hence, the way to go is to limit your vocabulary to subset of words that are of interest to you and visualize their neighbors only. This repository aims to automate this task. You input a set of vocabulary terms of interest in addition to your embeddings. Then you can visualize these words and their neighbors within TensorBoard.
The repository uses Faiss library from Facebook in addition to the latest TensorFlow from Google. It supports including multiple embeddings in the same TensorBoard session.
It is tested on with TensorFlow 1.2.1 under Python 2.7 (It is more straightforward to install Faiss with Python 2.7).
Prerequisites Setup
-
Install Faiss, Facebook's library for efficient similarity search, by following their guide
- For example, on Ubuntu 14 (CPU installation), I followed the below steps:
# Clone faiss git clone https://github.com/facebookresearch/faiss.git cd faiss # copy the make file cp example_makefiles/makefile.inc.Linux ./makefile.inc # Uncomment the part for your system in makefile.inc and apply the commands. E.g. for Ubuntu 14, I applied `sudo apt-get install libopenblas-dev liblapack3 python-numpy python-dev` and uncommented the line starting with BLASLDFLAGS vi ./makefile.inc # for the cpu installation: make tests/test_blas make make py -
Create the python virtual environment in order to install the project prerequisites there, without affecting the rest of your python environment. I executed the below commands. You might need to install the virtual environment using
sudo apt-get install python-pip python-dev python-virtualenv. If you use Anaconda, you can do the corresponding steps there.virtualenv --system-site-packages venv_dir source venv_dir/bin/activate -
Add Faiss to the python path to use it, e.g., if the directory is
FAISS_DIRECTORY, you can issue:export PYTHONPATH=FAISS_DIRECTORY:$PYTHONPATH -
Install the rest of the dependencies (basicall tensorflow and numpy):
pip install --upgrade pip
pip install -r requirements.txt
Running the Code
-
The first step is to obtain the embeddings of the vocabulary we have and their neighbors. For that, we run:
cd embeddingsviz
python embeddings_knn.py -e ORIGINAL_EMBEDDINGS_FILE -v VOCAB_TXT_FILE -o OUTPUT_EMBEDDINGS_FILE -k NUM_NEIGHBORS
# e.g.: python embeddings_knn.py -e ~/data/fasttext.vec -v ./vocab_file.txt -o ./fasttext_subset_1.vec -k 100
The ORIGINAL_EMBEDDINGS_FILE is assumed to be of the following format. The first line is a header setting the vocabulary size and the embeddings dimension. This is the format used in fastText.
VOCAB_SIZE EMBEDDING_DIMENSIONS
word_1 vec_1
word_2 vec_2
However, the code will also work with another format which does not has a header (e.g., the default GloVe format).
This step has to be executed for each embeddings file you want. The VOCAB_TXT_FILE has one word per line. NUM_NEIGHBORS has to be chosen so that the total number of words in the vocab and their neighbors is not very large (e.g., they should add up to ~10,000 words).
-
The second step is to convert the resulting embeddings of your vocab and their neighbors into a format that TensorBoard understands and place them in the log directory:
python embeddings_formatter.py -l LOGS_DIRECTORY -f EMBEDDINGS_FILE_1 EMBEDDINGS_FILE_2 -n NAME_1 NAME_2 # e.g.: python embeddings_formatter.py -l logs -f ./fasttext_subset_1.vec ./fasttext_subset_2.vec -n subset_1 subset_2 -
The final step is to run TensorBoard, pointing it to this directory:
tensorboard --logdir=logs --port=6006 -
Now you can point your browser to the embeddings visualization, e.g.
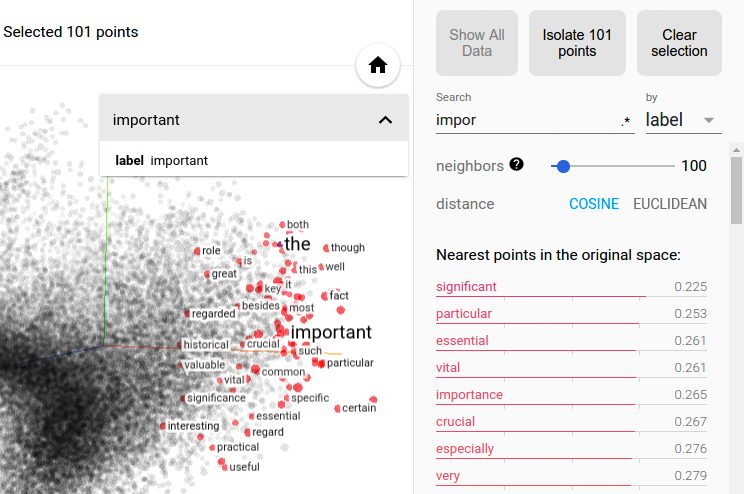
http://server_address:6006/#embeddings. You will see an interface like the following:
Developer
License
References:
- https://www.tensorflow.org/get_started/embedding_viz