blog
 blog copied to clipboard
GitHub Actions实现RN App自动化构建并推送到蒲公英
背景
XX项目有App终端,技术栈 React Native,本地打包,QA去打扰开发人员占用时间,打包费时,也受开发电脑配置影响,慢得可能要30分钟。电脑配置高也至少10+分钟,一天多次,断断续续打断开发的开发节奏,影响效率。
为什么不用Jenkins?
- 有服务器,但运维一直没帮忙装Android环境,导致App构建迟迟不落实。
- 服务器一般没有Mac OS的,需要支持iOS App自动化还得采购走申请,了解到以往平台那边的项目也不是自动化打包的。
为什么用 GitHub Actions?
- Gtihub Actions 自2018年上线后,就被社区广泛使用,基本托管在Github的项目都会首选 Action,因为好用
- 社区共享了很多Action 插件,市场上可以搜到各种符合需求的Action插件,可做到拿来即用,节省时间。
CICD实现思路
由于代码是在公司的 Gitlab,也不会(更不允许)推送到 GitHub,所以采用的策略就是借用一个Github 空项目,在 Runner 执行 job step 流程时,拉取远程公司项目代码,然后再走构建流程。
借用 secrets 来获取配置的环境变量 GITLAB_TOKEN(访问私库Gitlab秘钥) 和 GITLAB_REPO_URL(私库代码Git url), 就可以把私库代码 clone 下来,并做到安全保密。
手动构建触发
手动都可以,想自动更容易
选择支持手动构建触发的原因是,让QA或开发自己决定何时触发,构建什么分支,也避开了无用的自动化构建。 借用 workflow_dispatch 来实现变量控制,如下:
name: Android构建
on:
  workflow_dispatch:
    inputs:
      buildBranch:
        description: '输入构建分支(dev/test/master/prod)'
        required: true
        default: 'dev'
      uploadArtifact:
        description: '是否将生成的apk上传到Github Artifact (true/false)'
        required: false
        default: 'true'
      uploadCloud:
        description: '是否将生成的apk上传到蒲公英。(true/false)'
        required: false
        default: 'true'
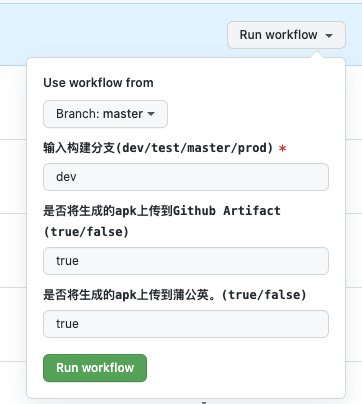
可以通过 ${{ github.event.inputs.buildBranch}} 获取到构建分支,其他输入框类似
shell 脚本拉取代码
checkout.sh 脚本只负责拉取分支代码即可
#!/bin/bash

set -e

repositoryUrl="${GITLAB_REPO_URL}"
branchName=${1}
devBranch='dev'
testBranch='test'
masterBranch='master'
prodBranch='prod'

function log() {
  echo "$(date)>>>>$@"
}


# 克隆分支代码

if [[ $branchName == $testBranch ]];then
    echo "包含test"
    git clone -b test $repositoryUrl
elif [[ $branchName == $masterBranch ]];then
    echo "包含master"
    git clone $repositoryUrl
elif [[ $branchName == $prodBranch ]];then
    echo "包含[prod]"
    git clone -b prod $repositoryUrl
elif [[ $branchName == $devBranch ]];then
    echo "包含dev"
    git clone -b dev $repositoryUrl
else
    echo "默认执行dev分支代码"
    git clone -b dev $repositoryUrl
fi

cd g-crm-app

log "$(git branch)"
# 拉取最新代码
git pull

cd ..
# 将代码放到github runner 执行目录下
cd xxx-app && mv * ../

pwd

ls -l

# 此处应该有切换环境服务地址的脚本执行
# node ./scripts/prebuild.js
Android 构建
主要流程描述:
- 触发构建入参(分支、是否推送到蒲公英等)
- checkout 代码
- 安装依赖
- 执行构建
cd android && chmod +x ./gradlew && ./gradlew assembleRelease - 上传apk到蒲公英平台,见api#uploadApp
- 消息推送
name: Android构建
on:
  workflow_dispatch:
    inputs:
      buildBranch:
        description: '输入构建分支(dev/test/master/prod)'
        required: true
        default: 'dev'
      uploadArtifact:
        description: '是否将生成的apk上传到Github Artifact (true/false)'
        required: false
        default: 'true'
      uploadCloud:
        description: '是否将生成的apk上传到蒲公英。(true/false)'
        required: false
        default: 'true'

env:
  GITLAB_REPO_URL: ${{ secrets.GITLAB_REPO_URL }}
  WECOM_WEBHOOK_KEY: ${{ secrets.WECOM_WEBHOOK_KEY }}
  UPLOAD_TOKEN_URL: ${{ secrets.UPLOAD_TOKEN_URL }}
  UPLOAD_URL: ${{ secrets.UPLOAD_URL }}

jobs:
  build-android:
    runs-on: ubuntu-latest
    steps:
      - name: Checkout
        uses: actions/checkout@v2
      - name: Get commit message
        run: |
          GIT_MESSAGE="$(git log --format=%B -n 1)"
          date_str=$(date "+%Y-%m-%d %H:%M:%S")
          seconds=$(date -d "$date_str" +%s)
          seconds_new=$(expr $seconds + 28800)
          echo "COMMIT_MESSAGE=$GIT_MESSAGE" >> $GITHUB_ENV
          echo "BUILD_TIME=$(date -d @$seconds_new "+%Y-%m-%d_%H_%M_%S")" >> $GITHUB_ENV
      - name: Show commit message
        run: |
          echo "$COMMIT_MESSAGE"
          echo "$BUILD_TIME"
          echo "${{ github.event.inputs.buildBranch }}"
      - name: Checkout code
        run: |
          bash ./checkout2.sh "${{ github.event.inputs.buildBranch }}"
      - name: Install npm dependencies
        run: |
          npm install
      - name: Start Build Apk Message
        run: |
          node ./send-startmsg.js "${{ github.server_url }}/${{ github.repository }}/actions/runs/${{ github.run_id }}" "${{ github.event.inputs.uploadCloud }}"
      - name: Build Android Release
        run: |
          cd android && chmod +x ./gradlew && ./gradlew assembleRelease
      - name: Upload Artifact
        if: ${{ github.event.inputs.uploadArtifact == 'true' }}
        uses: actions/upload-artifact@v1
        with:
          name: app-release.apk
          path: android/app/build/outputs/apk/release/
      - name: Upload Artifact Success
        if: ${{ github.event.inputs.uploadArtifact == 'true' }}
        run: |
          npm i request
          node ./send-success.js "${{ github.server_url }}/${{ github.repository }}/actions/runs/${{ github.run_id }}" "${{ github.event.inputs.uploadCloud }}"
      - name: Push to Fir
        id: PushToFir
        run: |
          curl -F 'file=@android/app/build/outputs/apk/release/app-release.apk' -F '_api_key=${{ secrets.PGYER_API_KEY }}' https://www.pgyer.com/apiv2/app/upload
        continue-on-error: true
      - name: Send fir error notify
        id: firErrorMessage
        if: steps.PushToFir.outcome != 'success'
        run: |
          node ./send-msg.js "Android 附件同步到蒲公英平台失败。请检查错误重新执行或前往Action直接下载apk文件 \n>[Job RunId](${{ github.server_url }}/${{ github.repository }}/actions/runs/${{ github.run_id }})"
      - name: Send finally notify
        run: |
          node ./send-msg.js "Android 构建成功,并同步到蒲公英平台。\n>[Job Link](${{ github.server_url }}/${{ github.repository }}/actions/runs/${{ github.run_id }}) \n>蒲公英地址:[https://www.pgyer.com/dev-apk](https://www.pgyer.com/dev-apk)"
      - name: On Failure
        if: ${{ failure() }}
        run: |
          npm i request
          node ./send-error.js "${{ github.server_url }}/${{ github.repository }}/actions/runs/${{ github.run_id }}"

IOS 构建
IOS 构建流程其实和Android流程一致,只是构建平台的区别,以及IOS需要配置证书对ipa签名,所以借用了Action插件:ios-build-action
name: IOS构建
on:
  # push:
  #   branches: [master*]
  # pull_request:
  #   branches: [master*]

  workflow_dispatch:
    inputs:
      buildBranch:
        description: '输入构建分支(dev/test/master/prod)'
        required: true
        default: 'dev'
      uploadArtifact:
        description: '是否将生成的ipa上传到Github Artifact (true/false)'
        required: false
        default: 'true'
      uploadCloud:
        description: '是否将生成的ipa上传到蒲公英。(true/false)'
        required: false
        default: 'true'

env:
  GITLAB_REPO_URL: ${{ secrets.GITLAB_REPO_URL }}
  WECOM_WEBHOOK_KEY: ${{ secrets.WECOM_WEBHOOK_KEY }}
  UPLOAD_TOKEN_URL: ${{ secrets.UPLOAD_TOKEN_URL }}
  UPLOAD_URL: ${{ secrets.UPLOAD_URL }}

jobs:
  build:
    runs-on: macos-10.15
    timeout-minutes: 60
    strategy:
      matrix:
        node-version: [14.18.x]
    steps:
      - name: Checkout repository
        uses: actions/checkout@v2
      - name: Get commit message
        run: |
          GIT_MESSAGE="$(git log --format=%B -n 1)"
          echo "COMMIT_MESSAGE=$GIT_MESSAGE" >> $GITHUB_ENV
      - name: Show commit message
        run: |
          echo "$COMMIT_MESSAGE"
          echo "$BUILD_TIME"
          echo "${{ github.event.inputs.buildBranch }}"
      - name: Checkout code
        run: |
          bash ./checkout2.sh "${{ github.event.inputs.buildBranch }}"
      - name: Install npm dependencies
        run: |
          npm -v
          npm install
      - name: pod
        run: |
          cd ios && pod install --repo-update
          cd ..
      - name: Start Build Apk Message
        run: |
          node ./send-startmsg.js "${{ github.server_url }}/${{ github.repository }}/actions/runs/${{ github.run_id }}" "${{ github.event.inputs.uploadCloud }}"  "IOS"
      - uses: yukiarrr/[email protected]
        with:
          project-path: ios/g_service.xcodeproj
          workspace-path: ios/g_service.xcworkspace
          p12-path: ios/Certificates.p12
          mobileprovision-path: ios/tieniuniu.mobileprovision
          # p12-base64: ${{ secrets.P12_BASE64 }}
          # p12-cer-base64: ${{ secrets.P12_CER_BASE64 }}
          # mobileprovision-base64: ${{ secrets.MOBILEPROVISION_BASE64 }}
          code-signing-identity: ${{ secrets.CODE_SIGNING_IDENTITY }}
          team-id: ${{ secrets.TEAM_ID }}
          # export-method: 'ad-hoc'
          export-method: 'development'
          configuration: 'Release'
          output-path: /Users/runner/work/outputs/release.ipa
      - name: Upload Artifact
        if: ${{ github.event.inputs.uploadArtifact == 'true' }}
        uses: actions/upload-artifact@v1
        with:
          name: release.ipa
          path: /Users/runner/work/outputs/
      - name: Upload Artifact Success
        if: ${{ github.event.inputs.uploadArtifact == 'true' }}
        run: |
          npm i request
          node ./send-success.js "${{ github.server_url }}/${{ github.repository }}/actions/runs/${{ github.run_id }}" "${{ github.event.inputs.uploadCloud }}" "IOS"
      - name: push to fir
        id: PushToFir
        run: |
          curl -F 'file=@/Users/runner/work/outputs/release.ipa' -F '_api_key=${{ secrets.PGYER_API_KEY }}' https://www.pgyer.com/apiv2/app/upload
        continue-on-error: true
      - name: Send fir error notify
        id: firErrorMessage
        if: steps.PushToFir.outcome != 'success'
        run: |
          node ./send-msg.js "同步到蒲公英平台失败。请检查错误重新执行或前往Action直接下载ipa文件 \n>[Job RunId](${{ github.server_url }}/${{ github.repository }}/actions/runs/${{ github.run_id }})"
      - name: Send finally notify
        run: |
          node ./send-msg.js "IOS构建成功,并同步到蒲公英平台。\n>[Job Link](${{ github.server_url }}/${{ github.repository }}/actions/runs/${{ github.run_id }}) \n>蒲公英地址:[https://www.pgyer.com/dev-tie](https://www.pgyer.com/dev-tie)"
      - name: On Failure
        if: ${{ failure() }}
        run: |
          npm i request
          node ./send-error.js "${{ github.server_url }}/${{ github.repository }}/actions/runs/${{ github.run_id }}"  "IOS"
本人非IOS开发人员,也是第一次弄这个,折腾了不少时间,对几个参数进行说明
-
runs-on: 指定操作系统,IOS这边如果是系统
>=15.0,需要Big Sur才支持,系统类型指定详细见:jobsjob_idruns-on -
project-path 项目 .xcodeproj 文件路径
-
workspace-path 项目 .xcworkspace文件路径
-
p12-path 证书和秘钥(cert,key两者)p12 文件,通过Mac电脑 KeyChain Access 软件导出
-
mobileprovision-path *.mobileprovision 描述文件,苹果开发者中心签名时下载
-
code-signing-identity 对应Xcode签名时你选择,Build Settings下,并且要对应p12中的cert
-
team-id 登陆开发者账号就可以看到的id,project.pbxproj 文件内的
DEVELOPMENT_TEAM
- uses: yukiarrr/[email protected]
        with:
          project-path: ios/g_service.xcodeproj
          workspace-path: ios/g_service.xcworkspace
          p12-path: ios/Certificates.p12
          mobileprovision-path: ios/tieniuniu.mobileprovision
          # p12-base64: ${{ secrets.P12_BASE64 }}
          # p12-cer-base64: ${{ secrets.P12_CER_BASE64 }}
          # mobileprovision-base64: ${{ secrets.MOBILEPROVISION_BASE64 }}
          code-signing-identity: ${{ secrets.CODE_SIGNING_IDENTITY }}
          team-id: ${{ secrets.TEAM_ID }}
          # export-method: 'ad-hoc'
          export-method: 'development'
          configuration: 'Release'
          output-path: /Users/runner/work/outputs/release.ipa
如果在搞IOS自动化构建之前,Xcode 构建打包到真机测试是成功的,自动化需要配置的东西,就基本是对的。
这里对非专业IOS开发人员有点困难的是 p12 和 mobileprovision 内容的获取。我个人是用文件配置,这个文件需要放到项目代码里,其实这里用 base64的方式配置到 Action 的 secrets 可能更方便(上边注释部分),不过要将文件内容转为 base64 。

参考资料
对于此块配置推荐阅读插件使用说明和以下苹果签名相关文章
源码
https://github.com/RootLinkFE/devops-crm-app
总结
方便好用!
最近也在折腾这块儿,你这种方案应该是最好的,奈何公司的 gitlab 是部署在内网的,GitHub Actions 访问不了,最终还是弄了台 mac 电脑专门来做 CI/CD
最近也在折腾这块儿,你这种方案应该是最好的,奈何公司的 gitlab 是部署在内网的,GitHub Actions 访问不了,最终还是弄了台 mac 电脑专门来做 CI/CD
有Mac服务器资源也挺好。类似的GItlab也一样的,只不过要自己配置Mac服务器资源跑runner。Github Action 官方默认提供了资源,搞起来速度是比较快。
最近也在折腾这块儿,你这种方案应该是最好的,奈何公司的 gitlab 是部署在内网的,GitHub Actions 访问不了,最终还是弄了台 mac 电脑专门来做 CI/CD
有Mac服务器资源也挺好。类似的GItlab也一样的,只不过要自己配置Mac服务器资源跑runner。Github Action 官方默认提供了资源,搞起来速度是比较快。
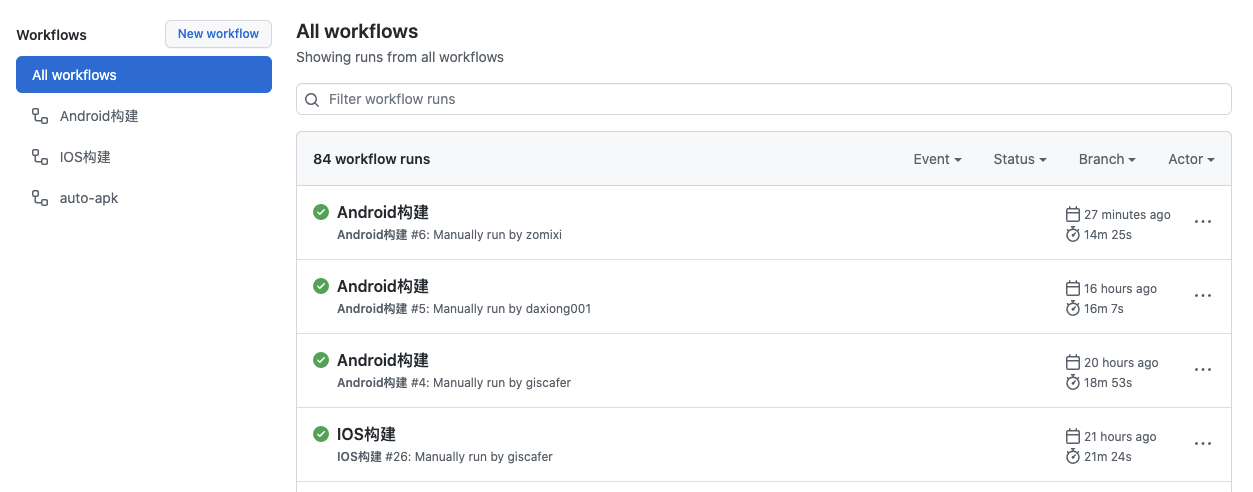
我看你的构建记录,构建一次大概需要 25 分钟,感觉时间有点儿长呢。是 app 比较大构建慢还是本身这种方式会比较慢呢? 我现在在 mac 上 构建 + 上传 差不多 5 分钟。
P.S 之前尝试在 docker 里面构建 Android,也差不多需要 20 分钟,感觉时间有点儿长,把这个方案也给否了
最近也在折腾这块儿,你这种方案应该是最好的,奈何公司的 gitlab 是部署在内网的,GitHub Actions 访问不了,最终还是弄了台 mac 电脑专门来做 CI/CD
有Mac服务器资源也挺好。类似的GItlab也一样的,只不过要自己配置Mac服务器资源跑runner。Github Action 官方默认提供了资源,搞起来速度是比较快。
我看你的构建记录,构建一次大概需要 25 分钟,感觉时间有点儿长呢。是 app 比较大构建慢还是本身这种方式会比较慢呢? 我现在在 mac 上 构建 + 上传 差不多 5 分钟。
P.S 之前尝试在 docker 里面构建 Android,也差不多需要 20 分钟,感觉时间有点儿长,把这个方案也给否了
- 目前是免费版的,资源肯定不会很好。
- Action 服务器是国外的,代码checkout和推送pgy都花多点时间,两者加起来花费的时间搞不好就超过5分钟了。
- npm依赖,ios pod install ,都没走缓存,每次都是重新来。每次都花费3~5分钟,Android可能更慢。(有优化空间)
- 上传到 Artifact,花费半分钟(可去掉的step)
- Android 构建 6~8分钟,IOS构建约20分钟(IOS 这个确实比本机慢很多,本地mbp就几分钟,这个是macos内存和核数配置是基础影响的,并且runner估计都是走docker的策略,不会占用整个虚拟机的内存或者其他资源)
付费的肯定快很多,毕竟免费的给全球用。如果性能特别好,那成本很高了,目前解决的问题是,QA不再问我们要包而已,节省开发时间和干扰次数。需要优化到更好就要付费,不管是Github付费版的还是自己购买服务器。
Github Action Supported runners and hardware resources
Hardware specification for Windows and Linux virtual machines:
- 2-core CPU
- 7 GB of RAM memory
- 14 GB of SSD disk space
Hardware specification for macOS virtual machines:
- 3-core CPU
- 14 GB of RAM memory
- 14 GB of SSD disk space
https://github.com/actions/virtual-environments/blob/main/images/macos/macos-11-Readme.md