TDComponents
 TDComponents copied to clipboard
Compilation of TouchDesigner tox components
:tophat: TDComponents
A collection of small components that make everyday life in TouchDesigner slightly more bearable.
:floppy_disk: TouchDesigner 2023.11340 (Windows)
- color_curves.tox - Download v2.3.4
- optimeister.tox - Download v0.6.52
- timecode.tox - Download v0.1.3
- playback.tox - Download v0.2.37
- masker.tox - Download v0.4.4
- chop_recorder.tox - Download v0.2.8
:artist:
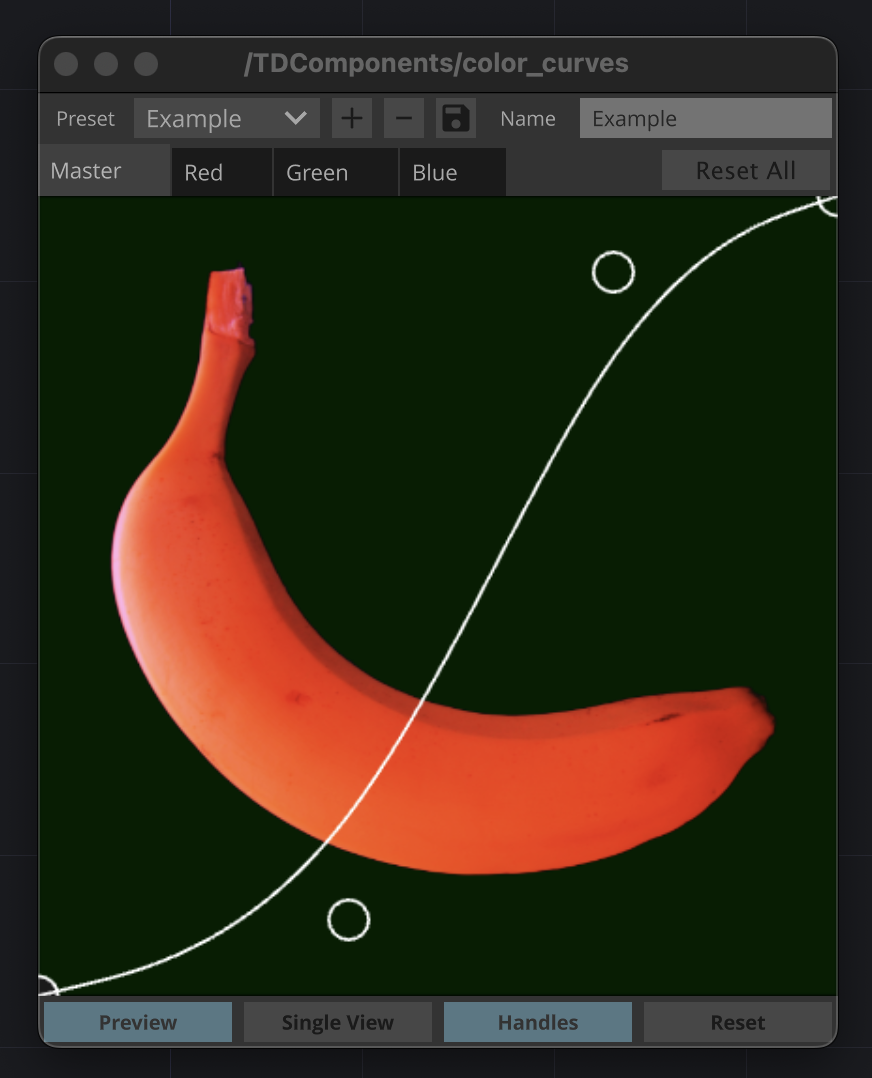
ColorCurves
ColorCurves graphically adjusts per-channel color levels of a TOP using a plotted curve, similar to many image and video editing applications. Credit goes to Vasily for authoring the original version of this component, to which I built onto.
Input
Any TOP can be fed into the component's input. Default is the TD Banana.
Output
The component's output consists of the graded TOP.
Usage
Channels
Master (all channels), Red, Green and Blue channels can be edited individually by selecting them from the top tab menu. All settings can be reset for all 4 channel editors by pulsing the Reset All button.
Adding/Editing Points
Click anywhere in the curve editor (the square with the thin white diagonal line crossing through it) to add a point at that location. Click and drag to move the point into your desired position. If you click and drag on an existing point, that point will be moved.
Removing Points
Right click on any point to remove it.
Interpolation
Default interpolation between points is Linear. You can select between Step, Linear, Ease and Hermite for various curve styles. If Hermite is selected, the Hermite Tension par slider allows you to further tune your curve.
Smoothing
In addition to interpolation, your curve can be smoothed out by increasing the Smooth par slider. By default it is set to 0.0 (no interpolation). This can be used in combination with any interpolation mode.
Preview / Levels
By default a Preview of your TOP is shown. If you toggle the Preview button, it will switch to a Levels display of your current channel, which shows the total amount of values (y axis) in your adjusted TOP, drawn from dark to bright values (x-axis).
Single / Split Views
By default a single view of the edited image is shown. To compare against the original, toggle the Single View button to the Split View mode, which draws a vertical bar in the curve editor that slides from left to right. The original TOP image is on the left, and the edited TOP is on the right.
Handles and Reset
The circle handles and curve line call additional draw functions via Render TOPs. To reduce compute in your project, these can be hidden via the Handles toggle button.
Finally, the Reset button will reset the current channel being edited.
Playback
-
Start to End Blend- Defines the curve interpolation between the intro transition and outro transition (the 'hold' section of the animation). -
Perform Mode- Toggles between Python-driven playback and CHOP-driven playback. While CHOP-driven playback is slightly more efficient, it is prone to more bugs. Python (Perform Modeset toFalse) is recommended for more complex configurations. -
Current Frame Index- Sets the current frame of the animation. Useful as a scrubbing tool to trace the movement of animations while editing. Automatically updates during playback. -
Play Anim- Plays/resets the animation. Resetting (settingPlay Animto False) is the equivalent of cueing the animation back to it's first frame (0). Automatically resets at the completion of non-looping animations. -
Pause Anim- Pauses the animation. Setting toFalseresumes the animation ifPlay Animis enabled. -
Exit Anim- Jumps the animation to the first frame of the outro transition and continues playback until the animation has fully exited (played out and reset to first frame). Useful for exiting an animation at a specific cue event. -
Loop Anim- Loops the animation (restarts indefnitely) when enabled. When disabled, the animation plays as a 'one-shot' (single playback) and then resets to the first frame (0). -
Hold End Frame- Holds on the end frame of the animation rather than resetting to the first frame (0). Useful if the end frame is a different value than the first frame, as this would otherwise cause a single jump frame at the very end of the exit.
Start
-
Cue Frame- The first frame of the animation to play from. Useful if the animation must be entered from a different point than theStart Frame(the very beginning of the animation curve), such as instances where the intro transition must be skipped. ThePlay Animparameter will always start playback from this value. -
Start Frame- The very beginning of the animation curve and where the intro transition begins. This can be set to a higher value than 0 if a delay in the intro transition is desired. -
Start Length (Frames)- The length of the intro transition (an s-curve that goes from aStart Invalue to aStart Outvalue). -
Start In Value (1-4)- Each channel's initial value during the intro transition. -
Start Out Value (1-4)- Each channel's end value during the intro transition. -
Start Curve Type- The intro transition's s-curve interpolation. -
Start Steepness- The steepness of the intro transition's s-curve. -
Start Linearize- How straight (linear) the intro transition's s-curve is. -
Start Bias- How quickly to the left (beginning) or right (end) the intro transition ramps up or down; that is, how dramatic it's curve ramps up or ramps down, depending on the bias.
End
-
End Frame- The very end of the animation curve and where the outro transition ends. -
End Length (Frames)- The length of the outro transition (an s-curve that goes from anEnd Invalue to anEnd Outvalue). -
End In Value (1-4)- Each channel's initial value during the outro transition. -
End Out Value (1-4)- Each channel's end value during the outro transition. -
End Curve Type- The outro transition's s-curve interpolation. -
End Steepness- The steepness of the outro transition's s-curve. -
End Linearize- How straight (linear) the outro transition's s-curve is. -
End Bias- How quickly to the left (beginning) or right (end) the outro transition ramps up or down; that is, how dramatic it's curve ramps up or ramps down, depending on the bias.
:man_cook:
Optimeister
Optimeister cooks common CHOP outputs only when their data changes. This considerably improves performance of complex networks with many downstream CHOPs following ones that typically always cook. Supported CHOPs include: Delay, Filter, Lag, Logic, Timer, Trigger, Speed, and Slope.
It accepts channel inputs via custom parameters or a single wire in, which can be multi-channel, allows for renaming of outputs, and the full customization of parameters bound to the CHOP operation specified (Delay/Filter/Lag/etc.).
Parameters
General
-
Reinit- Reinitializes the component, a sort of reset button. -
Selectively Uncook Operation- Bypass the main operation node (usually Filter or Lag CHOP) while it is not actively tweening data. Can greatly improve performance in environments with many instances of Optimeister. Note that this may not always function as intended, and should be disabled if any oddities with output data are observed. -
Version- Current version of the component, which can be compared with this repo to confirm the latest version. -
Help- Opens this webpage in a browser for the very section you're reading right now... help! #meta -
GitHub- Opens the main GitHub repo for downloading any updates to Optimeister.
Input
-
Use Wired Input- Used to disable the use of the wired input instead of the Input parameters (Input0, Input1, etc.). Will automatically set itself when a wired input is connected, and vice-versa will disable itself when disconnected. -
Num Inputs- The total number of input channels. Can be set manually when Use Wired Input is disabled. Otherwise, it is set to Read Only and automatically updated to the number of input channels detected when wired input is used. -
Input * Value- Each input channel as a parameter. Can be referenced withop('Optimeister').par.Input0, etc. Set to Read Only when Use Wired Input is enabled to prevent data stream doubling. Supports expression and bind modes that reference external sources. Note that expression and bind modes will be disabled (reset to constant mode) when a wired input is detected.
Output
-
Use Input Channel Names- When enabled all Output Channels will default to the input channel names if using wired inputs. If using custom parameters on the Input page, they will be Input0, Input1, Input2, etc. When disabled, the Output Channel Names parameters will become editable (instead of Read Only) and override the existing output values when changed. If this parameter is toggled, any edits made are retained in Python storage, so any custom channel names are not immediately lost. -
Output Channel *- The name of each output channel as a parameter, editable or Read Only depending on whether the Use Input Channel Names parameter is enabled or not.
Operation
-
Operation Type- The type of CHOP that input data runs through; the intermediary of Optimeister. Supported Operators include: Delay, Filter, Lag, Logic, Timer, Trigger, Speed, and Slope. All parameters of the selected Operation Type are automatically added below this parameter and bound to the intermediary CHOP. This allows for easy external adjustments of settings without diving into the Optimeister base component (useful, for example, if Optimeister operates in a clone setup within a project.)
:play_or_pause_button:
Playback
Playback plays, scrubs, loops and fades movies in/out in a simple geometryCOMP setup.
Parameters
-
Active- Fades the movie material alpha on/off. -
Video File- The video file that is played back. -
One-shot or Loop- Plays the video file once or loops it forever. Can be switched during playback for advanced workflows. -
Play- Plays/pauses the video playback. -
Scrub- Scrubs the video file from start to finish. 0.0 is the first frame of the file, 1.0 is the last frame. Can be scrubbed at anytime. Setting to 0.0 is the equivalent of cueing the video. -
Progress- The current frame of the video being displayed (normalized fraction, same asScrub). -
Size- The width and height of the rectangleSOP in which the video is displayed. This can be pixel values, or fractional values, depending on your scene setup and scale.
:stopwatch:
Timecode
Timecode renders a TOP output of timecode (HH:MM:SS:FF) using 2D texture slicing instead of the Text TOP. This generally cooks about twice as fast as an equivalent Text TOP. It can be configured with a custom font, generate timecode from an internal timer setup, or receive a single row/column table DAT input.

Parameters
Internal Timer
-
Active- Enables/disables the internal Timer CHOP. Will auto-disable on a timer cycle if an external input is connected to the Timecode COMP input. -
Init- Initializes the internal Timer CHOP. -
Start- Starts the internal Timer CHOP. -
Play- Plays/pauses the internal Timer CHOP. -
Cue- Cues the internal Timer CHOP. -
Length- Updates the length of the internal Timer CHOP, in seconds. Note that setting this parameter will automatically re-initialize the internal Timer CHOP in order to take effect. -
Speed- Sets the playback speed of the internal Timer CHOP. A speed of 0.5 will play a 30 secondLengthover a 60 second timespan, and a speed of 2 will play a 10 secondLengthin 5 seconds. -
Cycle- Enables/disables whether the internal Timer CHOP loops (cycles) or not. Note that setting this parameter will automatically re-initialize the internal Timer CHOP in order to take effect.
Settings
-
Resolution (w/h)[0]- Sets the width and height resolutions of the TOP output, in pixels. This component is designed for an aspect ratio between 4 and 6 (4-6 times as wide as it is high); any aspect ratio can be used, however certain layout considerations/restrictions may apply outside of this range. -
Aspect Ratio (Read only)- Displays the aspect ratio (AR) of the setResolution. Useful for determining an appropriate resolution, see previous bullet point for more info. -
Number Offset (4x floats)- The horizontal position of each number group (hours, minutes, seconds, frames). These are loaded as expressions by default, automatically adapting based on the resolution and aspect ratio, but can be further customized here if desired. -
Spacer Offset (3x floats)- The horizontal position of each spacer (colon, or ':'), a separator between each number group. These are loaded as expressions by default, automatically adapting based on the resolution and aspect ratio, but can be further customized here if desired. -
Font[0]- Sets the system font to be used for numbers and spacers (:). -
Custom Font[0]- Sets a custom font file (ttf/otf) to be used for numbers and spacers (:). -
Number Size[0]- Sets the vertical size, in pixels, of the number font. -
Spacer Size- Sets the vertical size, in pixels, of the spacer (:) font. -
Number Color[0]- Sets the RGBA values (0-1) of the number font. -
Spacer Color- Sets the RGBA values (0-1) of the spacer (:) font. -
Update Attributes[0]- Updates all 2D texture slices of the numbers. Will automatically run after most parameter changes, including resolution, number size, font, and color changes. While running, all parameters are set to read only to prevent update errors. Updating the entire timecode normally takes less than 6 seconds. During this time the project is placed into non-realtime mode, and each number is given 4 frames to cook, which is typically adequate time. If it is not, or any errors/missing frames occur, try running it manually again by pulsing this parameter.
[0] Updating/running this parameter will make all Timecode COMP parameters read-only during the update process, to prevent accidental glitches (an update process must finish cleanly before re-updating). The update process generally takes less than 6 seconds to complete.