CTEmail
 CTEmail copied to clipboard
Published
20 hours ago •
 dyike
dyike
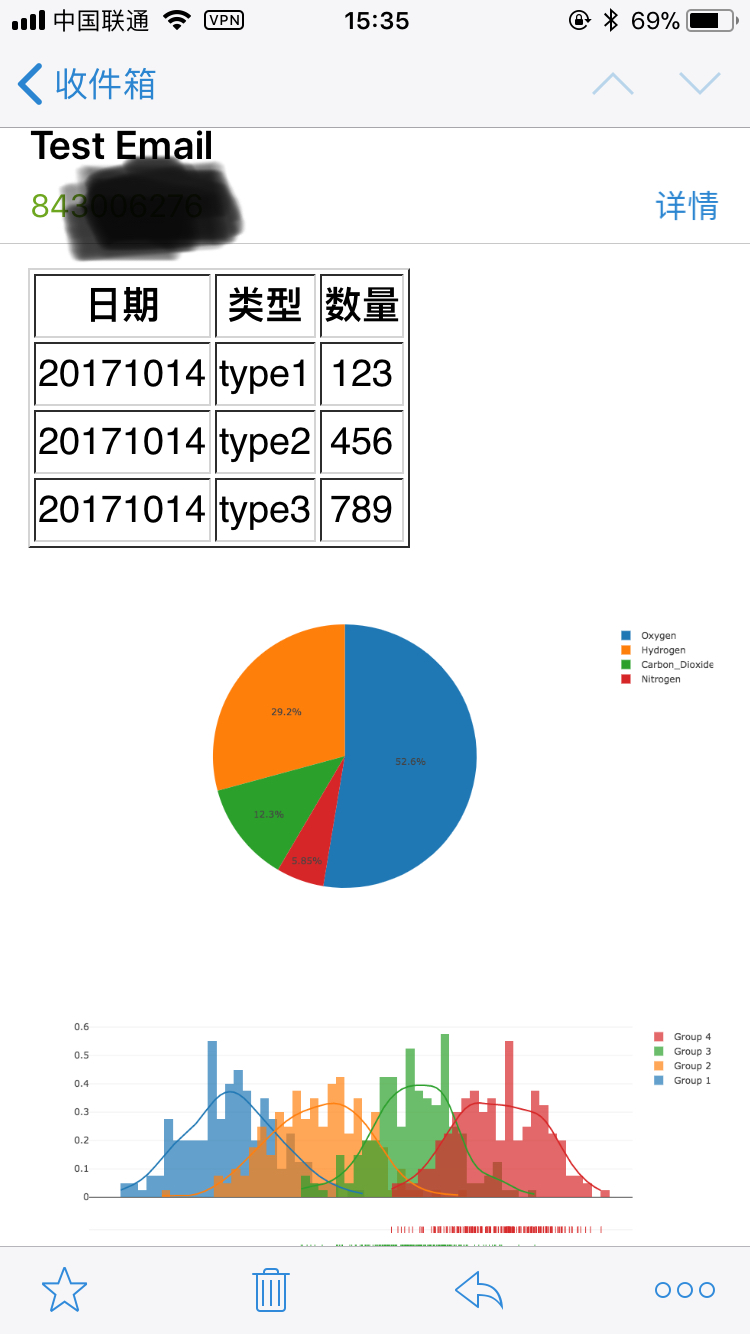
Chart and text in Email
Interduction
CTEmail is a Charts and Text Email script, which can send email with chart pictures in email content body not email attachment.
Why make this tool?
- As a programmer, we hope to complete everything automatically by scripts, such as send report email daily.
- In business, we cooperate with some friends. Sometimes we exchange the report with data, where we can use charts and suitable text to display.
- We can find some pictures in some emails, but those pictures are manual and the email is also manual.
- These are all things that we needs.
Who can use it?
- Product manager, CTEmail is one of the best practices!
- Operating Officer, CTEmail is one of the best practices!
- Programmer, everything is automated!
Requirement
- Python:Python2(You can also use Python3 with similar code!)
- PlotlyA tool for displaying your data. It supports offline and online modes. You can read the documents from the website.
Project structure
├── README.md
├── content
│   ├── image1.png
│   ├── image2.png
│   └── index.html
├── ctemail.py
├── get_img.py
└── send.py
- Under the
contentfolder, you will see theindex.htmlfile, which is the content of email. Also this folder include the images(charts) resources. -
ctemail.pyis theCTEmailclass written by Python script. -
send.pyis the script to send email and configures of email account. -
get_img.pycan generate the chart images by plotly.
Installation
First Step:
git clone [email protected]:dyike/CTEmail.git
Second Step:
Config the send email scprit:
from ctemail import CTEmail
e = CTEmail('Your email acount', 'Your password')
# " ./content/ " is the email path
e.send_email('Test Email', './content/', ['[email protected]'])
Third Step:
Deal with the data, then generate the chart images.
Also we can add some code to generate the conten/index.html file.
Here is a demo:
import plotly.plotly as py
import plotly.graph_objs as go

py.sign_in('Your account', 'API Token') # Configure your username and api key token

trace = go.Bar(x=[2, 4, 6], y= [10, 12, 15])
data = [trace]
layout = go.Layout(title='A Simple Plot', width=800, height=640)
fig = go.Figure(data=data, layout=layout)

py.image.save_as(fig, filename='./content/image.png')
Fourth Step:
In the email template file, you will see the <EMAIL_IMG> tag. It is essential! The script will find the tag to parse. If you want to add two or more images, you should do as follows:
    <a><EMAIL_IMG><img src="image1.png"></EMAIL_IMG></a>
    <a><EMAIL_IMG><img src="image2.png"></EMAIL_IMG></a>
Fifth Step:
Send email!
python send.py
then, you will received email!
LICENSE
MIT