win95-maze-rs
 win95-maze-rs copied to clipboard
Windows 95® screensaver maze in Rust with OpenGL.
Win 95 Screensaver Maze in Rust
Win 95® screensaver maze in Rust with OpenGL.
Some code take from bwasty's learn-opengl-rs.
Compiling/Installing
Assuming you have the rust toolchain and
GLFW (libglfw3 and libglfw3-dev in Ubuntu, glfw3 in macOS) installed,
it should be as easy as:
cargo install
And then
win95-maze
or
win95-maze --fullscreen
for the full experience.
Design
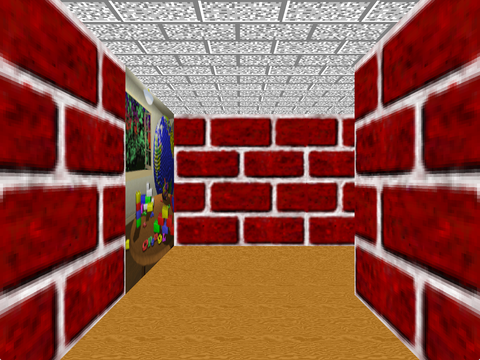
Maze
After initializing the window and GL contexts, we create a Maze struct:
pub struct Maze {
    pub grid: Vec<Vec<u8>>,
    pub width: usize,
    pub height: usize
}
This is basically a matrix of 4 bit bit-fields, denoting for each maze cell if it has a wall to the North, East, South or West.
The grid is initially filled with zeroes, and then populated using a recursive backtracker. The code for this is heavily based on Jamis Buck's ruby implementation.
Camera
The camera is as simple as:
pub struct Camera {
    pub pos: Point3<f32>,
    pub dir: Vector3<f32>,
    pub up: Vector3<f32>,
    pub upside_down: bool,
}
where upside_down is used to decide where to roll (if world-up or world-down),
and up used to turn (it's kinda useless here since we always rotate around
world-y but it's more correct, also we need it to roll).
The camera has three methods to move around: move_to, rotate_to and roll_to.
Each one takes a point or vector and modifies the camera to approach it,
returning true when it's done. This is done each frame.
When they return true, it means we need to calculate the next state.
Walker
To know how to move around the maze, we have a Walker:
pub struct Walker<'a> {
    maze: &'a Maze,
    pub direction: Direction,
    pub i: usize,
    pub j: usize
}
This holds a reference to the maze and a position inside it in grid coordinates,
plus a direction enum
pub enum Direction {
    North, East, South, West
}
used simply to know where to move/look in vector coordinates.
The walker has a next method, which calculates the next position and direction.
It will always move forward and choose randomly in a bifurcation.
Rendering
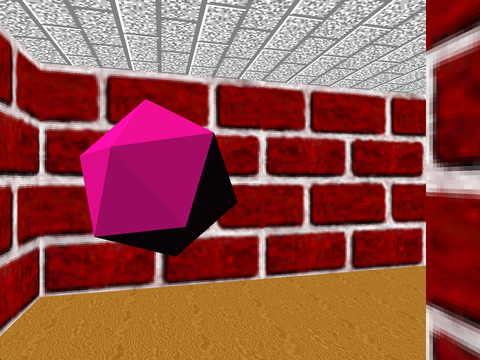
Walls and icosahedrons are similar structs, with a pos: Vector<f32> position
vector and other specific data. Each has an associated renderer struct which holds the
VAO (vertex array object) and does the OpenGL initializing mambo-jambo.
Vertices are read from an array. Walls have a vec2 attribute for the texture,
and icos a vec3 for the normal (used for shading).
The icosahedron vertices where generated with Blender3D and
the info extracted with PyCollada.
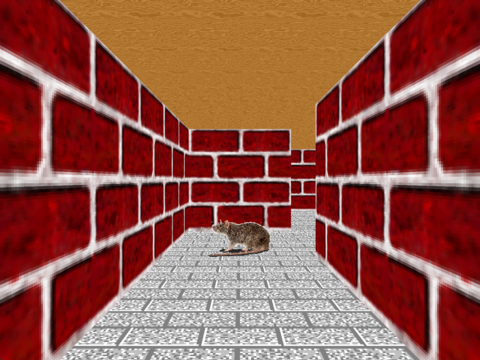
Each kind of object has a renderer: WallRenderer, IcoRenderer and RatRenderer.
These have a set_up method which handles uniform variables and maybe textures,
that is things that don't change between object instances.
Finally they have a draw method which takes the shader program,
sets the appropriate matrices in the shader's uniforms and renders a VAO.
The wall renderer has an extra check for when the texture type changed between drawings, so it only has to set those uniforms when needed. To maximize the benefit of this, walls are ordered by texture type.
Finally, rats are like a camera. They each have a walker to move trough the maze, and a special handling in the shaders to fake transparency.
Shaders
The Shader and Texture modules are basically taken from learn-opengl-rs. They mainly initialize some OpenGL stuff.
The shaders themselves are pretty simple: the vertex shader multiplies the model, view and projection matrices and then just passes the texture and normal properties down the pipeline to the fragment shader:
if (rat) {
    ...
} else {
    gl_Position = proj * view * model * vec4(aPos, 1.0);
}
oTex = aTex;
oNor = mat3(transpose(inverse(model))) * aNor;
Unless the rat bool is true, in which case it resets the rotations so the rats
always face the camera like in the original:
if (rat) {
    // reset rotation part of the model view matrix
    mat4 mv = mat4(1.0);
    mat4 tmp = view * model;
    mv[3] = tmp[3];
    gl_Position = proj * mv * vec4(aPos, 1.0);
}
Here, we also find a little abuse of OpenGL's flexibility:
layout (location = 0) in vec3 aPos;
layout (location = 1) in vec2 aTex;
layout (location = 2) in vec3 aNor;
The aTex property is used by the walls (to map the texture), and the aNor by
the icos (to calculate the diffuse lighting).
But their respective vertex data doesn't define both, only the one they use.
So, the VAO of each object then goes on to activate only the relevant attribute.
So the IcoRenderer enables the third attribute (counting from 0):
// aNor = 2
gl::EnableVertexAttribArray(2);
but not the second, and vice versa for the WallRenderer. I'm not sure if this
was smart or just plain awful though.
Finally the fragment shader decides, based on a solid flag, if to render using
a texture or a diffuse lighting color. Also, if the current fragment is pure
green and alpha is true, it discards it to simulate transparency
on BMP images:
if (solid) {
    vec3 lightDir = vec3(1.0, 1.0, 1.0);
    float diffuse = max(dot(oNor, lightDir), 0.2);
    FragColor = vec4(color * diffuse * 0.2, 0.0);
} else {
    vec4 color = texture(tex, oTex * tiling);
    // if has alpha and pure green, discard
    if (alpha && color.rgb == vec3(0.0, 1.0, 0.0)) {
        discard;
    }
    FragColor = color;
}
State
There is also a simple state machine
enum State {
    Walking,
    Turning,
    Rolling
}
to control the camera, which after the completion of the movement methods, decides what state to take next based on the position of the icosahedrons and the walker's direction.
Rolling is for when the camera hits an icosahedron, which makes the former
go upside down and deletes the ico.
Screenshots
A short video: https://youtu.be/Dt6NTzJ0nyk