closertb.github.io
 closertb.github.io copied to clipboard
React进阶,写中后台也能写出花
写于:2019-02-04
吐槽大会
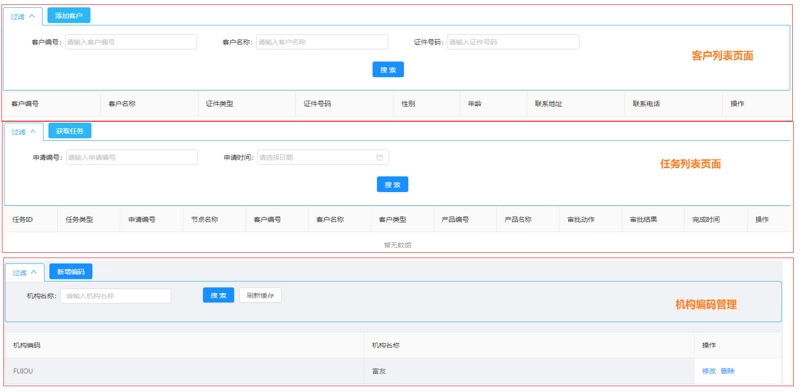
刚接触React时,新鲜感爆棚,原来前端代码可以这样写,页面可以这样搭,事件可以这样绑定,一切的一切都是这么让人好奇。但在公司做了好几个中后台系统以后,发现自己写出的代码千篇一律,做出的页面就像多胞胎,随意从工作中截了三个页面:
我工作主要围绕着React,Dva,Antd这一类框架展开,yes, you are right, 这一套组合就是为中后台系统而生的,复制粘贴,不断的重复,真的就是感觉自己在搬砖,做着体力劳动,如果日复一日的这样下去,我估计30岁就会被退(gun)休(dan),不是被公司,而是被这个圈子。

前端练习生
组件化的再封装
当你用着Antd的各种组件(Form, Table, Row,Button等等),省去了担忧写页面样式的烦恼,但总感觉自己干了很多重复工作,比如渲染一个列表,你需要做如下的配置,N个列表页,这样的代码你要写N次;
const pagination = {
  total,
  current: search.pageNum,
  pageSize: search.pageCount,
  onChange: page => actions.onSearch({ pageNum: page }),
  showTotal: t => `共 ${t} 条`
};
const tableProps = {
  columns,
  pagination,
  bordered: true,
  dataSource: datas,
  loading: loading.list,
  rowKey,
  scroll: { x: '120%' }
};
你需要配置分页相关属性,翻页后调用的方法,数据源和表格项,但对于同一个中后台系统来说,他们的数据结构非常相似,各个表之间唯一不同的就是数据及表格项。所以我们可以在Table组件的基础上再封装一层变成一个EnhanceTable,然后在这个组件里加上这些通用的数据处理。使用时,我们只需要直接将整个props传递过去(虽然有一点浪费性能),附带设置一下rowKey属性,详情源码及使用请可参考示例项目。
<EnhanceTable {...this.Props} rowKey="id" extraFields={this.getExtraFields()} />
组件化的进阶:配置对象搭页面

以前我写上面一个页面,是这样挨着一行行敲代码的。当然也不全是,ctrl + c,ctrl + v这样的基本技能也是必知必用的:
    <Form style={{ marginBottom: '16px' }} className="h-search-form">
      <Row>
        <Col span={6}>
          <FormItem label="真实姓名" {...formItemLayout}>
            {getFieldDecorator('userName', {
              initialValue: userName,
            })(
              <Input type="text" placeholder="请输入真实姓名" />
            )}
          </FormItem>
        </Col>
        <Col span={6}>
          <FormItem label="邮箱" {...formItemLayout}>
            {getFieldDecorator('mail', {
              initialValue: mail,
            })(
              <Input type="text" placeholder="请输入邮箱" />
            )}
          </FormItem>
        </Col>
        <Col span={6}>
          <FormItem label="用户ID" {...formItemLayout}>
            {getFieldDecorator('userId', {
              initialValue: userId,
            })(
              <Input type="text" placeholder="请输入用户ID" />
            )}
          </FormItem>
        </Col>
        <Col span={6}>
          <FormItem label="状态" {...formItemLayout}>
            {getFieldDecorator('enable', {
              initialValue: enable,
            })(
              <Select placeholder="不限" allowClear>
                {EnableStatus.map(({ value, label }) => (
                  <Option key={value} value={String(value)}>{label}</Option>
                ))}
              </Select>
            )}
          </FormItem>
        </Col>
      </Row>
      <Row>
        <Col span={24} className="tx-c">
          <Button type="primary" onClick={this.handleSearch}>搜索</Button>
          {permission.add &&
            <Button type="primary" className="ml-10" onClick={() => openModal('add')}>添加用户</Button>
          }
        </Col>
      </Row>
    </Form>
当后面自己写多了,厌烦了FormItem, getFieldDecorator, Input,Select这些组件之后,代码就变成了这样:
<Form className="h-search-form">
  <Row>
    {searchFields.map((field, index) => (
      <Col span={6} key={index}>
        <FormRender {...{ key, field, data: search }} />
      </Col>
    ))}
  </Row>
</Form>
解决的办法就是组件的封装加配置,详情源码及使用请参考示例项目代码:
学以致用,才能让工作更简单:高阶组件
当明白了keys,状态提升,props,state这些概念后,好像已足够让我们完成产品需求中的页面,前面组件化的封装其实仅仅仅复用了数据处理的逻辑,但有些需求,普通的组件化封装已经不足以解决,比如下面这种:

你一个页面有多个弹框,也许不止上面这三种,有可能十多种,刚开始工作时,我是这样写的:
<Modal {...modalProps}>
  {type === 'edit' ? <Edit {...editProps} /> : <Detail {...detailProps}/>}
</Modal>
但当你的页面弹框有十多种时,条件表达式就显得有点无助了,可能需要if...else,或者Switch...case。但是在判断页面的动作时,可能你已经用过相似的判断逻辑,所以你的代码也许可以精简一下了。其实上面的操作,我们想做的,就是为我们想要显示的组件加一个弹框容器。盆友,高阶组件了解一下,官方文档是这样描述的

const EnhancedComponent = higherOrderComponent(WrappedComponent);
用通俗的话来讲,经过高阶组件(函数)higherOrderComponent强化过的组件WrappedComponent ,新组件(EnhancedComponent)除拥有原始组件的特性外,还会拥有一些额外的能力,比如这里我们想实现的弹框容器。Redux-Router的connect就是最常见的高阶函数,它让展示组件拥有了方法和状态,还有Form.create():
export default connect(mapStateToProps, mapDispatchToProps)(Page);
接下来,我们试着来实现这个能给普通组件加一个弹框容器的高阶组件:
import { Form, Modal } from 'antd';

// 获取函数名称
Function.prototype.getName = function () {
  return this.name || this.toString().match(/function\s*([^(]*)\(/)[1];
};
let oldChild;
let HComponent;
/**
 * description:
 * 在Modal基础上新增加Form属性
 * 增加了子组件是否更新的判断,避免组件不必要的销毁
 * 给组件配上默认的onOk与onCancel方法
 * @param {*} Component
 */
export default function withModal(Component){
  class HModal extends React.Component {
    constructor(props) {
      super(props);
      const { visible } = props;
      this.state = {
        visible: Boolean(visible)
      };
      this.handleCancel = this.handleCancel.bind(this);
      this.handleOk = this.handleOk.bind(this);
    }

    handleOk() {
      const { confirmLoading, form, onOk } = this.props;
      const hideModal = () => {
        // 如果没有设置confirmLoading,则直接关闭窗口
        if (confirmLoading === undefined) {
          this.handleCancel();
        }
      };

      if (onOk) {
        // 表单验证成功后才关闭表单
        form.validateFields((error, values) => {
          if (error) return;
          const res = onOk(values);
          res && hideModal();
        });
      }
    }

    render() {
      const { confirmLoading, visible, title = '弹窗容器', form, ...others } = this.props;
      const modalProps = {
        title,
        confirmLoading,
        visible: this.state.visible,
        onOk: this.handleOk,
        onCancel: this.handleCancel,
      };
      const childProps = {
        form,
        visible,
        confirmLoading,
        ...others,
      };

      return (
        <Modal {...modalProps}>
          <Component {...childProps} />
        </Modal>
      );
    }
  }
  // 如果原始组件类型没有改变,则返回上一次生成的组件,否则生成一个新组件
  HComponent = !HComponent || Component.getName() !== oldChild.getName() ?
  Form.create()(HModal) : HComponent;
  oldChild = Component;
  return HComponent;
}
然后调用时,你只需要在判断动作(type)的时候,同时指定想对应的子组件,然后再这样调用:
要想写一个好用的高阶组件,看起来很简单,但实际上需要考虑的细节很多,就拿上面没有加入缓存的代码来说,会产生如下图所示的效果。

探究其原因,在点击提交时,因为子组件调用了父组件的方法,改变了confirmLoading的状态,会导致父组件render方法的执行,然后const WithModal = withModal(child)会再执行一次。所以WithModal已不再是点击ok前的那个WithModal了,componentWillReceiveProps就不再适用了。所以要想保持组件原有的生命周期,我们就需要避免WithModal组件被销毁,所以使用了缓存的思路来保持这个组件。其实在官方文档中,已经特别提到了一般而言,你不需要考虑这些细节东西。但是它对高阶函数的使用有影响,那就是你不能在组件的render函数中调用高阶函数, 但实际使用时,我们有这种需求确实要用,我们就得想办法绕过这些坑,详细实现可参考示例项目代码。
能用高阶组件实现的,RenderProps都可以代替
前面提到过React官方文档对于高阶组件的使用注意,而绕开它最好的办法就是使用renderProps,React-Router作者Michael Jackson有一个演讲视频《Never Write Another HoC》。首先我们需要明白Modal本身就是用renderProps模式写的,但这里为了演示,修改一下,用renderProps模式重写弹框容器组件,改动其实很小:
// 只用改动return函数:
return (
  <Modal {...modalProps}>
    {this.props.children(childProps)}
  </Modal>
);
// 然后调用时:
<HModal {...modalProps}>
{type === 'edit' ? <Edit {...editProps} /> : <Detail {...detailProps}/>}
</HModal>
what,好像并没有改变什么,和最开始Modal的直接调用并没有多大的差别,所以有没有更好的办法呢?有,就是与高阶组件结合:
function enhanceComponent(component) {
return component;
}
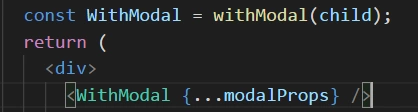
const ChildComponent = enhanceComponent(child);
return (
<div>
<WithSearch {...searchBarProps} >
{props => <Search {...props} searchFields={searchFields} />}
</WithSearch>
<EnhanceTable {...forkProps} rowKey="id" extraFields={this.getExtraFields()} />
<HModal {...modalProps}>
{props => <ChildComponent {...props} />}
</HModal >
</div>
);
有可能你会问,这里也在render中使用了高阶组件(enhanceComponent),那不是也会造成子组件的重复销毁与生成,没法保持组件完整的生命周期吗?答案是否,子组件的生命周期不会被打断,因为return component;并没有重新生成一个组件,它只是改变了组件的地址指向,因为子组件是一个引用类型,而不是一个基本类型,所以render函数多次执行,只要动作是同一种,那上一次被挂起的子组件将被沿用。renderProps确实是一种很值得实践的模式,值得深究,在Graphql的Apollo框架中,这种模式被最为推荐。
后记
以上就是我工作半年,自己慢慢学习和琢磨的中后台系统开发的最佳实践。React相比于Vue和Angular,它确实要灵活好多,有多种设计模式,只要你能想,有思路,就没有没法实现的。文中所提到的所有代码都可以在示例项目中找到,并npm i,npm start跑起来:
Github:示例项目