epicgames-freegames-node
 epicgames-freegames-node copied to clipboard
Automatically login and find available free games the Epic Games Store. Sends you a prepopulated checkout link so you can complete the checkout after logging in. Supports multiple accounts, login sess...
Epic Games Store Weekly Free Games
Automatically login and redeem promotional free games from the Epic Games Store. Handles multiple accounts, 2FA, captcha bypass, captcha notifications, and scheduled runs.
Setup
JSON Configuration
The tool can be configured with a combination of JSON and environment variables. The config file supports JSON5 syntax (comments, trailing commas, etc). For each property, the JSON config value takes priority over the respective environment variable value.
For details on each option, its defaults, and environment variable key, see the config documentation site.
The config file is stored in the mounted /usr/app/config volume and can be named config.json or config.json5.
config.json or config.json5
{
  "runOnStartup": true,
  "cronSchedule": "5 16 * * *",
  "logLevel": "info",
  "webPortalConfig": {
    "baseUrl": "https://epic.exmaple.com",
  },
  "accounts": [
    {
      "email": "[email protected]",
      "password": "abc1234",
      "totp": "EMNCF83ULU3K3PXPJBSWY3DPEHPK3PXPJWY3DPEHPK3YI69R39NE"
    },
  ],
  "notifiers": [
    // You may configure as many of any notifier as needed
    // Here are some examples of each type
    {
      "type": "email",
      "smtpHost": "smtp.gmail.com",
      "smtpPort": 587,
      "emailSenderAddress": "[email protected]",
      "emailSenderName": "Epic Games Captchas",
      "emailRecipientAddress": "[email protected]",
      "secure": false,
      "auth": {
          "user": "[email protected]",
          "pass": "abc123",
      },
    },
    {
      "type": "discord",
      "webhookUrl": "https://discord.com/api/webhooks/123456789123456789/A-abcdefghijklmn-abcdefghijklmnopqrst12345678-abcdefghijklmnop123456",
      // Optional list of users or roles to mention
      "mentionedUsers": ["914360712086843432"],
      "mentionedRoles": ["734548250895319070"],
    },
    {
      "type": "telegram",
      "token": "644739147:AAGMPo-Jz3mKRnHRTnrPEDi7jUF1vqNOD5k",
      "chatId": "-987654321",
    },
    {
      "type": "apprise",
      "apiUrl": "http://192.168.1.2:8000",
      "urls": "mailto://user:[email protected]",
    },
    {
      "type": "pushover",
      "token": "a172fyyl9gw99p2xi16tq8hnib48p2",
      "userKey": "uvgidym7l5ggpwu2r8i1oy6diaapll",
    },
    {
      "type": "gotify",
      "apiUrl": "https://gotify.net",
      "token": "SnL-wAvmfo_QT",
    },
  ],
}
Captchas
Epic Games currently serves captchas and bot detection to its login and checkout pages. This project works around the issue in two ways:
- hCaptcha accessibility cookies
- Sending you captchas
hCaptcha accessibility cookies
This is currently unavailable. See #178 for details.
hCaptcha offers an accessibility tool for vision impaired users that can be used to bypass captchas served by Epic Games. It's very simple to set up:
- Go here and enter an email you have access to
- In your email inbox find an email titled "Instructions for using hCaptcha Accessibility"
- Right-click the "Get Accessibility Cookie" button and copy its link address
- Add the link to your config as the
hcaptchaAccessibilityUrloption
Sending you captchas
For whatever reason, if your IP/account loses trust with hCaptcha, this project can notify and have you manually solve a captcha. To use this requires:
- Access to one of the notification methods (Discord, Telegram, email, Apprise, Pushover, etc.)
- Configuring the captcha solving page webserver
- Either via local IP or reverse proxy/port forwarding (if you don't know what this means, use the next option)
- Or by using localtunnel to very easily remotely tunnel the webserver
See below for detailed instructions on each requirement.
Webserver setup
- Expose port 3000 in your Docker run config (e.g.
-p 81:3000maps the host machine's port 81 to the container's port 3000) - If you want to access the Captcha solving page from outside your network, setup any port forwarding/reverse proxy/DNS
- Set the
webPortalConfig.baseUrlin the config - The web portal uses WebSocket to communicate. If you're using a reverse proxy, you may need additional configuration to enable WebSocket. This guide from Uptime Kuma covers most scenarios.
Localtunnel setup
If you don't have the ability to port forward/reverse proxy on your network, you can still access captcha remotely by setting:
{
  "webPortalConfig": {
    "localtunnel": true,
  },
}
in your config.json.
Notification setup
Each notification method has unique setup instructions. Read [its documentation](notification methods) on the config site for exact details and instructions. The example config may also help as an example.
Testing notification and webserver
Since captcas may not always appear, the notification methods and webserver can be manually tested. Essentially, you just need to add:
"testNotifiers": true,
to the root of your config.json. For more details check out the config docs.
Two-factor login
Epic has begun enforcing two-factor when claiming some free games. It rarely may be necessary for some free games when using this tool.
If you have two-factor authentication (2FA) enabled on your account, you need to add your TOTP secret as an environment variable. To get your TOTP secret, you may need to redo your 2FA setup:
- Go here to enable 2FA.
- Click "enable authenticator app."
- In the section labeled "manual entry key," copy the key.
- Use your authenticator app to add scan the QR code.
- Activate 2FA by completing the form and clicking activate.
- Once 2FA is enabled, use the key you copied as the value for the TOTP parameter.
If you can't get 2FA working with this tool, try enabling MAKE PRIMARY for "Authenticator App" in your Epic account settings.
Docker Configuration
This image is available from both GitHub Container Registry and Docker Hub:
ghcr.io/claabs/epicgames-freegames-node:latestcharlocharlie/epicgames-freegames:latest
If you're experiencing issues with Chromium starting (hangs on login/notification), you can try the Debian image:
ghcr.io/claabs/epicgames-freegames-node:bullseye-slimcharlocharlie/epicgames-freegames:bullseye-slim
If you are using full JSON configuration, the only remaining Docker configurables are the port and volume.
Environment Variables
Most configuration options can be set via environment variable. Look for the env tag in the config docs for each option's key.
If for whatever reason you want to change the default config directory or config file name, CONFIG_DIR and CONFIG_FILE_NAME are available as environment variables.
Ports
| Host port | Container port | Description |
|---|---|---|
3000 |
3000 |
Port mapping on which the web server hosting the captcha solving page resides |
Volumes
| Host location | Container location | Mode | Description |
|---|---|---|---|
/my/host/dir/ |
/usr/app/config |
rw |
Location of the config and cookie file(s) |
Memory Limit
It's recommended to add -m 2g as a docker run parameter to set a max memory usage of 2GB. The Chromium processes can sometimes run away, and without a limit your system will eventually lock up.
Docker Run
With JSON Config
$ docker run -d -v /my/host/dir/:/usr/app/config:rw -p 3000:3000 -m 2g charlocharlie/epicgames-freegames:latest
Without JSON Config
Without JSON config, you can only configure one account.
$ docker run -d -e TZ=America/Chicago -e [email protected] -e PASSWORD=abc123 -e TOTP=ABC123 -e RUN_ON_STARTUP=true -e BASE_URL=https://example.com -e SMTP_HOST=smtp.gmail.com -e SMTP_PORT=587 -e SMTP_HOST=smtp.gmail.com -e [email protected] -e EMAIL_SENDER_NAME="Epic Games Captchas" -e [email protected] -e SMTP_SECURE=true -e [email protected] -e SMTP_PASSWORD=abc123 -v /my/host/dir/:/usr/app/config:rw -p 3000:3000 -m 2g charlocharlie/epicgames-freegames:latest
Cookie Import
If you're experiencing issues logging in with username and password, you can import cookies for a temporary session.
- Setup the container per the below instructions
- In your web browser, log in to the Epic Games Store with "Remember me" checked.
- Install the EditThisCookie browser extension.
- While viewing the Epic Games Store page, open the EditThisCookie extension window, change the URL to
https://www.epicgames.com/id, and click the export button: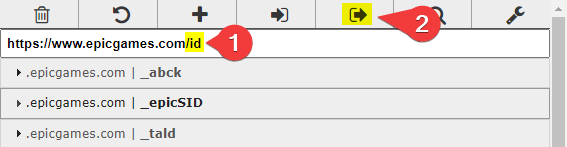
- In your mounted
./configfolder, create<email_address>-cookies.json(e.g.[email protected]), and paste in your cookies. - Start the container and the cookies will automatically be converted to a new format.
Cookie Import Notes
- If you click "Log Out" on the browser session you copied the cookies from, the container may break.
- If you have the container scheduled regularly, it should automatically refresh the cookies and keep you logged in for some time.
Running without Docker
If for some reason you don't want to use Docker to run this tool you can run it from source by cloning this repo and installing Node.js.
- Get this repo from Github
- Clone using git (recommended):
git clone https://github.com/claabs/epicgames-freegames-node.git - Or download and unpack ZIP archive: epicgames-freegames-node
- Clone using git (recommended):
- Create
configfolder in the cloned/unpacked directory - Create JSON configuration
- Install Node.js 14 or higher
- Install Node.js dependencies
- Start terminal and navigate to cloned/unpacked directory
- Run
npm i
- Start application:
npm run start:ts - To update when using Git:
git pullnpm i
Development
Recommended Dev Environment Variables
Place these variables in a .env file in the project root. These variables support automatic account creation for rapid testing.
| Variable | Example | Description |
|---|---|---|
| SMTP4DEV_URL | http://192.168.1.100:5000 |
Web UI address for smtp4dev instance for automatic account creation |
| SMTP4DEV_USER | user |
A basic auth username for smtp4dev if applicable |
| SMTP4DEV_PASSWORD | abc123 |
A basic auth password for smtp4dev if applicable |
| CREATION_EMAIL_HOST | test.example.com |
The email suffix for newly created accounts |
Miscellaneous
v3 to v4 Migration
In v4, three config options have been deprecated and moved: email, baseUrl, and onlyWeekly. The deprecated options will be automatically converted to the new options at runtime, but you will need to change your config.json for a stable solution.
email
Copy the email block into the notifiers array and add "type": "email" to the email config object.
{
  "email": {
    "smtpHost": "smtp.gmail.com",
    "smtpPort": 587,
    "emailSenderAddress": "[email protected]",
    "emailSenderName": "Epic Games Captchas",
    "emailRecipientAddress": "[email protected]",
    "secure": false,
    "auth": {
        "user": "[email protected]",
        "pass": "abc123",
    },
  },

  // ⬇ changes to ⬇

  "notifiers": [
    {
      "type": "email", // This indicates the notifier type
      "smtpHost": "smtp.gmail.com",
      "smtpPort": 587,
      "emailSenderAddress": "[email protected]",
      "emailSenderName": "Epic Games Captchas",
      "emailRecipientAddress": "[email protected]",
      "secure": false,
      "auth": {
          "user": "[email protected]",
          "pass": "abc123",
      },
    },
  ],
}
baseUrl
Move the baseUrl block into the webPortalConfig config object.
{
  "baseUrl": "https://epic.example.com",

  // ⬇ changes to ⬇

  "webPortalConfig": {
    "baseUrl": "https://epic.example.com",
  },
}
onlyWeekly
The onlyWeekly boolean has been changed to the searchStrategy string.
{
  "onlyWeekly": true,

  // ⬇ changes to ⬇

  "searchStrategy": "weekly"
}
{
  "onlyWeekly": false,

  // ⬇ changes to ⬇

  "searchStrategy": "promotion"
}
Thanks
Thanks to epicgames-weekly-freegames for the inspiration.
Thanks to puppeteer-extra for making much of this possible technologically.