go-zero-source
 go-zero-source copied to clipboard
go-zero 源码阅读
[TOC]
go-zero 源码阅读
go-zero 作为一个微服务框架,不仅给我们提供了很好的参考,而且核心代码量不多,我们可以在闲暇时间读读他的核心代码,来多多学习充电。
go-zero 源码为 v1.3.1 版本,如更新有改动,请参考新版本
rest 部分
代码结构
rest
├── handler // 自带中间件
│   ├── authhandler.go // 权限
│   ├── breakerhandler.go // 断路器
│   ├── contentsecurityhandler.go // 安全验证
│   ├── cryptionhandler.go // 加密解密
│   ├── gunziphandler.go // zip 压缩
│   ├── loghandler.go // 日志
│   ├── maxbyteshandler.go // 最大请求数据限制
│   ├── maxconnshandler.go // 最大请求连接数限制
│   ├── metrichandler.go // 请求指标统计
│   ├── prometheushandler.go // prometheus 上报
│   ├── recoverhandler.go // 错误捕获
│   ├── sheddinghandler.go // 过载保护
│   ├── timeouthandler.go // 超时控制
│   └── tracinghandler.go // 链路追踪
├── httpx
│   ├── requests.go
│   ├── responses.go
│   ├── router.go
│   ├── util.go
│   └── vars.go
├── internal
│   ├── cors // 跨域处理
│   │   └── handlers.go
│   ├── response
│   │   ├── headeronceresponsewriter.go
│   │   └── withcoderesponsewriter.go
│   ├── security // 加密处理
│   │   └── contentsecurity.go
│   ├── log.go
│   └── starter.go
├── pathvar // path 参数解析
│   └── params.go
├── router
│   └── patrouter.go
├── token
│   └── tokenparser.go
├── config.go // 配置
├── engine.go // 引擎
├── server.go
└── types.go
服务启动流程
我们以 go-zero-example 项目 http/demo/main.go 代码来分析

go-zero 给我们提供了如下组件与服务,我们来逐一阅读分析
- http框架常规组件(路由、调度器、中间件、跨域)
- 权限控制
- 断路器
- 限流器
- 过载保护
- prometheus
- trace
- cache
http框架常规组件
路由
路由使用的是二叉查找树,高效的路由都会使用树形结构来构建
二叉查找树可参见源码
https://github.com/zeromicro/go-zero/tree/master/core/search
go-zero 路由实现了 http\server.go Handler interface 来拦截每个请求
入口源码地址: github.com/zeromicro/go-zero/rest/router/patrouter.go
func (pr *patRouter) ServeHTTP(w http.ResponseWriter, r *http.Request) {
	reqPath := path.Clean(r.URL.Path) // 返回相当于path的最短路径名称
	if tree, ok := pr.trees[r.Method]; ok { // 查找对应 http method
		if result, ok := tree.Search(reqPath); ok { // 查找路由 path
			if len(result.Params) > 0 {
				r = pathvar.WithVars(r, result.Params) // 获取路由参数并且添加到 *http.Request 中
			}
			result.Item.(http.Handler).ServeHTTP(w, r) // 调度方法
			return
		}
	}

	allows, ok := pr.methodsAllowed(r.Method, reqPath)
	if !ok {
		pr.handleNotFound(w, r)
		return
	}

	if pr.notAllowed != nil {
		pr.notAllowed.ServeHTTP(w, r)
	} else {
		w.Header().Set(allowHeader, allows)
		w.WriteHeader(http.StatusMethodNotAllowed)
	}
}
调度器
go-zero 没有调度器,在上文 ServeHTTP 中已经使用了调度器,这归结于 golang 已经给我们实现了一个很好的 http 模块,如果是其他语言,我们在设计框架的时候往往要自己实现调度器。
中间件
我们可以在 *.api 中添加如下代码来使用
@server(
	middleware: Example // 路由中间件声明
)
service User {
	@handler UserInfo
	post /api/user/userinfo returns (UserInfoResponse)
}
通过生成代码命令,生成的代码如下
package middleware

import (
	"log"
	"net/http"
)

type ExampleMiddleware struct{}

func NewExampleMiddleware() *ExampleMiddleware {
	return &ExampleMiddleware{}
}

func (m *ExampleMiddleware) Handle(next http.HandlerFunc) http.HandlerFunc {
	return func(w http.ResponseWriter, r *http.Request) {
		// TODO generate middleware implement function, delete after code implementation
		next(w, r)
	}
}
go-zero 给我们提供了一些常用的中间件,方便我们在开发时候使用
- rest.WithCors() 跨域设置
// example
server := rest.MustNewServer(c.RestConf, rest.WithCors("localhost:8080"))

// 源码
func WithCors(origin ...string) RunOption {
	return func(server *Server) {
		server.router.SetNotAllowedHandler(cors.NotAllowedHandler(nil, origin...))
		server.Use(cors.Middleware(nil, origin...))
	}
}
跨域
- resrt.WithCustomCors() 自定义跨域方法
// example
var origins = []string{
	"localhost:8080",
}
server := rest.MustNewServer(c.RestConf,
	rest.WithCustomCors(
        // 设置 http header
		func(header http.Header) {
			header.Set("Access-Control-Allow-Origin", "Access-Control-Allow-Origin")
		},
        // 不允许地址返回指定数据
		func(writer http.ResponseWriter) {
			writer.Write([]byte("not allow"))
		},
        // 允许跨域地址
		origins...,
	),
)

// 源码
func WithCustomCors(middlewareFn func(header http.Header), notAllowedFn func(http.ResponseWriter),
	origin ...string) RunOption {
	return func(server *Server) {
		server.router.SetNotAllowedHandler(cors.NotAllowedHandler(notAllowedFn, origin...))
		server.Use(cors.Middleware(middlewareFn, origin...))
	}
}
- rest.WithJwt() jwt
// example
rest.WithJwt("uOvKLmVfztaXGpNYd4Z0I1SiT7MweJhl")

// 源码
func WithJwt(secret string) RouteOption {
	return func(r *featuredRoutes) {
		validateSecret(secret)
		r.jwt.enabled = true
		r.jwt.secret = secret
	}
}
- rest.WithJwtTransition() jwt token 转换,新老 token 可以同时使用
// example
rest.WithJwtTransition("uOvKLmVfztaXGpNYd4Z0I1SiT7MweJhl", "uOvKLmVfztaXGpNYd4Z0I1SiT7MweJh2")

// 源码
func WithJwtTransition(secret, prevSecret string) RouteOption {
	return func(r *featuredRoutes) {
		// why not validate prevSecret, because prevSecret is an already used one,
		// even it not meet our requirement, we still need to allow the transition.
		validateSecret(secret)
		r.jwt.enabled = true
		r.jwt.secret = secret
		r.jwt.prevSecret = prevSecret
	}
}
权限控制
入口源码地址:github.com/zeromicro/go-zero/rest/handler/authhandler.go
权限控制核心文件带注释代码如下,大家可以参阅
- https://github.com/caicaispace/go-zero-source/tree/master/code/rest/rest/handler/authhandler.go
- https://github.com/caicaispace/go-zero-source/tree/master/code/rest/rest/token/tokenparser.go
go-zero 提供 jwt 权限控制,jwt 只做登录与未登录验证,细粒度的权限验证我们可以使用其他成熟方案
jwt 原理不复杂,有兴趣的可以翻阅源码学习
熔断器
入口源码地址:github.com/zeromicro/go-zero/rest/handler/breakerhandler.go
go-zero 的熔断器基于滑动窗口来实现,我们首先来看看滑动窗口是啥
leetcode 中有这样一个题目:剑指 Offer II 041. 滑动窗口的平均值
给定一个整数数据流和一个窗口大小,根据该滑动窗口的大小,计算滑动窗口里所有数字的平均值。

实现 MovingAverage 类:

MovingAverage(int size) 用窗口大小 size 初始化对象。
double next(int val) 成员函数 next 每次调用的时候都会往滑动窗口增加一个整数,请计算并返回数据流中最后 size 个值的移动平均值,即滑动窗口里所有数字的平均值。

示例:

输入:
inputs = ["MovingAverage", "next", "next", "next", "next"]
inputs = [[3], [1], [10], [3], [5]]
输出:
[null, 1.0, 5.5, 4.66667, 6.0]

解释:
MovingAverage movingAverage = new MovingAverage(3);
movingAverage.next(1); // 返回 1.0 = 1 / 1
movingAverage.next(10); // 返回 5.5 = (1 + 10) / 2
movingAverage.next(3); // 返回 4.66667 = (1 + 10 + 3) / 3
movingAverage.next(5); // 返回 6.0 = (10 + 3 + 5) / 3
我们来想一想解题思路:
- 窗口大小是固定的
- 窗口每次都会滑动
- 窗口滑动就是替换旧数据
我们来解一解题:
type MovingAverage struct {
	index   int   // 当前环形数组的位置
	count   int   // 数组大小
	sum     int   // 数据总量
	buckets []int // 环形数组
}

/** Initialize your data structure here. */
func Constructor(size int) MovingAverage {
	return MovingAverage{index: size - 1, buckets: make([]int, size)}
}

func (ma *MovingAverage) Next(val int) float64 {
	ma.sum += val
	ma.index = (ma.index + 1) % len(ma.buckets) // 循环数组索引
	if ma.count < len(ma.buckets) {
		ma.count++
		ma.buckets[ma.index] = val
	} else {
		ma.sum -= ma.buckets[ma.index] // 减去旧数据
		ma.buckets[ma.index] = val     // 替换旧数据
	}
	return float64(ma.sum) / float64(ma.count)
}

func Test_Demo(t *testing.T) {
	ma := Constructor(3)
	fmt.Println(ma.Next(1))  // 返回 1.0 = 1 / 1
	fmt.Println(ma.Next(10)) // 返回 5.5 = (1 + 10) / 2
	fmt.Println(ma.Next(3))  // 返回 4.66667 = (1 + 10 + 3) / 3
	fmt.Println(ma.Next(5))  // 返回 6.0 = (10 + 3 + 5) / 3
}
从解题的代码中我们可以看到滑动窗口的本质是循环数组,而循环数组的核心思路是
- 循环数组的索引
ma.index = (ma.index + 1) % len(ma.cache) // 循环数组索引
- 新数据替换旧数据
ma.sum -= ma.cache[ma.index] // 减去旧数据
ma.cache[ma.index] = val     // 替换旧数据
再来看看 go-zero 的 rollingwidnow,是不是和前面学习的滑动窗口是一样一样的呀 : )
type window struct {
	buckets []*Bucket // 环形数组
	size    int
}

// 初始化窗口
func newWindow(size int) *window {
	buckets := make([]*Bucket, size)
	for i := 0; i < size; i++ {
		buckets[i] = new(Bucket)
	}
	return &window{
		buckets: buckets,
		size:    size,
	}
}

// 往执行的 bucket 加入指定的指标数据
func (w *window) add(offset int, v float64) {
    // 窗口滑动代码
    // rw.offset = (offset + span) % rw.size
	w.buckets[offset%w.size].add(v)
}
滑动窗口看完了,我们再来看看柳暗花明又一村的Google Sre过载保护算法
其算法数学表达式如下:
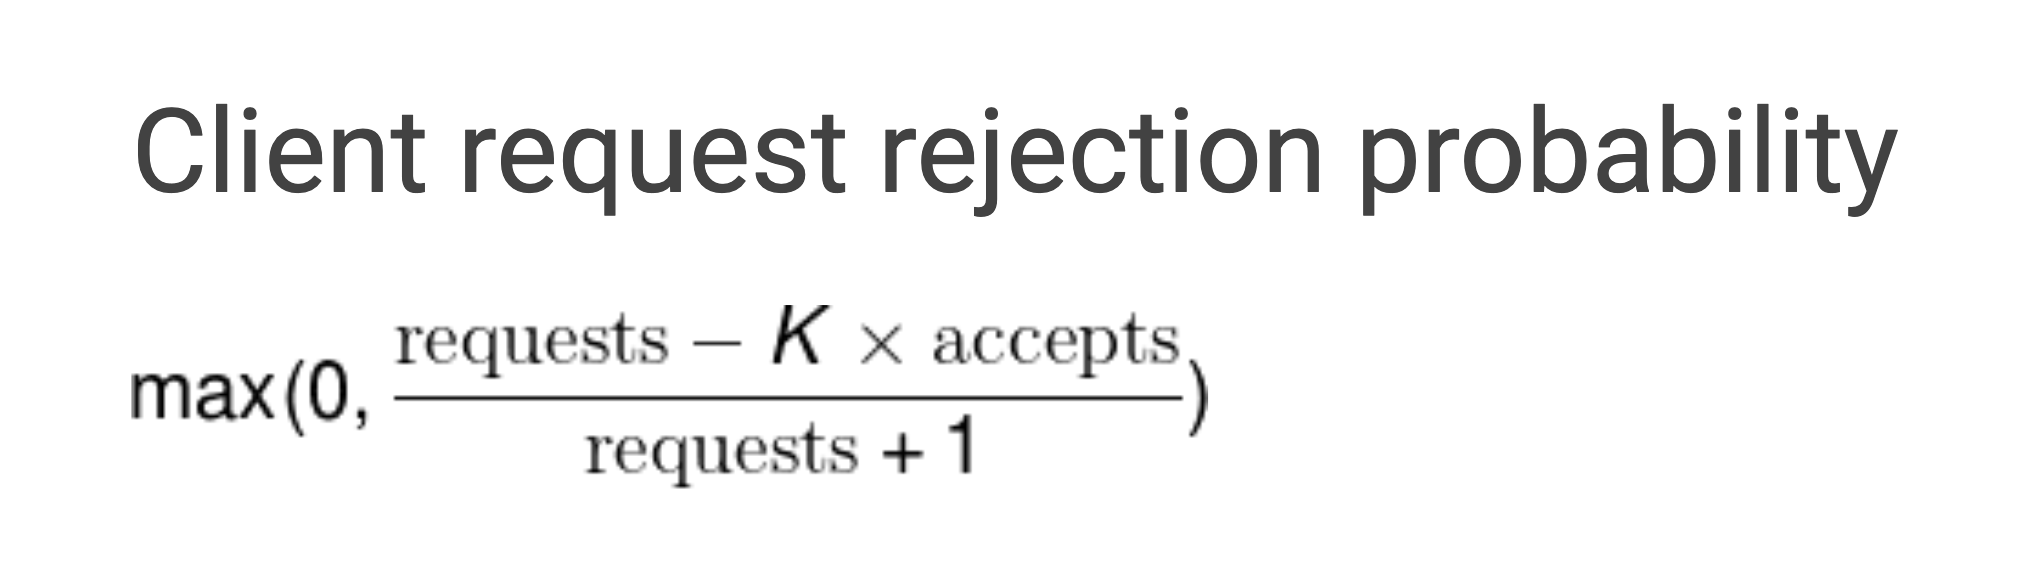
- requests:请求数量(调用方发起请求的数量总和)
- accepts:请求接受数量(被调用方正常处理的请求数量)
- K:倍值(越小越敏感)
// 判断是否触发熔断
func (b *googleBreaker) accept() error {
	accepts, total := b.History()
	weightedAccepts := b.k * float64(accepts)
	// Google Sre过载保护算法 https://landing.google.com/sre/sre-book/chapters/handling-overload/#eq2101
	dropRatio := math.Max(0, (float64(total-protection)-weightedAccepts)/float64(total+1))
	if dropRatio <= 0 {
		return nil
	}

	if b.proba.TrueOnProba(dropRatio) {
		return ErrServiceUnavailable
	}

	return nil
}
go-zero 熔断器给我们提供如下方法,供我们使用:
type (
	// 自定义判定执行结果
	Acceptable func(err error) bool
	// 手动回调
	Promise interface {
		// Accept tells the Breaker that the call is successful.
		// 请求成功
		Accept()
		// Reject tells the Breaker that the call is failed.
		// 请求失败
		Reject(reason string)
	}
	Breaker interface {
		// 熔断器名称
		Name() string

		// 熔断方法,执行请求时必须手动上报执行结果
		// 适用于简单无需自定义快速失败,无需自定义判定请求结果的场景
		// 相当于手动挡。。。
		Allow() (Promise, error)

		// 熔断方法,自动上报执行结果
		// 自动挡。。。
		Do(req func() error) error

		// 熔断方法
		// acceptable - 支持自定义判定执行结果
		DoWithAcceptable(req func() error, acceptable Acceptable) error

		// 熔断方法
		// fallback - 支持自定义快速失败
		DoWithFallback(req func() error, fallback func(err error) error) error

		// 熔断方法
		// fallback - 支持自定义快速失败
		// acceptable - 支持自定义判定执行结果
		DoWithFallbackAcceptable(req func() error, fallback func(err error) error, acceptable Acceptable) error
	}
)
关于 go-zero 熔断器的文章就到这里啦,看完之后是不是觉得很简单,觉得不简单可以多读几遍,感谢大家的阅读。
引用文章:
过载保护
入口源码地址:github.com/zeromicro/go-zero/rest/handler/sheddinghandler.go
在看文章之前可以看看万总的这篇文章《服务自适应降载保护设计》,文章已经给我们介绍很清楚了,从基础原理到架构需求再到代码注释,无不细致入微,感谢万总。
之前在设计架构的时候对于服务过载保护只会想到在客户端、网关层来实现,没考虑过在服务端也可以达到这种效果,一来涉及这种技术的文章较少(可能是我孤陋寡闻了),二来服务端不确定的情况比较多,比如服务器出现问题,或者其他在同一台服务器运行的软件把服务器直接搞挂,这样在服务端实现过载保护在某些层面来说鲁棒性可能不太好 ,但在和熔断器结合后,用服务端来实现过载保护也是合情合理的。
我们来看下过载保护设计到的几个算法
自旋锁
- 原理
问:假设有1个变量lock,2个协程怎么用锁实现lock++,lock的结果最后为2
答:
-
锁也是1个变量,初值设为0;
-
1个协程将锁原子性的置为1;
-
操作变量
lock; -
操作完成后,将锁原子性的置为0,释放锁。
-
在1个协程获取锁时,另一个协程一直尝试,直到能够获取锁(不断循环),这就是自旋锁。
2、自旋锁的缺点
某个协程持有锁时间长,等待的协程一直在循环等待,消耗CPU资源。
不公平,有可能存在有的协程等待时间过程,出现线程饥饿(这里就是协程饥饿)
- go-zero 自旋锁源码
type SpinLock struct {
    // 锁变量
	lock uint32
}

// Lock locks the SpinLock.
func (sl *SpinLock) Lock() {
	for !sl.TryLock() {
        // 暂停当前goroutine,让其他goroutine先行运算
		runtime.Gosched()
	}
}

// TryLock tries to lock the SpinLock.
func (sl *SpinLock) TryLock() bool {
    // 原子交换,0换成1
	return atomic.CompareAndSwapUint32(&sl.lock, 0, 1)
}

// Unlock unlocks the SpinLock.
func (sl *SpinLock) Unlock() {
    // 原子置零
	atomic.StoreUint32(&sl.lock, 0)
}
源码中还使用了 golang 的运行时操作包 runtime
runtime.Gosched()暂停当前goroutine,让其他goroutine先行运算
注意:只是暂停,不是挂起。
当时间片轮转到该协程时,Gosched()后面的操作将自动恢复
我们来写写几行代码,看看他的作用是啥
func output(s string) {
	for i := 0; i < 3; i++ {
		fmt.Println(s)
	}
}
// 未使用Gosched的代码
func Test_GoschedDisable(t *testing.T) {
	go output("goroutine 2")
	output("goroutine 1")
}
// === RUN   Test_GoschedDisable
// goroutine 1
// goroutine 1
// goroutine 1
// --- PASS: Test_GoschedDisable (0.00s)
结论:还没等到子协程执行,主协程就已经执行完退出了,子协程将不再执行,所以打印的全部是主协程的数据。当然,实际上这个执行结果也是不确定的,只是大概率出现以上输出,因为主协程和子协程间并没有绝对的顺序关系
func output(s string) {
	for i := 0; i < 3; i++ {
		fmt.Println(s)
	}
}
// 使用Gosched的代码
func Test_GoschedEnable(t *testing.T) {
	go output("goroutine 2")
	runtime.Gosched()
	output("goroutine 1")
}

// === RUN   Test_GoschedEnable
// goroutine 2
// goroutine 2
// goroutine 2
// goroutine 1
// goroutine 1
// goroutine 1
// --- PASS: Test_GoschedEnable (0.00s)
结论:在打印goroutine 1之前,主协程调用了runtime.Gosched()方法,暂停了主协程。子协程获得了调度,从而先行打印了goroutine 2。主协程不是一定要等其他协程执行完才会继续执行,而是一定时间。如果这个时间内其他协程没有执行完,那么主协程将继续执行,例如以下例子
func output(s string) {
	for i := 0; i < 3; i++ {
		fmt.Println(s)
	}
}
// 使用Gosched的代码,并故意延长子协程的执行时间,看主协程是否一直等待
func Test_GoschedEnableAndSleep(t *testing.T) {
	go func() {
		time.Sleep(5000)
		output("goroutine 2")
	}()
	runtime.Gosched()
	output("goroutine 1")
}
// === RUN   Test_GoschedEnableAndSleep
// goroutine 2
// goroutine 2
// goroutine 2
// goroutine 1
// goroutine 1
// goroutine 1
// --- PASS: Test_GoschedEnableAndSleep (0.00s)
结论:即使我们故意延长子协程的执行时间,主协程还是会一直等待子协程执行完才会执行。
源码中还使用了 golang 的原子操作包 atomic
atomic.CompareAndSwapUint32()函数用于对uint32值执行比较和交换操作,此函数是并发安全的。
// addr 表示地址
// old  表示uint32值,它是旧的,
// new  表示uint32新值,它将与旧值交换自身。
// 如果交换完成,则返回true,否则返回false。
func CompareAndSwapUint32(addr *uint32, old, new uint32) (swapped bool)
atomic.StoreUint32() 函数用于将val原子存储到* addr中,此函数是并发安全的。
// addr 表示地址
// val  表示uint32值,它是旧的,
func StoreUint32(addr *uint32, val uint32)
过载保护核心还使用了滑动窗口,滑动窗口的原理和细节可以看前一篇文章,里面有详细解答。
引用文章:
限流器
go-zero 给我们提供了两种限流器,而且都是基于 redis 实现的可分布式的
限流器核心文件带注释代码如下,大家可以参阅
- 计数器限流器 https://github.com/caicaispace/go-zero-source/blob/master/code/core/limit/periodlimit.go
- 令牌桶限流器 https://github.com/caicaispace/go-zero-source/blob/master/code/core/limit/tokenlimit.go
我们通过最小化代码来看看限流器的核心思路
简易计数器算法
// 简易计数器算法
type Counter struct {
	rate  int           // 计数周期内最多允许的请求数
	begin time.Time     // 计数开始时间
	cycle time.Duration // 计数周期
	count int           // 计数周期内累计收到的请求数
	lock  sync.Mutex
}

func (l *Counter) Allow() bool {
	l.lock.Lock()
	defer l.lock.Unlock()

	if l.count == l.rate-1 {
		now := time.Now()
		if now.Sub(l.begin) >= l.cycle {
			// 速度允许范围内, 重置计数器
			l.Reset(now)
			return true
		} else {
			return false
		}
	} else {
		// 没有达到速率限制,计数加1
		l.count++
		return true
	}
}

func (l *Counter) Set(r int, cycle time.Duration) {
	l.rate = r
	l.begin = time.Now()
	l.cycle = cycle
	l.count = 0
}

func (l *Counter) Reset(t time.Time) {
	l.begin = t
	l.count = 0
}

func Test_Counter(t *testing.T) {
	c := Counter{}
	c.Set(20, time.Second)
	reqTime := 2 * time.Second                     // 总请求时间
	reqNum := 200                                  // 总请求次数
	reqInterval := reqTime / time.Duration(reqNum) // 每次请求间隔
	var trueCount, falseCount int
	for i := 0; i < reqNum; i++ {
		go func() {
			if c.Allow() {
				trueCount++
			} else {
				falseCount++
			}
		}()
		time.Sleep(reqInterval)
	}
	fmt.Println("true count: ", trueCount)
	fmt.Println("false count: ", falseCount)
}
最终输出
// === RUN   Test_Counter
// true count:  44
// false count:  156
// --- PASS: Test_Counter (2.07s)
简易令牌桶算法
// 简易令牌桶算法
type TokenBucket struct {
	rate         int64 // 固定的token放入速率, r/s
	capacity     int64 // 桶的容量
	tokens       int64 // 桶中当前token数量
	lastTokenSec int64 // 桶上次放token的时间戳 s

	lock sync.Mutex
}

// 判断是否可通过
func (l *TokenBucket) Allow() bool {
	l.lock.Lock()
	defer l.lock.Unlock()

	now := time.Now().Unix()
	// 先添加初始令牌
	l.tokens = l.tokens + (now-l.lastTokenSec)*l.rate
	if l.tokens > l.capacity {
		l.tokens = l.capacity
	}
	l.lastTokenSec = now
	if l.tokens > 0 {
		// 还有令牌,领取令牌
		l.tokens--
		return true
	}
	// 没有令牌,则拒绝
	return false
}

// 动态设置参数
// r rate
// c capacity
func (l *TokenBucket) Set(r, c int64) {
	l.rate = r
	l.capacity = c
	l.tokens = r
	l.lastTokenSec = time.Now().Unix()
}

func Test_TokenBucket(t *testing.T) {
	lb := &TokenBucket{}
	lb.Set(20, 20)
	requestTime := 2 * time.Second                             // 总请求时间
	requestNum := 200                                          // 总请求次数
	requestInterval := requestTime / time.Duration(requestNum) // 每次请求间隔
	var trueCount, falseCount int
	for i := 0; i < requestNum; i++ {
		go func() {
			if lb.Allow() {
				trueCount++
			} else {
				falseCount++
			}
		}()
		time.Sleep(requestInterval)
	}
	fmt.Println("true count: ", trueCount)
	fmt.Println("false count: ", falseCount)
}
最终输出
=== RUN   Test_TokenBucket
true count:  60
false count:  140
--- PASS: Test_TokenBucket (2.07s)
简易漏桶算法
漏桶算法的分布式版本 go-zero 没有给我们实现,我们看看其核心算法,然后参照核心算法来实现分布式版本,给大家布置个作业 :)
// 简易漏桶算法
type LeakyBucket struct {
	rate       float64 // 固定每秒出水速率
	capacity   float64 // 桶的容量
	water      float64 // 桶中当前水量
	lastLeakMs int64   // 桶上次漏水时间戳 ms

	lock sync.Mutex
}

// 判断是否可通过
func (l *LeakyBucket) Allow() bool {
	l.lock.Lock()
	defer l.lock.Unlock()

	now := time.Now().UnixNano() / 1e6
	eclipse := float64((now - l.lastLeakMs)) * l.rate / 1000 // 先执行漏水
	l.water = l.water - eclipse                              // 计算剩余水量
	l.water = math.Max(0, l.water)                           // 桶干了
	l.lastLeakMs = now
	if (l.water + 1) < l.capacity {
		// 尝试加水,并且水还未满
		l.water++
		return true
	} else {
		// 水满,拒绝加水
		return false
	}
}

// 动态设置参数
// r rate
// c capacity
func (l *LeakyBucket) Set(r, c float64) {
	l.rate = r
	l.capacity = c
	l.water = 0
	l.lastLeakMs = time.Now().UnixNano() / 1e6
}

func Test_LeakyBucket(t *testing.T) {
	lb := &LeakyBucket{}
	lb.Set(20, 20)
	reqTime := 2 * time.Second                     // 总请求时间
	reqNum := 200                                  // 总请求次数
	reqInterval := reqTime / time.Duration(reqNum) // 每次请求间隔
	var trueCount, falseCount int
	for i := 0; i < reqNum; i++ {
		go func() {
			if lb.Allow() {
				trueCount++
			} else {
				falseCount++
			}
		}()
		time.Sleep(reqInterval)
	}
	fmt.Println("true count: ", trueCount)
	fmt.Println("false count: ", falseCount)
}
最终输出
// === RUN   Test_LeakyBucket
// true count:  60
// false count:  140
// --- PASS: Test_LeakyBucket (2.06s)
引用文章:
负载均衡
在阅读 go-zero 源码之前我们先来看看常用的负载均衡算法,看看其原理,以及是如何实现,然后我们在用这些负载均衡算法来和 go-zero 的对比下,看看各自的优缺点是啥。
轮询
proxy 服务与 ndoe 服务配置文件
{
    "proxy": {
        "url": "127.0.0.1:8080"
    },
    "nodes": [
        {
            "url": "127.0.0.1:8081"
        },
        {
            "url": "127.0.0.1:8082"
        },
        {
            "url": "127.0.0.1:8083"
        }
    ]
}
proxy 服务、 ndoe 服务、轮询算法代码
// 配置
type Config struct {
	Proxy Proxy   `json:"proxy"`
	Nodes []*Node `json:"nodes"`
}

// proxy 服务器配置
type Proxy struct {
	Url string `json:"url"`
}

// node 服务器配置
type Node struct {
	URL      string `json:"url"`
	IsDead   bool
	useCount int
	mu       sync.RWMutex
}

var cfg Config

func init() {
    // 加载配置文件
	data, err := ioutil.ReadFile("./config.json")
	if err != nil {
		log.Fatal(err.Error())
	}
	json.Unmarshal(data, &cfg)
}

// 设置 node 服务器宕机状态
func (node *Node) SetDead(b bool) {
	node.mu.Lock()
	node.IsDead = b
	node.mu.Unlock()
}

// 获取 node 服务器是否宕机
func (node *Node) GetIsDead() bool {
	node.mu.RLock()
	isAlive := node.IsDead
	node.mu.RUnlock()
	return isAlive
}

var (
	mu  sync.Mutex
	idx int = 0
)

// 轮询算法
func rrlbbHandler(w http.ResponseWriter, r *http.Request) {
	maxLen := len(cfg.Nodes)
	// Round Robin
	mu.Lock()
	currentNode := cfg.Nodes[idx%maxLen] // 循环数组
	if currentNode.GetIsDead() {
		idx++ // 如果 node 宕机,则轮询到下一个 node
		currentNode = cfg.Nodes[idx%maxLen]
	}
	currentNode.useCount++
	targetURL, err := url.Parse("http://" + currentNode.URL)
	log.Println(targetURL.Host)
	if err != nil {
		log.Fatal(err.Error())
	}
	idx++
	mu.Unlock()
	reverseProxy := httputil.NewSingleHostReverseProxy(targetURL)
	reverseProxy.ErrorHandler = func(w http.ResponseWriter, r *http.Request, e error) {
		log.Printf("%v is dead.", targetURL)
		currentNode.SetDead(true)
		rrlbbHandler(w, r) // 节点宕机 递归调用自己
	}
	reverseProxy.ServeHTTP(w, r)
}

// node是否存活
func isAlive(url *url.URL) bool {
	conn, err := net.DialTimeout("tcp", url.Host, time.Minute*1)
	if err != nil {
		log.Printf("Unreachable to %v, error %s:", url.Host, err.Error())
		return false
	}
	defer conn.Close()
	return true
}

// node探活
func healthCheck() {
	t := time.NewTicker(time.Minute * 1)
	for {
		select {
		case <-t.C:
			for _, node := range cfg.Nodes {
				pingURL, err := url.Parse(node.URL)
				if err != nil {
					log.Fatal(err.Error())
				}
				isAlive := isAlive(pingURL)
				node.SetDead(!isAlive)
				msg := "ok"
				if !isAlive {
					msg = "dead"
				}
				log.Printf("%v checked %s by healthcheck", node.URL, msg)
			}
		}
	}
}

// 启动 proxy 服务
func proxyServerStart() {
	var err error
	go healthCheck()
	s := http.Server{
		Addr:    cfg.Proxy.Url,
		Handler: http.HandlerFunc(rrlbbHandler),
	}
	if err = s.ListenAndServe(); err != nil {
		log.Fatal(err.Error())
	}
}

// 启动所有 node 服务
func nodeServerStart() {
	http.HandleFunc("/ping", func(w http.ResponseWriter, r *http.Request) {
		w.Write([]byte("pong"))
	})
	wg := new(sync.WaitGroup)
	wg.Add(len(cfg.Nodes))
	for i, node := range cfg.Nodes {
		go func() {
			if i > 0 {
                  // 模拟一个node宕机
				log.Fatal(http.ListenAndServe(node.URL, nil))
			}
			wg.Done()
		}()
		time.Sleep(time.Millisecond * 100)
	}
	wg.Wait()
}
最核心的算法就是这一段,非常简单,轮询的本质其实是循环数组
	currentNode := cfg.Nodes[idx%maxLen] // 数组循环
	if currentNode.GetIsDead() {
		idx++ // 如果 node 宕机,则轮询到下一个 node
		currentNode = cfg.Nodes[idx%maxLen]
	}
我们来编写测试代码来测试下吧
func Test_RoundRobinBalancer(t *testing.T) {
	go nodeServerStart()
	time.Sleep(time.Millisecond * 200)
	go proxyServerStart()
	time.Sleep(time.Millisecond * 100)
	for _, tt := range [...]struct {
		name, method, uri string
		body              io.Reader
		want              *http.Request
		wantBody          string
	}{
		{
			name:     "GET with ping url",
			method:   "GET",
			uri:      "http://127.0.0.1:8080/ping",
			body:     nil,
			wantBody: "pong",
		},
	} {
		t.Run(tt.name, func(t *testing.T) {
			for i := 1; i <= 10; i++ {
				body, err := utils.HttpRequest(tt.method, tt.uri, tt.body)
				if err != nil {
					t.Errorf("ReadAll: %v", err)
				}
				if string(body) != tt.wantBody {
					t.Errorf("Body = %q; want %q", body, tt.wantBody)
				}
			}
			for _, node := range cfg.Nodes {
				log.Printf("node: %s useCount: %d", node.URL, node.useCount)
			}
		})
	}
}
测试结果如下:
-------- node 调度顺序--------
2022/04/06 19:50:24 127.0.0.1:8081
2022/04/06 19:50:24 http://127.0.0.1:8081 is dead.
2022/04/06 19:50:24 127.0.0.1:8082
2022/04/06 19:50:24 127.0.0.1:8083
2022/04/06 19:50:24 127.0.0.1:8082
2022/04/06 19:50:24 127.0.0.1:8083
2022/04/06 19:50:24 127.0.0.1:8082
2022/04/06 19:50:24 127.0.0.1:8083
2022/04/06 19:50:24 127.0.0.1:8082
2022/04/06 19:50:24 127.0.0.1:8083
2022/04/06 19:50:24 127.0.0.1:8082
2022/04/06 19:50:24 127.0.0.1:8083
-------- node 调用次数 --------
2022/04/06 19:50:24 node: 127.0.0.1:8081 useCount: 1
2022/04/06 19:50:24 node: 127.0.0.1:8082 useCount: 5
2022/04/06 19:50:24 node: 127.0.0.1:8083 useCount: 5
第一个 node 宕机,这一段输出了宕机状态
2022/04/06 19:28:48 127.0.0.1:8081
2022/04/06 19:28:48 http://127.0.0.1:8081 is dead.
从这一段可以看出节点服务是被交替调用
2022/04/06 19:28:48 127.0.0.1:8082
2022/04/06 19:28:48 127.0.0.1:8083
2022/04/06 19:28:48 127.0.0.1:8082
2022/04/06 19:28:48 127.0.0.1:8083
2022/04/06 19:28:48 127.0.0.1:8082
2022/04/06 19:28:48 127.0.0.1:8083
2022/04/06 19:28:48 127.0.0.1:8082
2022/04/06 19:28:48 127.0.0.1:8083
2022/04/06 19:28:48 127.0.0.1:8082
2022/04/06 19:28:48 127.0.0.1:8083
在这一段可以看出 node 1 被调用了一次,而后递归调用自己,请求分别被 node2 和 node3 各调用 5 次。
说明我们的轮询调度算法是成功的,大家可以复制代码,自己尝试运行下
2022/04/06 19:28:48 node: 127.0.0.1:8081 useCount: 1
2022/04/06 19:28:48 node: 127.0.0.1:8082 useCount: 5
2022/04/06 19:28:48 node: 127.0.0.1:8083 useCount: 5
随机轮询
随机轮询算法也非常的 easy
我们在 rrlbHandle 函数下面添加如下函数
// 随机轮询算法
func rrrlbHandler(w http.ResponseWriter, r *http.Request) {
	maxLen := len(cfg.Nodes)
	// Rand Round Robin
	mu.Lock()
	idx, _ := rand.Int(rand.Reader, big.NewInt(int64(maxLen))) // 获取随机数
	currentNode := cfg.Nodes[int(idx.Int64())%maxLen] // 获取随机节点
	if currentNode.GetIsDead() {
		idx, _ = rand.Int(rand.Reader, big.NewInt(int64(maxLen)))
		currentNode = cfg.Nodes[int(idx.Int64())%maxLen]
	}
	currentNode.useCount++
	targetURL, err := url.Parse("http://" + cfg.Nodes[int(idx.Int64())%maxLen].URL)
	log.Println(targetURL.Host)
	if err != nil {
		log.Fatal(err.Error())
	}
	mu.Unlock()
	reverseProxy := httputil.NewSingleHostReverseProxy(targetURL)
	reverseProxy.ErrorHandler = func(w http.ResponseWriter, r *http.Request, e error) {
		// NOTE: It is better to implement retry.
		log.Printf("%v is dead.", targetURL)
		currentNode.SetDead(true)
		rrrlbHandler(w, r)
	}
	reverseProxy.ServeHTTP(w, r)
}
锁机轮询的核心算法如下
	idx, _ := rand.Int(rand.Reader, big.NewInt(int64(maxLen))) // 获取随机数
	currentNode := cfg.Nodes[int(idx.Int64())%maxLen] // 获取随机节点
	if currentNode.GetIsDead() {
		idx, _ = rand.Int(rand.Reader, big.NewInt(int64(maxLen)))
		currentNode = cfg.Nodes[int(idx.Int64())%maxLen]
	}
编写测试代码来测试下
首先修改proxyServerStart服务函数
func proxyServerStart() {
	var err error
	go healthCheck()
	s := http.Server{
		Addr:    cfg.Proxy.Url,
		// Handler: http.HandlerFunc(rrlbbHandler), // 关闭轮询调度算法
		Handler: http.HandlerFunc(rrrlbHandler), // 开启随机轮询调度算法
	}
	if err = s.ListenAndServe(); err != nil {
		log.Fatal(err.Error())
	}
}
测试代码与轮询算法测试代码保持不变
测试结果如下:
-------- node 调度顺序--------
2022/04/06 19:49:51 127.0.0.1:8081
2022/04/06 19:49:51 http://127.0.0.1:8081 is dead.
2022/04/06 19:49:51 127.0.0.1:8082
2022/04/06 19:49:51 127.0.0.1:8081
2022/04/06 19:49:51 http://127.0.0.1:8081 is dead.
2022/04/06 19:49:51 127.0.0.1:8082
2022/04/06 19:49:51 127.0.0.1:8083
2022/04/06 19:49:51 127.0.0.1:8083
2022/04/06 19:49:51 127.0.0.1:8082
2022/04/06 19:49:51 127.0.0.1:8083
2022/04/06 19:49:51 127.0.0.1:8083
2022/04/06 19:49:51 127.0.0.1:8081
2022/04/06 19:49:51 http://127.0.0.1:8081 is dead.
2022/04/06 19:49:51 127.0.0.1:8083
2022/04/06 19:49:51 127.0.0.1:8081
2022/04/06 19:49:51 http://127.0.0.1:8081 is dead.
2022/04/06 19:49:51 127.0.0.1:8082
2022/04/06 19:49:51 127.0.0.1:8082
-------- node 调用次数 --------
2022/04/06 19:49:51 node: 127.0.0.1:8081 useCount: 4
2022/04/06 19:49:51 node: 127.0.0.1:8082 useCount: 5
2022/04/06 19:49:51 node: 127.0.0.1:8083 useCount: 5
从测试结果中可以看出,node 调用顺序是随机的,node 调用次数负载到未宕机的 node2、node3 上总计被调用10次
说明我们的算法也是成功的
加权轮询
加权轮询我们也基于轮询的代码来修改
修改配置文件
{
    "proxy": {
        "url": "127.0.0.1:8080"
    },
    "nodes": [
        {
            "url": "127.0.0.1:8081",
            "weight": 2
        },
        {
            "url": "127.0.0.1:8082",
            "weight": 3
        },
        {
            "url": "127.0.0.1:8083",
            "weight": 5
        }
    ]
}
我们再给 Node 的结构体加两个属性
-
currentWeightnode临时权重 -
effectiveWeightnode有效权重 -
Weightnode权重
type Node struct {
	currentWeight   int // node临时权重
	effectiveWeight int // node有效权重
	Weight          int    `json:"weight"` // node权重
	IsDead          bool
	useCount        int
	URL             string `json:"url"`
	mu              sync.RWMutex
}
修改 init 函数如下如下代码
func init() {
	data, err := ioutil.ReadFile("./config.json")
	if err != nil {
		log.Fatal(err.Error())
	}
	json.Unmarshal(data, &cfg)
	for _, node := range cfg.Nodes {
		node.currentWeight = node.Weight
	}
}
修改 rrlbHandler 函数为如下代码
func rrlbHandler(w http.ResponseWriter, r *http.Request) {
	mu.Lock()
	currentNode := cfg.Next()
	targetURL, err := url.Parse("http://" + currentNode.URL)
	if err != nil {
		log.Fatal(err.Error())
	}
	log.Println(targetURL.Host)
	mu.Unlock()
	reverseProxy := httputil.NewSingleHostReverseProxy(targetURL)
	reverseProxy.ErrorHandler = func(w http.ResponseWriter, r *http.Request, e error) {
		// NOTE: It is better to implement retry.
		log.Printf("%v is dead.", targetURL)
		currentNode.SetDead(true)
		rrlbHandler(w, r)
	}
	reverseProxy.ServeHTTP(w, r)
}
添加 Next 函数代码如下,此函数即为加权轮询核心算法
注意:在获取最大临时权重 node 的过程中我们要保证最大临时权重node的临时权重要持续递减,而且各个node的临时权重要持续递增,以保证调度的平滑性
func (c *Config) Next() *Node {
	totalEffectiveWeight := 0
	var maxWeightNode *Node
	for _, node := range c.Nodes {
		// 1.统计所有node有效权证之和
		totalEffectiveWeight += node.effectiveWeight
		// 2.变更node临时权重=node临时权重+node有效权重
		// node临时权重递增,交替加权,以保证调度平滑性
		node.currentWeight += node.effectiveWeight
		// 3.node有效权重默认与node权临时重相同,通讯异常时-1,通信成功+1,直到恢复到 weight 大小
		if node.effectiveWeight < node.Weight {
			if node.GetIsDead() {
				node.effectiveWeight--
			} else {
				node.effectiveWeight++
			}
		}
		// 4.选择最大临时权重node
		if maxWeightNode == nil || node.currentWeight > maxWeightNode.currentWeight {
			maxWeightNode = node
		}
	}
	if maxWeightNode == nil {
		return nil
	}
	// 5.变更 node临时权重=node临时权重-node有效权重之和
	// 最大权重node临时权重递减,交替减权,以保证调度平滑性
	maxWeightNode.currentWeight -= totalEffectiveWeight
	if maxWeightNode.GetIsDead() {
		maxWeightNode = c.Next()
	}
	maxWeightNode.useCount++
	return maxWeightNode
}
测试结果如下:
-------- node 调度顺序--------
2022/04/06 21:50:00 127.0.0.1:8083
2022/04/06 21:50:00 127.0.0.1:8083
2022/04/06 21:50:00 127.0.0.1:8083
2022/04/06 21:50:00 127.0.0.1:8082
2022/04/06 21:50:00 127.0.0.1:8083
2022/04/06 21:50:00 127.0.0.1:8082
2022/04/06 21:50:00 127.0.0.1:8083
2022/04/06 21:50:00 127.0.0.1:8083
2022/04/06 21:50:00 127.0.0.1:8081
2022/04/06 21:50:00 http://127.0.0.1:8081 is dead.
2022/04/06 21:50:00 127.0.0.1:8083
2022/04/06 21:50:00 127.0.0.1:8082
-------- node 调用次数 --------
2022/04/06 21:50:00 node: 127.0.0.1:8081 useCount: 1
2022/04/06 21:50:00 node: 127.0.0.1:8082 useCount: 3
2022/04/06 21:50:00 node: 127.0.0.1:8083 useCount: 7
从结果中可以看出,调度还是比较平滑的,而且对应权重node在调度中调用次数也比较合理
一致性哈希
一致性哈希主要针对的是缓存服务做负载均衡,以保证缓存节点变更后缓存失效过多,导致缓存穿透,从而把数据库打死。
一致性哈希原理可以参考这篇文章图解一致性哈希算法,细节剖析本文不再赘述。
我们来看看其核心算法
// service node 结构体定义
type ServiceNode struct {
	Ip    string
	Port  string
	Index int
}

// 返回service node实例
func NewServiceNode(ip, port string) *ServiceNode {
	return &ServiceNode{
		Ip:   ip,
		Port: port,
	}
}

func (sn *ServiceNode) SetIndex(index int) {
	sn.Index = index
}

type UInt32Slice []uint32

// Len()
func (s UInt32Slice) Len() int {
	return len(s)
}

// Less()
func (s UInt32Slice) Less(i, j int) bool {
	return s[i] < s[j]
}

// Swap()
func (s UInt32Slice) Swap(i, j int) {
	s[i], s[j] = s[j], s[i]
}

// 虚拟节点结构定义
type VirtualNode struct {
	VirtualNodes map[uint32]*ServiceNode
	NodeKeys     UInt32Slice
	sync.RWMutex
}

// 实例化虚拟节点对象
func NewVirtualNode() *VirtualNode {
	return &VirtualNode{
		VirtualNodes: map[uint32]*ServiceNode{},
	}
}

// 添加虚拟节点
func (v *VirtualNode) AddVirtualNode(serviceNode *ServiceNode, virtualNum uint) {
	// 并发读写map-加锁
	v.Lock()
	defer v.Unlock()
	for i := uint(0); i < virtualNum; i++ {
		hashStr := serviceNode.Ip + ":" + serviceNode.Port + ":" + strconv.Itoa(int(i))
		v.VirtualNodes[v.getHashCode(hashStr)] = serviceNode
	}
	// 虚拟节点hash值排序
	v.sortHash()
}

// 移除虚拟节点
func (v *VirtualNode) RemoveVirtualNode(serviceNode *ServiceNode, virtualNum uint) {
	// 并发读写map-加锁
	v.Lock()
	defer v.Unlock()
	for i := uint(0); i < virtualNum; i++ {
		hashStr := serviceNode.Ip + ":" + serviceNode.Port + ":" + strconv.Itoa(int(i))
		delete(v.VirtualNodes, v.getHashCode(hashStr))
	}
	v.sortHash()
}

// 获取虚拟节点(二分查找)
func (v *VirtualNode) GetVirtualNodel(routeKey string) *ServiceNode {
	// 并发读写map-加读锁,可并发读不可同时写
	v.RLock()
	defer v.RUnlock()
	index := 0
	hashCode := v.getHashCode(routeKey)
	i := sort.Search(len(v.NodeKeys), func(i int) bool { return v.NodeKeys[i] > hashCode })
	// 当i大于下标最大值时,证明没找到, 给到第0个虚拟节点, 当i小于node节点数时, index为当前节点
	if i < len(v.NodeKeys) {
		index = i
	} else {
		index = 0
	}
	// 返回具体节点
	return v.VirtualNodes[v.NodeKeys[index]]
}

// hash数值排序
func (v *VirtualNode) sortHash() {
	v.NodeKeys = nil
	for k := range v.VirtualNodes {
		v.NodeKeys = append(v.NodeKeys, k)
	}
	sort.Sort(v.NodeKeys)
}

// 获取hash code(采用md5字符串后计算)
func (v *VirtualNode) getHashCode(nodeHash string) uint32 {
	// crc32方式hash code
	// return crc32.ChecksumIEEE([]byte(nodeHash))
	md5 := md5.New()
	md5.Write([]byte(nodeHash))
	md5Str := hex.EncodeToString(md5.Sum(nil))
	h := 0
	byteHash := []byte(md5Str)
	for i := 0; i < 32; i++ {
		h <<= 8
		h |= int(byteHash[i]) & 0xFF
	}
	return uint32(h)
}
我们来写测试代码,测试下
func Test_HashConsistency(t *testing.T) {
	// 实例化10个实体节点
	var serverNodes []*hashconsistency.ServiceNode
	serverNodes = append(serverNodes, hashconsistency.NewServiceNode("127.0.0.1", "3300"))
	serverNodes = append(serverNodes, hashconsistency.NewServiceNode("127.0.0.1", "3301"))
	serverNodes = append(serverNodes, hashconsistency.NewServiceNode("127.0.0.1", "3302"))
	serverNodes = append(serverNodes, hashconsistency.NewServiceNode("127.0.0.1", "3303"))
	serverNodes = append(serverNodes, hashconsistency.NewServiceNode("127.0.0.1", "3304"))
	serverNodes = append(serverNodes, hashconsistency.NewServiceNode("127.0.0.1", "3305"))
	serverNodes = append(serverNodes, hashconsistency.NewServiceNode("127.0.0.1", "3306"))
	serverNodes = append(serverNodes, hashconsistency.NewServiceNode("127.0.0.1", "3307"))
	serverNodes = append(serverNodes, hashconsistency.NewServiceNode("127.0.0.1", "3308"))
	serverNodes = append(serverNodes, hashconsistency.NewServiceNode("127.0.0.1", "3309"))
	serverNodesLen := uint(len(serverNodes))
	virtualNodeService := hashconsistency.NewVirtualNode()
	// 添加对应的虚拟化节点数
	for _, sn := range serverNodes {
		virtualNodeService.AddVirtualNode(sn, serverNodesLen)
	}
	// 打印节点列表
	var nodes1, nodes2 []string
	fmt.Println("-------- node 调度顺序--------")
	for i := 1; i <= 20; i++ {
		// 移除node2节点
		if i == 11 {
			virtualNodeService.RemoveVirtualNode(serverNodes[1], serverNodesLen)
		}
		cacheKey := fmt.Sprintf("user:id:%d", i%10)
		// 获取对应节点地址
		serviceNode := virtualNodeService.GetVirtualNodel(cacheKey)
		str := fmt.Sprintf("node: %s cachekey: %s", serviceNode.Ip+":"+serviceNode.Port, cacheKey)
		if i <= 10 {
			nodes1 = append(nodes1, str)
		} else {
			nodes2 = append(nodes2, str)
		}
	}
	utils.PrintDiff(strings.Join(nodes1, "\n"), strings.Join(nodes2, "\n"))
}
测试结果如下:
-------- node 调度顺序--------
-node: 127.0.0.1:3301 cachekey: user:id:1 // node1宕机
+node: 127.0.0.1:3300 cachekey: user:id:1 // 原node1的缓路由到此node0
 node: 127.0.0.1:3309 cachekey: user:id:2
 node: 127.0.0.1:3309 cachekey: user:id:3
 node: 127.0.0.1:3309 cachekey: user:id:4
 node: 127.0.0.1:3300 cachekey: user:id:5
 node: 127.0.0.1:3307 cachekey: user:id:6
-node: 127.0.0.1:3301 cachekey: user:id:7 // node1宕机
+node: 127.0.0.1:3302 cachekey: user:id:7 // 原node1的缓路由到此node2
 node: 127.0.0.1:3305 cachekey: user:id:8
-node: 127.0.0.1:3301 cachekey: user:id:9 // node1宕机
+node: 127.0.0.1:3300 cachekey: user:id:9 // 原node1的缓路由到此node0
 node: 127.0.0.1:3309 cachekey: user:id:0
从测试中可以看出宕机的node都被自动路由到最近的node,而没有宕机的node继续承接旧的缓存key,说明通过一致性哈希算法,可以保证我们的缓存不会因为服务宕机操作大面积缓存失效的问题
我们再把一致性哈希算法带入到服务中,来看看效果如何
// Config is a configuration.
type Config struct {
	Proxy                     Proxy   `json:"proxy"`
	Nodes                     []*Node `json:"nodes"`
	HashConsistency           *VirtualNode
	HashConsistencyVirtualNum uint
}

// Proxy is a reverse proxy, and means load balancer.
type Proxy struct {
	Url string `json:"url"`
}

// Node is servers which load balancer is transferred.
type Node struct {
	URL      string `json:"url"`
	IsDead   bool
	UseCount int
	mu       sync.RWMutex
}

var cfg Config

func init() {
	data, err := ioutil.ReadFile("./config.json")
	if err != nil {
		log.Fatal(err.Error())
	}
	json.Unmarshal(data, &cfg)
	if cfg.HashConsistencyVirtualNum == 0 {
		cfg.HashConsistencyVirtualNum = 10
	}
	cfg.HashConsistency = NewVirtualNode()
	for i, node := range cfg.Nodes {
		addr := strings.Split(node.URL, ":")
		serviceNode := NewServiceNode(addr[0], addr[1])
		serviceNode.SetIndex(i)
		cfg.HashConsistency.AddVirtualNode(serviceNode, cfg.HashConsistencyVirtualNum)
	}
}

func GetCfg() Config {
	return cfg
}

// SetDead updates the value of IsDead in node.
func (node *Node) SetDead(b bool) {
	node.mu.Lock()
	node.IsDead = b
	addr := strings.Split(node.URL, ":")
	serviceNode := NewServiceNode(addr[0], addr[1])
	cfg.HashConsistency.RemoveVirtualNode(serviceNode, cfg.HashConsistencyVirtualNum)
	node.mu.Unlock()
}

// GetIsDead returns the value of IsDead in node.
func (node *Node) GetIsDead() bool {
	node.mu.RLock()
	isAlive := node.IsDead
	node.mu.RUnlock()
	return isAlive
}

var mu sync.Mutex

// rrlbbHandler is a handler for round robin load balancing
func rrlbbHandler(w http.ResponseWriter, r *http.Request) {
	// Round Robin
	mu.Lock()
	cacheKey := r.Header.Get("cache-key")
	virtualNodel := cfg.HashConsistency.GetVirtualNodel(cacheKey)
	targetURL, err := url.Parse(fmt.Sprintf("http://%s:%s", virtualNodel.Ip, virtualNodel.Port))
	if err != nil {
		log.Fatal(err.Error())
	}
	currentNode := cfg.Nodes[virtualNodel.Index]
	currentNode.UseCount++
	if currentNode.GetIsDead() {
		rrlbbHandler(w, r)
		return
	}
	mu.Unlock()
	reverseProxy := httputil.NewSingleHostReverseProxy(targetURL)
	reverseProxy.ErrorHandler = func(w http.ResponseWriter, r *http.Request, e error) {
		// NOTE: It is better to implement retry.
		log.Printf("%v is dead.", targetURL)
		currentNode.SetDead(true)
		rrlbbHandler(w, r)
	}
	w.Header().Add("balancer-node", virtualNodel.Ip+virtualNodel.Port)
	reverseProxy.ServeHTTP(w, r)
}

// pingNode checks if the node is alive.
func isAlive(url *url.URL) bool {
	conn, err := net.DialTimeout("tcp", url.Host, time.Minute*1)
	if err != nil {
		log.Printf("Unreachable to %v, error %s:", url.Host, err.Error())
		return false
	}
	defer conn.Close()
	return true
}

// healthCheck is a function for healthcheck
func healthCheck() {
	t := time.NewTicker(time.Minute * 1)
	for {
		select {
		case <-t.C:
			for _, node := range cfg.Nodes {
				pingURL, err := url.Parse(node.URL)
				if err != nil {
					log.Fatal(err.Error())
				}
				isAlive := isAlive(pingURL)
				node.SetDead(!isAlive)
				msg := "ok"
				if !isAlive {
					msg = "dead"
				}
				log.Printf("%v checked %s by healthcheck", node.URL, msg)
			}
		}
	}
}

// ProxyServerStart serves a proxy
func ProxyServerStart() {
	var err error
	go healthCheck()
	s := http.Server{
		Addr:    cfg.Proxy.Url,
		Handler: http.HandlerFunc(rrlbbHandler),
	}
	if err = s.ListenAndServe(); err != nil {
		log.Fatal(err.Error())
	}
}

// ProxyServerStart serves a node
func NodeServerStart() {
	http.HandleFunc("/ping", func(w http.ResponseWriter, r *http.Request) {
		w.Write([]byte("pong"))
	})
	wg := new(sync.WaitGroup)
	wg.Add(len(cfg.Nodes))
	for i, node := range cfg.Nodes {
		go func() {
			if i != 0 {
				log.Fatal(http.ListenAndServe(node.URL, nil))
			}
			// log.Fatal(http.ListenAndServe(node.URL, nil))
			wg.Done()
		}()
		time.Sleep(time.Millisecond * 100)
	}
	wg.Wait()
}
编写测试代码测试下:
func Test_HashConsistencyWithServer(t *testing.T) {
	go hashconsistency.NodeServerStart()
	time.Sleep(time.Millisecond * 200)
	go hashconsistency.ProxyServerStart()
	time.Sleep(time.Millisecond * 100)
	for _, tt := range [...]struct {
		name, method, uri string
		body              io.Reader
		want              *http.Request
		wantBody          string
	}{
		{
			name:     "GET with ping url",
			method:   "GET",
			uri:      "http://127.0.0.1:8080/ping",
			body:     nil,
			wantBody: "pong",
		},
	} {
		t.Run(tt.name, func(t *testing.T) {
			fmt.Println("-------- node 调度顺序--------")
			var nodes1, nodes2 []string
			for i := 1; i <= 20; i++ {
				cacheKey := fmt.Sprintf("user:id:%d", i%10)
				cli := utils.NewHttpClient().
					SetHeader(map[string]string{
						"cache-key": cacheKey,
					}).SetMethod(tt.method).SetUrl(tt.uri).SetBody(tt.body)
				err := cli.Request(nil)
				if err != nil {
					t.Errorf("ReadAll: %v", err)
				}
				str := fmt.Sprintf("node: %s cachekey: %s", cli.GetRspHeader().Get("balancer-node"), cacheKey)
				if err != nil {
					t.Errorf("ReadAll: %v", err)
				}
				if string(cli.GetRspBody()) != tt.wantBody {
					t.Errorf("Body = %q; want %q", cli.GetRspBody(), tt.wantBody)
				}
				if i <= 10 {
					nodes1 = append(nodes1, str)
				} else {
					nodes2 = append(nodes2, str)
				}
			}
			utils.PrintDiff(strings.Join(nodes1, "\n"), strings.Join(nodes2, "\n"))
			fmt.Println("-------- node 调用次数 --------")
			for _, node := range hashconsistency.GetCfg().Nodes {
				log.Printf("node: %s useCount: %d", node.URL, node.UseCount)
			}
		})
	}
}
测试结果如下:
-------- node 调度顺序--------
2022/04/08 15:14:55 http://127.0.0.1:8081 is dead.
 node: 127.0.0.18082 cachekey: user:id:1
-node: 127.0.0.18081 cachekey: user:id:2
+node: 127.0.0.18083 cachekey: user:id:2
 node: 127.0.0.18083 cachekey: user:id:3
 node: 127.0.0.18082 cachekey: user:id:4
 node: 127.0.0.18082 cachekey: user:id:5
 node: 127.0.0.18082 cachekey: user:id:6
 node: 127.0.0.18083 cachekey: user:id:7
 node: 127.0.0.18083 cachekey: user:id:8
 node: 127.0.0.18082 cachekey: user:id:9
 node: 127.0.0.18083 cachekey: user:id:0
-------- node 调用次数 --------
2022/04/08 15:14:55 node: 127.0.0.1:8081 useCount: 1
2022/04/08 15:14:55 node: 127.0.0.1:8082 useCount: 10
2022/04/08 15:14:55 node: 127.0.0.1:8083 useCount: 10
测试结果符合预期,nice :)
go-zero
go-zero 的负载均衡算法通过替换 grpc 默认负载均衡算法来实现负载均衡
详细注释代码请参阅 https://github.com/caicaispace/go-zero-source/blob/master/code/balancer/zrpc/p2c/p2c.go
我们看看其中核心的两个算法
- 一、牛顿冷却
原理请参阅 https://www.ruanyifeng.com/blog/2012/03/ranking_algorithm_newton_s_law_of_cooling.html
const (
	decayTime = int64(time.Second * 1) // 衰退时间
)

type NLOC struct{}

func NewNLOC() *NLOC {
	return &NLOC{}
}

func (n *NLOC) Hot(timex time.Time) float64 {
	td := time.Now().Unix() - timex.Unix()
	if td < 0 {
		td = 0
	}
	w := math.Exp(float64(-td) / float64(decayTime))
	// w, _ = utils.MathRound(w, 9)
	return w
}
我们来测试下:
func Test_NLOC(t *testing.T) {
	timer := time.NewTimer(time.Second * 10)
	quit := make(chan struct{})

	defer timer.Stop()
	go func() {
		<-timer.C
		close(quit)
	}()

	timex := time.Now()
	go func() {
		n := NewNLOC()
		ticker := time.NewTicker(time.Second * 1)
		for {
			<-ticker.C
			fmt.Println(n.Hot(timex))
		}
	}()

	for {
		<-quit
		return
	}
}
测试结果如下:
0.999999900000005
0.99999980000002
0.999999700000045
0.99999960000008
0.999999500000125
0.99999940000018
0.999999300000245
0.99999920000032
0.999999100000405
0.9999990000005
从上面结果中可以看出,热度是随时间逐渐衰退的
- 二、EWMA 滑动平均
原理请参阅 https://blog.csdn.net/mzpmzk/article/details/80085929
const (
    AVG_METRIC_AGE float64 = 30.0
    DECAY float64 = 2 / (float64(AVG_METRIC_AGE) + 1)
)

type SimpleEWMA struct {
	// 当前平均值。在用Add()添加后,这个值会更新所有数值的平均值。
	value float64
}

// 添加并更新滑动平均值
func (e *SimpleEWMA) Add(value float64) {
	if e.value == 0 { // this is a proxy for "uninitialized"
		e.value = value
	} else {
		e.value = (value * DECAY) + (e.value * (1 - DECAY))
	}
}

// 获取当前滑动平均值
func (e *SimpleEWMA) Value() float64 {
	return e.value
}

// 设置 ewma 值
func (e *SimpleEWMA) Set(value float64) {
	e.value = value
}
编写测试代码测试下:
const testMargin = 0.00000001

var samples = [100]float64{
	4599, 5711, 4746, 4621, 5037, 4218, 4925, 4281, 5207, 5203, 5594, 5149,
	4948, 4994, 6056, 4417, 4973, 4714, 4964, 5280, 5074, 4913, 4119, 4522,
	4631, 4341, 4909, 4750, 4663, 5167, 3683, 4964, 5151, 4892, 4171, 5097,
	3546, 4144, 4551, 6557, 4234, 5026, 5220, 4144, 5547, 4747, 4732, 5327,
	5442, 4176, 4907, 3570, 4684, 4161, 5206, 4952, 4317, 4819, 4668, 4603,
	4885, 4645, 4401, 4362, 5035, 3954, 4738, 4545, 5433, 6326, 5927, 4983,
	5364, 4598, 5071, 5231, 5250, 4621, 4269, 3953, 3308, 3623, 5264, 5322,
	5395, 4753, 4936, 5315, 5243, 5060, 4989, 4921, 4480, 3426, 3687, 4220,
	3197, 5139, 6101, 5279,
}

func withinMargin(a, b float64) bool {
	return math.Abs(a-b) <= testMargin
}

func TestSimpleEWMA(t *testing.T) {
	var e SimpleEWMA
	for _, f := range samples {
		e.Add(f)
	}
	fmt.Println(e.Value())
	if !withinMargin(e.Value(), 4734.500946466118) {
		t.Errorf("e.Value() is %v, wanted %v", e.Value(), 4734.500946466118)
	}
	e.Set(1.0)
	if e.Value() != 1.0 {
		t.Errorf("e.Value() is %v", e.Value())
	}
}
测试成功,加油!!!
引用文章:
- 自适应负载均衡算法原理与实现
- 基于gRPC的注册发现与负载均衡的原理和实战
- 负载均衡-P2C算法
- Kratos 源码分析:Warden 负载均衡算法之 P2C
- Golang 实现加权轮询负载均衡
- 指数加权移动平均(Exponential Weighted Moving Average)
服务部署
生产环境搭建
docker & k8s搭建
详细请看我的下一篇文章
git私有仓库 & 容器私有仓库 & CI、DI
详细请看我的下一篇文章
配置文件编写 & 生成
dockerfile
我们先用网关部分代码来演示
- 执行代码
./cmd.sh gen dockerfile gateway
- 生成文件
code/service/gateway/api/Dockerfile
### 加载基础镜像
FROM golang:alpine AS builder

LABEL stage=gobuilder

ENV CGO_ENABLED 0
ENV GOOS linux
### 设置 go module 代理
ENV GOPROXY https://goproxy.cn,direct

WORKDIR /build/zero

### 下载依赖文件
ADD go.mod .
ADD go.sum .
RUN go mod download
COPY . .
COPY service/gateway/api/etc /app/etc
### 编译源代码
RUN go build -ldflags="-s -w" -o /app/gateway service/gateway/api/gateway.go

### 生成docker镜像
FROM alpine

RUN apk update --no-cache && apk add --no-cache ca-certificates tzdata
ENV TZ Asia/Shanghai

WORKDIR /app
COPY --from=builder /app/gateway /app/gateway
COPY --from=builder /app/etc /app/etc

CMD ["./gateway", "-f", "etc/gateway.prod.yaml"]
从生成的Dockerfile可以看到主要有两个部分
- 加载golang基础镜像,将代码编译为二进制文件
- 加载运行环境基础镜像并生成gateway运行环境的docker镜像
为啥分为两个部分呢,我们不能直接把编译代码和打包镜像放一起吗,这当然是可以的,但是这样会导致docker镜像包会很大,而把编译和打包分开后可以大大减少docker镜像包的大小,方便我们快速分发和部署。
编译代码&镜像打包
➜  go-zero-mall git:(master) ✗ ./cmd.sh docker build gateway
-------- docker build gateway  --------
time: 2022-05-02 00:19:58 msg: ------------ docker build gateway ------------
Untagged: gateway:latest
Deleted: sha256:0eedc326b97f06a3c5d19665309369c4c163e430b6c3d17de8ba9a1ebaf37ca8
[+] Building 31.9s (19/19) FINISHED
 => [internal] load build definition from Dockerfile                            0.0s
 => => transferring dockerfile: 733B                                            0.0s
 => [internal] load .dockerignore                                               0.0s
 => => transferring context: 2B                                                 0.0s
 => [internal] load metadata for docker.io/library/alpine:latest                3.7s
 => [internal] load metadata for docker.io/library/golang:alpine                3.4s
 => [builder 1/8] FROM docker.io/library/golang:alpine@sha256:42d35674864fbb57  0.0s
 => [internal] load build context                                               1.2s
 => => transferring context: 35.78MB                                            1.1s
 => [stage-1 1/5] FROM docker.io/library/alpine@sha256:4edbd2beb5f78b1014028f4  0.0s
 => CACHED [builder 2/8] WORKDIR /build/zero                                    0.0s
 => CACHED [builder 3/8] ADD go.mod .                                           0.0s
 => CACHED [builder 4/8] ADD go.sum .                                           0.0s
 => CACHED [builder 5/8] RUN go mod download                                    0.0s
 => [builder 6/8] COPY . .                                                      0.6s
 => [builder 7/8] COPY service/gateway/api/etc /app/etc                         0.0s
 => [builder 8/8] RUN go build -ldflags="-s -w" -o /app/gateway service/gatew  26.1s
 => CACHED [stage-1 2/5] RUN apk update --no-cache && apk add --no-cache ca-ce  0.0s
 => CACHED [stage-1 3/5] WORKDIR /app                                           0.0s
 => CACHED [stage-1 4/5] COPY --from=builder /app/gateway /app/gateway          0.0s
 => CACHED [stage-1 5/5] COPY --from=builder /app/etc /app/etc                  0.0s
 => exporting to image                                                          0.0s
 => => exporting layers                                                         0.0s
 => => writing image sha256:0eedc326b97f06a3c5d19665309369c4c163e430b6c3d17de8  0.0s
 => => naming to docker.io/library/gateway:latest                               0.0s

Use 'docker scan' to run Snyk tests against images to find vulnerabilities and learn how to fix them
docker images查看docker镜像信息
➜  go-zero-mall git:(master) ✗ docker images
REPOSITORY                  TAG       IMAGE ID       CREATED         SIZE
gateway                     latest    0eedc326b97f   7 days ago      41.6MB
自动部署文件编写deploy.yaml
apiVersion: apps/v1
kind: Deployment
metadata:
  labels:
    app: go-zero-mall-gateway
  name: go-zero-mall-gateway
  namespace: zero   #一定要写名称空间
spec:
  progressDeadlineSeconds: 600
  replicas: 3
  selector:
    matchLabels:
      app: go-zero-mall-gateway
  strategy:
    rollingUpdate:
      maxSurge: 50%
      maxUnavailable: 50%
    type: RollingUpdate
  template:
    metadata:
      labels:
        app: go-zero-mall-gateway
    spec:
      imagePullSecrets:
        - name: aliyun-docker-hub  #提前在项目下配置访问阿里云的账号密码
      affinity:
        podAntiAffinity:
          preferredDuringSchedulingIgnoredDuringExecution:
            - weight: 100
              podAffinityTerm:
                labelSelector:
                  matchLabels:
                    app: go-zero-mall-gateway
                topologyKey: kubernetes.io/hostname
      containers:
        - image: $REGISTRY/$ALIYUNHUB_NAMESPACE/gateway:latest
          imagePullPolicy: Always
          name: app
          ports:
            - containerPort: 8000
              protocol: TCP
          resources:
            limits:
              cpu: 200m
              memory: 60Mi
          terminationMessagePath: /dev/termination-log
          terminationMessagePolicy: File
      dnsPolicy: ClusterFirst
      restartPolicy: Always
      terminationGracePeriodSeconds: 30
---
apiVersion: v1
kind: Service
metadata:
  labels:
    app: go-zero-mall-gateway
  name: go-zero-mall-gateway
  namespace: zero
spec:
  ports:
    - name: http
      port: 8000
      protocol: TCP
      targetPort: 8000
  selector:
    app: go-zero-mall-gateway
  sessionAffinity: None
  type: ClusterIP
通过自动部署文件我们可以指定一些关键指标
- 服务名称
- pod数量
- 自动扩容阀值
- 服务权重
- 容器端口
- cpu&memory最大使用量
通过这些指标我们的服务基本可以稳定运行啦
Jenkins文件编写Jenkinsfile
pipeline {
  agent {
    node {
      label 'go'
    }

  }
  stages {
    stage('clone code') {
      agent none
      steps {
        git(url: 'https://gitee.com/go-open-project/go-zero-mall.git', changelog: true, poll: false)
        sh 'ls -al'
      }
    }

    stage('deploy user') {
      // agent none
      steps {
        container ('go') {
          withCredentials([
            kubeconfigFile(
              credentialsId: env.KUBECONFIG_CREDENTIAL_ID,
              variable: 'KUBECONFIG'
            )])
            {
              sh 'envsubst < code/service/user/rpc/deploy.yaml | kubectl apply -f -'
            }
        }
      }
    }

    stage('deploy product') {
      // agent none
      steps {
        container ('go') {
          withCredentials([
            kubeconfigFile(
              credentialsId: env.KUBECONFIG_CREDENTIAL_ID,
              variable: 'KUBECONFIG'
            )])
            {
              sh 'envsubst < code/service/product/rpc/deploy.yaml | kubectl apply -f -'
            }
        }
      }
    }

    stage('deploy order') {
      // agent none
      steps {
        container ('go') {
          withCredentials([
            kubeconfigFile(
              credentialsId: env.KUBECONFIG_CREDENTIAL_ID,
              variable: 'KUBECONFIG'
            )])
            {
              sh 'envsubst < code/service/order/rpc/deploy.yaml | kubectl apply -f -'
            }
        }
      }
    }

    stage('deploy gateway') {
      // agent none
      steps {
        container ('go') {
          withCredentials([
            kubeconfigFile(
              credentialsId: env.KUBECONFIG_CREDENTIAL_ID,
              variable: 'KUBECONFIG'
            )])
            {
              sh 'envsubst < code/service/gateway/api/deploy.yaml | kubectl apply -f -'
            }
        }
      }
    }

  }
  environment {
    DOCKER_CREDENTIAL_ID = 'dockerhub-id'
    GITHUB_CREDENTIAL_ID = 'github-id'
    KUBECONFIG_CREDENTIAL_ID = 'demo-kubeconfig'
    REGISTRY = 'registry.cn-shanghai.aliyuncs.com'
    DOCKERHUB_NAMESPACE = 'caicaispace'
    ALIYUNHUB_NAMESPACE = 'caicaispace'
    GITHUB_ACCOUNT = 'kubesphere'
    APP_NAME = 'go-zero-mall-gateway'
  }
  parameters {
    string(name: 'TAG_NAME', defaultValue: '', description: '')
  }
}
我们在 DevOps 中设置好环境变量、仓库地址、webhook 后便可在我们推送代码后自动部署我们的项目
说明:我们的容器是在开发环境打包的,我们当然也可以通过 Jenkins 来自动打包镜像
- 自动部署状态
- 服务运行状态
- 调用线上用户登录接口
总结
- 通过 go-zero 可以方便生成dockerfile
- 在
deploy.yaml中指定服务部署指标 - 在
Jenkinsfile中指定服务从哪里来,分别需要部署哪些服务,等等。 - 私有部署
- 镜像服务可以使用
Harbor搭建, - 镜像制品可以使用云服务或
Jenkins来打包生成, - 私有仓库可以使用云服务,gitee,开源仓库服务来搭建
- 镜像服务可以使用