whos-on-my-network
 whos-on-my-network copied to clipboard
Keep an eye on who and when something is connected to your network
Keep and eye on who is on your network and when.
![]()
This tool allows you to identify and keep records of who's on your network and when.
After you scan your network, you can then view devices connected to your network, when they were last seen and keep track of who owns devices (thus allowing you to identify who's on the network).
Pre-built Module and Binary
On every official version change, a release is made with two assets:
-
whos_on_my_network.zip: The whos_on_my_network module with the webapp pre-built. -
whos_on_my_network_binary.zip: A Windows executable of whos_on_my_network (does not support plugins)
The pre-built Windows executable does not use a plugin and will default to the built-in method. To make a build containing a particular plugin yourself, execute
bash package.sh {plugin-name}; this will produce whos_on_my_network.exe which will use the declared plugin.
If you are using Windows, you will also need to install Npcap.
🛠️ Setup
To setup the project, you will need to clone it, install Python dependencies and then build the webapp.
Requirements
- Python 3.6
- Node
- Npcap (Windows Only)
Setup Steps
- Clone this git repository:
git clone https://github.com/brentvollebregt/whos-on-my-network - cd into the project:
cd whos-on-my-network - Create a Python venv:
python -m venv .venv - Activate the Python venv:
.venv/Scripts/activate.bat - Install Python dependencies:
python -m pip install -r requirements.txt - Build the webapp:
cd webapp && npm i && npm run build
🖥️ Usage
There are two primary functions to this tool, scanning and viewing scans. To use the tool, use the whos_on_my_network folder as a Python module by executing python -m whos_on_my_network - this command will show you the usage.
To scan, you have two options; the current command and watch. To view scans, you can host the webapp using start.
Scanning Using current
The current command allows you to run a single scan and see who's currently on the network.
Usage can be found by executing:
python -m whos_on_my_network current --help
Arguments:
| Argument | Description |
|---|---|
| -n, --network-id | Network id to scan. Default is 192.168.1.0/24. |
| -u, --use-plugin | Plugin used to scan network. (see below) |
| -v, --verbose | Verbose output of scans. |
Examples:
| Command | Description |
|---|---|
python -m whos_on_my_network current |
Will scan the network once using all defaults and output a table displaying MAC addresses, IP addresses and hostnames. |
python -m whos_on_my_network current --network-id "192.168.2.0/24" |
Will scan the network once for IP addresses in 192.168.2.0/24 and output a table displaying findings. |
Scanning Using watch
The watch command allows you to run multiple scans on a network with a delay indefinitely. This allows you to keep watching the network automatically as a background task.
Usage can be found by executing:
python -m whos_on_my_network watch --help
| Argument | Description |
|---|---|
| -t, --refresh-time | Seconds until the network is re-scanned. Default is 300s. |
| -n, --network-id | Network id to scan. Default is 192.168.1.0/24. |
| -a, --amount | Amount of times to scan the network. Default is no limit. |
| -u, --use-plugin | Plugin used to scan network. (see below) |
| -v, --verbose | Verbose output of scans. |
Examples:
| Command | Description |
|---|---|
python -m whos_on_my_network watch |
Will repeatedly scan the network using all defaults. |
python -m whos_on_my_network watch --refresh-time 60 |
Will repeatedly scan the network once every minute. |
python -m whos_on_my_network current --network-id "192.168.2.0/24" |
Will repeatedly scan the network for IP addresses in 192.168.2.0/24. |
python -m whos_on_my_network current --amount 5 |
Will scan the network five times and then stop. |
Hosting the Webapp and Server Using start
The start command starts the server that serves the webapp.
| Argument | Description |
|---|---|
| -h, --host | The hostname used to host the server. |
| -p, --port | The port used to host the server. |
Examples:
| Command | Description |
|---|---|
python -m whos_on_my_network start |
Will start the server up at localhost:8080. |
python -m whos_on_my_network start --host 192.168.1.2 --port 7000 |
Will start the server up at 192.168.1.2:7000. |
Screenshots
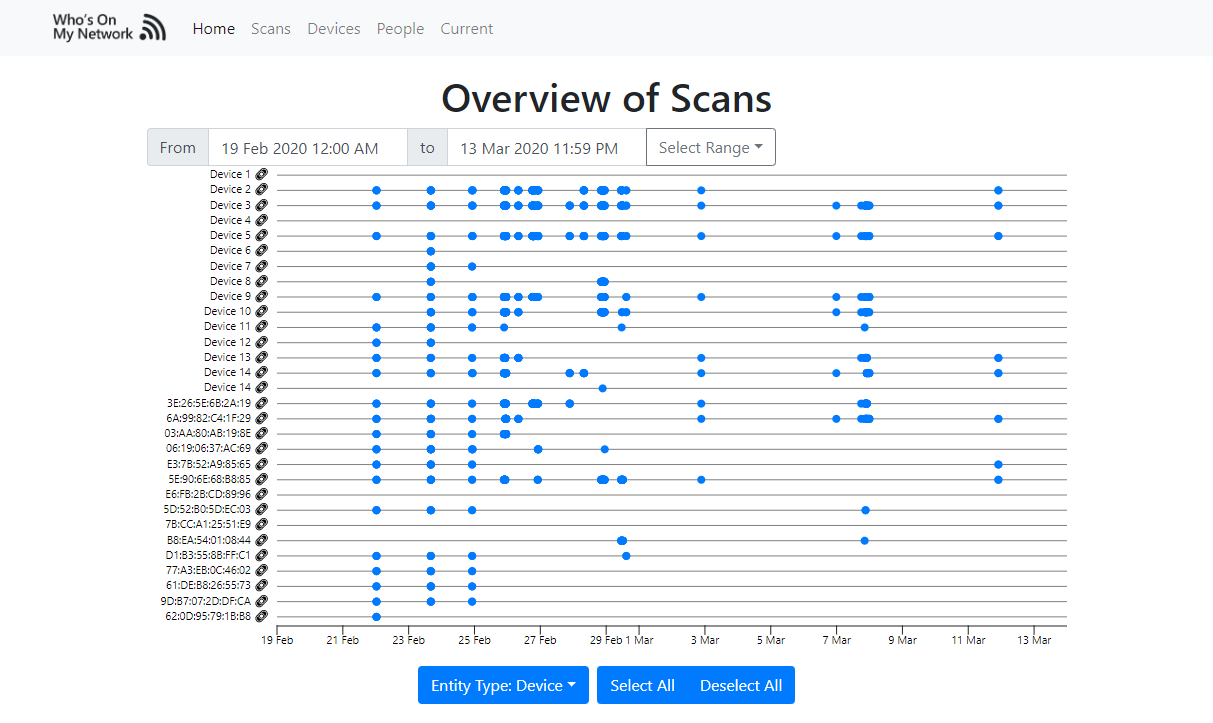
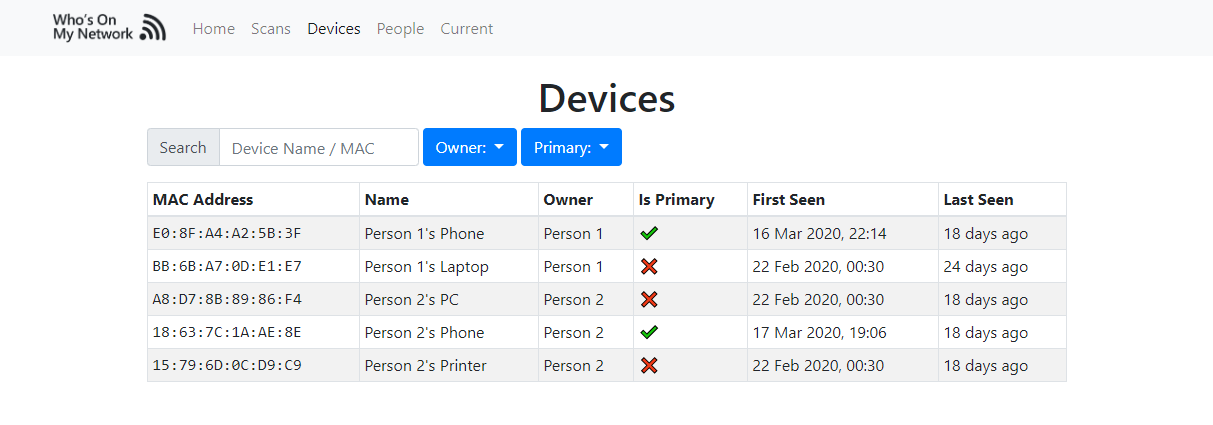
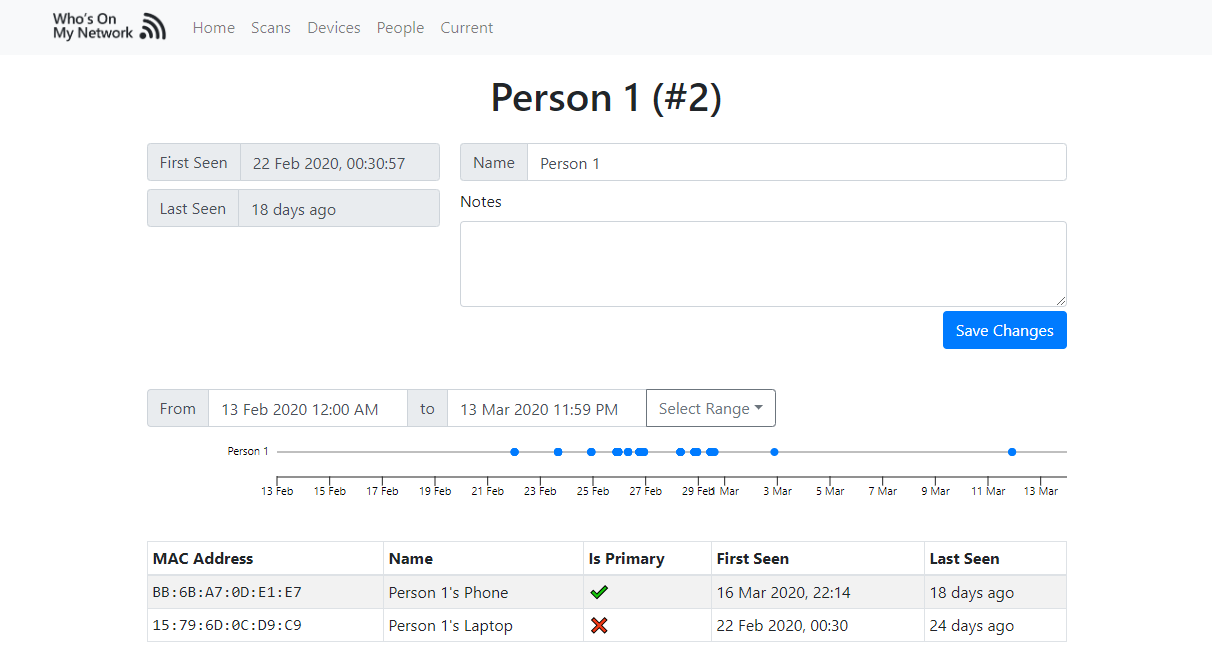
See more in my blog post.
🧪 Development Setup
When running the client (webapp/) in development mode using npm start, the client will use the REACT_APP_API_ROOT environment variable value to decide where to send requests.
The same process for production and development is used for the server; running python -m whos_on_my_network or run.py in a debugger will allow you to set breakpoints and see what is going on.
Examples of using the Python application can be found in
.vscode/launch.json.
❓ How Does This Tool Work?
By default, this tool uses scapy to send ARP packets to all addresses in the provided network range (default is 192.168.1.0/24) to identify what devices are on the network. When a host responds, its MAC address, IP address and hostname are obtained and an entry is added to the SQLite database matched to the current scan.
⚙️ Configuration and Database
When running the module/executable, two files will be created if they do not exist already:
-
config.json: Contains basic configuration for the application -
database.sqlite: Used for scan and user data storage
The location of these files are in the parent directory of the module when not packaged or in %APPDATA%/WhoIsOnMyNetwork (Windows) / $HOME/WhoIsOnMyNetwork (Linux and MacOS) when using a packaged version of the application (exe).
When running the unpacked application, you can force the files to be in the packaged locations by setting the environment variable
FORCE_PACKAGED_MODEtotrue.
🔌 Plugins
The two commands current and watch both have an argument --use-plugin. This allows you to specify a custom Python script in the directory whos_on_my_network/plugins which contains a function named scan that takes two parameters and returns a list of DiscoveredDevice objects as defined in whos_on_my_network.service.scanning.
An example plugin for the ASUS RT-AC58U router has been provided as asus-rt-ac58u.py in the plugins folder. This script logs into the router, identifies who is connected to the router and returns a summary of the information found in the object expected.
A plugin can also be set as the default scanning method by setting default_plugin in config.json to the name of the file without the extension; for example:
{
  "host": "0.0.0.0",
  "port": 8080,
  "verbose": false,
  "default_network_id": "192.168.1.0/24",
  "default_plugin": "asus-rt-ac58u"
}
Metadata
Owner
Metadata
Keep an eye on who and when something is connected to your network