[FEATURE] support \hline in array environment
Description
First of all, great project and thanks so much for making/sharing it!
This is a feature request. I'd like to be able to add horizontal lines (in particular \hline) when working in an array environment.
for example:
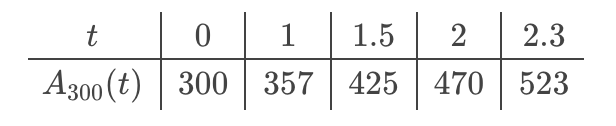
\begin{array}{c|c|c|c|c|c}
t & 0 & 1 & 1.5 & 2 & 2.3 \\ \hline
A_{300}(t) & 300 & 357 & 425 & 470 & 523
\end{array}
would render as:
where as currently it renders like this:

Implementation Notes
Commands: \hline \toprule \midrule and \bottomrule
-
\hlinehas a default width controlled by\arrayrulewidthwhich is set (by the standard classes) to 0.4pt - On the other side,
\topruleand\bottomrulehave a default thicknes controlled by\heavyrulewidthwhich is set to 0.08em - the default thickness for
\midruleis given by the length\lightrulewidth, with an initial value of 0.05em - Additionally,
\toprule,\midruleand\bottomrulehave an optional<length>argument - For
\toprule: the space above is given by\abovetopsep(set to 0pt by default); the space below is given by\belowrulesep(default 0.65ex) - For
\bottomrule: the space above is given by\aboverulesep (set to 0.4ex by default) and the space below is given by\belowbottomsep` (default 0pt). - For
\midrule, the space above is controlled by\aboverulesepand the space below is given by\belowrulesep.
The LaTeX commands \hline, \toprule, \midrule, and \bottomrule are used to create horizontal lines in tables, but they differ in their intended use and appearance. Here's a brief overview of each:
-
\hline:- This command creates a simple horizontal line across the entire width of the table.
- It's often used in basic table formatting to separate rows.
- Example:
\begin{tabular}{|c|c|}
\hline
Column 1 & Column 2 \\
\hline
Data 1 & Data 2 \\
\hline
\end{tabular}
-
\toprule:- Part of the
booktabspackage, this command is used to create a thicker top horizontal line in a table. - It provides a professional look, suitable for publications.
- Example:
\begin{tabular}{cc}
\toprule
Column 1 & Column 2 \\
\midrule
Data 1 & Data 2 \\
\bottomrule
\end{tabular}
- Part of the
-
\midrule:- Also from the
booktabspackage, this command creates a thinner horizontal line compared to\toprule. - It is used to separate the header from the body or different sections of the table.
- Example:
\begin{tabular}{cc}
\toprule
Column 1 & Column 2 \\
\midrule
Data 1 & Data 2 \\
\bottomrule
\end{tabular}
- Also from the
-
\bottomrule:- This command, like
\toprule, is part of thebooktabspackage and creates a thicker horizontal line at the bottom of the table. - It is used to signify the end of the table's data.
- Example:
\begin{tabular}{cc}
\toprule
Column 1 & Column 2 \\
\midrule
Data 1 & Data 2 \\
\bottomrule
\end{tabular}
- This command, like
\hline is for simple horizontal lines, while \toprule, \midrule, and \bottomrule from the booktabs package are used for creating professional-looking tables with different thicknesses for the top, middle, and bottom lines respectively.