lit-translate
 lit-translate copied to clipboard
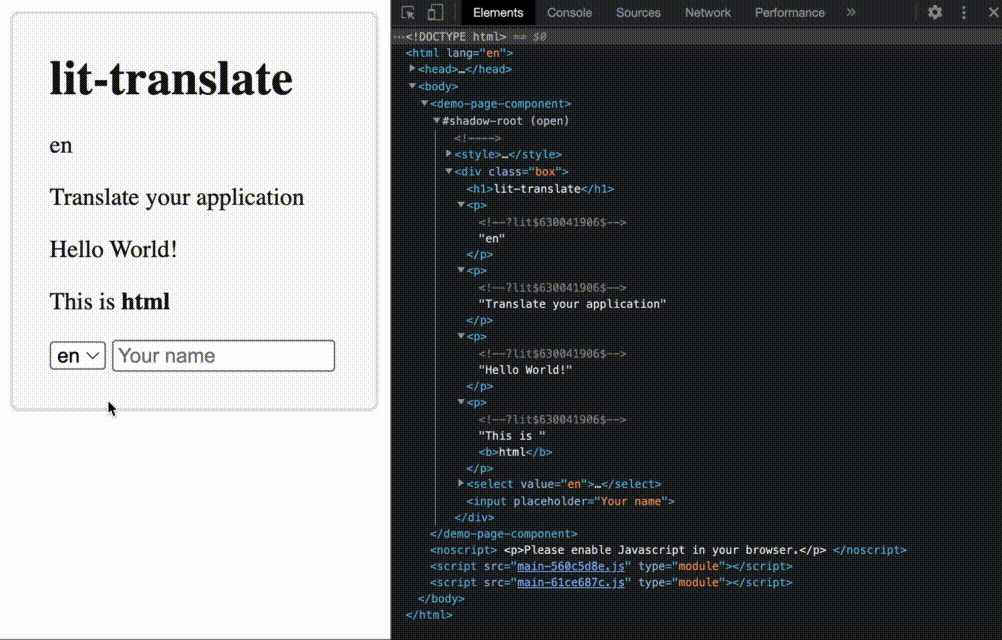
A blazing-fast and lightweight internationalization (i18n) library for your next web-based project
lit-translate
![]()
![]()
![]()
![]()
![]()
![]()
A blazing-fast and lightweight internationalization (i18n) library for your next web-based project
- Contains a lit directive that automatically updates the translations when the language changes
- Has a simple API that can return a translation for a given key using the dot notation (eg.
get("home.header.title")) - Works very well with JSON based translation data-structures
- Can interpolate values into the strings using the {{ key }} syntax out of the box
- Caches the translations for maximum performance
- Has a very small footprint, approximately 800 bytes minified & gzipped (2kb without)
- Extremely customizable, just about everything can be changed (eg. choose your own translations loader, how to interpolate values, empty placeholder and how to look up the strings)
- Check out the playground here

➤ Table of Contents
- ➤ Installation
- ➤ 1. Define the translations
- ➤ 2. Register the translate config
- ➤ 3. Set the language
- ➤ 4. Get the translations
- ➤ 5. Interpolate values
- ➤ 6. Use the
translatedirective withlit - ➤ Wait for strings to be loaded before displaying your app
- ➤ Advanced Customisation
- Format text with
IntlMessageFormat - Use the default translations as keys
- Format text with
- ➤ Typesafe Translations
- 1. Add
resolveJsonModuleto your tsconfig - 2. Use the
typedKeysFactoryfunction - 3. Import the typed functions
- 1. Add
- ➤
litDirectives- Re-render a value when the language changes with the
langChangeddirective - Create your own
litdirectives that re-renders a value when the language changes
- Re-render a value when the language changes with the
- ➤ License
➤ Installation
npm i lit-translate
➤ 1. Define the translations
Create a .json file for each language you want to support. Heres an example of how en.json could look like.
{
  "header": {
    "title": "Hello",
    "subtitle": "World"
  },
  "cta": {
    "awesome": "{{ animals }} are awesome!",
    "cats": "Cats"
  },
  "footer": {
    "html": "<b>Bold text</b>"
  }
}
➤ 2. Register the translate config
Use the registerTranslateConfig function to register a loader that loads translations based on the selected language. In the example below, a loader is registered that uses the fetch API to load a .json file for the selected language.
import { registerTranslateConfig } from "lit-translate";

registerTranslateConfig({
  loader: lang => fetch(`${lang}.json`).then(res => res.json())
});
➤ 3. Set the language
Set the language with the use function. When called it will use the registered loader from step 2 to load the strings for the selected language.
import { use } from "lit-translate";

use("en");
➤ 4. Get the translations
Get translations with the get function. Give this function a string of keys (separated with .) that points to the desired translation in the JSON structure. The example below is based on the translations defined in step 1 and registered in step 2.
import { get } from "lit-translate";

get("header.title"); // "Hello"
get("header.subtitle"); // "World"
➤ 5. Interpolate values
When using the get function it is possible to interpolate values (replacing placeholders with content). As default, you can use the {{ key }} syntax in your translations and provide an object with values replacing those defined in the translations when using the get function. The example below is based on the strings defined in step 1 and registered in step 2.
import { get } from "lit-translate";

get("cta.awesome", { animals: get("cta.cats") }); // Cats are awesome!
➤ 6. Use the translate directive with lit
If you are using lit you might want to use the translate directive. This directive makes sure to automatically update all the translated parts when the use function is called with a new language. If your strings contain HTML you can use the translateUnsafeHTML directive. The example below is based on the strings defined in step 1 and registered in step 2.
import { translate, translateUnsafeHTML } from "lit-translate";
import { LitElement, html } from "lit";
import { customElement } from "lit/decorators.js";

@customElement("my-element")
class MyElement extends LitElement {
  render () {
    html`
      <h1>${translate("header.title")}</h1>
      <p>${translate("header.subtitle")}</p>
      <span>${translate("cta.awesome", { animals: () => get("cta.cats") })}</span>
      <span>${translateUnsafeHTML("footer.html")}</span>
    `;
  }
}
➤ Wait for strings to be loaded before displaying your app
You might want to avoid empty placeholders being shown initially before any of the translation strings have been loaded. This it how you could defer the first render of your app until the strings have been loaded.
import { use, translate } from "lit-translate";
import { LitElement, html, PropertyValues } from "lit";
import { customElement, state } from "lit/decorators.js";

@customElement("my-app")
export class MyApp extends LitElement {

  // Defer the first update of the component until the strings has been loaded to avoid empty strings being shown
  @state() hasLoadedStrings = false;

  protected shouldUpdate(props: PropertyValues) {
    return this.hasLoadedStrings && super.shouldUpdate(props);
  }

  // Load the initial language and mark that the strings has been loaded so the component can render.
  async connectedCallback() {
    super.connectedCallback();

    await use("en");
    this.hasLoadedStrings = true;
  }

  // Render the component
  protected render () {
    return html`
      <p>${translate("title")}</p>
    `;
  }
}
➤ Advanced Customisation
If you want you can customise just about anything by overwriting the configuration hooks. Below is an example of what you can customise. Try it as a playground here.
import { registerTranslateConfig, extract, get, use } from "lit-translate";

registerTranslateConfig({

  // Loads the language by returning a JSON structure for a given language
  loader: lang => {
    switch (lang) {

      // English strings
      case "en":
        return {
          app: {
            title: "This is a title",
            description: "This description is {placeholder}!"
          },
          awesome: "awesome"
        };

      // Danish strings
      case "da":
        return {
          app: {
            title: "Dette er en titel",
            description: "Denne beskrivelse er {placeholder}!"
          },
          awesome: "fed"
        };

      default:
        throw new Error(`The language ${lang} is not supported..`);
    }
  },

  // Interpolate the values using a key syntax.
  interpolate: (text, values) => {
    for (const [key, value] of Object.entries(extract(values || {}))) {
      text = text.replace(new RegExp(`{.*${key}.*}`, `gm`), String(extract(value)));
    }


    return text;
  },

  // Returns a string for a given key
  lookup: (key, config) => {

    // Split the key in parts (example: hello.world)
    const parts = key.split(" -> ");

    // Find the string by traversing through the strings matching the chain of keys
    let string = config.strings;

    // Shift through all the parts of the key while matching with the strings.
    // Do not continue if the string is not defined or if we have traversed all the key parts
    while (string != null && parts.length > 0) {
      string = string[parts.shift()];
    }

    // Make sure the string is in fact a string!
    return string != null ? string.toString() : null;
  },

  // Formats empty placeholders (eg. !da.headline.title!) if lookup returns null
  empty: (key, config) => `!${config.lang}.${key}!`
});

use("en").then(() => {
  get("app -> description", { placeholder: get("awesome") }); // Will return "This description is awesome"
});
Format text with IntlMessageFormat
IntlMessageFormat is a library that formats ICU message strings with number, date, plural, and select placeholders to create localized messages using ICU placeholders. This library is a good addition to lit-translate. You can add it to the interpolate hook to get the benefits as shown in the following example. Try the example as a playground here.
import { registerTranslateConfig, extract } from "lit-translate";
import { IntlMessageFormat } from "intl-messageformat";

registerTranslateConfig({
  loader: lang => {
    switch (lang) {
      case "en":
        return {
          photos: `You have {numPhotos, plural, =0 {no photos.} =1 {one photo.} other {# photos.}}`
        };

      case "en":
        return {
          photos: `Du har {numPhotos, plural, =0 {ingen billeder.} =1 {et billede.} other {# billeder.}}`
        };

      default:
        throw new Error(`The language ${lang} is not supported..`);
    }
  },

  // Use the "intl-messageformat" library for formatting.
  interpolate: (text, values, config) => {
    const msg = new IntlMessageFormat(text, config.lang);
    return msg.format(extract(values));
  }
});

use("en").then(() => {
  get("photos", {numPhotos: 0}); // Will return "You have no photos"
  get("photos", {numPhotos: 1}); // Will return "You have one photo."
  get("photos", {numPhotos: 5}); // Will return "You have 5 photos."
});
Use the default translations as keys
Inspired by GNU gettext you can use the default translation as keys. The benefit of doing this is that you will save typing time and reduce code clutter. You can use xgettext to extract the translatable strings from your code and then use po2json to turn your .po files into .json files. The following code shows an example of how you could implement this. Try it as a playground here.
import { registerTranslateConfig, use, get } from "lit-translate";

registerTranslateConfig({
  loader: lang => {
    switch (lang) {
      case "da":
        return {
          "The page is being loaded...": "Siden indlæses..."
        };
      default:
        return {};
    }
  },
  lookup: (key, config) => config.strings != null && config.strings[key] != null ? config.strings[key].toString() : key,
  empty: key => key,
});

get("The page is being loaded..."); // Will return "The page is being loaded..."

use("da").then(() => {
  get("The page is being loaded..."); // Will return "Siden indlæses..."
});
➤ Typesafe Translations
If you have a lot of translation keys you can quickly lose the overview of your strings. If you use Typescript you can make the keys of your translation keys typesafe - this will also give you autocompletion when you enter the keys. To achieve this you have to do the following:
1. Add resolveJsonModule to your tsconfig
Add resolveJsonModule to your tsconfig which will allow us to import modules with a .json extension.
{
  ...
  "compilerOptions": {
    ...
    "resolveJsonModule": true
  }
}
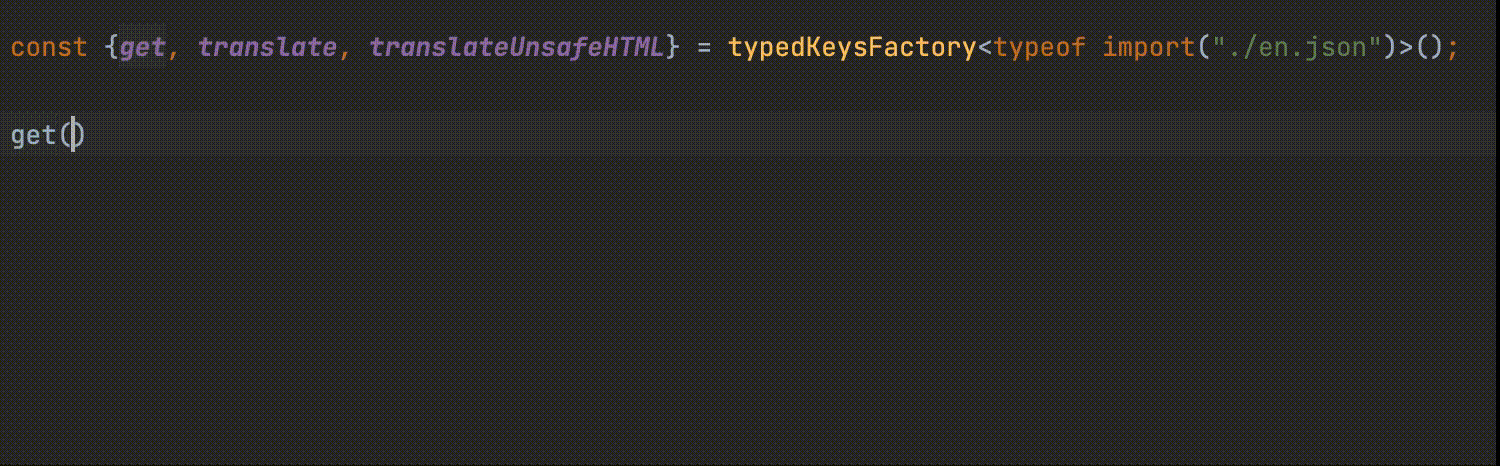
2. Use the typedKeysFactory function
Create a file, for example typed-lit-translate.ts. Then use the factory function typedKeysFactory and provide it with the type of one of your translation files. Use typeof import(..) to import the .json file and get the type. Provide this type to the factory function, and it will return a version of get, translate and translateUnsafeHTML where the keys are typed. Export these and make sure to import from your typed-lit-translate.ts file instead of lit-translate.
// typed-lit-translate.ts
import { typedKeysFactory } from "lit-translate";

const {get, translate, translateUnsafeHTML} = typedKeysFactory<typeof import("en.json")>();
export {get, translate, translateUnsafeHTML};
3. Import the typed functions
Make sure to import the typed versions of get, translate and translateUnsafeHTML that you have created instead of importing from lit-translate.
import { get } from "typed-lit-translate.ts";

get("this.key.is.typed");
➤ lit Directives
Re-render a value when the language changes with the langChanged directive
Use the langChanged directive to re-render a value when the language changes.
import { langChanged, translateConfig } from "lit-translate";
import { html, LitElement, TemplateResult } from "lit";
import { customElement } from "lit/decorators.js";

@customElement("my-component")
export class MyComponent extends LitElement {
  protected render(): TemplateResult {
    return html`
      <img src="${langChanged(() => `img-${translateConfig.lang || "en"}.png`)}" />
    `;
  }
}
Create your own lit directives that re-renders a value when the language changes
Extend the LangChangedDirectiveBase base class to create your own directives that re-renders a value when the language changes. Below is an example of a directive that localizes assets paths based on the selected language.
import { LangChangedDirectiveBase, translateConfig } from "lit-translate";
import { directive } from "lit/directive.js";

export const localizeAssetPath = directive(class extends LangChangedDirectiveBase {
  render (fileName: string, config = translateConfig) {
    return this.renderValue(() => `localized-assets/${config.lang || "en"}/${fileName}`);
  }
});
➤ License
Licensed under MIT.