TrackNetV3
 TrackNetV3 copied to clipboard
Beyond TrackNetV2 ,and "First" TrackNet using Attention
TrackNetV3 : beyond TrackNetV2 ,and First TrackNet using Attention
TrackNet is a semantic segmentation tracking network.
It has the most advanced accuracy in the current TrackNet system, and also has the best accuracy for Few Shot Learning!
擁有目前TrackNet追蹤網路中最先進的精準度,且對於小樣本同樣有最佳的精準度!
V2 and V3 are trained on the same small sample dataset (with the following distributions: training set = 32,421 images, validation set = 3,717 images, test set = 11,118 images).
V2 跟 V3 是在同樣的小樣本資料集訓練(以下 train set=32421張 valid set=3717張 test set=11118張)
Trainset : https://github.com/alenzenx/TrackNetV3/tree/main/raw_data
Testset : https://github.com/alenzenx/TrackNetV3/tree/main/raw_data2
Paper : Click to obtain TrackNetV3 paper
TrackNetV3 architecture

Key component

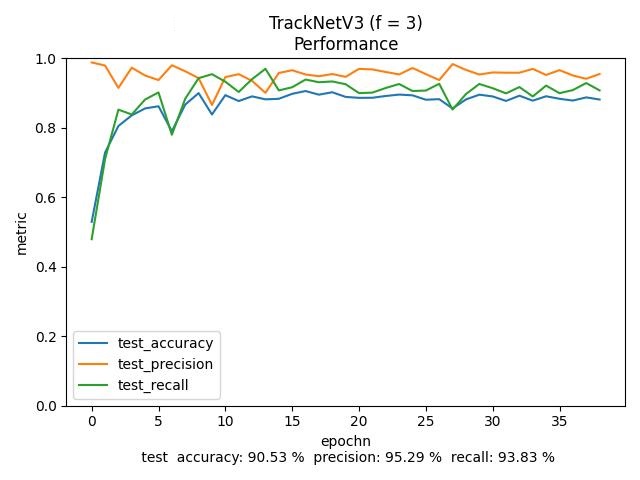
TrackNetV3 best accuracy in small sample dataset: 90.53%
Click to obtain training weights | 點擊以獲取權重 : 90.53%
model from : model.py
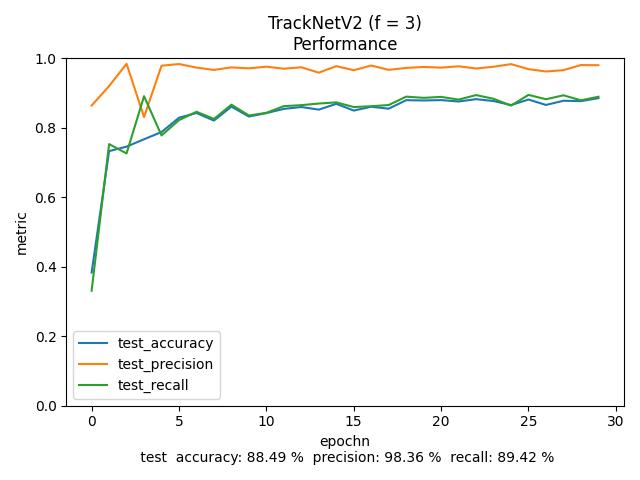
TrackNetV2 best accuracy in small sample dataset: 88.49%
model from : model原始檔.py
環境建議:
os system support :
-
windows 10 -
windows 11 -
ubuntu -
others Linux
python = 3.7.9~3.9.4
cuda = 11.7 or others
cudnn = 8.9.0 or others (在windows下cudnn裡的檔案請全部拖進cuda中,不然tensorflow可能會報錯)
安裝步驟 :
請先檢查有沒有 tutorial-env 的資料夾,有的話請先整個刪除,重新安裝虛擬環境
only Windows :
-
python 3.9.4安裝時要 Add Python 3.9 to PATH -
tensorflow安裝前,請先在 Windows 上啟用長路徑 -
tensorflow安裝前,要下載並安裝Microsoft Visual C++ Redistributable for Visual Studio 2015、2017 和 2019 。
安裝虛擬環境 :
python -m venv tutorial-env
安裝pytorch(cuda11.7) :
pip3 install torch torchvision torchaudio --index-url https://download.pytorch.org/whl/cu117
安裝tensorflow-GPU(大概會安裝tensorflow==2.10.0) :
pip install "tensorflow<2.11"
安裝其他套件 :
pip install -r requirements.txt
如何自己做數據集:
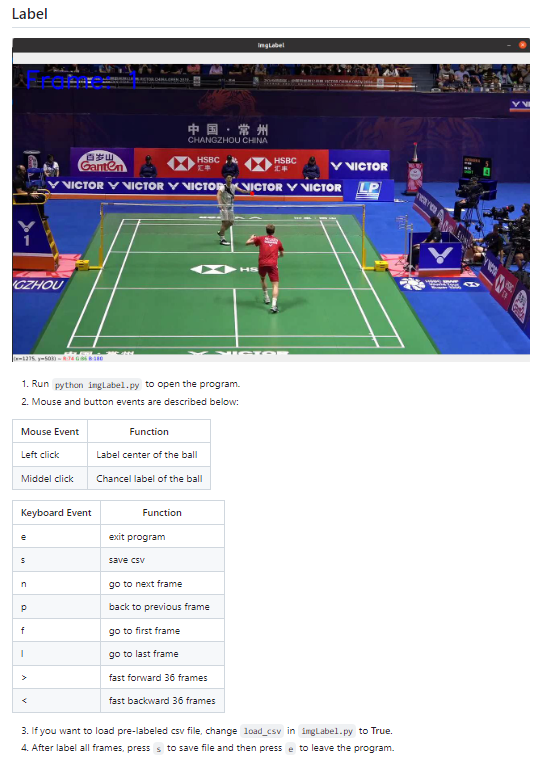
標註video:(會產生csv)
python imgLabel.py --label_video_path=你要標註的影片
使用此連結的標註方法
全部的影片都標註完成後,請自行分開訓練集與測試集(驗證集)
1.成對的
訓練集:影片與csv檔丟到raw_data資料夾2.成對的
測試集(驗證集):影片與csv檔丟到raw_data2資料夾
注意! 如果剛下載專案raw_data資料夾與raw_data2已經存在檔案的話,代表我已經標註好了,你可以選擇使用我標註的直接訓練,也可以自行標註。
TrackNetV2_Dataset資料夾請保持下列形式:
    TrackNetV2_Dataset
                ├─ train
                |
                |
                └─ test
注意! 除了上述的train與test,TrackNetV2_Dataset底下的其他檔案請在標註前都刪除(包括train底下的資料夾與test底下的資料夾)
轉換資料集的格式 : 運行 zz_Tracknet_badminton_DataConvert.py
如果是要轉換訓練集
請在 zz_Tracknet_badminton_DataConvert.py 裡更改
original_raw_data = 'raw_data'
target_folder = 'TrackNetV2_Dataset/train'
然後運行 python zz_Tracknet_badminton_DataConvert.py
如果是要轉換測試集(驗證集)
請在 zz_Tracknet_badminton_DataConvert.py 裡更改
original_raw_data = 'raw_data2'
target_folder = 'TrackNetV2_Dataset/test'
然後運行 python zz_Tracknet_badminton_DataConvert.py
轉換後檢查及預處理影像:
python preprocess.py
注意! 如果 TrackNetV2_Dataset 裡已經有訓練集與測試集(驗證集)且2個資料夾裡都有match1、match2...資料夾,即可開始訓練。
備註:
- zz_Tracknet_badminton_DataConvert.py的檔案是 將imgLabel.py生成的raw_data 轉換成 Tracknetv2-main 所需要的格式。 因為原始資料的標註軟體沒給,所以用imgLabel.py代替,所以需要一個 zz_Tracknet_badminton_DataConvert.py 來轉格式。
- 在Windows下請不要用python3,請使用python
如何開始訓練:
請注意訓練時的batchsize,會關係到專屬GPU記憶體的大小, 我使用的 GPU 是 Nvidia RTX3060 12G ,我使用的batchsize=4
訓練:
python train.py --num_frame 3 --epochs 30 --batch_size 4 --learning_rate 0.001 --save_dir exp
預測 :
python predict.py --video_file=test.mp4 --model_file=exp/model_best.pt --save_dir pred_result
預測後使用 : 去躁及 smooth 羽球預測的曲線
python denoise.py --input_csv=pred_result/test_ball.csv
smooth 羽球預測的曲線後 : predict 優化後的影片
python show_trajectory.py --video_file test.mp4 --csv_file pred_result/test_ball.csv --save_dir pred_result
smooth 羽球預測的曲線後 : 預測擊球時刻
python event_detection.py --input_csv=pred_result/test_ball.csv
reference
TrackNetV3 是參考原始版本的 TrackNetV2 及 Resnet 版本的 TrackNet-Badminton-Tracking-tensorflow2 加以改進的TrackNet版本。