ghost-cursor
 ghost-cursor copied to clipboard
🖱️ Generate human-like mouse movements with puppeteer or on any 2D plane
Ghost Cursor

Generate realistic, human-like mouse movement data between coordinates or navigate between elements with puppeteer like the definitely-not-robot you are.
Oh yeah? Could a robot do this?
Installation
yarn add ghost-cursor
or with npm
npm install ghost-cursor
Usage
Generating movement data between 2 coordinates.
import { path } from "ghost-cursor"

const from = { x: 100, y: 100 }
const to = { x: 600, y: 700 }

const route = path(from, to)

/**
 * [
 *   { x: 100, y: 100 },
 *   { x: 108.75573501957051, y: 102.83608396351725 },
 *   { x: 117.54686481838543, y: 106.20019239793275 },
 *   { x: 126.3749821408895, y: 110.08364505509256 },
 *   { x: 135.24167973152743, y: 114.47776168684264 }
 *   ... and so on
 * ]
 */
Usage with puppeteer:
import { createCursor } from "ghost-cursor"
import puppeteer from "puppeteer"

const run = async (url) => {
  const selector = "#sign-up button"
  const browser = await puppeteer.launch({ headless: false });
  const page = await browser.newPage()
  const cursor = createCursor(page)
  await page.goto(url)
  await page.waitForSelector(selector)
  await cursor.click(selector)
  // shorthand for
  // await cursor.move(selector)
  // await cursor.click()
}
Puppeteer-specific behavior
cursor.move()will automatically overshoot or slightly miss and re-adjust for elements that are too far away from the cursor's starting point.- When moving over objects, a random coordinate that's within the element will be selected instead of hovering over the exact center of the element.
- The speed of the mouse will take the distance and the size of the element you're clicking on into account.

Ghost cursor in action on a form
Methods
toggleRandomMove(random: boolean): void
Toggles random mouse movements on or off.
click(selector?: string | ElementHandle, options?: ClickOptions): Promise<void>
Simulates a mouse click at the specified selector or element.
- selector (optional): CSS selector or ElementHandle to identify the target element.
- options (optional): Additional options for clicking.
hesitate (number):Delay before initiating the click action in milliseconds.waitForClick (number):Delay after pressing the mouse button in milliseconds.moveDelay (number):Delay after moving the mouse in milliseconds.
move(selector: string | ElementHandle, options?: MoveOptions): Promise<void>
Moves the mouse to the specified selector or element.
- selector: CSS selector or ElementHandle to identify the target element.
- options (optional): Additional options for moving.
paddingPercentage (number):Percentage of padding to be added around the element. Default is0.waitForSelector (number):Time to wait for the selector to appear in milliseconds.moveDelay (number):Delay after moving the mouse in milliseconds.maxTries (number):Maximum number of attempts to mouse-over the element. Default is10.moveSpeed (number):Speed of mouse movement.
moveTo(destination: Vector): Promise<void>
Moves the mouse to the specified destination point.
- destination: An object with
xandycoordinates representing the target position. For example,{ x: 500, y: 300 }.
Other Utility Methods
installMouseHelper(page: Page): Promise<void>
Installs a mouse helper on the page. Makes pointer visible. Use for debugging only.
getRandomPagePoint(page: Page): Promise<Vector>
Gets a random point on the browser window.
path(point: Vector, target: Vector, optionsOrSpread?: number | PathOptions): Vector[]
Generates a set of points for mouse movement between two coordinates.
- point: Starting point of the movement.
- target: Ending point of the movement.
- optionsOrSpread (optional): Additional options for generating the path.
spreadOverride (number):Override the spread of the generated path.moveSpeed (number):Speed of mouse movement.
How does it work
Bezier curves do almost all the work here. They let us create an infinite amount of curves between any 2 points we want and they look quite human-like. (At least moreso than alternatives like perlin or simplex noise)
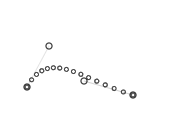
The magic comes from being able to set multiple points for the curve to go through. This is done by picking 2 coordinates randomly in a limited area above and under the curve.
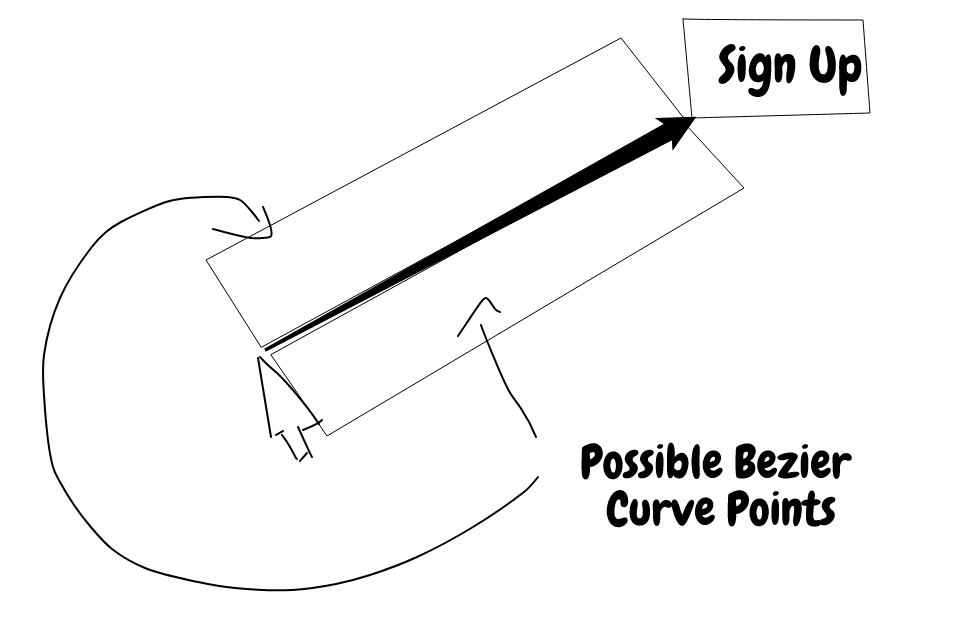
However, we don't want wonky looking cubic curves when using this method because nobody really moves their mouse that way, so only one side of the line is picked when generating random points.
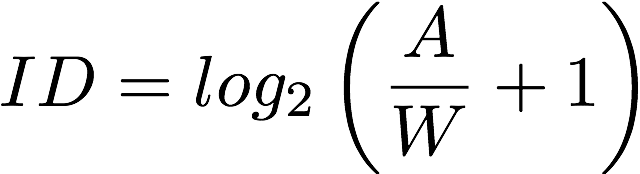 When calculating how fast the mouse should be moving we use Fitts's Law
to determine the amount of points we should be returning relative to the width of the element being clicked on and the distance
between the mouse and the object.
When calculating how fast the mouse should be moving we use Fitts's Law
to determine the amount of points we should be returning relative to the width of the element being clicked on and the distance
between the mouse and the object.
To turn on logging, please set your DEBUG env variable like so:
- OSX:
DEBUG="ghost-cursor:*" - Linux:
DEBUG="ghost-cursor:*" - Windows CMD:
set DEBUG=ghost-cursor:* - Windows PowerShell:
$env:DEBUG = "ghost-cursor:*"