bigmac
 bigmac copied to clipboard
Big Mac, macOS 11 Big Sur and macOS Monterey disk installer and back up tool for Intel based Macs
🍔 Apple Software Restore - seriously broken when run from within an app!
One new development that is plaguing the development of BigMac 2 and 3 is the state of Apple Software Restore or ASR.
When running it as privileged / sudo as root within bigmac, it cannot clone the 800MB installer image and will receive the following error:
Couldn't set up partitions on target device - operation DeleteAPFSVolume, line #5502 - Resource busy
This same command works fine in the Terminal.
bigmac2 is currently in a broken state until I find a fix. One workaround is to go back a 100% shell script experience, or a hybrid that does this step in terminal via a menu bar app.
in case you are wondering what is the command that is being skipped here it is:
sudo /usr/sbin/asr -s /Users/Shared/bigmac2/bigmac2.dmg -t /Volumes/bigmac2 -nov -nop -er
^ If you run this command manually, you should be able to continue creating the installer disk.
My guess is the permissions when run from an app even as root, do not carry over to asr's child processes.
🍔 After reviewing Big Mac 2 and its technicial issues expanding it.
I've decided to start working on BigMac 3. The plan is to turn it into a menu bar app and have it designed in the order show operations should proceed. This will be an complete overall, but hopefully it will be much easier to troubleshoot.
BigMac 3 will have some nice features like a GUI for sudo and it will support not only admin/password, but Touch ID, Apple Watch and even a Yubikey! This change will work within the terminal as well, but smart enough not to affect ssh.
The main reason for this is Monterey 12.4 requires sudo for Apple Software Restore. Using other types of admin privileges doesn't work which is driving me bonkers! The best alternative is to give sudo a full gui.
BigMac 3 will only ask for privileges when it needs it. Usually when "Installing..." you will be asked for your credentials. For more common operations such as downloading, bigmac2 will use your downloads folder. Easy peasy.
BigMac 3 plans to support
- iMac (models from 2015)
- MacBook Air (models from 2015 and 2017 models)
- MacBook Pro (2015 and 2016 models)
- Mac mini (2014 models)
- Mac Pro (2013 model: cylinder/trash can)
- MacBook (2016 model)
and previous models that are capable of running Metal
When?
Hope to have something later this fall. As parts are working, it will be uploaded. There will be a check list etc etc
🍔 Big Mac 2.0.9 build 10
BigMac2 is planning to add Ventura support for the following Unsupported Macs.
I believe all there models can be supported and they also will not have to worry about race conditons.
These Macs should all support Metal v2. I do not see any reason why they will not work with BigMac2 provided support gets added.
🐞 Critical Bug
For those who are using TouchID for sudo, there is a problem with BigMac2's priveleged launcher.
This will be fixed as soon as possible with a new priveleged launcher.
workaround open terminal:
sudo /Applications/bigmac2.app/Contents/MacOS/bigmac2
Added Support for macOS Big Sur 11.6.8, "macOS Monterey 12.5 as of 8.13.22
Because of race conditions during macOS boot with Mac Pros years 2008 to 2012, Open Core Legacy Patcher is recommended and OCLP can compliement BigMac2. I will eventually produce a guide on how to make the two products work seamlessly with each other.
For Mac enthusiasts who want to run macOS Big Sur or macOS Monterey on Unsupported Mac hardware.
Bluetooth, WiFi, Handoff possible on Monterey (Mac Pro 3,1 4,1 5,1):
This weekend I started experimenting with a Lenovo WiFi 802.11ac/Bluetooth 4.2LE PCIe card using a combination of Open Source drivers that mess well with Apple's and was able to get Handoff working with Monterey Beta 2 and currently have WiFi and BT working on Big Sir 11.2.3 and Monterey Beta 2 and 3.
The culprit for my BCM 20702B0 card not working after Monterey Beta 1 is USB. Many users are modding the card and re-routing USB to a USB 3.0 card or USB 2.0 Hub. I use the same idea and routed the USB from the Lenovo PCIe card to a USB 3.0 port. This works on both Big Sur and Monterey. I lose a PCIe slot, but I can live with that.
First Time User Guide macOS 11.2.3 (from an unsupported Mac)
-
If running Bigmac2 recovery / install disk from OWC 2.5" SSD, use a 4x PCIe slot (on Mac Pro 3,1 use the 3rd PCIe slot, not the 1st or 2nd 16x slots)
-
If Bigmac2 app does not run, try resigning it:
codesign --force --deep --sign - /Applications/bigmac2.app -
If you have Bluetooth 2 EDR Card, remove it. You can reinstall it later after you run the Disable Bluetooth patch
-
For 2008 Mac Pros: If you have not installed dosdude1's APFS ROM Patcher, do that first. (2009 - 2012 Mac Pros with upgraded firmware do not need this),
-
If you want native WiFi and BT4, do yourself a huge favor and get a 802.11ac/BT4LE Broadcom black iMac style combo card. This will also give you Airdrop and Handoff without any weird hacks.
-
Install BigMac 2 to an external hard drive or USB Flash thumb drive (should be relatively fast and min of 32 GB)
-
Next disable SIP. Boot BigMac 2 up from an external USB 2.0 on an unsupported Mac:
csrutilcsrutil disablecsrutil authenticated-root disable
-
This should stop the Kill -9 errors users have been getting
-
BigMac2 should behave from the USB 2.0 disk and on Internal SSDs. If you ZAP your PRAM, repeat.
-
If you cannot disable SIP, do this from a Recovery Disk or Create install media disk.
Installation of macOS 11.2.3 from a Supported Intel Mac
-
Boot into Recovery: Cmd-R at boot
-
Open Terminal. These next steps are required to run BigMac2 and CloneToolX from a bigmac2 install disk from a Supported Mac:
csrutilcsrutil disablecsrutil authenticated-root disable
-
Download BigMac2 beta
-
if Bigmac2 app does not run, try resigning it:
codesign --force --deep --sign - /Applications/bigmac2.app -
Select install macOS Monterey beta 2
-
Boot from bigmac2
-
From the Springboard, launch bigmac2
-
From bigmac2's pre install tab, Launch the installer. In five seconds, the macOS installer will be shown.
-
Several reboots will happen
-
When welcome screen shows, shutdown.
-
Boot back into the bigmac2 intall disk
-
For Mac Pro 3,1 run the Telemtery post install by itself
-
Then for all systems, delete the APFS Snapshot by itself
-
Shutdown
-
Now see if the USB 2.0 install boots on your unsupported Mac (this will be slow)
-
If success, you can now clone your system to BigMac. Besure to remove the live snapshot on the clone using bigmac delete snapshot.
-
Install any other post install items from bigMac2 and also check Bless and update KCs.
Future OC instructions when BM includes OC integration:
- placeholder
Monterey Beta 2 is Experimental
- This is what we know so far:
- Legacy WiFi cards will not work. Upgrade to 802.11ac/BT4LE Cards
- BlueTooth 4LE 20702B0 Cards are currently only working with beta 1.
- Having zero luck with USB Bluetooth cards on Monterery.
- We will be testing IntelWireless WiFi / BT combo cards soon with third party drivers.
- USB 2.0 devices will only work with a USB 3.0 Hub or Switch. This includes Apple USB 2.0 Devices. ;(
- If the progress bar boots slowly and not far, that usually means that it will boot up.
- With Race Condition, a full system seems to boot better when not in Verbose mode. This could just be voodoo.
- For AMD cards MouSSE is not needed. It's only needed on Mojave. I run an RX 580 8GB flashed and a Radeon Pro WX4100 non flashed. Neither need MouSSE. It will be removed from future versions of bigmac2.

Recommended Flash Drive or a USB 2.0 / 3.0 SSD
For Big Mac 2 installer disks, I use Samsung Flash Drive FIT Media 32GB. Once you have disabled SIP and authenticated-root, you can install BigMac 2 to an internal SSD or Harddrive on a 32GB APFS Partition. Remember if you ZAP your PRAM, you'll need to use your USB 2.0 Drive instead.
Here are some screenshots and notes
Select your macOS version. Then to download it from Apple click "Download macOS"

Click "Create Installer Disk" Erase an APFS partition, SSD or Fast Flash Thumb drive (32GB or bigger)
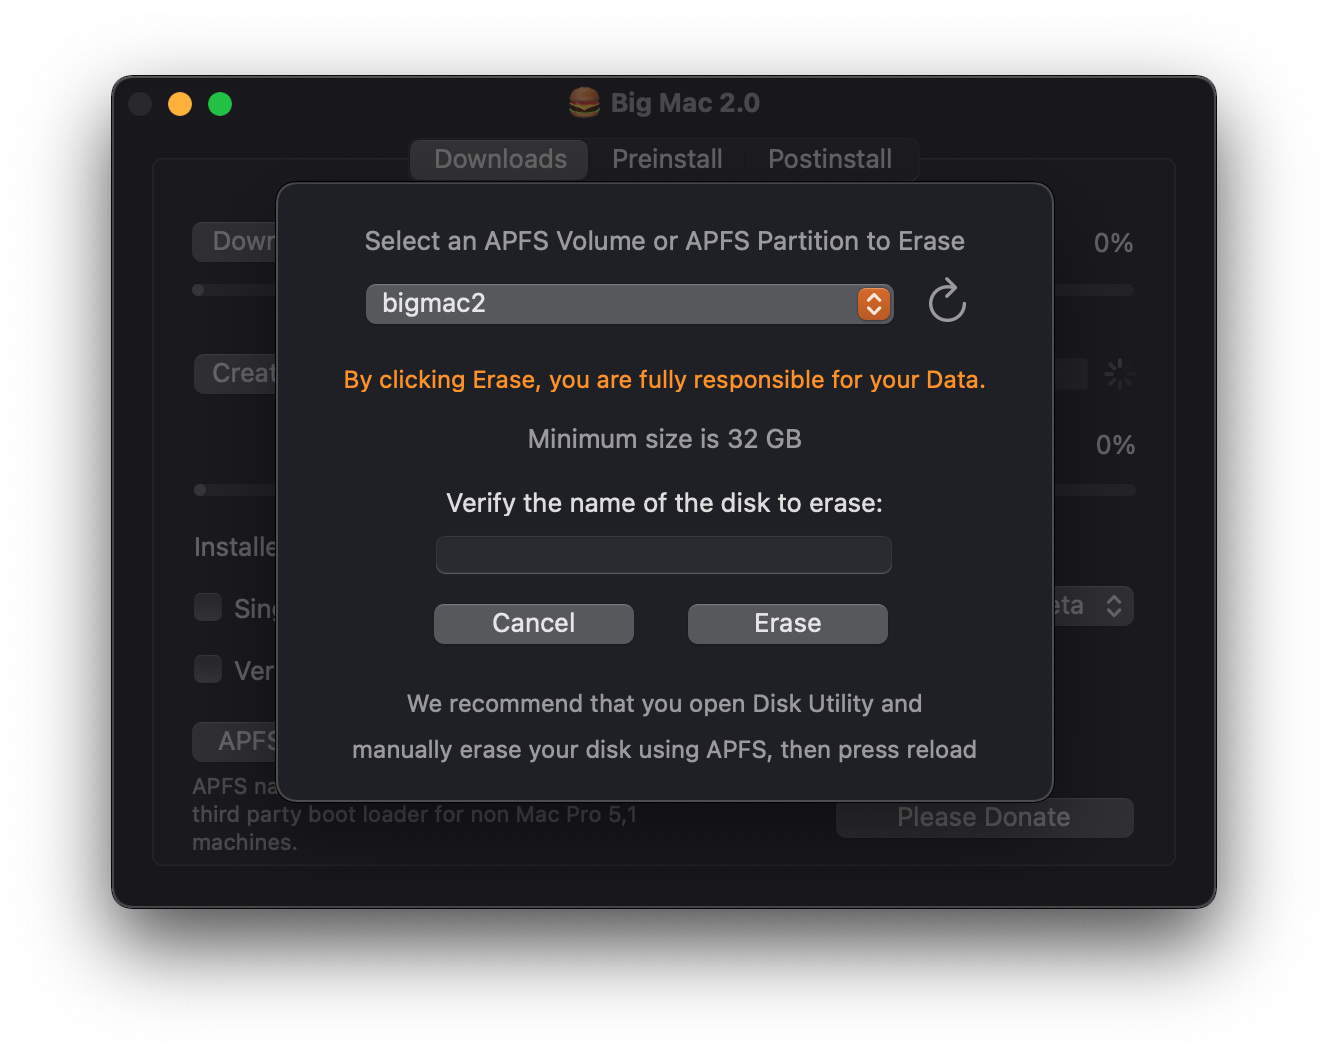
This will create your installer disk to an APFS volume

Boot up the installer disk (Not compatible with USB 1 or BT2 EDR)

From the boot disk select these options and press Launch Installer

Recommended checkboxes. If unsure, use Telemetry and Remove APFS Snapshots to start

ClonetoolX included with Big Mac 2.0 (See Big Mac 2.0's boot disk)

Metadata
Owner
Metadata
Big Mac, macOS 11 Big Sur and macOS Monterey disk installer and back up tool for Intel based Macs