一个Android Markdown编辑器的实现
Markdown,一种易读易写的书写语言。更多标记语法,参考Markdown 语法说明 (简体中文版) 本文所述的markdown语法基于GitHub Flavored Markdown.
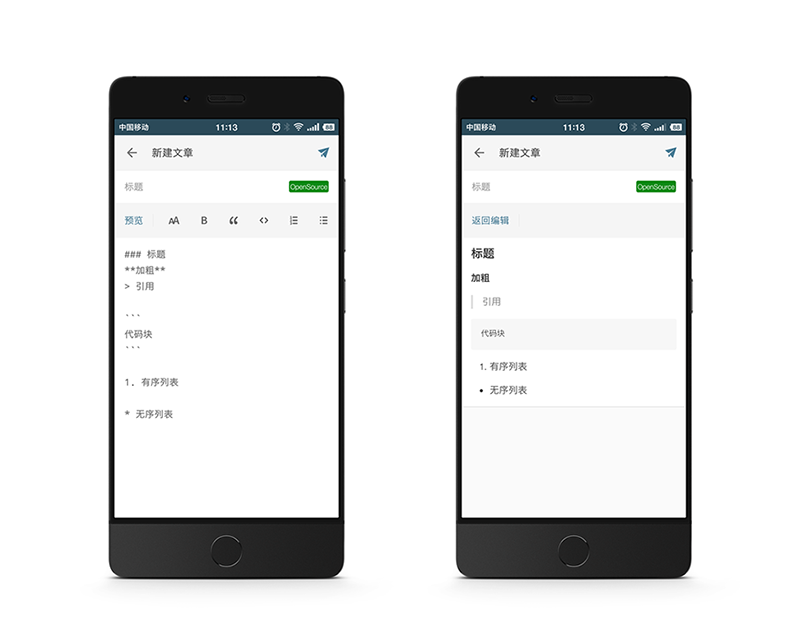
本文讨论如何在Android平台实现一个具有简单功能(代码也是极其简单)的Markdown编辑器,界面效果如下图,Android应用参见GitHub博客 APP:
Layout布局
直接进入主题,从截图中可以看出,这是一个带有标题、标签、内容的编辑器。整体布局构造如下:
appbar(含有保存功能的菜单)
titlezone(标题区域)
-----|- titleEdit(标题输入框)
-----|- labelView(标签View,点击进入标签选择视图)
toolbar(工具栏)
contentzone(内容区)
-----|- contentEdit(编辑区)
-----|- previewView(预览区)
toolbar工具栏
工具栏提供了markdown的基本功能,包括插入标题、粗体、引用、代码、列表,同时提供了markdown转化为HTML的预览功能。
<android.support.v7.widget.Toolbar
    android:id="@+id/toolbar2"
    android:layout_width="match_parent"
    android:layout_height="?attr/actionBarSize"
    android:layout_gravity="left"
    android:layout_margin="0dp"
    android:background="?attr/colorPrimary"
    android:gravity="left"
    android:padding="0dp"
    app:contentInsetLeft="0dp"
    app:contentInsetStart="0dp"
    app:contentInsetStartWithNavigation="0dp"
    app:popupTheme="@style/AppTheme.PopupOverlay"
    app:titleTextAppearance="@style/Toolbar.TitleText">

    <TextView
        android:id="@+id/switchPreAndEdit"
        android:layout_width="wrap_content"
        android:layout_height="match_parent"
        android:background="?android:attr/selectableItemBackgroundBorderless"
        android:clickable="true"
        android:gravity="center"
        android:paddingLeft="16dp"
        android:paddingRight="16dp"
        android:text="@string/blog_preview"
        android:textColor="@color/colorPrimaryDark" />

    <View
        android:layout_width="1px"
        android:layout_height="20dp"
        android:background="@color/divider"
        android:padding="6dp"></View>
</android.support.v7.widget.Toolbar>
通过id=switchPreAndEdit实现预览功能和编辑功能的切换,菜单menu/create.xml如下:
<?xml version="1.0" encoding="utf-8"?>
<menu xmlns:android="http://schemas.android.com/apk/res/android"
    xmlns:app="http://schemas.android.com/apk/res-auto">

    <group android:id="@+id/group">
        <item
            android:id="@+id/action_header"
            android:icon="@drawable/ic_font"
            android:title="预览"
            app:showAsAction="always" />

        <item
            android:id="@+id/action_bold"
            android:icon="@drawable/ic_bold"
            android:title="粗体"
            app:showAsAction="always" />
        <item
            android:id="@+id/action_quote"
            android:icon="@drawable/ic_quote"
            android:title="引用"
            app:showAsAction="always" />
        <item
            android:id="@+id/action_code"
            android:icon="@drawable/ic_code"
            android:title="代码"
            app:showAsAction="always" />
        <item
            android:id="@+id/action_list"
            android:icon="@drawable/ic_list"
            android:title="列表"
            app:showAsAction="always" />
        <item
            android:id="@+id/action_unlist"
            android:icon="@drawable/ic_unlist"
            android:title="无序列表"
            app:showAsAction="always" />

    </group>
</menu>
在Activity中,实现toolbar与菜单的关联:
Toolbar toolbar2 = (Toolbar) findViewById(R.id.toolbar2);
toolbar2.inflateMenu(R.menu.create);
toolbar2.setOnMenuItemClickListener(this);
编辑区与预览区
<RelativeLayout
    android:layout_width="match_parent"
    android:layout_height="match_parent">

    <EditText
        android:id="@+id/content"
        android:layout_width="match_parent"
        android:layout_height="match_parent"
        android:layout_margin="0dp"
        android:background="@null"
        android:fontFamily="monospace"
        android:gravity="top|left"
        android:hint=""
        android:inputType="textMultiLine"
        android:lineSpacingExtra="8dp"
        android:minLines="6"
        android:padding="16dp"
        android:scrollbars="vertical"
        android:textColor="@color/color_666"
        android:textColorHint="@color/color_999"
        android:textCursorDrawable="@drawable/cursor_editor"></EditText>

    <RelativeLayout
        android:id="@+id/preview"
        android:layout_width="match_parent"
        android:layout_height="match_parent"
        android:visibility="invisible">

        <TextView
            android:id="@+id/progress"
            android:layout_width="wrap_content"
            android:layout_height="wrap_content"
            android:padding="16dp"
            android:text="@string/loading_preview"
            android:textColor="@color/color_666" />

        <WebView
            android:id="@+id/webview"
            android:layout_width="fill_parent"
            android:layout_height="match_parent"
            android:background="#fff"
            android:visibility="invisible" />
    </RelativeLayout>

</RelativeLayout>
编辑区由EditText实现,预览区则由WebView实现。 具体交互效果是点击工具栏的预览按钮,展示loading preview视图,待webview加载完毕,展示预览视图WebView,此时预览按钮变化成返回按钮,点击返回按钮,重新进入编辑区。
功能实现
功能主要分成两个部分,一个部分是如何实现markdown的语法插入,另一个部分是如何实现预览。
markdown语法插入
语法插入分为三种:
第一种为内联插入,即在当前位置插入前后标记,光标定位在中间,比如强调粗体(**粗体**)、内联代码(`code`),注意,如果选中了文字,我们将作为标签内容处理;
private void mdInline(Editable editableText, String character, int selectionStart, int selectionEnd) {
    editableText.insert(selectionEnd, character);
    editableText.insert(selectionStart, character);
    textArea.setSelection(selectionEnd + character.length());
}
如代码所示,在光标选中的前后位置插入特定标记字符,且将光标定位到选中文字之后。
第二种为单标签插入,即在下一行插入标记,光标定位在标记之后,比如标题(###)、引用(> )、列表(* );
private void mdNewSingleLine(Editable editableText, String character, int selectionStart, int selectionEnd) {
    if (selectionEnd == editableText.length() || '\n' == editableText.charAt(selectionEnd)) {
        editableText.insert(selectionEnd, "\n");
    } else {
        editableText.insert(selectionEnd, "\n\n");
    }
    if (selectionStart == 0 || '\n' == editableText.charAt(selectionStart - 1)) {
        editableText.insert(selectionStart, "\n" + character + " ");
        textArea.setSelection(selectionEnd + ("\n" + character + " ").length());
    } else {
        editableText.insert(selectionStart, "\n\n" + character + " ");
        textArea.setSelection(selectionEnd + ("\n\n" + character + " ").length());
    }
}
此段代码中,对光标选中的前后位置进入换行符插入,同时插入标记字符,光标定位在选中文字之后。
第三种为双标签插入,即插入前后标记,光标定位在中间。比如代码块(```)。
private void mdNewDoubleLine(Editable editableText, String character, int selectionStart, int selectionEnd) {
    if (selectionEnd == editableText.length() || '\n' == editableText.charAt(selectionEnd)) {
        editableText.insert(selectionEnd, "\n" + character + "\n");
    } else {
        editableText.insert(selectionEnd, "\n" + character + "\n\n");
    }
    if (selectionStart == 0 || '\n' == editableText.charAt(selectionStart - 1)) {
        editableText.insert(selectionStart, "\n" + character + "\n");
        textArea.setSelection(selectionEnd + ("\n" + character + "\n").length());
    } else {
        editableText.insert(selectionStart, "\n\n" + character + "\n");
        textArea.setSelection(selectionEnd + ("\n\n" + character + "\n").length());
    }
}
双标签插入相较于单标签插入,我们只要在光标选中末尾处,插入结束标记字符即可。至此,工具栏的监听代码已完成。
@Override
public boolean onMenuItemClick(MenuItem item) {
    int itemId = item.getItemId();
    Editable editableText = textArea.getEditableText();
    int selectionStart = textArea.getSelectionStart();
    int selectionEnd = textArea.getSelectionEnd();
    CharSequence selectStr = editableText.subSequence(selectionStart, selectionEnd);

    switch (itemId) {
        case R.id.action_header:
            mdNewSingleLine(editableText, "###", selectionStart, selectionEnd);
            break;
        case R.id.action_bold:
            mdInline(editableText, "**", selectionStart, selectionEnd);
            break;
        case R.id.action_code:
            if (selectionStart == 0 || '\n' == editableText.charAt(selectionStart - 1)) {
                mdNewDoubleLine(editableText, "```", selectionStart, selectionEnd);
            } else {
                mdInline(editableText, "`", selectionStart, selectionEnd);
            }
            break;
        case R.id.action_quote:
            mdNewSingleLine(editableText, ">", selectionStart, selectionEnd);
            break;
        case R.id.action_list:
            mdNewSingleLine(editableText, "1.", selectionStart, selectionEnd);
            break;
        case R.id.action_unlist:
            mdNewSingleLine(editableText, "*", selectionStart, selectionEnd);
            break;
    }

    return false;
}
预览功能
预览功能其实就是两个View的隐藏与展现。功能的重点在于如何实现md到html的转化,以及webview如何加载html数据。
- md转化成html有很多开源工具,这里使用了GitHub的开放API:
Request url:
POST https://api.github.com/markdown

Request body:
{
  "text": "### 1. 关于Dubbo、原理、负载均衡 "
}
- 获取的html片段,我们通过webview的loadDataWithBaseURL方法进行加载
String template = Template.getInstance().getPreview();
String data = template.replace("{{body}}", response);
mWebView.loadDataWithBaseURL("file:///android_asset/", data, "text/html", "utf-8", null);
更多More
关于markdown的标记,不止本文实现的这些功能,我们可以在工具栏扩展图片插入、链接插入等新功能。当然,在电脑上有ctr+z取消输入,在手机上编辑器也可以增加恢复撤销功能。
最后,目前移动设备上并不适合长文本输入,简短的Markdown输入来的更自由,更方便。