proxyman-windows-linux
 proxyman-windows-linux copied to clipboard
Published
20 hours ago •
 ProxymanApp
Manual Install the Certificate
Description
It's not reliable to automatically install the certificate on Windows, we should provide
Acceptance Criteria - UI
- Don't use the BlueprintJS UI component anymore. Use a clean design from TailwindCSS UI (https://tailwindui.com/components). Ping @NghiaTranUIT for credentials.
- (1): Add Manual Tab
- (2): Add Proxyman Certificate to the system.
- (3): Not implemented
- (4): Install button
- (5): Add Proxyman Certificate to Trusted Root Certificate Authorities
- (6): Please follow 2 steps to Install and Trust Proxyman Certificate in your devices:
- (7): Don't use the image:
Add new UI:
- Similar this layout:
- (1): Use this image:

- (2): Click on the "Install Certificate" button
- (3): Use this image:
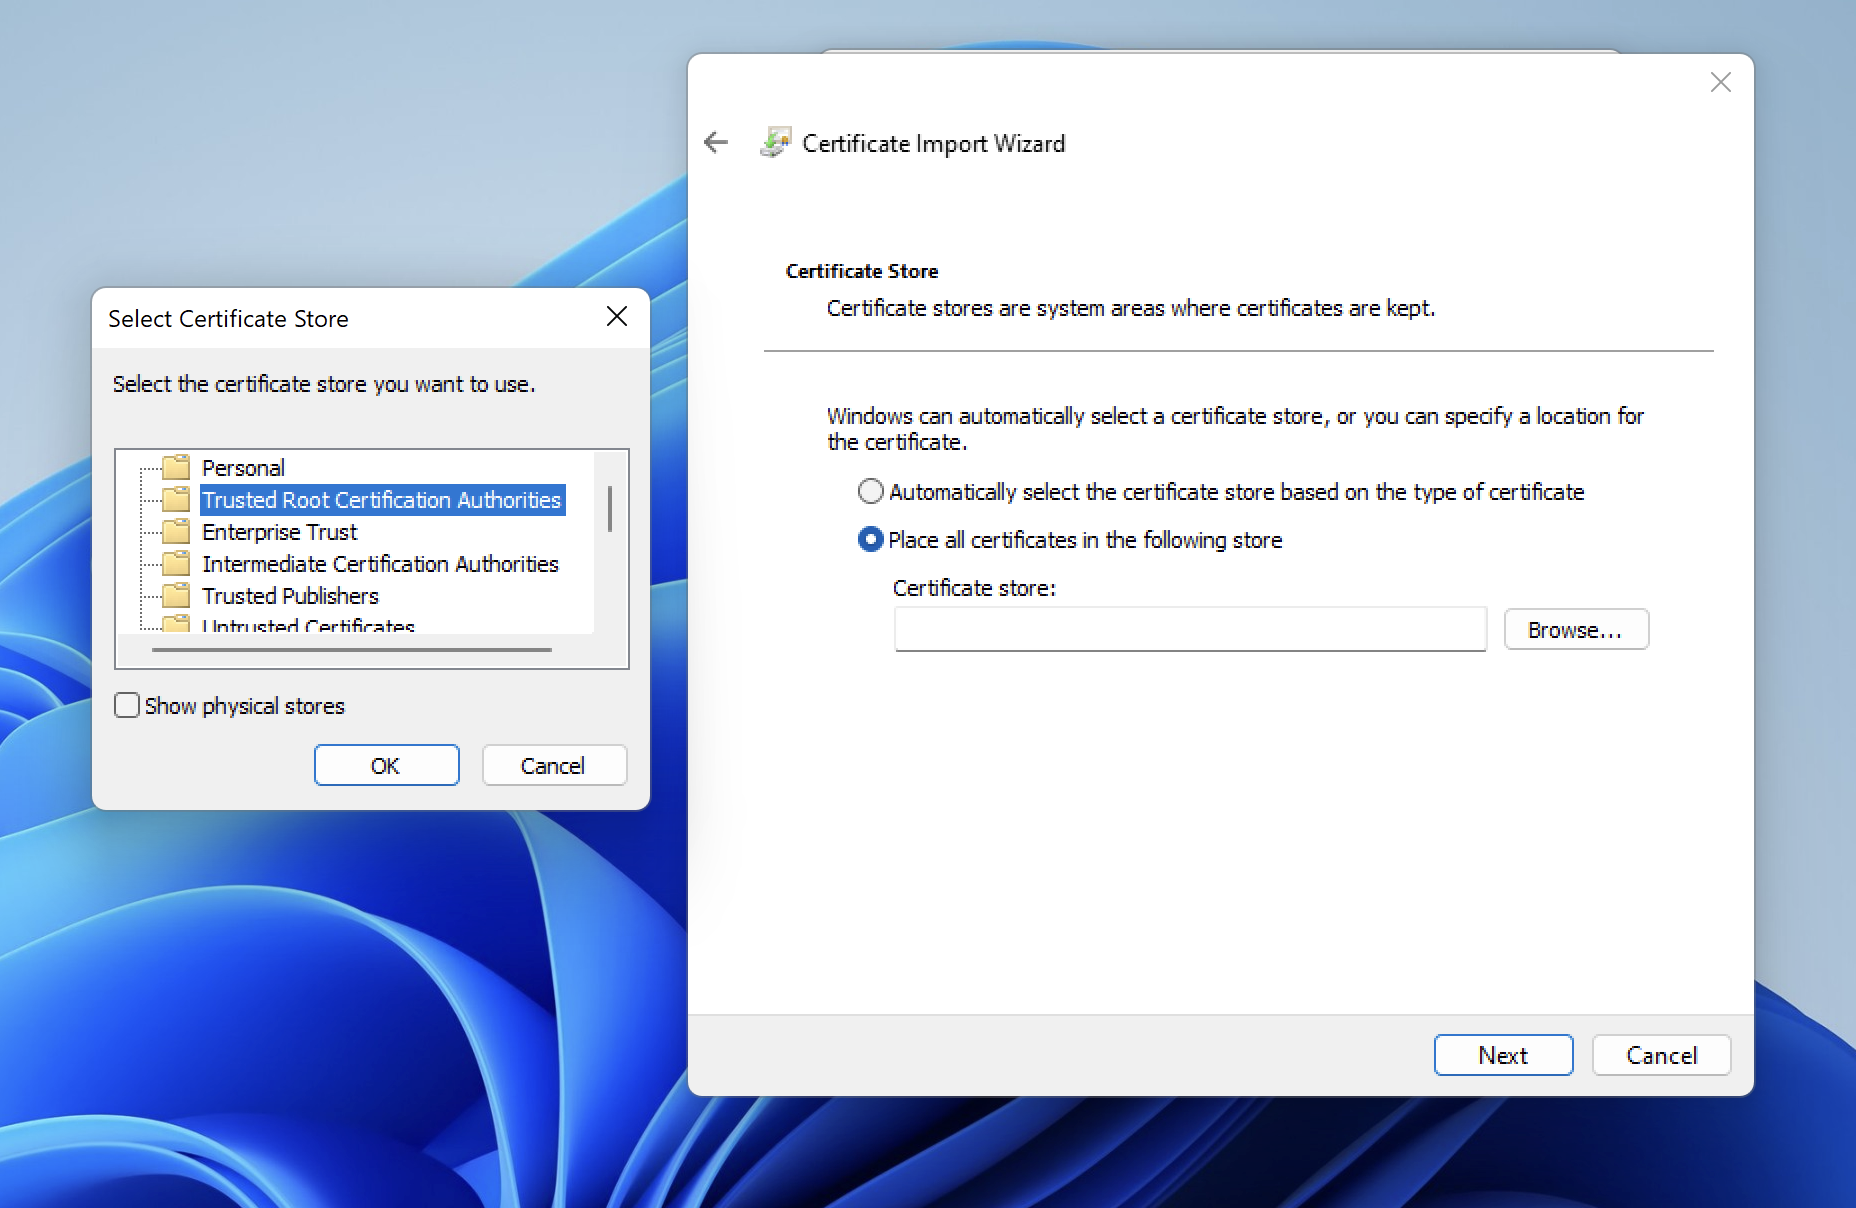
- (4): Select "Current User" -> Select "Place certificate in the following store" -> Click on "Browse..." button -> Select "Trusted Root Certification Authorities" -> OK -> Next -> Finish
Note:
- I will provide a different screenshot later. Please use it temporarily.
Acceptance Criteria - Code
- Find a solution to install the certificate by GUI (By showing the Certificate in Windows)
- Do not use BlueprintJS anymore, we deprecate it. Use clean buttons/UI from Tailwind UI. No need to customize. Just use the clean button, UI.
- Find a solution to check whether or not the certificate is installed in the Certificate Manager.
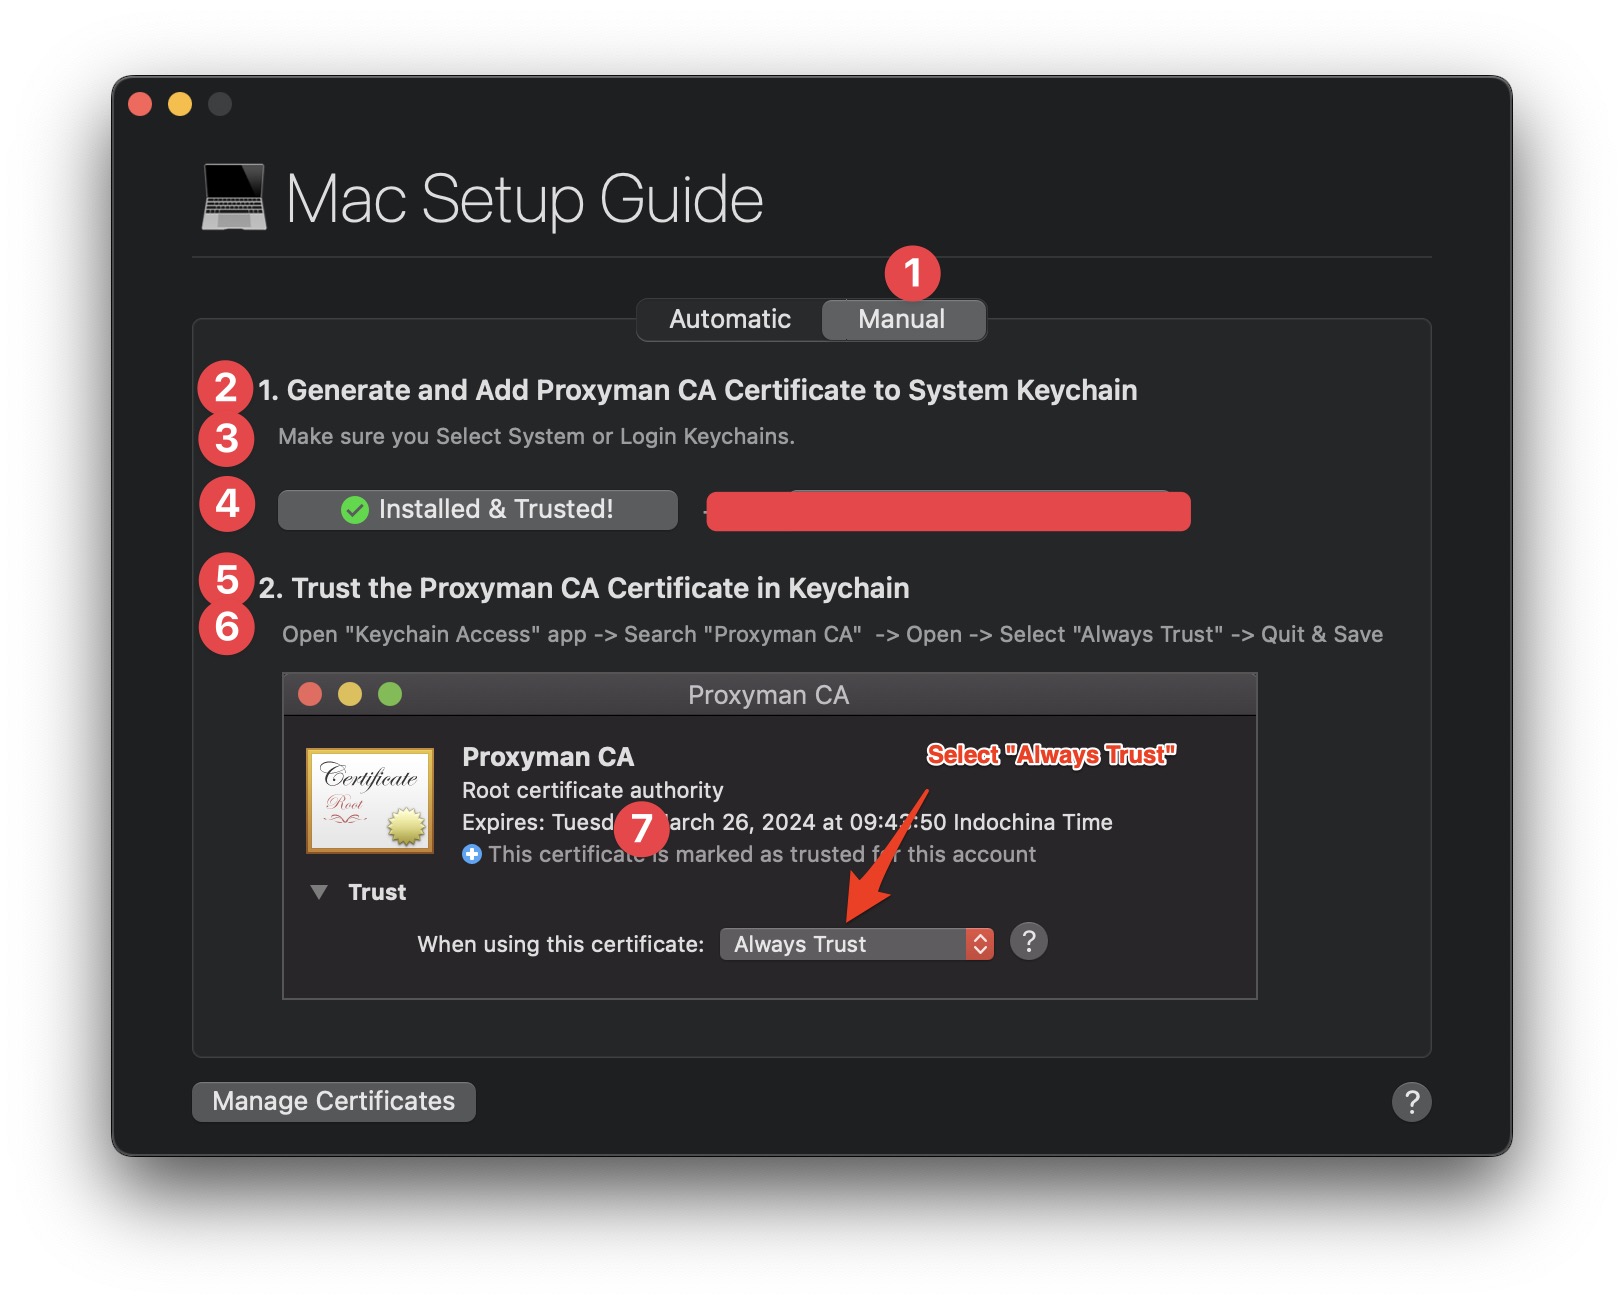
- Observe the Windows Active event (Click on the windows) -> Check whether or not the certificate is added to the Certificate Manager. See the macOS for example: If you delete the certificate in the keychain -> Back to the app -> It will check and show the Warning if needed.
- Update the Install button state properly.
How to detect whether or not a certificate is installed in the Keychain (macOS), Store CA (Windows) or not?
- https://www.npmjs.com/package/system-ca
New requirement
- Get current OS:
- Windows: "Windows Setup Guide", has two tabs (Auto & Manual)
- Linux: "Linux Setup Guide". Only Auto Tab. Hide the Manual
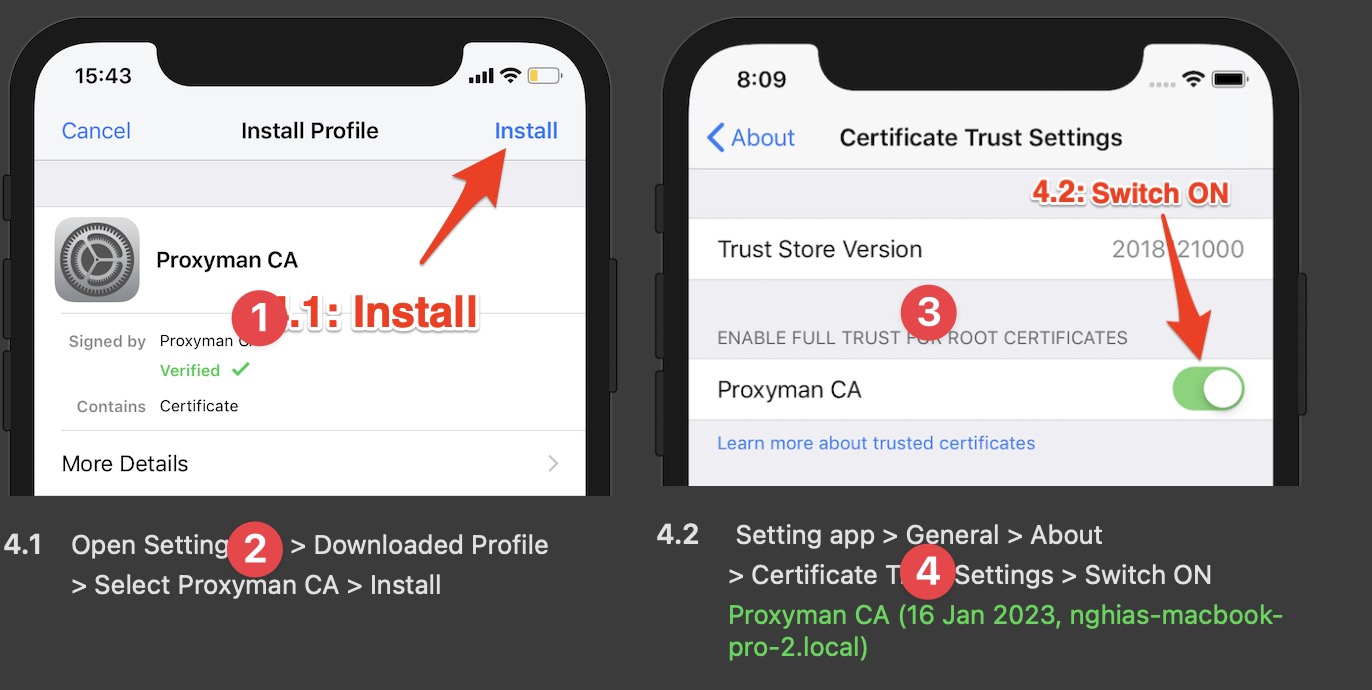
- Add the "Show Me" button at the end of each step 2.1 and 2.2 (See the screenshot)=> Click will show a new Popover -> With a bigger Screenshot (80% width and height of the entire screen) -> I can click to the gray background to dismiss the Screenshot view -> Make sure It doesn't the "Windows Setup Guide" doesn't dismiss.
- In the Manual Tab, I can also click on the Image -> Same action as "Show me" button
- Add Section:
Certificate Statuswith a new button "Verify" (Use this text instead of from the screenshot) -> Read the next section for the logic.
Certificate Status
-
Create a new class
CertificateVerification -
When the "Verify" button is clicked -> Show the loader (similar to the loader in the Activate License Key)
-
Use new
certutil.exesolution to check -
If error-> Show the label
-
If it successes -> Show this label:
Update v2
- Use new 3 images:
- Step 2.3 should be in the new line. Step 2.1 and Step 2.2 in the same line (as current UI)
- Make the Window Setup Guide (Manual Tab) bigger a little bit by adding
100pxto the height. Make sure we can see all 3 steps in the same windows.Don't Scroll.
Step 2.1
- Replace with this image:
Step 2.2:
- Use new text:
Select "Local Machine" checkbox and click the Next button
- Replace this image:
Step 2.3:
- Use new text
Follow the instructions and make sure to select "Trusted Root Certification"
- Highlight
Trusted Root Certificationwith red color - Use new image