How to make Realsense get a high quality depth image like the Repository does?如何使相机获取像项目中一样的高质量深度图?
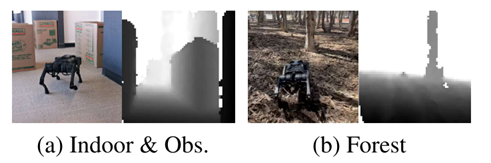
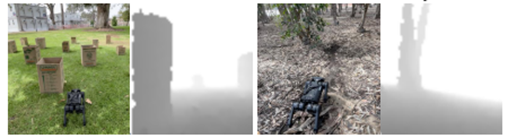
Question1:The paper’s depth image are of high quality, and the boundaries between objects and ground and between objects and objects are relatively clear, as follows:
问题1:论文中的深度图质量很高,物体和地面与物体与物体间边界比较清晰,如下:
 However, the boundaries in images that whether I saved with the realsense viewer or the code of repository, cannot be distinguished well.
我使用realsense455无论在realsense viewer中保存的图片,还是用项目开源代码中图片获取部分保存下来的64*64的图片,边界之间都很难被区分。
Below are images taken on a cloudy day with low light conditions. The images from left to right are obtained from the repository code, Realsense Viewer RGB, and Realsense Viewer depth respectively.
如下是在阴天光线较弱环境下拍摄的图片,从左至右顺序分别为通过项目代码中获取、Realsense Viewer RGB、Realsense Viewer depth:
However, the boundaries in images that whether I saved with the realsense viewer or the code of repository, cannot be distinguished well.
我使用realsense455无论在realsense viewer中保存的图片,还是用项目开源代码中图片获取部分保存下来的64*64的图片,边界之间都很难被区分。
Below are images taken on a cloudy day with low light conditions. The images from left to right are obtained from the repository code, Realsense Viewer RGB, and Realsense Viewer depth respectively.
如下是在阴天光线较弱环境下拍摄的图片,从左至右顺序分别为通过项目代码中获取、Realsense Viewer RGB、Realsense Viewer depth:


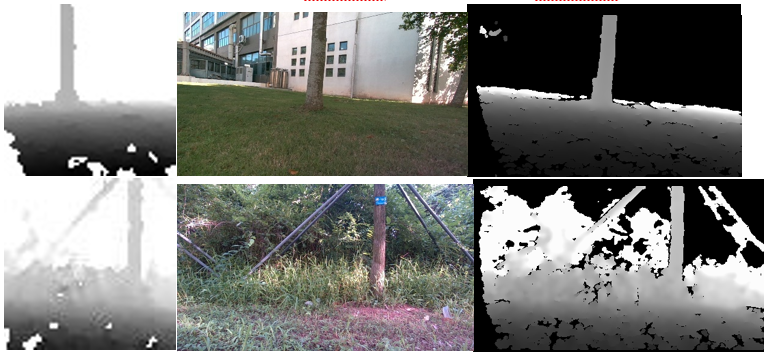
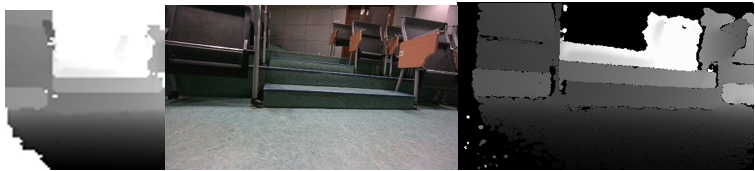
 Below are images taken under the shade of a sunny day. The images from left to right are obtained from the repository code, Realsense Viewer RGB, and Realsense Viewer depth:
如下是晴天阴影下拍摄的图片,从左至右顺序分别为通过项目代码中获取、Realsense Viewer RGB、Realsense Viewer depth:
Below are images taken under the shade of a sunny day. The images from left to right are obtained from the repository code, Realsense Viewer RGB, and Realsense Viewer depth:
如下是晴天阴影下拍摄的图片,从左至右顺序分别为通过项目代码中获取、Realsense Viewer RGB、Realsense Viewer depth:
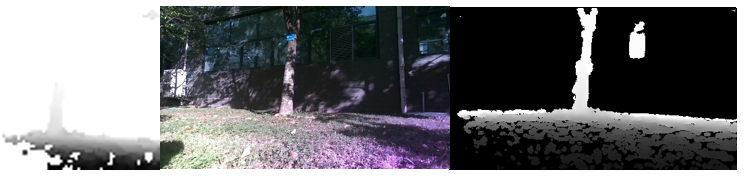
 Below are images taken on a sunny day. The images from left to right are obtained from the repository code, Realsense Viewer RGB, and Realsense Viewer depth:
如下是晴天阳光下拍摄的图片,从左至右顺序分别为通过项目代码中获取、Realsense Viewer RGB、Realsense Viewer depth:
Below are images taken on a sunny day. The images from left to right are obtained from the repository code, Realsense Viewer RGB, and Realsense Viewer depth:
如下是晴天阳光下拍摄的图片,从左至右顺序分别为通过项目代码中获取、Realsense Viewer RGB、Realsense Viewer depth:
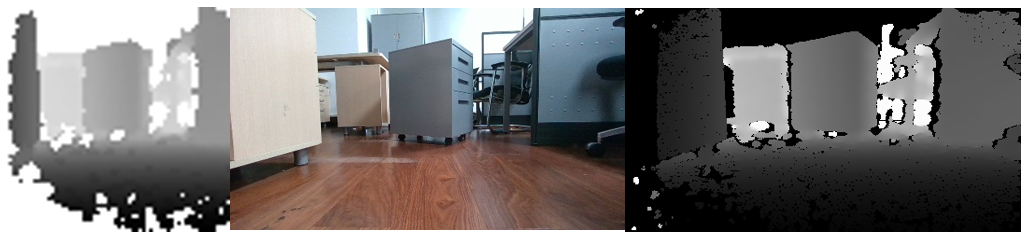
 Below are images taken indoors under weak light source. The images from left to right are obtained from the repository code, Realsense Viewer RGB, and Realsense Viewer depth:
如下是室内较弱光源下拍摄的图片,从左至右顺序分别为通过项目代码中获取、Realsense Viewer RGB、Realsense Viewer depth:
Below are images taken indoors under weak light source. The images from left to right are obtained from the repository code, Realsense Viewer RGB, and Realsense Viewer depth:
如下是室内较弱光源下拍摄的图片,从左至右顺序分别为通过项目代码中获取、Realsense Viewer RGB、Realsense Viewer depth:
 Regarding acquiring and processing depth images, in terms of hardware, I refer to some blogs on camera debugging and adjust the laser power to the maximum; in terms of code, I first clip the depth map to between 0.3 and 3, and then reshape it to the size of 64x64, and finally normalize it to between 0 and 255 with cv2.normalize and save with cv2.imwrite. However, it still does not meet the depth results in your papers. So do I need to perform other special settings or operations on the camera or code?
关于获取以及处理深度图像,在硬件方面,我参考一些相机调试的帖子,将laser power调至最大;在代码方面,我按照repository中的代码首先将深度图clip到0.3和3之间,然后将其reshape为64x64的大小,最后用cv2.normalize将其归一化至0到255之间并用cv2.imwrite将其保存。但是图像质量还是达不到论文中的效果。请问如果想要达到论文中的效果,还需要对相机或是代码进行其他更多的特殊设置或是操作吗?
Regarding acquiring and processing depth images, in terms of hardware, I refer to some blogs on camera debugging and adjust the laser power to the maximum; in terms of code, I first clip the depth map to between 0.3 and 3, and then reshape it to the size of 64x64, and finally normalize it to between 0 and 255 with cv2.normalize and save with cv2.imwrite. However, it still does not meet the depth results in your papers. So do I need to perform other special settings or operations on the camera or code?
关于获取以及处理深度图像,在硬件方面,我参考一些相机调试的帖子,将laser power调至最大;在代码方面,我按照repository中的代码首先将深度图clip到0.3和3之间,然后将其reshape为64x64的大小,最后用cv2.normalize将其归一化至0到255之间并用cv2.imwrite将其保存。但是图像质量还是达不到论文中的效果。请问如果想要达到论文中的效果,还需要对相机或是代码进行其他更多的特殊设置或是操作吗?
Question2:I found that the depth images in your paper has no holes, but I don’t see the corresponding code for depth completion. What is your method for depth completion in software or hardware? The Realsense Viewer has the function of holes filling in Spatial filter and Hole filling filter. However, it still does not meet the depth results in your papers.
问题2:您论文中的深度图片没有空洞,但是没有看到对深度进行补全的对应代码,请问您在软件或硬件上深度补全的方法是什么。我使用realsense viewer中Post-Processing下属的spatial filter中的Holes filling mode和Hole filling filter来对深度进行补全,但是效果都不是很好。
Below are images without Holes filling:
如下为不进行补全的图片:
 The following 4 groups of images from top to bottom are using Holes filling mode: 2-pixel radius、4-pixel radius、8-pixel radius、16-pixel radius, respectively.
如下4组图片由上至下分别为开启Holes filling mode:2-pixel radius、4-pixel radius、8-pixel radius、16-pixel radius:
The following 4 groups of images from top to bottom are using Holes filling mode: 2-pixel radius、4-pixel radius、8-pixel radius、16-pixel radius, respectively.
如下4组图片由上至下分别为开启Holes filling mode:2-pixel radius、4-pixel radius、8-pixel radius、16-pixel radius:
 The following is using the Hole filling filter:
如下为开启Hole filling filter:
The following is using the Hole filling filter:
如下为开启Hole filling filter:

Question3:What is the function of mean and var in lines 83 and 86 in a1_hardware\control_loop_execution\rl_policy_wrapper.py? How is their value determined? In addition, I notice that “FIXME: Mean measured = 1.02,FIXME: Variance measured = 0.11” in comment, but the code is set to “mean = 1.25、var = 0.425 ** 2”, is there any special meaning here? 问题3:请问a1_hardware\control_loop_execution\rl_policy_wrapper.py中83和86行的mean和var的作用是什么?其取值是如何确定的?另外注释中“FIXME: Mean measured = 1.02,FIXME: Variance measured = 0.11”,但是代码中设置为“mean = 1.25、var = 0.425 ** 2”,这里有什么特殊含义吗? https://github.com/Mehooz/vision4leg/blob/d80f9db796b2b7aa610733a821a7ff4167dfcd54/a1_hardware/control_loop_execution/rl_policy_wrapper.py#L80-L90
Hi, We did not apply other additional processing for the depth image. The code in this repo is what we used on our robot. We are using D435 on our robot. I'm not quite sure why the quality of the depth map you get is not quite good. If you have access to D435, you can probably try it with D435 first. Another thing is that depth reading under strong lighting conditions is much noisier as you may already find out. For the "mean & std", there is no specific meaning for the value, we collect a batch of depth samples in simulation and calculate the mean and std. You can use other values for your environments.
Although the depth ranges of the 435 and 455 are different, according to the relevant information I checked, the performance of the 455 is better than that of the 435. In fact, I've tried multiple 435 and 455 cameras. Indistinguishable boundaries and noise are common problems. Do you have any parameter settings for the camera in Realsense Viewer or other hardware-related tricks? 尽管435和455相机在深度范围上有所区别,但是据我查阅的相关资料,455性能要优于435。我尝试过多台435和455相机,效果不佳是一个共性的问题。 请问你在Realsense Viewer中或其他硬件相关手段对相机有无进行参数设置?
Hi, We did not apply other additional processing for the depth image. The code in this repo is what we used on our robot. We are using D435 on our robot. I'm not quite sure why the quality of the depth map you get is not quite good. If you have access to D435, you can probably try it with D435 first. Another thing is that depth reading under strong lighting conditions is much noisier as you may already find out. For the "mean & std", there is no specific meaning for the value, we collect a batch of depth samples in simulation and calculate the mean and std. You can use other values for your environments.
We did not configure the realsense with the realsense viewer or something else. How long did you run the realsense to get the depth image? In some of our experiments, the Realsense depth reading improves after several seconds of warm-up. So we usually run the robot without a command for several seconds to warm up the camera.
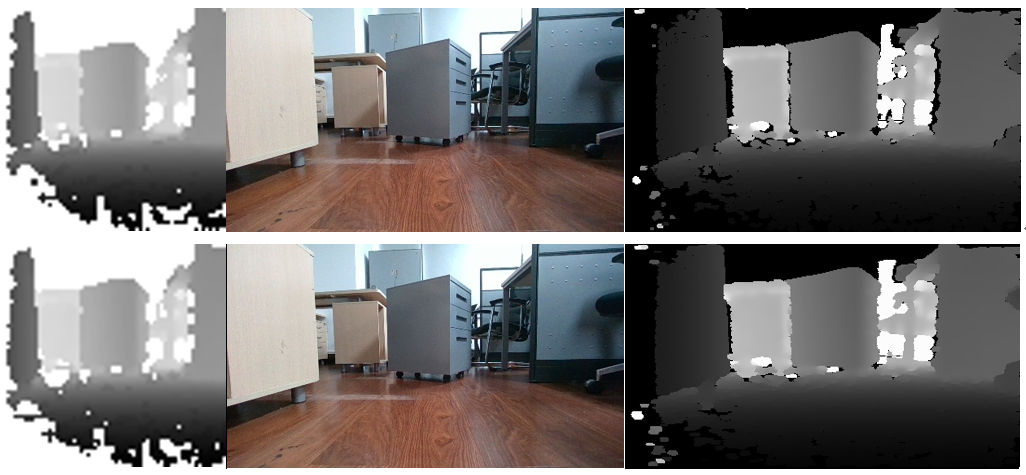
I took two sets of pictures to compare and found that there is not much difference. The following are images that I taken immediately after connecting the camera:
我拍了两组图片进行对照发现差别不大,下面是我连接相机后立即拍摄得到的图片:
 The following are the images that I taken after warm up:
下面是warm up后拍摄的图片:
The following are the images that I taken after warm up:
下面是warm up后拍摄的图片:
 In addition, I found that if the camera is placed higher, there will be less holes in the ground part of the image.
另外我发现如果把相机放置的高一些,图片中地面部分的空洞会少一些。
In addition, I found that if the camera is placed higher, there will be less holes in the ground part of the image.
另外我发现如果把相机放置的高一些,图片中地面部分的空洞会少一些。
@hit421 Hi, have you addressed your issue? If there is nothing we can help, I will close this issue.