Deep-Model-Transfer
 Deep-Model-Transfer copied to clipboard
A method for Fine-Grained image classification
Deep-Model-Transfer
![]()
![]()
A method for Fine-Grained image classification implemented by TensorFlow. The best accuracy we have got are 73.33%(Bird-200), 91.03%(Car-196), 72.23%(Dog-120), 96.27%(Flower-102), 86.07%(Pet-37).
Note: For Fine-Grained image classification problem, our solution is combining deep model and transfer learning. Firstly, the deep model, e.g., vgg-16, vgg-19, inception-v1, inception-v2, inception-v3, inception-v4, inception-resnet-v2, resnet50, is pretrained in ImageNet dataset to gain the feature extraction abbility. Secondly, transfer the pretrained model to Fine-Grained image dataset, e.g., 🕊️Bird-200, 🚗Car-196, 🐶Dog-120, 🌸Flower-102, 🐶🐱Pet-37.
Installation
- Install the requirments:
- Ubuntu 16.04+
- TensorFlow 1.5.0+
- Python 3.5+
- NumPy
- Nvidia GPU(optional)
- Clone the repository
$ git clone https://github.com/MacwinWin/Deep-Model-Transfer.git
Pretrain
Slim provide a log of pretrained models. What we need is just downloading the .ckpt files and then using them. Make a new folder, download and extract the .ckpt file to the folder.
pretrained
├── inception_v1.ckpt
├── inception_v2.ckpt
├── inception_v3.ckpt
├── inception_v4.ckpt
├── inception_resnet_v2.ckpt
|   └── ...
Transfer
- set environment variables
-
Edit the set_train_env.sh and set_eval_env.sh files to specify the "DATASET_NAME", "DATASET_DIR", "CHECKPOINT_PATH", "TRAIN_DIR", "MODEL_NAME".
-
"DATASET_NAME" and "DATASET_DIR" define the dataset name and location. For example, the dataset structure is shown below. "DATASET_NAME" is "origin", "DATASET_DIR" is "/../Flower_102"
Flower_102
├── _origin
|   ├── _class1
|            ├── image1.jpg
|            ├── image2.jpg
|            └── ...
|   └── _class2
|   └── ...
- "CHECKPOINT_PATH" is the path to pretrained model. For example, '/../pretrained/inception_v1.ckpt'.
- "TRAIN_DIR" stores files generated during training.
- "MODEL_NAME" is the name of pretrained model, such as resnet_v1_50, vgg_19, vgg_16, inception_resnet_v2, inception_v1, inception_v2, inception_v3, inception_v4.
- Source the set_train_env.sh and set_eval_env.sh
$ source set_train_env.sh
- prepare data
We use the tfrecord format to feed the model, so we should convert the .jpg file to tfrecord file.
- After downloading the dataset, arrange the iamges like the structure below.
Flower_102
├── _origin
|   ├── _class1
|            ├── image1.jpg
|            ├── image2.jpg
|            └── ...
|   └── _class2
|   └── ...

Flower_102_eval
├── _origin
|   ├── _class1
|            ├── image1.jpg
|            ├── image2.jpg
|            └── ...
|   └── _class2
|   └── ...

Flower_102_test
├── _origin
|   ├── _class1
|            ├── image1.jpg
|            ├── image2.jpg
|            └── ...
|   └── _class2
|   └── ...
If the dataset doesn't have validation set, we can extract some images from test set. The percentage or quantity is defined at ./datasets/convert_tfrecord.py line 170 171.
- Run ./convert_data.py
$ python convert_data.py \
     --dataset_name=$DATASET_NAME \
     --dataset_dir=$DATASET_DIR
- train and evaluate
- Edit ./train.py to specify "image_size", "num_classes".
- Edit ./train.py line 162 to selecet image preprocessing method.
- Edit ./train.py line 203 to create the model inference.
- Edit ./train.py line 219 to define the scopes that you want to exclude for restoration
- Edit [./set_train_env.sh]
- Run script./run_train.sh to start training.
- Create a new terminal window and set the ./set_eval_env.sh to satisfy validation set.
- Create a new terminal, edit ./set_eval_env.sh, and run script./run_eval.sh as the following command.
Note: If you have 2 GPU, you can evaluate with GPU by changing [./eval.py] line 175-line196 as shown below
 #config = tf.ConfigProto(device_count={'GPU':0})
 if not FLAGS.eval_interval_secs:
   slim.evaluation.evaluate_once(
       master=FLAGS.master,
       checkpoint_path=checkpoint_path,
       logdir=FLAGS.eval_dir,
       num_evals=num_batches,
       eval_op=list(names_to_updates.values()),
       variables_to_restore=variables_to_restore
       #session_config=config)
       )
 else:
   slim.evaluation.evaluation_loop(
       master=FLAGS.master,
       checkpoint_dir=checkpoint_path,
       logdir=FLAGS.eval_dir,
       num_evals=num_batches,
       eval_op=list(names_to_updates.values()),
       eval_interval_secs=60,
       variables_to_restore=variables_to_restore
       #session_config=config)
       )
- test
The ./test.py looks like ./train.py, so edit [./set_test_env.sh] as shown before to satisfy your environment. Then run ./run_test.py. Note: After test, you can get 2 .txt file. One is ground truth lable, another is predicted lable. Edit line303 and line304 to change the store path.
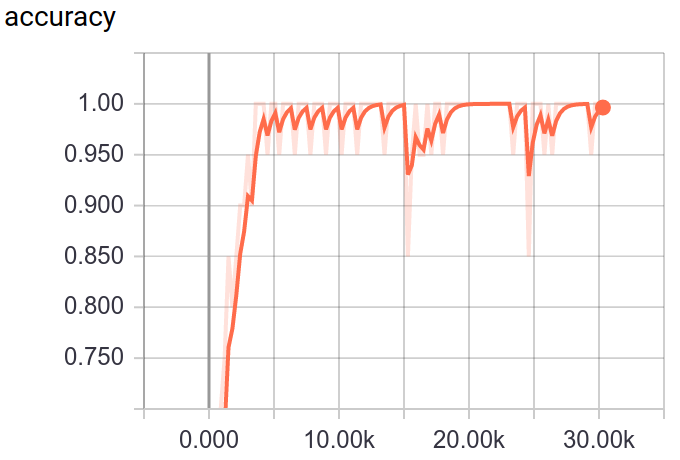
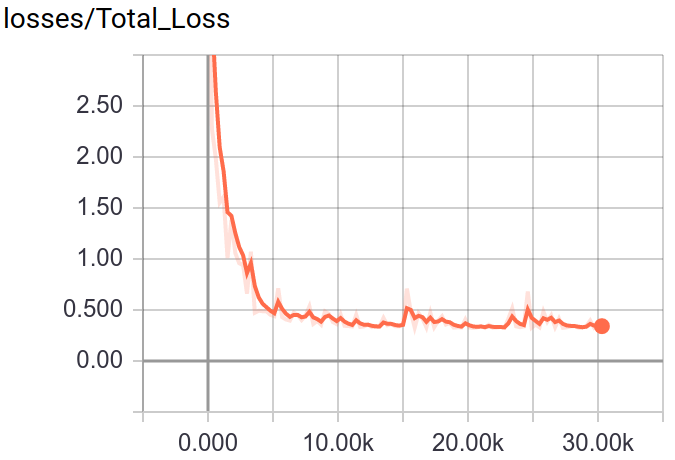
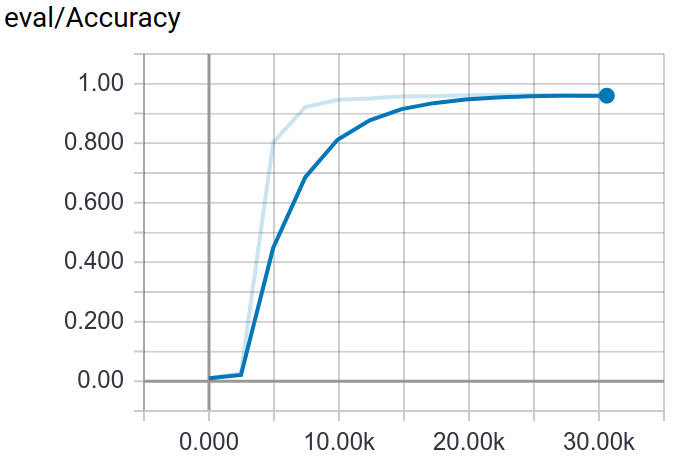
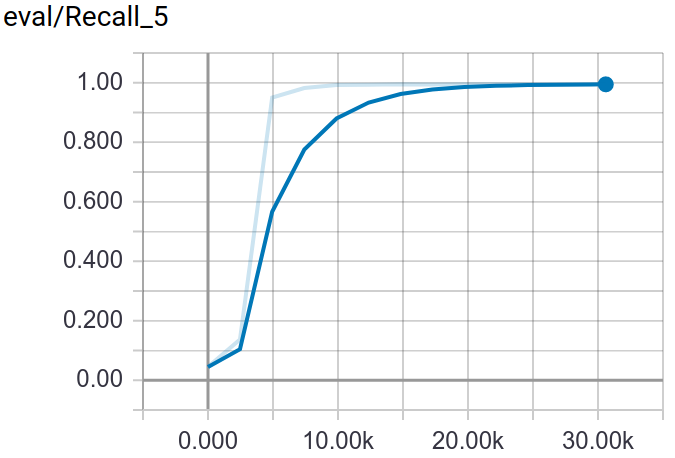
Visualization
Through tensorboard, you can visualization the training and testing process.
$ tensorboard --logdir $TRAIN_DIR
:point_down:Screenshot:
Deploy
Deploy methods support html and api. Through html method, you can upload image file and get result in web browser. If you want to get result in json format, you can use api method. Because I'm not good at front-end and back-end skill, so the code not looks professional.
The deployment repository: https://github.com/MacwinWin/Deep-Model-Transfer-Deployment

