PyUPPAAL
 PyUPPAAL copied to clipboard
PyUPPAAL is a python package basically for reflecting UPPAAL's model editing, verification, and counter-example parsing operations into scripts.
Introduction
![]()

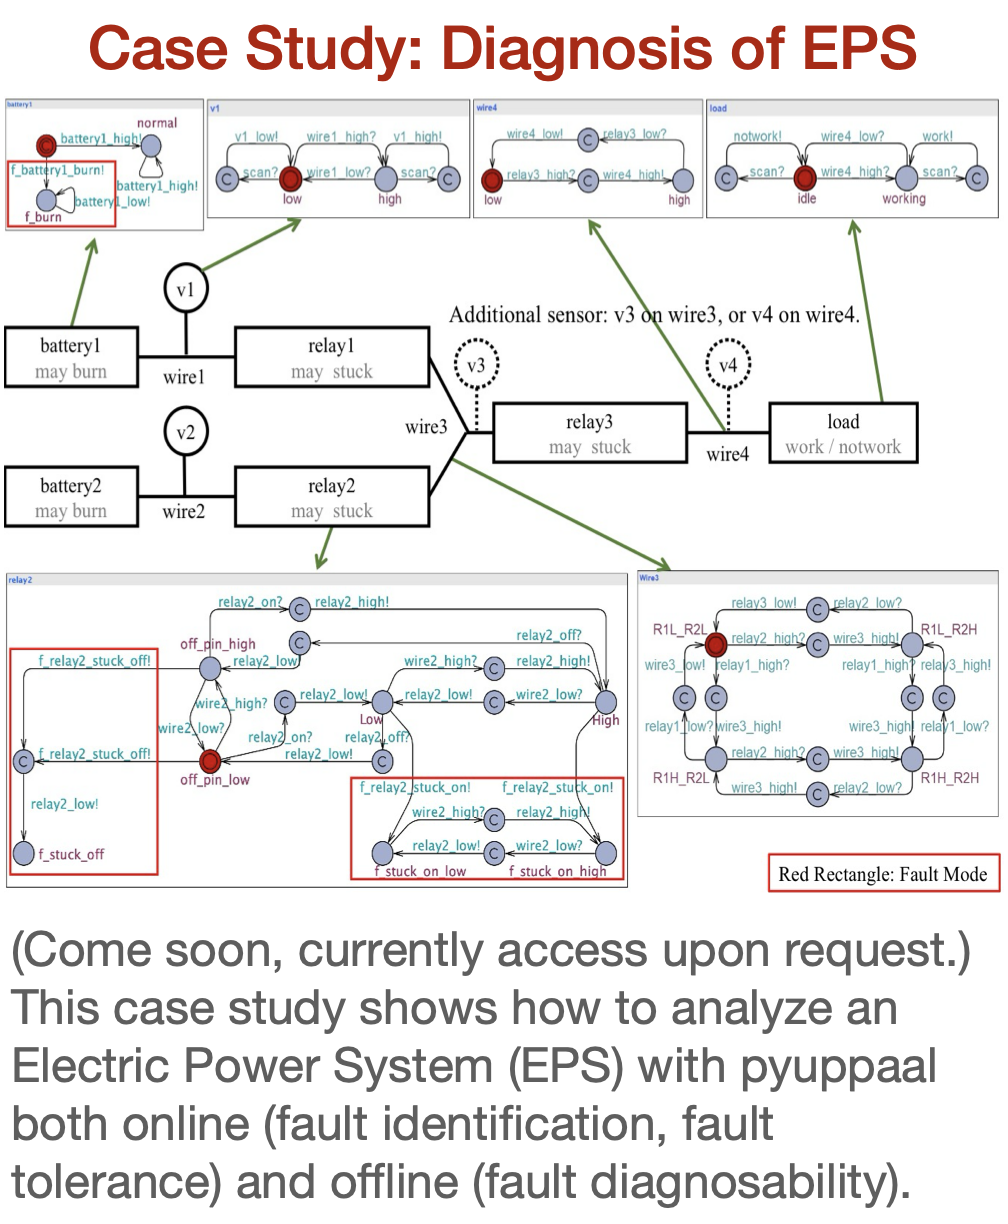
PyUPPAAL is a python package developed basically for reflecting UPPAAL's model editing, verification, and counter-example parsing operations into scripts. Implementing iterative model checking workflow is a typical application of pyuppaal, such as CEGAR, CEGIS, fault diagnosis, risk analysis, ect. We will add references and case studies for these problems. Some function have been implemented such as find_all_patterns(), fault_diagnosability(), fault_identification(), and fault_tolerance().
Notice:
- report issues / requirements at: github-issues.
- more demos for basic & advanced usage will come soon.
- [todo] Support for SMC analyzing.
Demos are provided to help users get familiar with PyUPPAAL:

Quickstart
1. Installation
pip install pyuppaal
2. Before Coding
- Be sure to set the
verifyta_pathin your first line of code, which serves as model checking engine: Download UPPAAL4.x/5.x. - You should activate UPPAAL, e.g., verify a model with UPPAAL GUI before use pyuppaal, to make sure that you have UPPAAL backend actiavted.
pyuppaal.set_verifyta_path("your/path/to//verifyta.exe")
3. Load, Edit, and Verify a Model
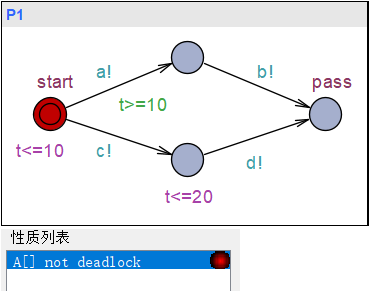
- Firstly we load the model demo.xml shown below.
- Then you can verify, and return the verify results as terminal outputs, or parsed SimTrace.
- In this demo, we just edit the
queriesof the.xmlmodel, and we also provide a demo showing how to edit the template, locations, edges, etc.: Demo-Scripted Model Construction.
import pyuppaal
from pyuppaal import UModel

print(f"pyuppaal version: {pyuppaal.__version__}\n")
pyuppaal.set_verifyta_path(r"C:\Users\10262\Documents\GitHub\cav2024\bin\uppaal64-4.1.26\bin-Windows\verifyta.exe")

umodel = UModel('demo.xml') # load the model
umodel.queries = ['E<> P1.pass']

# verify and return the terminal result.
print(f"======== terminal res ========\n{umodel.verify()}")

# verify and return the parsed trace as simulation trace: SimTrace.
simulation_trace = umodel.easy_verify()
print("======== parsed res ========")
print(f"untime pattern: {simulation_trace.untime_pattern}")
print(f"full trace: {simulation_trace}")
pyuppaal version: 1.2.1

======== terminal res ========
Writing example trace to demo-1.xtr
Options for the verification:
  Generating shortest trace
  Search order is breadth first
  Using conservative space optimisation
  Seed is 1713425560
  State space representation uses minimal constraint systems
[2K
Verifying formula 1 at /nta/queries/query[1]/formula
[2K -- Formula is satisfied.

======== parsed res ========
untime pattern: ['a', 'b']
full trace: State [0]: ['P1.start']
global_variables [0]: None
Clock_constraints [0]: [t(0) - P1.t ≤ 0; P1.t - t(0) ≤ 10; ]
transitions [0]: a: P1 -> ; P1.start -> P1._id2;
-----------------------------------
State [1]: ['P1._id2']
global_variables [1]: None
Clock_constraints [1]: [t(0) - P1.t ≤ -10; ]
transitions [1]: b: P1 -> ; P1._id2 -> P1.pass;
-----------------------------------
State [2]: ['P1.pass']
global_variables [2]: None
Clock_constraints [2]: [t(0) - P1.t ≤ -10; ]
4. Find all patterns
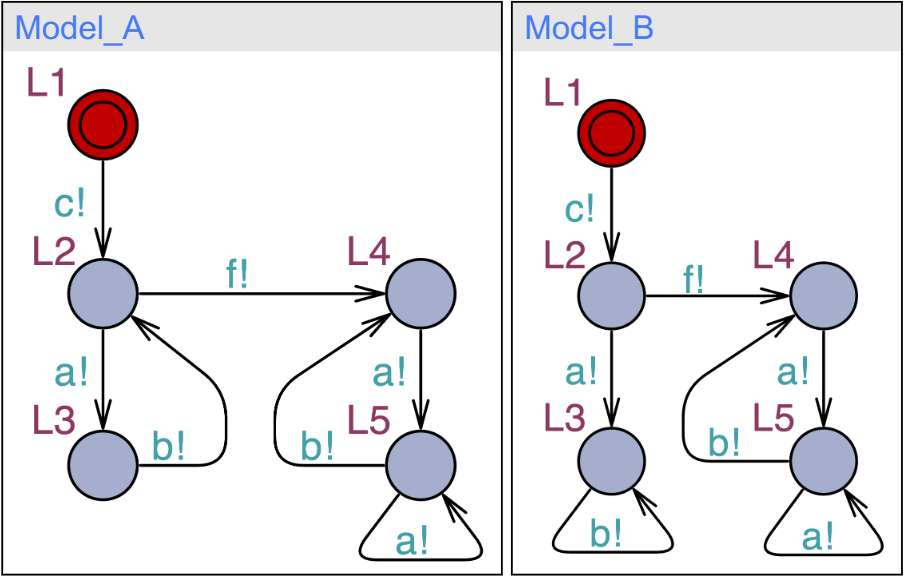
Now we want find all possible patterns that leads to P1.pass. The red line is pattern1, and the green line is pattern2.

for i, st in enumerate(umodel.find_all_patterns()):
    print(f'pattern{i+1}: ', st.untime_pattern)
pattern1:  ['a', 'b']
pattern2:  ['c', 'd']
4. Verify with Multi-threads
import pyuppaal as pyu
import time
import multiprocessing.dummy as mp

print(pyu.__version__)
# set verifyta path
pyu.set_verifyta_path(r"C:\Users\10262\Documents\GitHub\cav2024\bin\uppaal64-4.1.26\bin-Windows\verifyta.exe")

model_path_list = ['demo.xml', 'demo_new.xml'] * 100
trace_path_list = ['demo_trace.xtr', 'demo_new_grace.xtr'] * 100
# for loop
t0 = time.time()
for model, trace in zip(model_path_list, trace_path_list):
    pyu.Verifyta().verify(model_path=model, trace_path=trace)
print(f'Verify with for loop, time usage {time.time() - t0}')

# multi-threads
t0 = time.time()
# pyu.Verifytaeasy_verify(model_path=model_path_list, trace_path=trace_path_list, num_threads=20)
p = mp.Pool()
p.starmap(pyu.Verifyta().verify, zip(model_path_list, trace_path_list))
print(f'Verify with multi-threads, time usage {time.time() - t0}')
1.2.1
Verify with for loop, time usage 9.384526014328003
Verify with multi-threads, time usage 1.61281418800354
5. Get Communication Graph
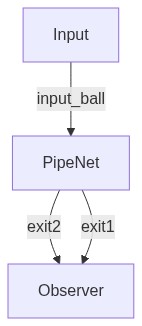
For models with multiple processes, you can use umod.get_communication_graph() method to visualize the sturcture of your UPPAAL model.
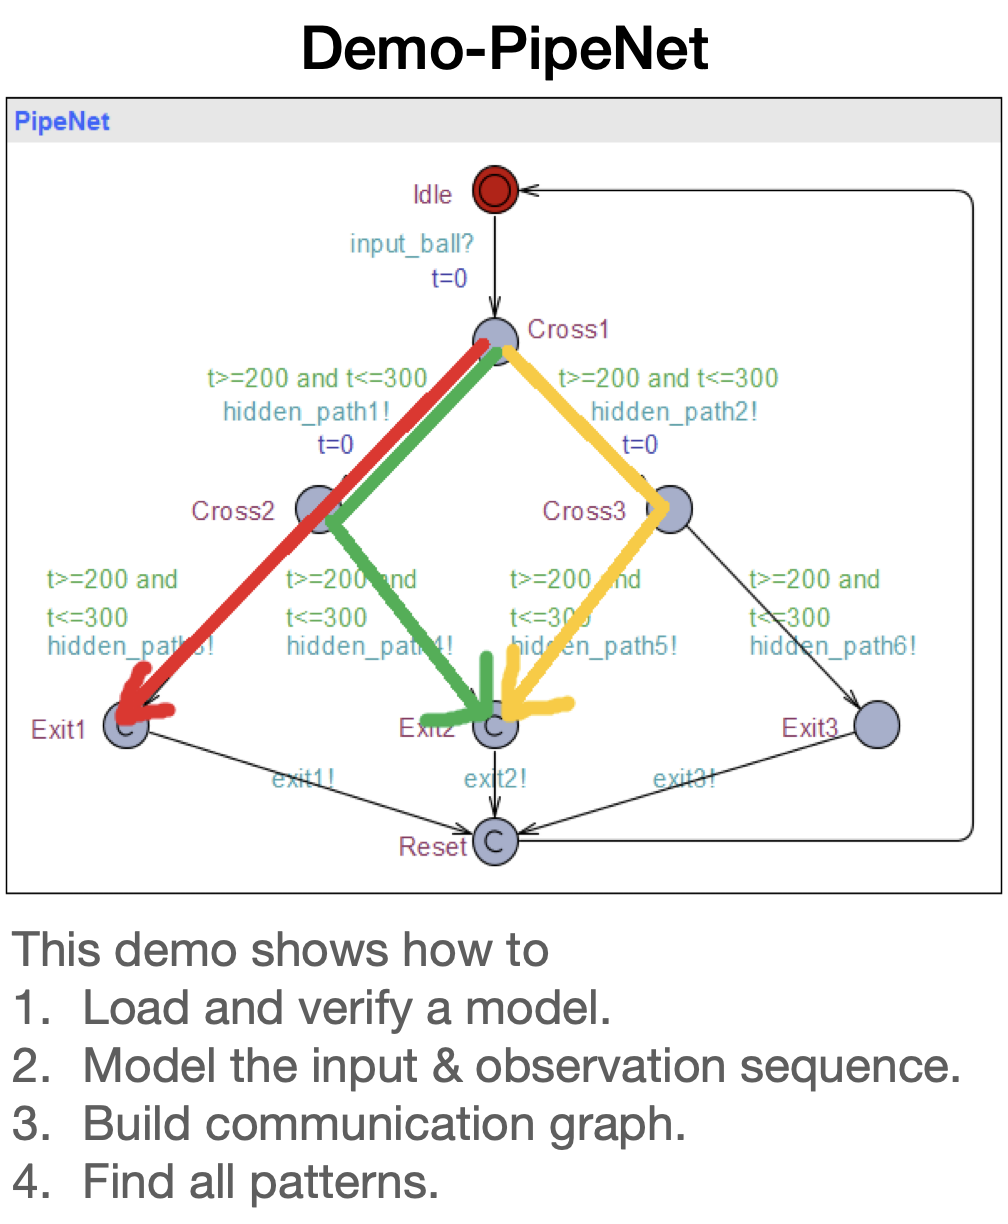
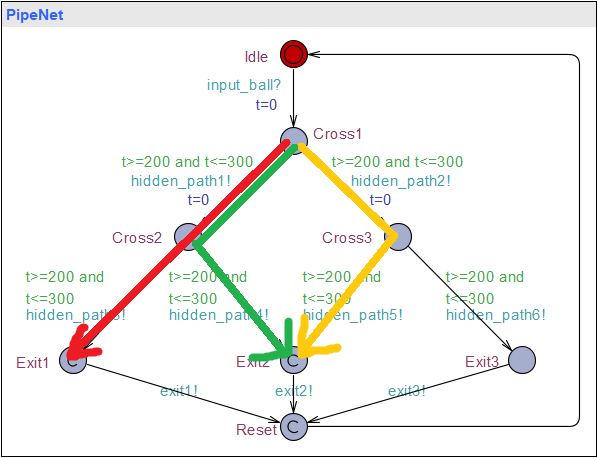
An example communication graph of a complex model in Demo_PipeNet is shown below:
6. Backup of old docs
Demos are provided to help users get familiar with PyUPPAAL (can not be rendered by github):
Demo-PipeNet
This demo demonstrates how to
- Load and verify a model.
- Model the input & observation sequence.
- Build communication graph.
- Find all patterns.
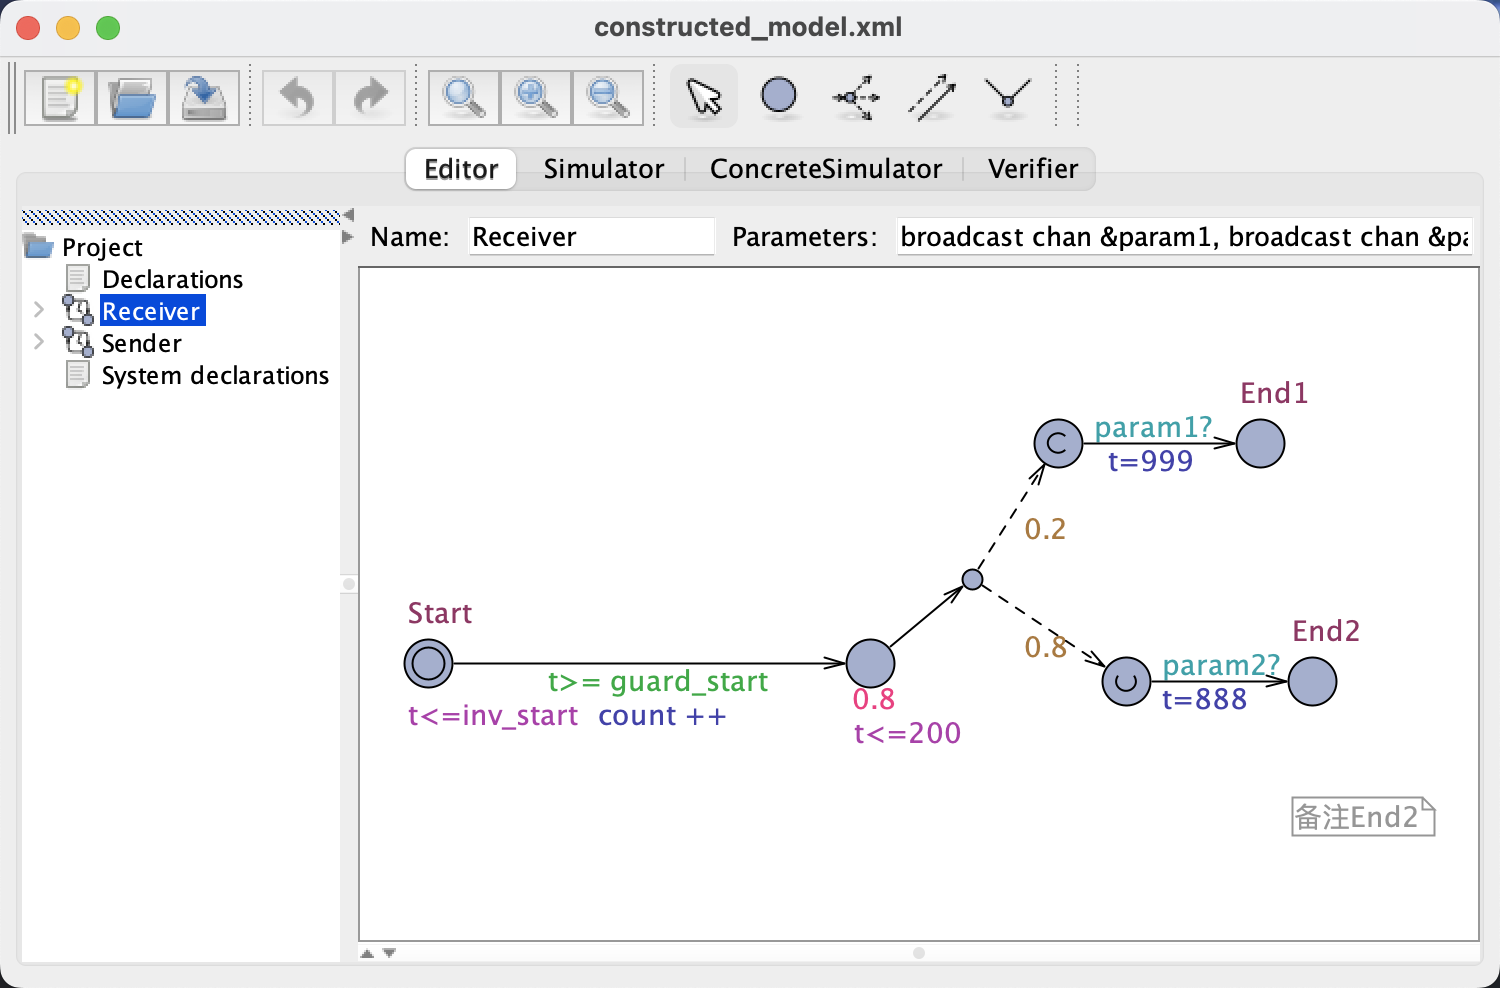
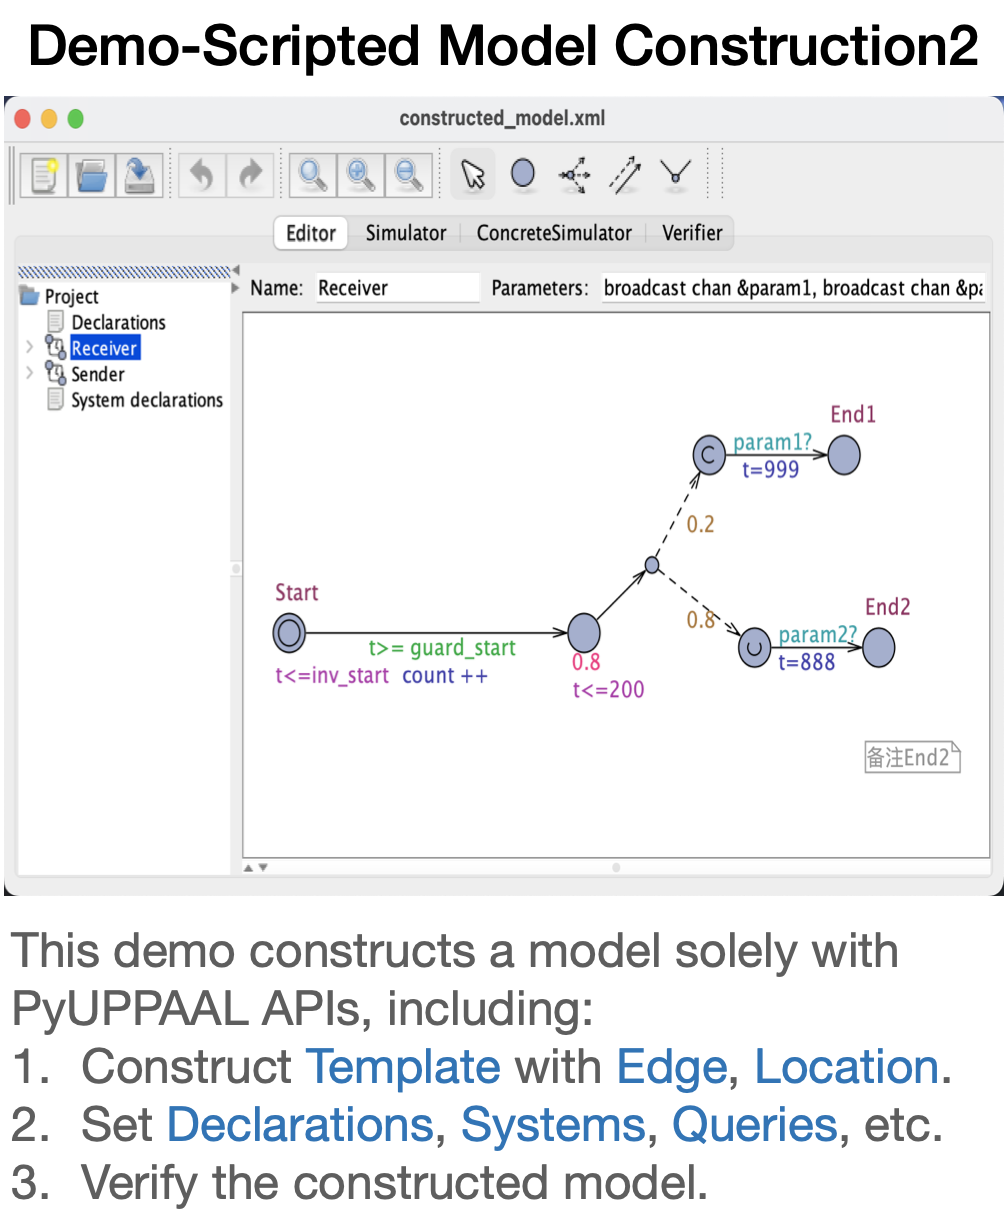
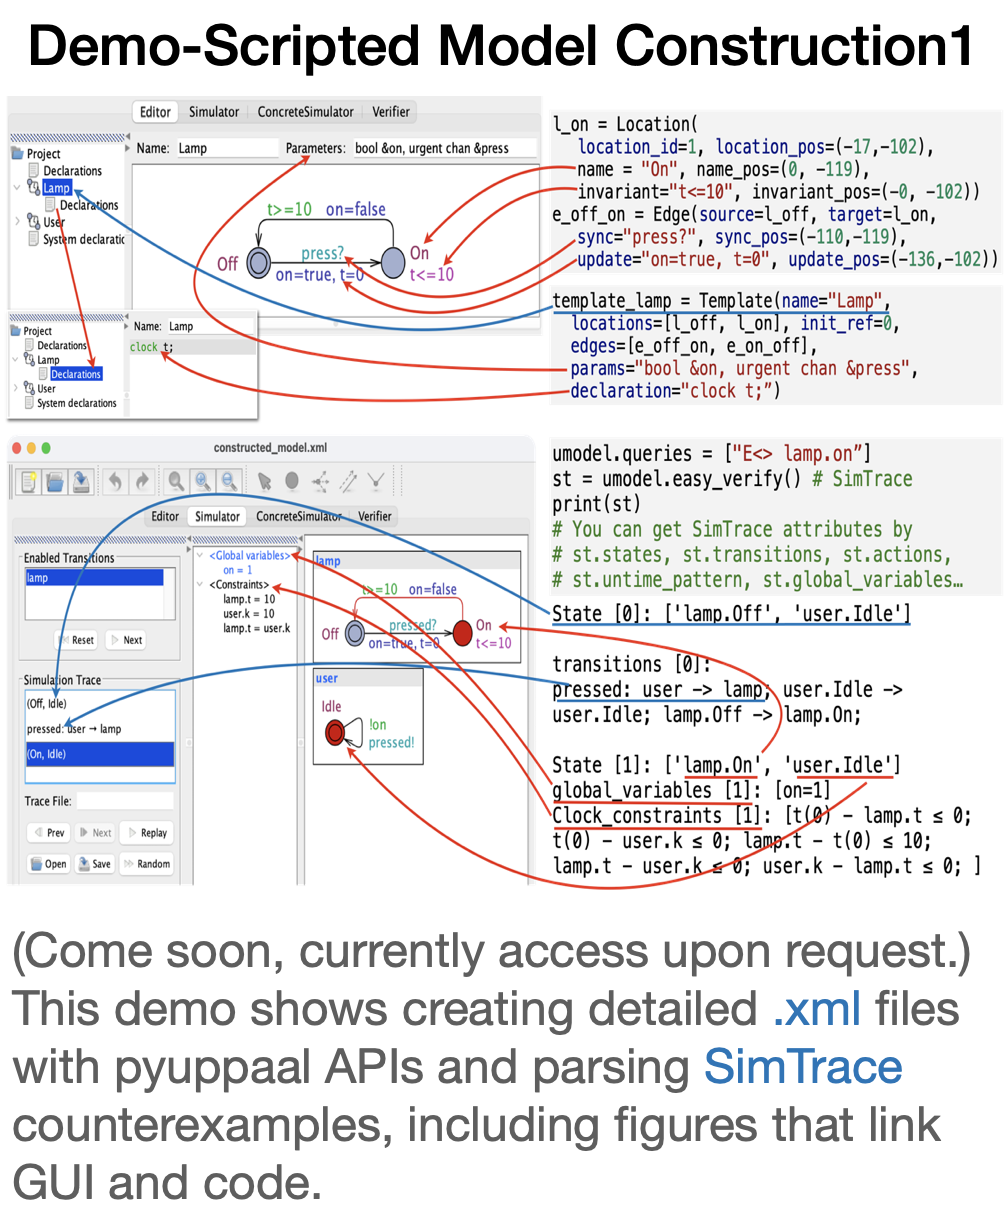
Demo-Scripted Model Construction
This demo constructs a model solely with PyUPPAAL APIs, including:
- Construct
TemplatewithEdge,Location. - Set
Declarations,Systems,Queries. - Verify the constructed model.
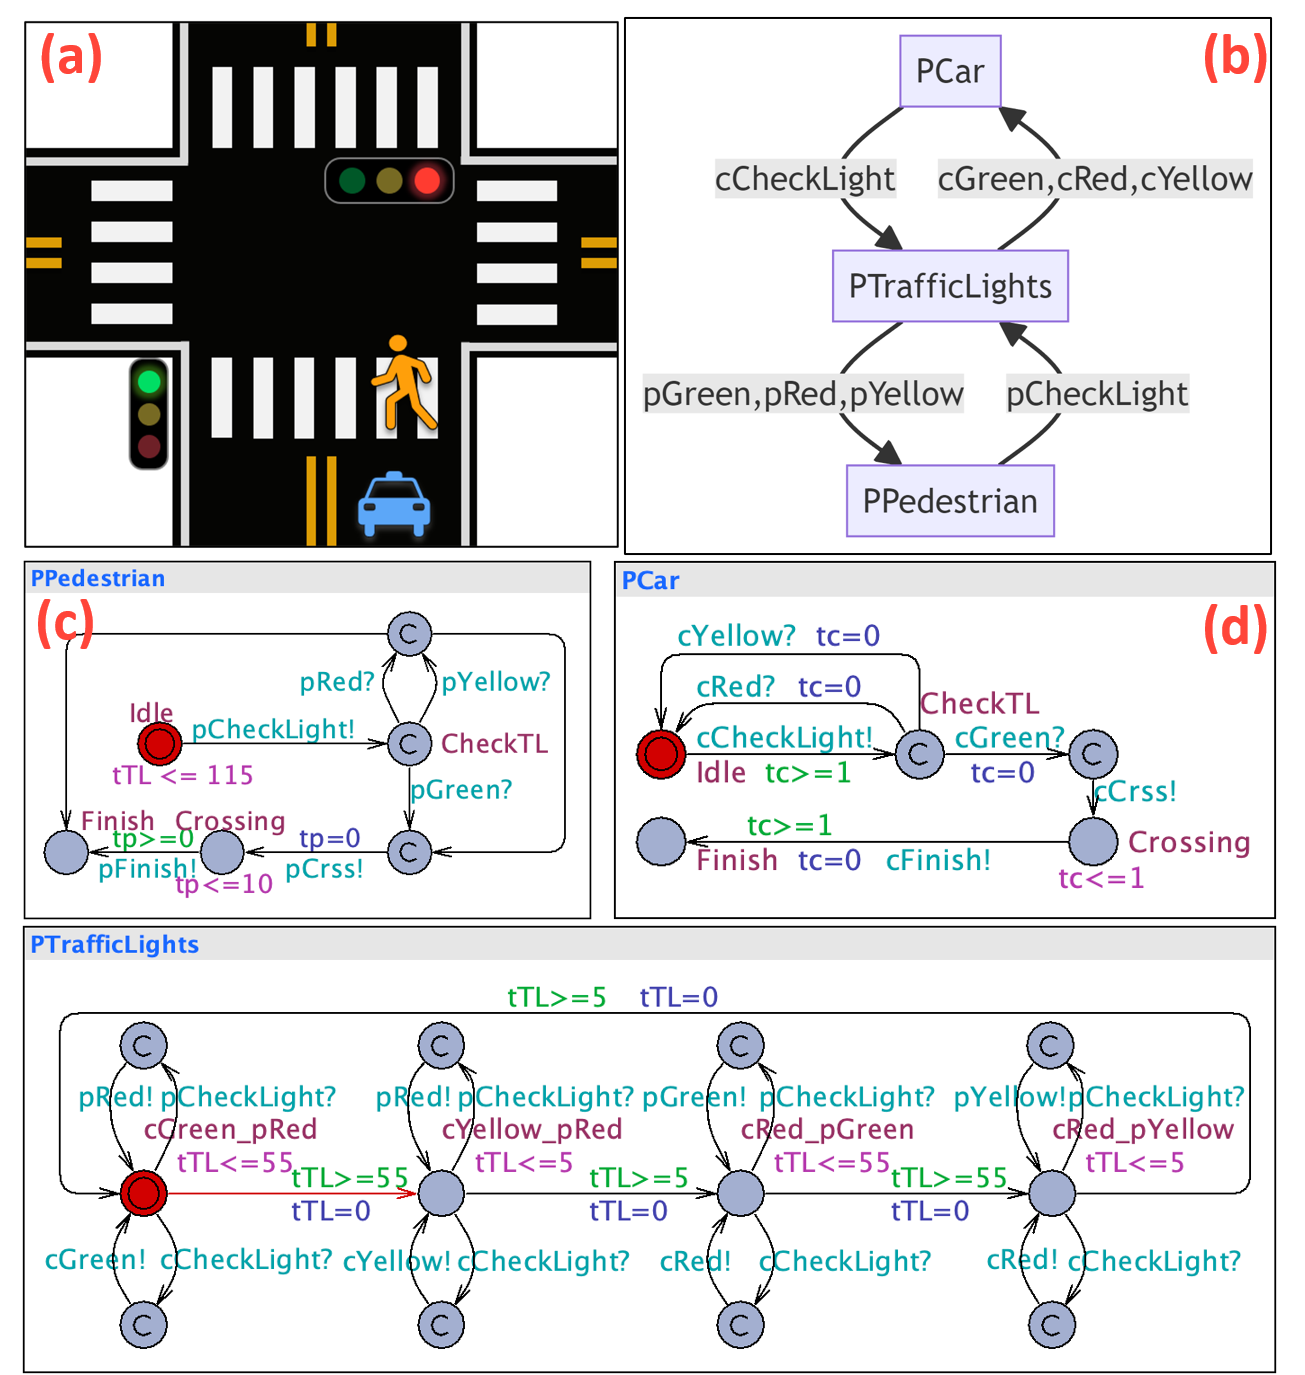
Demo-Pedestrain
This demo shows how to identify all event sequences that could result in a fault state, and see you can get ALL possible patterns only with PyUPPAAL find_all_patterns().

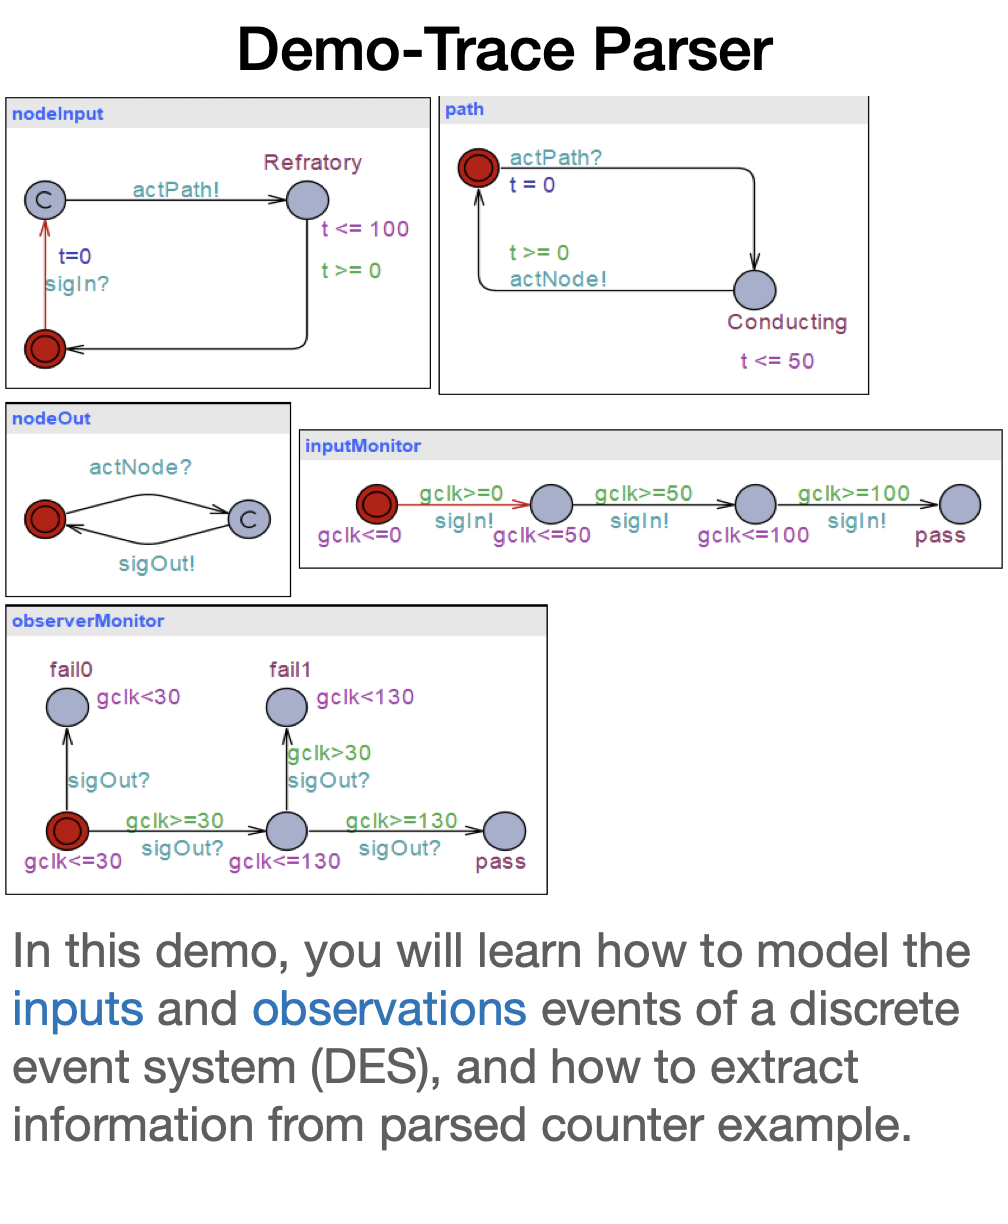
Demo-Trace Parser
In this demo, you will learn how to model the input and observations events of a descrete event system (DES), and how to extract information from parsed counter example.
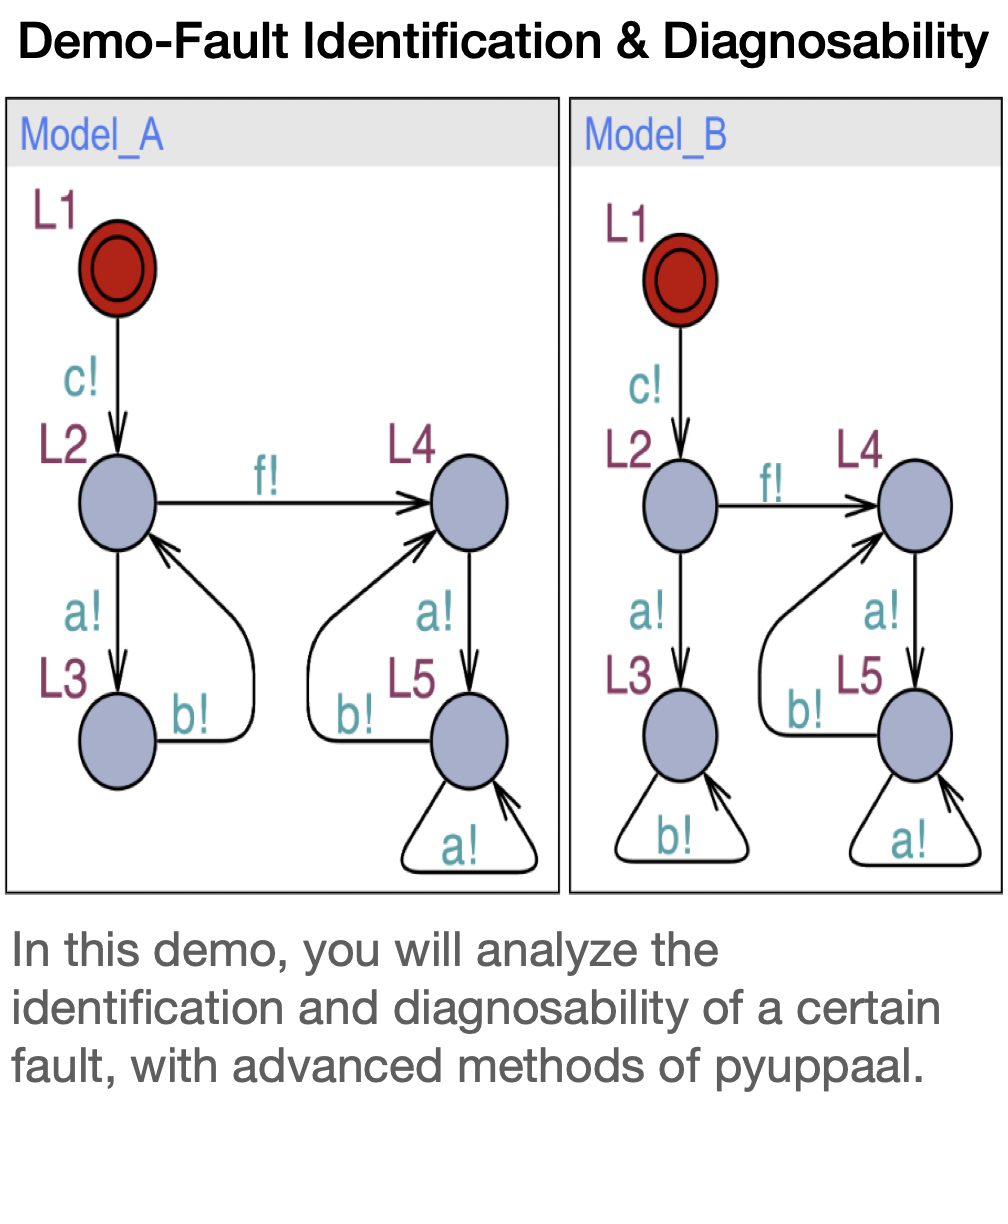
Demo-Fault Identification and Diagnosability
In this demo, you will analyze the identification and diagnosability of certain fault, wich advanced methods of pyuppaal.