Visual-SLAM
 Visual-SLAM copied to clipboard
Autonomous navigation of small UAS through unknown environments using vision-based SLAM, object detection, and collision avoidance
Visual-SLAM
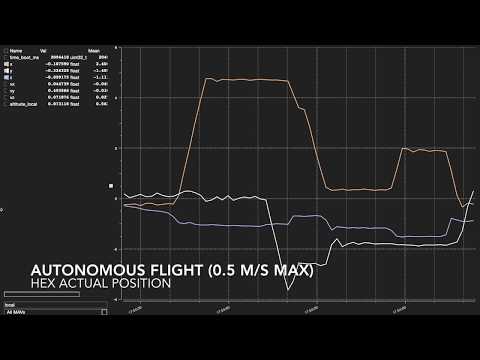
Indoor vision-based SLAM (Simultaneous Localization and Mapping) using a forward-facing camera and an altitude sensor for localization. It communicates with a PX4 autopilot via MAVROS.
It uses a downward-facing camera which can be combined with Visual-SLAM-GCS for detecting, picking and dropping off an object.
The package is currently setup for the following hardware:
- Matrix-vision BlueFOX MLC cameras
- TeraRanger One distance measurement sensors
- Lightware SF10 altimeters
- Dynamixel AX-12a servos

Building Visual-SLAM
Perform the following steps to setup Visual-SLAM on a new machine (currently only x86 processors):
-
Install ROS on your machine.
-
The SLAM algorithm is a modified version of ORB-SLAM2. Install the prerequisites required by ORB-SLAM2.
-
Install mavros packages for your version of ROS, to communicate with the autopilot. For example:
sudo apt-get install ros-kinetic-mavros* -
Git clone this repo in the Home folder, ie.
/home/$USER/:cd git clone https://github.com/IeiuniumLux/Visual-SLAM.git -
Add the following line to the end of bashrc:
export ROS_PACKAGE_PATH=$ROS_PACKAGE_PATH:/home/$USER/Visual-SLAM/Examples/ROS/ORB_SLAM2 -
Run the
build.shscript to build ORB-SLAM2, and the packages for the camera, altitude sensors and the servo. -
Run the
build_ros.shscript to build the SLAM code for a monocular camera.
Configuring
-
Copy over the rules file for the camera to
/etc/udev/rules.d/:sudo cp ~/Visual-SLAM/mvbluefox_ws/src/bluefox2/mvIMPACT/script/51-mvbf.rules /etc/udev/rules.d/ -
Calibrate the camera. Create a calibration YAML file (like this) and place it in ~/.ros/camera_info/ (create the folder if it does not exist). Rename the file as
mv_<your-camera-device-id>. -
Add USB rules for the altimeter/distance sensor, the gripper servo and the autpilot by following the instructions here. Perform the steps for one sensor at a time. During the attribute walkthrough step mentioned in the above link, pick the
idVendor,idProductand theserialthat appears at the very top in the terminal. Further, addMODE=="0666"to ensure the user has access to the USB ports (you can alternatively add the user to the dialout group). A sample rules file would look as follows:
SUBSYSTEM=="tty", ATTRS{idVendor}=="0403", ATTRS{idProduct}=="6015", ATTRS{serial}=="DN00IK4C", MODE=="0666", SYMLINK+="rangefinder"
SUBSYSTEM=="tty", ATTRS{idVendor}=="0403", ATTRS{idProduct}=="6015", ATTRS{serial}=="FTUAI24Z", MODE=="0666", SYMLINK+="px4"
- Go through the launch scripts in
~/Visual-SLAM/launch_scripts/and add a case with your hostname (if desired, you can change your hostname too) to it. For example, thematrixvision.shscript would look like:
#!/bin/bash
source /opt/ros/kinetic/setup.bash
cd ~/Visual-SLAM/mvbluefox_ws
source devel/setup.bash

case $HOSTNAME in
	(safe50-UDOO-x86) export ROS_IP=192.168.0.222; roslaunch bluefox2 bluefox2.launch device:=25002090;;
	(safe50-JOULE-x86) export ROS_IP=192.168.0.111; roslaunch bluefox2 bluefox2.launch device:=25002112;;
	(<your-hostname>) export ROS_IP=<your-IP>; roslaunch bluefox2 bluefox2.launch device:=<your-camera-device-id>;;
	(*) echo "Computer not recognized!";;
esac
Make sure to export all ROS_IP as your current IP address.
-
Add a new settings file like this in
~/Visual-SLAM/Examples/RGB-D/. Make sure you have the correct camera calibration parameters and the desired ORB-SLAM2 settings. -
In Visual-SLAM.yaml, change the
camera_yaml,camera_topicand theadditional_parametersto the desired configuration. -
Make sure the map file Slam_latest_Map.bin is the correct one, in case you want to reuse a previous map. Read below for loading/saving a map.
Running Visual-SLAM
-
To start the drivers for all hardware, along with SLAM, run the mapping_launch.sh script:
~/Visual-SLAM/mapping.sh -
While Visual-SLAM is running, you can change the navigation mode as follows:
~/Visual-SLAM/change_navigation_mode.sh <desired-mode>For example, to switch the PX4 to offboard mode:
~/Visual-SLAM/change_navigation_mode.sh O
You can find a list of available modes below.
Navigation Modes
Currently, Visual-SLAM has the following working modes:
mode_A: Mode to ARM the PX4 and take-off.mode_CW: Mode to clear waypoints. Can clear a specific waypoint usingCW<waypoint_number>or all waypoints, usingCWA.mode_DISARM: Mode to DISARM the PX4.mode_F: Mode to autonomously follow all the waypoints and land after the last one.mode_FLY: Mode to switch PX4 to OFFBOARD mode, ARM the PX4 and then take-off.mode_H: Mode to switch the desired position to home (0.8mabove where OFFBOARD was set).mode_L: Mode to switch PX4 to LAND.mode_LW: Mode to load a set of waypoints. Use asLW-<waypoint_file>.mode_N: Mode to switch desired position to the next waypoint.mode_O: Mode to switch PX4 to OFFBOARD mode.mode_R: Mode to record the current position as the next waypoint.mode_SEARCH: Mode to search for object, pick it up, and drop it off. Needs companion ground station code.mode_SW: Mode to save a set of waypoints. Use asSW-<waypoint_file>.mode_T: Mode to take-off.mode_W: Mode to switch
In order to add additional modes, add the .cpp file here, update ModeHeader.h, and update ros_mono.cc.
Load/Save Waypoints
You can load or save a set of waypoints by using the LW or the SW modes. These modes load/save waypoints from the waypoint_files directory. For example mode LW-test would load the test.txt file.
Load/Save Map
You can change the reuse_map and the save_map parameters in Visual-SLAM.yaml to load/save a map. If reuse_map is true, Visual-SLAM loads the map saved as Slam_latest_Map.bin. If save_map is true, Visual-SLAM overwrites Slam_latest_Map.bin with the current map.
Contributors
Sebastian Hening, Akshay Shetty, and Alfredo Benocmo
Acknowledgments
The authors would like to thank our collaborators and colleagues in the NASA SAFE50 project team.
Metadata
Owner
Metadata
Autonomous navigation of small UAS through unknown environments using vision-based SLAM, object detection, and collision avoidance